Advertisement
Advertisement
Table of Contents

Related Manuals for Jetson JOURNEY


Summary of Contents for Jetson JOURNEY
- Page 1 JOURNEY -MANUAL-...
-
Page 2: Table Of Contents
TABLE OF CONTENTS Introduction Included In The Box Features And Specs Assembly Safe Riding Charging Battery How To Use The Bike Controls A. Gears B. LCD Display C. Turning the Bike On and Off D. Pedal Assist E. Speedometer F. Walk Mode G. - Page 3 1-(888) 976-9904 or email us at customerservice@jetsonbike.com. This product manual can help you understand, use, and maintain your Journey. In order to avoid danger caused by collisions, falls, and loss of con- trol, please use caution and learn how to ride the Journey safely. Jetson and authorized dealers cannot be held liable for injury or damage caused from riding the Journey.
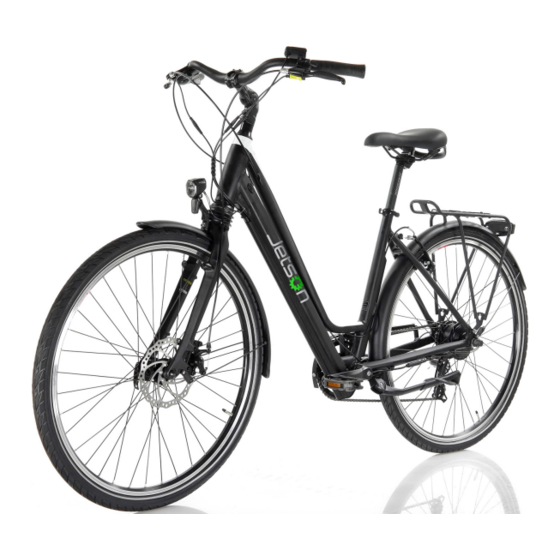
- Page 4 INCLUDED IN THE BOX Front Fork Rear Derailleur Handlebar Front Derailleur Handlebar Stem Pedals Charging Port Concealed Battery Frame Front Wheel Saddle Post Front Disc Brake Saddle Seat Clamping Lever Seat Tube...
-
Page 5: Lcd Display
Left Brake Lever LCD Display Gear Shifter FEATURES AND SPECS MODEL: JOURNEY MOTOR: 250w WHEEL DIAMETER: 27.5” MOTOR RATED RPM: 195 MAX SPEED: 20 MPH CHARGER: 110-240V MAX RANGE: 30-35 MILES CHARGE TIME: 4-6 HOURS BATTERY TYPE: LITHIUM ION PRODUCT WEIGHT: 42 LBS BATTERY RATED VOLTAGE: 36v/ 7.8Ah... - Page 6 ASSEMBLY The Journey comes partially assembled. In order to fully assemble, you will need to attach the Handlebars, the Front Wheel, the Disc Brake, and the Saddle. Please refer to the diagrams on pages 4 and 5 while assembling your Journey.
- Page 7 • Place the Handlebar into the Handlebar Stem and screw the 4 bolts in using the provided Allen Key. • Make sure all the wires are connected according to color. Connect Wires by Color...
- Page 8 Assembling the Front Disc Brake • Attach the Front Disc Brake to the Front Fork by screwing in the two bolts. Bolts ATTACHING THE FRONT WHEEL • Twist the cap off the Quick Release Clamping Lever and remove it from the Wheel.
- Page 9 Disc. •Please be careful not to bend the Disc Brake. If you find that it will not go in smoothly, please call us for assistance or bring the Journey to your local bike shop. • Now that the front Tire is fit to the Front Fork, slide the Quick Release Clamping Lever through the Front Wheel.
- Page 10 • Make sure the Quick Release Clamping Lever is secure. Push Lever in • Make sure the Brake is hooked onto the Disc and working properly.
- Page 11 ASSEMBLING PEDALS • There are 2 Pedals. Please look at the inside of each Pedal and see which is labeled R (right) and L (left). • To connect the Pedals to the bike, place L into the Left tube and R into the Right tube (left and right directions are as though you are sitting on the bike).
- Page 12 ATTACHING THE SADDLE • Slide the Saddle Post into the Saddle Tube. • Align the Saddle with the Frame to make sure it is straight. • Tighten the Saddle Clamping Lever. • The height of the Saddle should not be pulled higher than the safety tick marks on the Saddle Post.
- Page 13 Before your first ride you must fully charge the Journey. Charge for 12 hours for the first 3 times you use it. The Charging Port is located on the left side of the frame near the Handlebar Stem (see digram on P.
-
Page 14: Turning The Bike On And Off
Button TURNING THE BIKE ON AND OFF To turn the Journey on, press the Power Button (M). To turn it off, hold the Power Button (M) for several seconds. If you do not turn off the bike, it will shut off automatically after 10 minutes. -
Page 15: Pedal Assist
If the LCD Display does not turn on, check that the battery is charged and the LCD Display is fully connected. If you are still having issues, please contact Jetson support. PEDAL ASSIST The Pedal Assist mode was designed to make riding an e-bike mimic the natural motion you are used to feeling when riding a bicycle. -
Page 16: Battery Indicator
If there is an error with the function of the bike an error message will appear on the LCD Display along with an error code. Note: The e-bike will not run if there is an error code. Please contact Jetson Customer Support if there is an error. -
Page 17: Care And Maintenance
CARE AND MAINTENANCE DRIVING RANGE The average range of the Journey is 30-35 miles. However, a lot of factors will affect how far you can go per charge: • Driving surface: A smooth, flat surface will increase driving distance. - Page 18 CLEANING THE JOURNEY To clean the Journey carefully wipe with a damp cloth, then dry with a dry cloth. Do not use water to clean the Journey, as the electrical and electronic systems may get wet, resulting in personal injury or malfunction of the bicycle.
- Page 19 • Do not ride after drinking or taking prescription medication. • Do not carry items when riding. • Prior to each ride, inspect each part of the Journey to ensure it has been maintained correctly and is functioning properly. • Always give way to pedestrians.
- Page 20 ADDITIONAL OPERATION CAUTIONS Do not lift the Journey off the ground while it is in operation and the wheels are in motion. This can result in freely spinning wheels, which may cause injury to yourself or others nearby. Do not jump on or off the Journey, and do not jump while using it.
- Page 21 • Jetson® makes no warranty with respect to products or trade accessories not made by Jetson®, including, but not limited to, motors, tires, wheels, and batteries, such products or trade accessories, such items being subject to the original manufacturer’s warranty, if any.
- Page 22 For myself For my child For my grandchild Gift for someone else (adult) Gift for someone else (child) How did you hear about the Journey? ______________________________________________ _____________________________________________________________________________________ Complete this form and mail it to: Attention: Product Registration Jetson Electric Bikes...
- Page 24 JOURNEY...
Need help?
Do you have a question about the JOURNEY and is the answer not in the manual?
Questions and answers
where is serial number? No tags with 17 numbers or characters I need parts but can't order because of no serial number, can't send back was a gift and do not have receipt