Table of Contents

Related Manuals for GSS HDTA 614 T ASI


Summary of Contents for GSS HDTA 614 T ASI
- Page 1 Head-End Digital Modulator 4 x HDTV / COFDM HDTA 614 T ASI CLASS Phone: +49 (0) 911 / 703 8877 Grundig SAT Systems GmbH Fax: +49 (0) 911 / 703 9210 Beuthener Strasse 43 E-mail: info@gss.de D-90471 Nuremberg Internet: http://www.gss.de/en...
-
Page 2: Table Of Contents
Programming procedure ...............16 Programming the cassette ............18 Selecting the cassette ..............19 Output settings ................19 Modulator on/off, Level............20 Channel / Frequency ..............20 COFDM parameters ...............22 Output signal ................25 Transmission parameters ............26 Transmitter identification ............27 - 2 - HDTA 614 T ASI... - Page 3 Deleting a PID ................38 Renaming a PID ..............39 Output data rate ................40 Network Information Table (NIT) ............40 Factory reset ................42 Saving settings ................42 6 Final procedures ..................43 7 Channel and frequency tables ..............44 - 3 - HDTA 614 T ASI...
-
Page 4: Safety Regulations And Notes
At the end of its service life, please take your device to one of these public collection facilities for proper disposal. - 4 - HDTA 614 T ASI... -
Page 5: General Information
2.1 P aC k i n g C o n t e n t s 1 Cassette HDTA 614 T ASI 2 RF cables 1 Brief assembly instructions 2.2 m... -
Page 6: Description
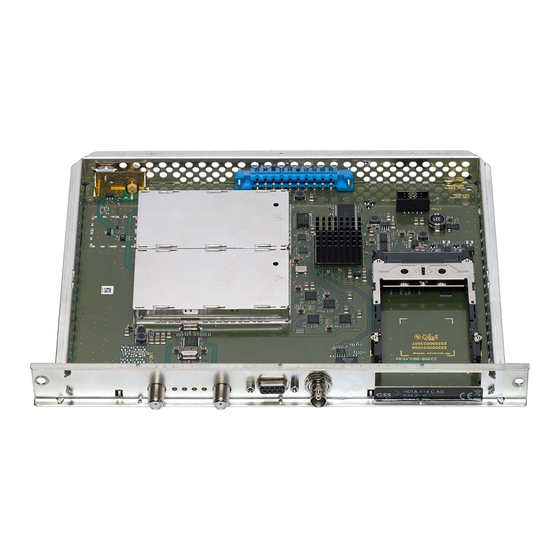
DVB-S / DVB-S2 standard (also 16/2 APSK) into four COFDM modulated sig- nals according to DIN EN 300744 for feeding into a cable network. The cassette has two digital SAT IF inputs and one RF output. - 6 - HDTA 614 T ASI... -
Page 7: Block Diagram
The modulators "B" and "D" work at the adjacent channels of modulators"A" and "C". Herein only frequency setting (frequency spacing of channel strips "A <–> B" and "C <–> D") is possible to reduce the bandwidth at signals of low data rates. - 7 - HDTA 614 T ASI... -
Page 8: Software Query
"V 45" or higher. You can find the current op- erating software for the control unit and the cassette, the software "BE-Flash" and the current assembly instructions on the website "www.gss.de/en". The cassette is intended for use in the STANDARD LINE head-end stations. - Page 9 The TPS module can adjust the "Network Information Table" (NIT) to accommodate the new station data. The "NIT" contains data which is required by the set-top boxes connected to the cable network for the automatic search feature. - 9 - HDTA 614 T ASI...
- Page 10 • Insert the cassette in this slot and push it into the housing. • Align the cassette and apply slight pressure to connect it to the connections of the board and the RF bus bar. • Fasten the cassette with the screws - 10 - HDTA 614 T ASI...
- Page 11 19" cabinet. Tighten the nuts on the cable terminals until the teeth on the lock washer have penetrated the exterior coating and a good connection is made between the hous- ing and cable terminals. - 11 - HDTA 614 T ASI...
- Page 12 —> Avoid wide differences in level at the inputs! • If required connect the ASI input to the ASI output of a corresponding signal source. • Connect the head-end station to the mains power supply. - 12 - HDTA 614 T ASI...
- Page 13 • Push the CA modules without canting into the guide rails of the CA slots and contact them to the common interfaces. —> If the module is inserted in the head-end station, the left common interface is assigned to tuner A, the right one to tuner C. - 13 - HDTA 614 T ASI...
-
Page 14: Station Filter
The key pad on the head-end station is used to scroll through the menus step- by-step: scrolls forward through the menus. select parameters in the menus. set values, initiate actions. selects sub-menus. scrolls backward through the menus. saves all entries. - 14 - HDTA 614 T ASI... - Page 15 Pa r at i o n • Test the software versions of the head-end station and the cassette and up- date them if necessary. The current software versions can be found on the website "www.gss.de/en". 5.2 n ot es...
- Page 16 Tuner C Tuner D 1xASI Tuner A Tuner B Tuner C 0xASI 2xASI Tuner A Tuner C 2xASI Tuner A Tuner B 3xASI B/C/D Tuner A - 16 - HDTA 614 T ASI 4xASI A/B/C/D Bx 4 INPUT Bx 4A...
- Page 17 / BAT sdt–other ◀ ▶ sdt–other / SDT–OTHER A…D D…A Bx 4A DROP 0x0000 ◀ ▶ off / on A…D D…A Bx 4A REMAP 0x0000–>0000 ◀ ▶ off / on A…D - 17 - HDTA 614 T ASI D…A...
- Page 18 —> The processor reads the cassettes‘ data (approximately 10 seconds). BE–Remote V 45 Ein / On please wait … t > 10 s • Press the button. —> The "Selecting the cassette" – "Box x …" menu is activated. - 18 - HDTA 614 T ASI...
- Page 19 —> It is possible to rotate through the submenus of all modulators using the buttons (ascending) and (descending). • Using buttons select the desired modulator. • Press the button. —> The "Modulator on/off, Level" – "LEVEL" submenu is activated. - 19 - HDTA 614 T ASI...
- Page 20 (frequency grid 8 MHz). The CCIR channel grid is 7 MHz in the range of the lower frequency bands (channels C5 … C12). If 8 MHz COFDM signal packages are transmitted in these channel ranges, this will result in interference (overlapping) and transmission problems. - 20 - HDTA 614 T ASI...
- Page 21 • Use buttons to adjust the desired frequency. • Press the button. —> The "Output signal" – "COFDM-MODE" submenu is activated. Please take note of the tables below before setting the COFDM parameters. - 21 - HDTA 614 T ASI...
- Page 22 16588 17564 18096 16588 18431 19516 20107 17418 19353 20491 21112 14929 16588 17564 18096 19906 22118 23419 24128 64 QAM 22394 24882 26346 27144 24882 27647 29273 30160 26126 29029 30737 31668 - 22 - HDTA 614 T ASI...
- Page 23 12441 13173 13572 12441 13824 14637 15080 13063 14515 15369 15834 11197 12441 13173 13572 14929 16588 17564 18096 64 QAM 16796 18662 19760 20358 18662 20735 21995 22620 19595 21772 23053 23751 - 23 - HDTA 614 T ASI...
- Page 24 Transmission mode Symbol duration T [µs] Carrier space ∆ f [kHz] 4.4643 2048 carrier theoretical 1705 carrier real Used bandwidth [MHz] 5.71 Total symbol duration [µs] Guard interval T [µs] 74.7 37.3 18.7 - 24 - HDTA 614 T ASI...
- Page 25 "NEG". The default setting is "POS". • Use to place the cursor under "POS". • Use to set the spectral position to "NEG". • Press the button. - 25 - HDTA 614 T ASI...
- Page 26 "G1/4" causes a low output data rate. For cable networks the setting "G1/32" is adequate. • Use the buttons to place the cursor under "G…". • Set the guard interval required using the buttons ("G1/4", "G1/8", "G1/16", "G1/32"). • Press the button. - 26 - HDTA 614 T ASI...
- Page 27 —> By pressing the button you return to the hexadecimal number setting. • Press the button. —> The "Substitute signal in the case of an incorrect input signal" – "FAILURE" submenu is activated. - 27 - HDTA 614 T ASI...
- Page 28 Line D 0xASI Tuner A Tuner B Tuner C Tuner D 1xASI Tuner A Tuner B Tuner C 2xASI Tuner A Tuner C 2xASI Tuner A Tuner B 3xASI B/C/D Tuner A 4xASI A/B/C/D - 28 - HDTA 614 T ASI...
- Page 29 • Press button Input signal source ASI: —> The "Station filter" – "e.g. 01/06" submenu is activated (page 32). Input signal source Tuner: —> The "LNB oscillator frequency, Input" – "LNB" menu is activated. - 29 - HDTA 614 T ASI...
- Page 30 SYMBOL 27500 DVB–S Symbol rate: The symbol rates of the satellite transponders can be found in the current chan- nel table of the satellite operator, in various satellite magazines and in the Internet. - 30 - HDTA 614 T ASI...
- Page 31 • Repeat the procedure by the quantity of the digits to be set. • Set the frequency offset shown in the display (e.g. "– 1.8") to less than 1 MHz ("± 0.x") by varying the input frequency using the buttons. - 31 - HDTA 614 T ASI...
- Page 32 In this menu stations (services) of a transponder can be switched off. Herein you select which scrambled station should be descrambled using an adequate CA module (only via tuner "A" and "C"). Bx 4A TV + 01/06 Das Erste - 32 - HDTA 614 T ASI...
- Page 33 —> If a station is scrambled (indication "*"), in this menu you select whether it should be descrambled using an adequate CA module (only possible via tuner "A" and "C"). - 33 - HDTA 614 T ASI...
- Page 34 To prevent this the PID monitoring can be switched off. • Use the buttons to switch "off" or "on" the PID monitoring. • Use the button to activate the menu of the CA module (only if Tuner "A" or "B" is selected). - 34 - HDTA 614 T ASI...
- Page 35 CA module and are returned to the "PID monitoring" – "CA" menu. • All settings are saved by pressing the button. —> You will be returned to the "PID monitoring" – "CA" menu. - 35 - HDTA 614 T ASI...
- Page 36 • Press the button. —> Returning to "Input settings" - "INPUT" main menu (page 29). —> If required set further channel strips. • Press the button. The "Option settings" – "OPTIONS" main menu is activated. - 36 - HDTA 614 T ASI...
- Page 37 • Using the button place the cursor under "off" and switch "on" the trans- mitter identification using the buttons. —> By pressing the button you return to the hexadecimal number setting. • Press the button. - 37 - HDTA 614 T ASI...
- Page 38 Bx 4A DROP 0x0000 • Use the buttons to place the cursor under the respective digit of the hexadecimal number of the PID to be deleted ("0x0000") and set the hexa- decimal number using - 38 - HDTA 614 T ASI...
- Page 39 • Press the button. —> Returning to "Option settings" main menu (page 37). —> If required set further channel strips. • Press the button. The "Output data rate" – "DATARATE" main menu is activated. - 39 - HDTA 614 T ASI...
- Page 40 NIT ("Make"). All active cassettes which are able to output a NIT ("NIT cassettes") must be set and ready for reception. —> The NIT of all "NIT cassettes" are switched on. - 40 - HDTA 614 T ASI...
- Page 41 NIT is added again. If you have changed parameters in the meantime, you must first select "Make" to generate a new, up-to-date NIT. • Press the button. —> The "Factory reset" – "FACTORY Defaults" menu is activated. - 41 - HDTA 614 T ASI...
- Page 42 —> If functions of the TPS module are activated, their status is shown in the second line of the menu: "M" – Station filter is switched on. "N" – NIT is activated. —> If required set further channel strips. - 42 - HDTA 614 T ASI...
- Page 43 Please regard the assembly instructions of the respective head-end station. • Mount the front cover (see assembly instructions of the head-end station). - 43 - HDTA 614 T ASI...
- Page 44 C 58 770.00 C 68 850.00 C 29 538.00 C 39 618.00 C 49 698.00 C 59 778.00 C 69 858.00 C 30 546.00 C 40 626.00 C 50 706.00 C 60 786.00 - 44 - HDTA 614 T ASI...
- Page 45 Declaration of CE conformity - 45 - HDTA 614 T ASI...
- Page 46 Service: Phone: +49 (0) 911 / 703 2221 Fax: +49 (0) 911 / 703 2326 Email: service@gss.de Alterations reserved. Technical data E. & O.E. © GSS GmbH V6/22092014...
Need help?
Do you have a question about the HDTA 614 T ASI and is the answer not in the manual?
Questions and answers