
Related Manuals for BCP SKY3486


Summary of Contents for BCP SKY3486
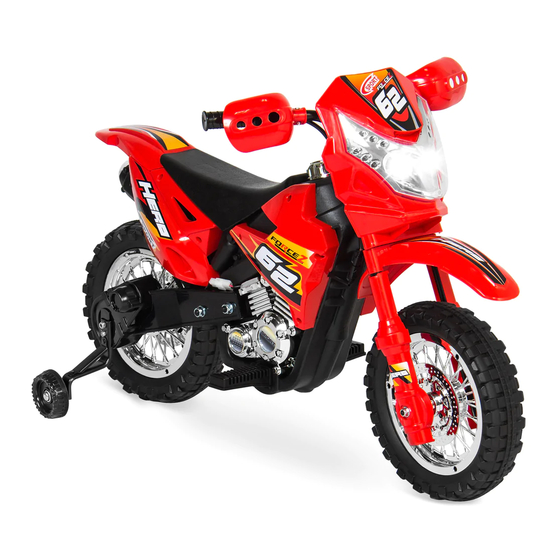
- Page 1 INSTRUCTION MANUAL Kids Ride-On Dirt Bike with Training Wheels SKY3486 + SKY3487 Ver. 2...
- Page 2 Thank you for choosing us! Since 2002, Best Choice Products has been bringing customers high-quality products at the absolute lowest price. With everything ranging from instruments and toys to furniture and outdoor, we’ve got your everyday living essentials covered. We’re centered around a customer-first philosophy –...
-
Page 3: Battery Warnings
SAFETY Please retain these instructions for future reference. This vehicle must be assembled by an adult who has read and understood the instructions in this manual. Keep the packaging and bags away from children and dispose of all packaging before use. Always use common sense and safe practices when operating this vehicle. -
Page 4: User Warnings
USER WARNINGS The following safety hazards may result in serious injury or death: • Never leave a child unattended. • Always sit in the seat when using this vehicle. • Keep your hands, hair, and clothes away from moving parts. •... -
Page 5: Tools Required
TOOLS REQUIRED 1 PERSON APPROXIMATELY AA - PHILLIPS PLASTIC WRENCH ASSEMBLY 45 MIN. 44 LBS 1 PERSON APPROXIMATELY SCREWDRIVER (2 PROVIDED) 2 AA BATTERIES 45 MIMBLY ASSEMBLY 1 HR. CAPACITY ASSEMBLY HARDWARE 4 PCS 2 PCS 2 PCS 1 SET PARTS FRONT AXLE SET HANDLEBARS... - Page 6 PARTS FOOTREST & AXLE FOOTREST & LOCK DASHBOARD 1 PC 1 PC 1 PC TRAINING WHEELS CHARGER 1 PC 1 PC Pg. 6...
- Page 7 TOOLS REQUIRED PRODUCT ASSEMBLY Place the part E wheel between the handlebar rails. Remove the spacer, washer, and nut from one side of the part A front axle set, slide the axle through the rails and wheel, and replace the spacer, washer, Slide the part C fender and part D front shocks and nut on the other side of the wheel.
- Page 8 TOOLS REQUIRED PRODUCT ASSEMBLY Attach the part F front frame to the part B handlebars with four part 1 screws. Attach the front assembly to the motorcycle with the part 4 nut and bolt set. Join the red connector on the right side of the handlebars to the red connector leading from the back of the motorcycle.
- Page 9 TOOLS REQUIRED PRODUCT ASSEMBLY Flip the motorcycle over. Remove the nuts attached to the part J training wheels, slide the training wheels onto the bolts on the rear of the motorcycle, then replace the nuts to secure the training wheels. Slide the part G footrest and axle through the body of the motorcycle.
- Page 10 TOOLS REQUIRED PRODUCT ASSEMBLY Use a screwdriver to open the compartment on the part I dashboard. Insert 2 AA batteries into the designated slots. Join the green/yellow connector from the dashboard to the corresponding green/yellow connector on the front of the motorcycle. Attach the dashboard to the motorcycle with two part 2 bolts and two part 3 nuts.
-
Page 11: Troubleshooting
CHARGING INSTRUCTIONS AND WARNINGS • Charging socket is located in the center of the motorcycle on the right side. Insert one end of the part K charger into the charging socket and plug the other end into a wall outlet. •... -
Page 12: Product Warranty Information
CARING FOR YOUR RIDE-ON • Park the vehicle indoors or cover it with a tarp to protect it from wet weather. • Do not leave the vehicle in the sun for long periods of time or fading may occur. Store in shade or cover with tarp. •...
Need help?
Do you have a question about the SKY3486 and is the answer not in the manual?
Questions and answers