Table of Contents
Advertisement
Quick Links
Download this manual
See also:
Operating Manual
Advertisement
Table of Contents

Related Manuals for Crestron CNAMPX-12X60


Summary of Contents for Crestron CNAMPX-12X60
- Page 1 Crestron CNAMPX-12/16X60 Professional Audio Amplifiers Service Guide...
- Page 2 This document was prepared and written by the Technical Documentation department at: Crestron Electronics, Inc. 15 Volvo Drive Rockleigh, NJ 07647 1-888-CRESTRON All brand names, product names and trademarks are the property of their respective owners. ©2006 Crestron Electronics, Inc.
-
Page 3: Table Of Contents
Audio Output Relay Board Replacement ...12 Cresnet System Interface Card Replacement ...12 In-Rush Surge Suppressor Replacement ...15 Cover Installation and Reconnect Unit ...16 Further Inquiries...20 Future Updates ...20 Merchandise Returns / Repair Service ...21 CRESTRON Limited Warranty ...21 Contents • i... -
Page 5: Professional Audio Amplifiers: Cnampx-12/16X60
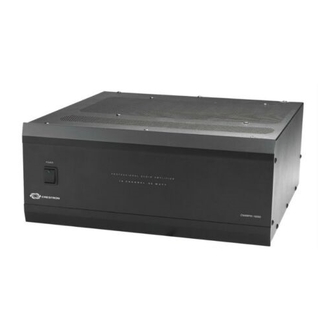
This guide provides service instructions for the CNAMPX-12X60 and CNAMPX- 16X60 Professional Audio Amplifiers. The amplifiers contain two-channel amplifier modules (six in the CNAMPX-12X60 and eight in the CNAMPX-16X60), a Crestron card, and an AC power fuse that are field replaceable. For any other components that need replacement, the unit must be returned to the factory for repair service. -
Page 6: Rack Mounting Precautions
CNAMPX-12/16X60 for proper circulation. Refer to the diagram on the next page. 2 • Professional Audio Amplifiers: CNAMPX-12/16X60 Crestron CNAMPX-12/16X60 Do not defeat the safety purpose of the polarized or ground-type plug. A polarized plug has two blades with one wider that the other. A grounding type plug has two blades and a third grounding prong. -
Page 7: Electro-Static Discharge (Esd) Precautions
Crestron CNAMPX-12/16X60 CNAMPX-12/16X60 Rack Spacing NOTE: Reliable grounding of rack mounted equipment should be maintained. Particular attention should be given to supply connections other than direct connections to the branch circuit. (e.g., use of power strips). Electro-Static Discharge (ESD) Precautions The CNAMPX-12/16X60 contains ESD sensitive devices. - Page 8 CNAMPX model and version to replace a defective fuse. The fuse is available commercially but if a replacement fuse cannot be obtained, contact Crestron customer service. 4 • Professional Audio Amplifiers: CNAMPX-12/16X60 4. Carefully push the fuse holder retainer tab releases and remove the fuse holder.
-
Page 9: Internal Replacement Procedures
Internal Replacement Procedures Internal replacement procedures consist of Amplifier Module, Audio Output Relay Board Replacement (not contained in CNAMPX-12X60), Cresnet System Interface Card procedures, and In-Rush Surge Suppressor. Prior to performing any of these procedures, the Disconnect Unit and Cover Removal procedure must be performed. - Page 10 Mounting Ear Screws (Left-Side) Top-Front and Side Cover Screws 6 • Professional Audio Amplifiers: CNAMPX-12/16X60 Crestron CNAMPX-12/16X60 7. Depending upon the particular installation, rack mounting ears may or may not be installed. Perform the appropriate step below. 7a. If rack mounting ears are 7b.
- Page 11 Crestron CNAMPX-12/16X60 NOTE: The four screws at the top-center of the cover are 1/2-inch long. The remaining cover screws are 1/4-inch. When reinstalling the cover, these screws are Top-Center Cover Screws Top-Rear Cover Screws Service Guide - DOC. 5885B Professional Audio Amplifiers 9.
-
Page 12: Amplifier Module Replacement
(or grounded workstation), a #1 Phillips screwdriver, and 5/64- inch and 5/32-inch hex wrenches. To replace an amplifier module, the defective module must be returned to Crestron and a replacement must be obtained from Crestron. Refer to “Merchandise Returns/Repair Service”... - Page 13 4. Position the unit bottom-side down onto the work surface. Refer to the diagram below (view is from overhead). Using a remove the module brace screws the CNAMPX-16X60) and remove both braces. Professional Audio Amplifiers: CNAMPX-12/16X60 • 9 5/32-inch hex wrench, for the CNAMPX-12X60,...
- Page 14 Cresnet System Interface Card Mounting Screws 10 • Professional Audio Amplifiers: CNAMPX-12/16X60 Crestron CNAMPX-12/16X60 5. Access to modules of the CNAMPX-12X60 is slightly different than access to CNAMPX-16X60 modules. Perform the appropriate step below. 5a. To replace module #6 of the the CNAMPX-16X60, continue to step 6 below.
- Page 15 NOTE: To obtain a replacement module, refer to “Merchandise Returns/Repair Service” on page 21 and contact Crestron customer service for further information. Service Guide - DOC. 5885B Professional Audio Amplifiers 8.
-
Page 16: Audio Output Relay Board Replacement
CNAMPX-12/16X60 are a grounding strap (or grounded workstation), a #1 Phillips screwdriver, and a 5/64-inch hex wrench. To replace the card, the defective card must be returned to Crestron and a replacement must be obtained from Crestron. Refer to “Merchandise Returns/Repair Service”... - Page 17 Crestron CNAMPX-12/16X60 WARNING: The CNAMPX-12/16X60 amplifiers are heavy units. The CNAMPX- 12X60 weighs approximately 81.40 lbs (37.00 kg) and the CNAMPX-16X60 weighs approximately 90.20 lbs (41.00 kg). Use more than one person to remove unit from or install unit into rack.
- Page 18 Cresnet System Interface Card Mounting Screws NOTE: To obtain a replacement Cresnet system interface card, refer to “Merchandise Returns/Repair Service” on page 21 and contact Crestron customer service for further information. CAUTION: The two connectors at the bottom-right of the Cresnet system interface card are both 2-pin connectors that are electrically the wire colors and/or connector labels.
-
Page 19: In-Rush Surge Suppressor Replacement
Service Guide - DOC. 5885B Professional Audio Amplifiers 8. Re-connect all connectors (one for the CNAMPX-12X60, CNAMPX-16X60) to the card. 9. Perform the appropriate step below. 9a. If performing another internal replacement procedure, proceed to that procedure. -
Page 20: Cover Installation And Reconnect Unit
90.20 lbs (41.00 kg). Use more than one person to remove unit from or install unit into rack. 16 • Professional Audio Amplifiers: CNAMPX-12/16X60 Crestron CNAMPX-12/16X60 8. Tighten the two screws snug – do not over-tighten. Apply Three Bond 1401C (or similar thread sealer) to the nuts to prevent loosening. - Page 21 Crestron CNAMPX-12/16X60 CAUTION: To prevent stripping of screw heads, threads, or mounting holes, do step(s). NOTE: The unit shown in this procedure is a CNAMPX-16X60. The procedure is identical for all models and all versions except where noted. CAUTION: The cover screws are 1/4-inch except the four screws at the top-center that are 1/2-inch long.
- Page 22 Professional Audio Amplifiers Top-Center Cover Screws Mounting Ear Screws (Left-Side) 18 • Professional Audio Amplifiers: CNAMPX-12/16X60 Crestron CNAMPX-12/16X60 5. Re-install all remaining cover screws to 1/8-inch hex wrench, tighten all cover screws an additional 1/8-turn. 6. Perform the appropriate step below.
- Page 23 Crestron CNAMPX-12/16X60 WARNING: Observe the “Rack Mounting Precautions” on page 2 to install unit into equipment rack. WARNING: The CNAMPX-12/16X60 amplifiers are heavy units. The CNAMPX- 12X60 weighs approximately 81.40 lbs (37.00 kg) and the CNAMPX-16X60 weighs approximately 90.20 lbs (41.00 kg). Use more than one person to install unit into rack.
-
Page 24: Problem Solving
For assistance in your local time zone, refer to the Crestron website (http://www.crestron.com/) for a listing of Crestron worldwide offices. You can also log onto the online help section of the Crestron website to ask questions about Crestron products. First-time users will need to establish a user account to fully benefit from all available features. -
Page 25: Return And Warranty Policies
CRESTRON shall not be liable to honor the terms of this warranty if the product has been used in any application other than that for which it was intended, or if it has been subjected to misuse, accidental damage, modification, or improper installation procedures. - Page 26 Crestron Electronics, Inc. Service Guide – DOC. 5885B 15 Volvo Drive Rockleigh, NJ 07647 06.06 Tel: 888.CRESTRON Fax: 201.767.7576 Specifications subject to www.crestron.com change without notice.
Need help?
Do you have a question about the CNAMPX-12X60 and is the answer not in the manual?
Questions and answers