Advertisement
Quick Links
Scan for full manual
Step 1: Check what's in the box
SID-X1N
Step-in Commander
1 Power adapter (12V DC output)
IMPORTANT NOTICE!
We highly recommend using only Kramer UNIKAT cables with these products. If using 3
shield must be soldered to the connectors for the products to function properly. Do not use any jumpers, unshielded wall plates or mid-
span cable connections. These extenders are not compatible with HDBaseT technologies. Prior to signal extension, ensure that the
extension line cable is lying straight and not coiled.
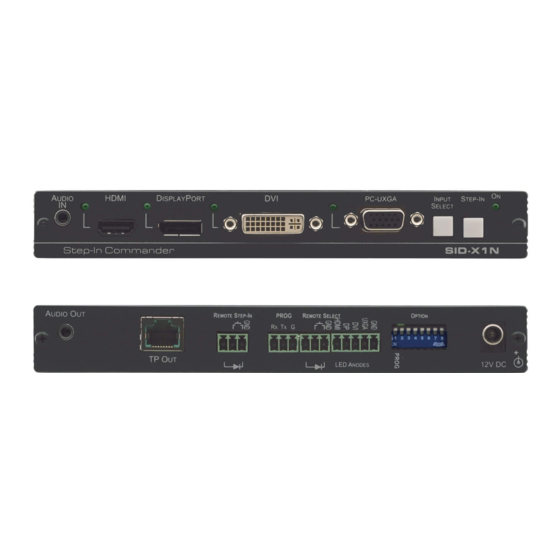
Step 2: Get to know your SID-X1N
#
Feature
1
AUDIO IN 3.5mm Mini Jack
2
LED
HDMI
3
HDMI Connector
4
LED
DisplayPort
5
DP Connector
6
LED
DVI
7
DVI Connector
8
LED
PC-UXGA
9
PC-UXGA 15-pin HD
Connector (F)
10
INPUT SELECT Button
11
STEP-IN Button
12
ON LED
The terms HDMI, HDMI High-Definition Multimedia Interface, and the HDMI Logo are trademarks or registered trademarks of HDMI Licensing Administrator, Inc.
SID-X1N Quick Start
SID-X1N Quick Start Guide
This guide helps you install and use your
Go to
www.kramerav.com/downloads/SID-X1N
upgrades are available.
Function
Connect to an unbalanced stereo audio source
Lights green when the HDMI input is selected
Connect to an HDMI source
Lights green when the DisplayPort input is selected
Connect to a DisplayPort source
Lights green when the DVI input is selected
Connect to a DVI source
Lights green when the PC-UXGA input is selected
Connect to a PC graphics source
Press repeatedly to cycle through the inputs manually to select an input, (overrides
automatic selection).
Note: When the button is lit it is inactive and pressing the button will not activate the
input
Press to activate the input on the switcher that the
SID-X1N
is connected to
Lights green when the device is powered on
SID-X1N
for the first time.
to download the latest user manual and check if firmware
1 Set of rack ears
1 Power cord
rd
party shielded CAT-6A cables, both ends of the
P/N: 2 9 0 0 - 3 0 1 2 2 2 QS
Rev: 5
Advertisement

Subscribe to Our Youtube Channel
Summary of Contents for Kramer SID-X1N
- Page 1 1 Power cord IMPORTANT NOTICE! We highly recommend using only Kramer UNIKAT cables with these products. If using 3 party shielded CAT-6A cables, both ends of the shield must be soldered to the connectors for the products to function properly. Do not use any jumpers, unshielded wall plates or mid- span cable connections.
- Page 2 • Reliable earthing of rack-mounted equipment should be maintained. Step 4: Connect inputs and outputs Always switch OFF the power on each device before connecting it to your SID-X1N. To achieve specified extension distances, use the recommended Kramer cables available at www.kramerav.com/product/SID-X1N.
- Page 3 Off—Power is disabled when input signal is lost after delay set by DIP-switch 7 DIP-switch 2 must be set to ON to enable DIP-switch 3 to control the DVI audio mode selection. Step 7: Operate SID-X1N Optional: Lock the current EDID if required.
- Page 4 Step 8: Technical Specifications INPUTS: Video: 1 HDMI on an HDMI connector 1 DP on a DisplayPort connector 1 DVI-D on a DVI-I connector 1 VGA on a 15-pin HD (F) connector Audio: 1 Unbalanced stereo audio on a 3.5mm mini jack OUTPUTS: 1 TP on an RJ-45 1 Unbalanced stereo audio in a 3.5mm mini jack...


Need help?
Do you have a question about the SID-X1N and is the answer not in the manual?
Questions and answers