
Subscribe to Our Youtube Channel
Related Manuals for Mecmesin Orbis


Summary of Contents for Mecmesin Orbis
- Page 1 Published on Mecmesin Support (https://help.mecmesin.com) Home > Orbis Closure Torque Tester Operating Manual Support Product Orbis Revision ID Manual 431-262-05-L00...
- Page 2 Introduction Before Use Operation Maintenance Assembly of the Orbis 4.1.1 Fitting Instructions for the Orbis Top Plate Powering the Orbis 4.2.1 Replacing rechargeable batteries 4.2.2 Low battery warning 4.2.3 Mains operation Using the Orbis 4.3.1 Fitting accessories 4.3.2 Powering up 4.3.3...
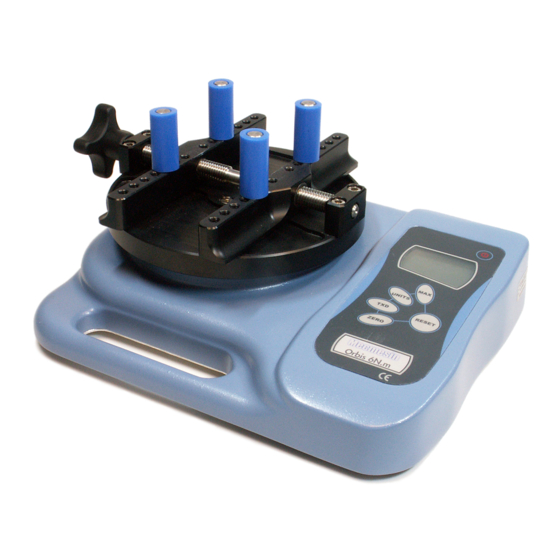
- Page 3 Introduction Thank you for choosing Mecmesin’s Orbis Digital Torque Tester. With correct use and regular re-calibration it will give many years of accurate and reliable service. The Orbis has been specifically designed as a high-accuracy, portable instrument for measuring clockwise and counter-clockwise torques.
-
Page 4: Before Use
Before Use Upon receiving the unit please check that no physical damage has occurred to the packaging material, plastic case or the instrument itself. If any damage is evident please notify Mecmesin immediately. -
Page 5: Operation
Operation The most commonly used features such as displaying torque, peak hold, zero and changing of displayed units can all be done by pressing single dedicated keys on the front panel. For less frequently used features a number of ‘hot keys’ are provided, whereby the operator simply presses and holds an appropriate key upon startup to enable a gauge option. -
Page 6: Maintenance
(provided), tighten the four-socket countersunk screws hand tight. When the Orbis is in transit, the top plate is removed to avoid damage to the torque sensor. When the Orbis is in transit, the top plate is removed to avoid damage to the torque sensor. - Page 7 Step 3: Tighten screws hand-tight only. Step 4: For use of Orbis with handle at front, repeat steps 1 to 3 but position top plate accordingly during step 2.
-
Page 8: Replacing Rechargeable Batteries
Powering the Orbis The Orbis is supplied with a set of 5 Nickel Metal Hydride AAA rechargeable batteries, which are supplied fully charged to allow use straight from the box. Do not use any other battery charger other than that supplied with the torque tester. -
Page 9: Mains Operation
4.2.3 Mains operation The Orbis may also be powered directly from the mains. Simply maintain the mains adaptor/charger connection to your mains supply as above. Only use the adaptor/charger supplied. Using the Orbis The Orbis is supplied with 4 pegs which grip the sample during testing. - Page 10 To power up the Orbis press the red key. A short self test runs during which the display will show the capacity in ‘N.m’ (newton metres).
- Page 11 Consult your supplier to arrange repair. To power down the Orbis press the red key. 4.3.3 Clockwise and Counter-clockwise Values Clockwise torque is displayed on the Orbis and recognised by the symbol shown in Fig. 2.
- Page 12 Zeroing the Orbis During operation of the Orbis, it is sometimes necessary to zero the display - e.g. when you wish to tare out a displayed torque applied by the sample, so it does not become part of the measured reading. Press and release the ZERO ZERO key.
-
Page 13: Normal Mode
4.3.9 Max Clockwise Torque Press the MAX MAX key again, and the display will show the maximum clockwise torque identified by its symbol. 4.3.10 Max Counter-clockwise Torque Press the MAX MAX key again, and the display will show the maximum counter-clockwise torque identified by its symbol. -
Page 14: Data Output
TXD key, at which point TX will disappear from the display. Please note that the continuous data stream only starts when approximately 2% of the rated capacity of the Orbis is reached. Orbis uses 9600 Baud 8 data bits, 1 start bit 1 stop bit and no parity. - Page 15 Once the desired Max display mode has been selected, it is possible to lock the mode, so that further pressing the MAX MAX key results in no change. Press and hold RESET RESET and MAX MAX keys simultaneously whilst powering up the Orbis with the...
- Page 16 Press and hold RESET RESET and UNITS UNITS keys simultaneously whilst powering up the Orbis with the key. ‘UNITS KEY LOCKED’ will appear on the display until the ‘Hot Keys’ are released. The units are now locked. To unlock the units, repeat as above. ‘UNITS KEY UNLOCKED’ will appear on the display until the ‘Hot Keys’ are...
- Page 17 Symptoms of overload may be (a) OL in display (b) buzzer sound (c) torque indicator bar present even under zero load. Place the Orbis horizontally on a flat, level surface. Press and hold the UNITS UNITS key whilst powering up the Orbis...
- Page 18 If the offset is between 5 - 10 %, please contact your supplier to arrange a re-calibration of your Orbis. If the offset is greater than 10 %, please contact your supplier to arrange for a torque sensor replacement.
- Page 19 4.6.3 Command: C The torque sensor size, in the current selected units. Note: ‘xxxx’ will be transmitted if the torque sensor is not calibrated or has a serious fault. Contact Mecmesin or Note: your supplier.
- Page 20 4.6.4 Command: @ When all options are OFF, and the Orbis is set at defaults, you will receive the following information listing: Response Response Explanation of Response Explanation of Response ORBIS Gauge type Torque sensor size in N.m as per 6N.m...
-
Page 21: Side View
4.7.1 Side View 4.7.2 Top View * Min-Max opening: 10 - 190mm diameter... -
Page 22: Communications Cables
4.8.4 Adaptor/Charger Unit The mains adaptor/charger supplied with the Orbis is a constant-current type. Primary: 230V - 50Hz (110V - 60Hz version also available) Secondary: 100mA constant current at 9V Charger output plug: Centre = positive Outer = negative 4.8.5... - Page 23 Spring Copse Business Park Slinfold, West Sussex RH13 0SZ United Kingdom Mecmesin Ltd is a company registered in England and Wales, company number 01302639. PPT Holdings Company Source URL (modified on 20/06/2019 - Source URL (modified on 20/06/2019 - 14:03):...
Need help?
Do you have a question about the Orbis and is the answer not in the manual?
Questions and answers