Table of Contents
Advertisement
Quick Links
Advertisement
Table of Contents

Related Manuals for Olympus OLYMPUS OSF-3


Summary of Contents for Olympus OLYMPUS OSF-3
- Page 1 INSTRUCTIONS SIGMOIDOFIBERSCOPE OLYMPUS OSF-3 Refer to the endoscope’s companion manual, the “OLYMPUS OSF-3 ENDOSCOPE REPROCESSING MANUAL” for reprocessing information. USA: CAUTION: Federal law restricts this device to sale by or on the order of a physician.
-
Page 3: Table Of Contents
Contents Contents Symbols..................Important Information — Please Read Before Use....Intended Use .................... Applicability of Endoscopy and Endoscopic Treatment ......Instruction Manual..................User Qualifications ................... Instrument Compatibility ................Reprocessing and Storage ............... Spare Equipment ..................Repair and Modification ................Signal Words .................... Warnings and Cautions ................ - Page 4 Contents Chapter 5 Troubleshooting ............Troubleshooting Guide..............Returning the Endoscope for Repair..........Appendix..................System Chart ................... OSF-3 OPERATION MANUAL...
-
Page 5: Symbols
Symbols Symbols The meaning(s) of the symbol(s) shown on the package with the components, the back cover of this instruction manual and/or this instrument are as follows: Refer to instructions. Endoscope Type BF applied part Manufacturer Authorized representative in the European Community OSF-3 OPERATION MANUAL... - Page 6 Symbols OSF-3 OPERATION MANUAL...
-
Page 7: Important Information - Please Read Before Use
Important Information — Please Read Before Use Important Information — Please Read Before Use Intended Use This instrument has been designed to be used with Light Sources, Documentation Equipment, Endo-Therapy Accessories, Eletctrosurgical Unit and other ancillary equipment for endoscopic applications within the lower digestive tract including rectum and sigmoid colon. -
Page 8: Instruction Manual
Note that the complete instruction manual set for this Endoscope consists of this manual and the “OLYMPUS OSF-3 ENDOSCOPE REPROCESSING MANUAL” which also accompanied the Endoscope at shipment. -
Page 9: Spare Equipment
Problems that appear not to be malfunctions may be correctable by referring to Chapter 5, “Troubleshooting”. If the problem cannot be resolved using the information in Chapter 5, contact Olympus. Signal Words The following signal words are used throughout this manual: Indicates a potentially hazardous situation which, if not avoided, could result in death or serious injury. - Page 10 Important Information — Please Read Before Use • Do not strike, bend, hit, pull, twist, or drop the endoscope’s distal end, insertion tube, bending section, control section, universal cord, or endoscope connector of the endoscope with excessive force. The endoscope may be damaged and could cause patient injury, burns, bleeding and/or perforations.
- Page 11 Important Information — Please Read Before Use Details on clinical endoscopic technique are the responsibility of trained specialists. Patient safety in endoscopic examinations and endoscopic treatment can be ensured through appropriate handling by the physician and the medical facility. Examples of inappropriate handling are given below. •...
-
Page 12: Chapter 1 Checking The Package Contents
Match all items in the package with the components shown below. Inspect each item for damage. If the instrument is damaged, a component is missing or you have any questions, do not use the instrument; immediately contact Olympus. This instrument was not disinfected or sterilized before shipment. Before using this instrument for the first time, reprocess it according to the instructions in the endoscope’s companion manual, the “OLYMPUS OSF-3 ENDOSCOPE... - Page 13 Chapter 1 Checking the Package Contents OSF-3 OPERATION MANUAL...
-
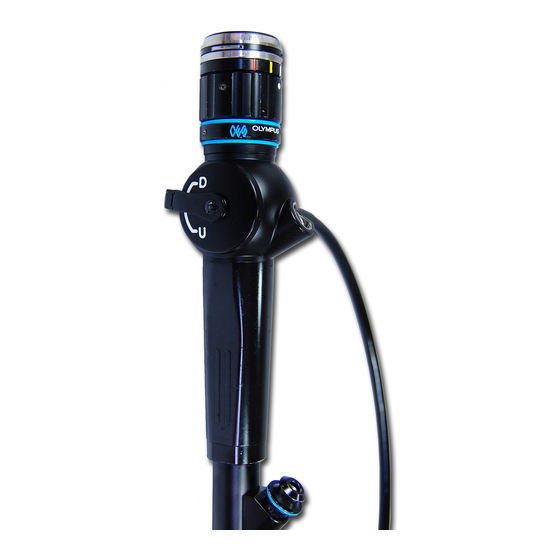
Page 14: Chapter 2 Instrument Nomenclature And Specifications
Chapter 2 Instrument Nomenclature and Specifications Chapter 2 Instrument Nomenclature and Specifications Nomenclature The Endoscope Main Body is illustrated with its valves detached. Universal Cord 17. ETO Cap (MB-156) 13. Light Guide Connector Section To the output socket of OES/EVIS Light Source 15. - Page 15 Chapter 2 Instrument Nomenclature and Specifications 8. Eyepiece Section 3. UP/DOWN Angulation Lock 6. Suction Valve (MB-197) 9. Diopter Adjustment Ring 5. Air/Water Valve (MB-196) Blue Ring (indicates that this is waterproof system) 1. UP/DOWN Angulation Control Knob Control 2. RIGHT/LEFT Angulation Section Control Knob Suction Cylinder...
-
Page 16: Endoscope Functions
Chapter 2 Instrument Nomenclature and Specifications Endoscope Functions 1. UP/DOWN Angulation Control Knob When turned in the “ U” direction, the Bending Section moves UP; When turned in the “ D” direction, the Bending Section moves DOWN. 2. RIGHT/LEFT Angulation Control Knob When turned in the “R ”... - Page 17 Accepts the Water Container tube to a sterile water supply. 15. S-Cord Connector Mount Connects to the S-cord to the conduct leakage current from the Endoscope to the Olympus Electrosurgical Unit. To connect, refer to the instruction manual for the Olympus Electrosurgical Unit. 16. Venting Connector Install the ETO Cap before performing ETO gas sterilization.
-
Page 18: Specifications
Chapter 2 Instrument Nomenclature and Specifications Specifications Environment Operating Ambient temperature 10 – 40°C (50 – 104°F) environment Relative humidity 30 – 85% Atmospheric pressure 700 – 1060 hPa (0.7 – 1.1 kgf/cm (10.2 – 15.4 psia) Transportation and Ambient temperature –47 to 70°C (–52.6 to 158°F) storage Relative humidity... - Page 19 Chapter 2 Instrument Nomenclature and Specifications Specifications Endoscope Functions Optical System Field of View 120° Direction of View 0° Depth of Field 3 to 100 mm Insertion Tube Distal End Outer ø 12 mm Diameter Distal End enlarged 1. Air/Water Nozzle 2.
- Page 20 Chapter 2 Instrument Nomenclature and Specifications Year of 2712345 manufacture The last digit of the year of manufacture is given in the second digit of the serial number. Degree of TYPE BF applied part. protection against electric shock OSF-3 OPERATION MANUAL...
-
Page 21: Chapter 3 Preparation And Inspection
Should the slightest irregularity be suspected, do not use this instrument and see Chapter 5, “Troubleshooting”. If the irregularity is still suspected after consulting Chapter 5, contact Olympus. Damage or irregularity may compromise patient or user safety and may result in more-severe equipment damage. -
Page 22: Preparation And Inspection Of The Endoscope
Figure 3.1 Preparation and Inspection of the Endoscope Clean and disinfect (or sterilize) the endoscope as described in the endoscope’s companion manual, the “OLYMPUS OSF-3 ENDOSCOPE REPROCESSING MANUAL”. Inspection of the Endoscope Inspect the control section and the endoscope connector for excessive scratching, deformation, loose parts or other irregularities. - Page 23 Chapter 3 Preparation and Inspection Figure 3.2 Using both hands, bend the Insertion Tube of the endoscope into a semicircle. Then, moving your hands as shown by the arrows in Figure 3.3, confirm that the entire Insertion Tube can be smoothly bent to form a semicircle and that the Insertion Tube is pliable.
- Page 24 Chapter 3 Preparation and Inspection Inspection of the Bending Mechanisms Perform the following inspections while the Bending Section is straight. If the movement of the UP/DOWN Angulation Lock, RIGHT/LEFT Angulation Lock and their Angulation Control Knobs are loose and/or not smooth, or the Bending Section does not angulate smoothly, the bending mechanism may be abnormal.
-
Page 25: Preparation And Inspection Of Accessories
Preparation and Inspection of Accessories Clean and disinfect (or sterilize) the Air/Water Valve (MB-196), Suction Valve (MB-197) and Biopsy Valve (MB-358) as described in the endoscope’s companion manual, the “OLYMPUS OSF-3 ENDOSCOPE REPROCESSING MANUAL”. Inspection of the Air/Water and Suction Valves Visually inspect the Air/Water and Suction Valves (see Figures 3.4 and 3.5). - Page 26 Chapter 3 Preparation and Inspection Hole Suction Valve (MB-197) Figure 3.5 The Air/Water and Suction Valves are consumables. If inspection of the Air/Water or Suction Valves reveals any irregularity, use new valves. Inspection of the Biopsy Valve The Biopsy Valve is a consumable item that should be inspected before each use.
-
Page 27: Attaching Accessories To The Endoscope
Chapter 3 Preparation and Inspection Attach the cap to the main body as shown in Figure 3.7. Slit Main Body Figure 3.7 Attaching Accessories to the Endoscope Attaching the Suction Valve Apply a small amount of lubricant to Moving Surface. Align the metal drain on the underside of the Suction Valve with the metal pin in the Suction Cylinder. - Page 28 Chapter 3 Preparation and Inspection Attaching the Air/Water Valve Apply a small amount of lubricant to the Seals. Attach the Air/Water Valve to the Air/Water Cylinder of the endoscope (see Figure 3.9). Confirm that the valve is fitted correctly without any bulging of the Skirt. Air/Water Valve (MB-196) Suction Valve (MB-197) Skirt...
-
Page 29: Preparation, Inspection And Connection Of Ancillary Equipment
Chapter 3 Preparation and Inspection Preparation, Inspection and Connection of Ancillary Equipment Preparation and Inspection of Ancillary Equipment Attach the Water Container (MD-431) to the specified receptacle. If the Water Container is attached anywhere else, water may drip from the Water Container’s water supply tube, and can impair the performance of the equipment. -
Page 30: Inspection Of The Endoscopic System
Chapter 3 Preparation and Inspection Connect the Suction Tube from the Suction Pump to the Suction Connector on the Endoscope Light Guide Connector. Endoscope Suction Pump (KV-4/SSU-2) Suction Tube To the Suction Connector on the endoscope Figure 3.12 Inspection of the Endoscopic System Inspection of the Endoscopic Image Turn the power switches of the Light Source ON, and adjust the light level according to the instruction manual for the Light Source. - Page 31 Chapter 3 Preparation and Inspection Immerse the Distal End of the Insertion Tube in sterile water to a depth of 10 cm. Confirm that no air bubbles are emitted when the Air/Water Valve is not operated. With the Distal End immersed to a depth of 10 cm, cover the hole in the Air/Water Valve with your finger and confirm that air bubbles are continuously emitted from the Air/Water Nozzle.
- Page 32 If the reattached or replaced Suction Valve fails to operate smoothly, the endoscope may be malfunctioning; stop using it and contact Olympus. • If the Biopsy Valve leaks, replace it with a new one. A leaking Biopsy Valve can reduce the efficacy of the endoscope’s...
- Page 33 Chapter 3 Preparation and Inspection Inspecting the Automatic Exposure System Following the instruction manuals of the Photographic Equipment and Light Source, check that the automatic exposure system operates correctly. OSF-3 OPERATION MANUAL...
-
Page 34: Chapter 4 Operation
• If angulation control is not functioning properly, stop the examination immediately, leave the endoscope inside the patient and contact Olympus. Do not forcibly withdraw the endoscope. Forcibly withdrawing the endoscope may cause patient injury. •... - Page 35 Chapter 4 Operation • The temperature of the Distal End of the endoscope may exceed 41°C (106°F) and reach 50°C (122°F) due to intense endoscopic illumination. Surface temperatures over 41°C (106°F) may cause mucosal burns. Always use the minimum level of illumination, minimum time and suitable distance necessary for adequate viewing.
-
Page 36: Insertion
Chapter 4 Operation Insertion Holding and Manipulating the Endoscope The Control Section of the endoscope is designed to be held in the left hand. The Air/Water and Suction Valves can be operated using the left index finger. The UP/DOWN Angulation Control Knob can be operated using the left thumb. The right hand is free to manipulate the Insertion Tube and RIGHT/LEFT Angulation Control Knob (see Figure 4.1). - Page 37 Chapter 4 Operation Must be10 cm or more Figure 4.2 Angulation of the Distal End If the angulation control mechanism or any other part of the system is not functioning properly, stop the examination immediately; free the Angulation Locks and turn the Angulation Control Knobs to the neutral positions.
- Page 38 Water Container, the endoscope or other equipment may not be working properly. Stop the procedure immediately and contact Olympus. Clean the Objective Lens by covering the Air/Water Valve hole to feed air from the Nozzle in the Distal End or depress the Air/Water Valve to feed water onto the Objective Lens.
- Page 39 Chapter 4 Operation Suction Valve Air/Water Valve Operating the Air/Water Valve and Suction Valve Figure 4.3 Suction • Avoid suctioning solid matter or thick fluids; channel or valve clogging can occur. If the Suction Valve clogs and aspirator cannot be turned off, disconnect the Suction tube from the Suction Connector on the Endoscope Connector.
-
Page 40: Using Endo-Therapy Accessories
Chapter 4 Operation Observation of the Endoscopic Image Refer to the Light Source’s instruction manual for instructions on how to adjust the brightness. Using Endo-Therapy Accessories For information on combining the endoscope with particular Endo-Therapy Accessories, read the instruction manuals for the Endo-Therapy Accessories. •... - Page 41 Chapter 4 Operation • If the Distal End of an Endo-Therapy Accessory is not visible in the endoscopic image, do not open the Distal End or extend the needle of the instrument. This could cause patient injury, bleeding, perforation and/or equipment damage. Insertion of Endo-Therapy Accessories Into the Endoscope •...
- Page 42 Chapter 4 Operation • When using an Injector, be sure not to extend or retract the needle from the catheter of the Injector until the Injector comes out from the Distal End of the endoscope. It could damage the instrument channel to extend the needle inside the channel or to insert or withdraw the Injector while the needle is coming out.
- Page 43 Chapter 4 Operation Withdrawal of Endo-Therapy Accessories Withdraw the Endo-Therapy Accessory slowly while the tip of the Endo-Therapy Accessory is closed. • Withdraw the Endo-Therapy Accessory slowly and straight out of the Biopsy Valve. Otherwise, the valve’s slit and/or hole could be damaged. This can reduce the efficacy of the endoscope’s suction system, and may leak or spray patient debris or fluids, posing an infection-control risk.
- Page 44 Chapter 4 Operation • Not all parts of the Endoscope are electrically insulated. When applying high frequency current, there is a danger of unintentional diathermy burns, so always wear electrically insulating chemical-resistant gloves. • To avoid patient injury and/or damage to the Endoscope, never emit high-frequency current before confirming that the electrode section of the high-frequency Endo-Therapy Accessory is extended from the Distal End of the endoscope...
-
Page 45: Withdrawal Of The Endoscope
Chapter 4 Operation • Allow the tip of the laser probe to cool down before pulling it in the channel. If the laser probe is withdrawn while hot, channel damage may occur. • Do not use a damaged laser probe. A laser probe with a damaged sheath or Distal End may cause patient injury and/or equipment damage. - Page 46 Chapter 4 Operation Transporting Outside the Hospital Transport the endoscope in the carrying case. • The Carrying Case cannot be cleaned or disinfected. Clean and disinfect or sterilize the endoscope before placing it in the carrying case. Disinfect or sterilize the endoscope again before use.
-
Page 47: Chapter 5 Troubleshooting
Section 5.1, “Troubleshooting Guide”. Should you fail to correct the problem even after taking the described remedial action, stop using the endoscope and send it to Olympus for repair. Olympus does not repair accessory parts. If an accessory part becomes damaged, contact Olympus to purchase a replacement. •... - Page 48 Chapter 5 Troubleshooting Air/Water Feeding Irregularity Possible Cause Solution Description No air or water feeding. Air pump is not Press the LOW, MED or HIGH operating. button on the Light Source according to the Light Source’s instruction manual. Air/Water Valve is Replace with a new Air/Water damaged.
- Page 49 Valve. Sticky Suction Valve. Valve is dirty. Reprocess the dirty Suction Valve according to the instructions in the endoscope’s companion manual, the “OLYMPUS OSF-3 ENDOSCOPE REPROCESSING MANUAL”. No lubricant. Apply a small amount of lubricant to the Moving Surface. Valve is damaged.
-
Page 50: Returning The Endoscope For Repair
Olympus. Olympus is not liable for any injury or damage which occurs as a result of repairs attempted by non-Olympus personnel. When returning the endoscope for repair, include a description of the endoscope malfunction or damage and the name and telephone number of the individual at your location who is most familiar with the endoscope problem. -
Page 51: Appendix
New products released after the introduction of this instrument may also be compatible for use in combination with this instrument. For further details, contact Olympus. If combinations of equipment other than those shown below are used, the full responsibility is assumed by the medical treatment facility. - Page 52 Appendix Lecturescope (LS-10R) OES Camera (SC16-10R) Suction Pump OES VIDEO SYSTEM (OTV-SE) OM Adapter SLR Camera (SM-R) (SC35) OM AE Adapter (SM-ER3) Suction Pump (KV-4/SSU-2) Video Adapter (AR-T2, AR-TZ, AR-TL) SCP Adapter OES Instant (AR-P10) Camera (SCP-10) Gas/Water Valve (MD-410) Gas Adapter (MAJ-422) Halogen Light Source...
- Page 53 Appendix Biopsy Valve (MB-358) Forceps, Brush, etc. See next page. Electrosurgical Units Electrosurgical Accessories See next page. UES-10/20 PSD-10/20 Washing and Disinfection Equipment Leakage Tester (MB-155) Channel-opening Ultrasonic Cleaner Cleaning Brush (KS-2) (MH-507) All Channel Irrigator Endoscope Washer (CW-3) (EW-20) ETO Cap (MB-156) AW Channel...
- Page 54 Appendix Endo-Therapy Accessories BIOPSY FORCEPS Fenestrated with Alligator type Fenestrated Alligator jaws needle Endoscope OSF-3 FB-11K-1 FB-23K-1, FB-24E-1 FB-25K-1 FB-36K-1 ROTATABLE ROTATABLE ROTATABLE BIOPSY FORCEPS BIOPSY FORCEPS BIOPSY FORCEPS BIOPSY FORCEPS Rat Tooth with Fenestrated with Rat tooth Fenestrated Alligator jaws needle (Swing Type) Endoscope...
- Page 55 Appendix GRASPING FORCEPS SUTURE CUTTING SURGICAL FORCEPS SCISSORS Tripod type Pentapod type Endoscope OSF-3 FG-45L-1 FG-46L-1 FS-1K FS-3L MEASURING WASHING PIPE MAGENTIC DEVICE EXTRACTOR Standard type Spray type Straight Endoscope OSF-3 IE-1L PW-1H-1 PW-5L-1 M1-2K DISPOSABLE Bendable LIGATING DEVICE INJECTOR INJECTOR Endoscope OSF-3...
- Page 56 Appendix Electrosurgical Accessories ELECTROSURGICAL SNARE Crescent Hexagonal Oval Mini oval Endoscope OSF-3 SD-5L-1 SD-6L-1 SD-9L-1/11L-1 SD-12L-1/13L-1 ELECTROSURGICAL SNARE DISPOSABLE DIATHERMIC SNARE Oval with thorn Mini oval with thorn Oval Mini oval Endoscope OSF-3 SD-16L-1 SD-17L-1 SD-14L SD-15L ELECTRO COAGULATION ELECTRODE SURGICAL wire HOT BIOPSY type KNIFE...
- Page 59 ©1997 OLYMPUS MEDICAL SYSTEMS CORP. All rights reserved. No part of this publication may be reproduced or distributed without the express written permission of OLYMPUS MEDICAL SYSTEMS CORP. OLYMPUS is a registered trademark of OLYMPUS CORPORATION. Trademarks, product names, logos, or trade names used in this document are generally registered trademarks or trademarks of each company.
- Page 60 Manufactured by 2951 Ishikawa-cho, Hachioji-shi, Tokyo 192-8507, Japan Fax: (042)646-2429 Telephone: (042)642-2111 Distributed by 3500 Corporate Parkway, P.O. Box 610 Center Valley, PA 18034-0610, U.S.A. Fax: (484)896-7128 Telephone: (484)896-5000 One Corporate Drive, Orangeburg, N.Y. 10962, U.S.A. Fax: (845)398-9444 Telephone: (845)398-9400 5301 Blue Lagoon Drive, Suite 290 Miami, FL 33126-2097, U.S.A.
Need help?
Do you have a question about the OLYMPUS OSF-3 and is the answer not in the manual?
Questions and answers