Table of Contents
Advertisement
Quick Links
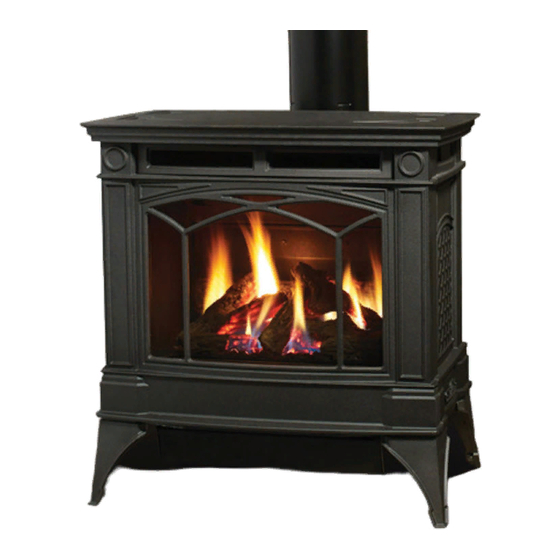
H35E-11 Direct Vent Gas Fireplace
H35E-11 Direct Vent Gas Fireplace
MODELS:
H35E-NG11 Natural Gas
WARNING
FIRE OR EXPLOSION HAZARD
Failure to follow safety warnings exactly could result in serious
injury, death, or property damage.
- Do not store or use gasoline or other flammable vapors and liquids in the vicinity of this or any other
appliance.
- WHAT TO DO IF YOU SMELL GAS
• Do not try to light any appliance.
• Do not touch any electrical switch: do not use any phone in your building.
Leave the building immediately.
• Immediately call your gas supplier from a neighbour's phone. Follow the gas supplier's
instructions.
• If you cannot reach your gas supplier, call the fire department.
- Installation and service must be performed by a qualified installer, service agency or the gas supplier.
Tested by:
Certified to/Certifié pour: CSA 2.17-2017
FPI FIREPLACE PRODUCTS INTERNATIONAL LTD. 6988 Venture St., Delta, BC Canada, V4G 1H4
920-045e
H35E-LP11 Propane
Installer: Please complete the details on the back cover
ANSI Z21.88-2017
and leave this manual with the homeowner.
CSA 2.33-2017
Homeowner: Please keep these instructions for future reference.
Owners &
Installation Manual
H35 Product Video
www.hampton-fire.com
08.16.21
Advertisement
Table of Contents

Related Manuals for HAMPTON BAY H35E-11


Summary of Contents for HAMPTON BAY H35E-11
- Page 1 Owners & H35E-11 Direct Vent Gas Fireplace H35E-11 Direct Vent Gas Fireplace Installation Manual H35 Product Video www.hampton-fire.com MODELS: H35E-NG11 Natural Gas H35E-LP11 Propane WARNING FIRE OR EXPLOSION HAZARD Failure to follow safety warnings exactly could result in serious injury, death, or property damage.
- Page 2 ® The H35E-11 is a hand crafted appliance and has been designed to provide you with all the warmth and charm of a wood fireplace at the flick of a switch. The model H35E-11 has been approved by Warnock Hersey/ Intertek for both safety and efficiency. As it also bears our own mark, it promises to provide you with economy, comfort and security for many trouble free years to follow.
-
Page 3: Installer's Information Unit Dimensions With Vertical Vent Collar
2 2 6 6 - - 7 7 / / 1 1 6 6 " " ( ( 6 6 7 7 2 2 m m m m ) ) ALL PICTURES / DIAGRAMS SHOWN THROUGHOUT THIS MANUAL ARE FOR ILLUSTRATION PURPOSES ONLY. ACTUAL PRODUCT MAY VARY DUE TO PRODUCT ENHANCEMENTS. Hampton H35E-11 Direct Vent Freestanding Gas Stove ®... -
Page 4: Unit Dimensions With Horizontal Vent Collar
Unit Dimensions with Horizontal Vent Collar 27-3/8" (694mm) 15-3/8" (391mm) 16-3/4" (425mm) 26-7/16" (672 mm) Hampton H35E-11 Direct Vent Freestanding Gas Stove ®... -
Page 5: Table Of Contents
If the unit is being operated in IPI (intermittent pilot) mode, neither the above instructions nor the seven day timer will apply. See the instructions in this manual and on the Lighting Instructions plate on the appliance to light or re-light the pilot. Hampton H35E-11 Direct Vent Freestanding Gas Stove ®... -
Page 6: Copy Of The Safety Decal
With the panel removed, the gas valve will be visible. The rating plate will be attached to a black chain located under the IFC. DO NOT REMOVE THE DECAL FROM THE UNIT. Hampton H35E-11 Direct Vent Freestanding Gas Stove ®... - Page 7 (e) A copy of all installation instructions for all Product Approved side wall horizontally vented gas fueled equipm ent, all venting instructions, all parts lists for venting instructions, and/or all venting design instructions shall remain with the appliance or equipment at the completion of the installation. Hampton H35E-11 Direct Vent Freestanding Gas Stove ®...
-
Page 8: Gas Installation Checklist
Does the supply pressure meet the requirements shown on the rating plate? Was a conversion performed? Was a leak check performed and manifold pressures verified? Is the shut-off valve installed and easily accessible to the customer? Hampton H35E-11 Direct Vent Freestanding Gas Stove ® 05/18/21... - Page 9 Are the model and serial numbers and the date of installation of the unit written in the manual and on the checklist? Were the warranty and unit registration reviewed with the customer? Comments: 05/18/21 Hampton H35E-11 Direct Vent Freestanding Gas Stove ®...
-
Page 10: Important Message
Sites, and Communities ANSI/NFPA 501A, and with CAN/CSA Z240-MH Mobile Home Standard DUE TO HIGH TEMPERATURES, THE in Canada. APPLIANCE SHOULD BE LOCATED OUT OF TRAFFIC AND AWAY FROM FURNITURE AND DRAPERIES. Hampton H35E-11 Direct Vent Freestanding Gas Stove ®... -
Page 11: Lighting / Shutdown Procedure
Manual mode: Fan will turn on and off immediately using the remote control transmitter if the fan function is in the "on" position. Continuous Pilot/Intermittent Pilot (CPI/IPI) selection See remote control instructions for details. Hampton H35E-11 Direct Vent Freestanding Gas Stove ®... -
Page 12: Copy Of The Lighting Plate Instructions
24 NSI/ hicles. maison P.4.1 920-088 Part #: 919-088 - Side B Hampton H35E-11 Direct Vent Freestanding Gas Stove ® Colours: Black on white, except for parts indicated as being Red. Punch out .25" hole top right corner where indicated. -
Page 13: Proflame Ii Remote Control Operating Instructions
This appliance requires coding/pairing of the remote control and IFC (Integrated Fireplace Control). See remote/IFC coding/pairing instructions found in this manual. Figure 1: Proflame Transmitter Figure 3: Battery Compartment Figure 2: Transmitter LCD Display Hampton H35E-11 Direct Vent Freestanding Gas Stove ®... - Page 14 Transmitter LCD display will only show the room temperature (Fig. 6). At the same time the Receiver will turn off the appliance. A single “beep” from the Receiver confirms reception of the command. Figure 9 Figure 10 Hampton H35E-11 Direct Vent Freestanding Gas Stove ® 919-829 06.10.20...
- Page 15 Down Arrow Key will turn the secondary burner off. A single “beep” will confirm reception of the command. will confirm the reception of the command. Figure 13 Figure 14 Figure 17 Figure 18 Hampton H35E-11 Direct Vent Freestanding Gas Stove ®...
- Page 16 3. Reinstall battery removed in Step 1 while holding both buttons—keep holding buttons, then release the MODE button only. 4. The screen will show either "Clr" or "Set" as the first option available is to disable or enable a mode. Hampton H35E-11 Direct Vent Freestanding Gas Stove ® 919-829 06.10.20...
-
Page 17: General Safety Information
"Conversion from Natural Gas to Propane" lint from carpeting, bedding material, etc. It section. is imperative that control compartments, and circulating air passageways of the appliance be kept clean and free from excessive lint from carpeting. Hampton H35E-11 Direct Vent Freestanding Gas Stove ®... -
Page 18: Clearances To Combustibles
Note: Oils from hands will shorten the life of the bulbs, do not handle bulbs with bare hands. 5. Reverse steps to reinstall. Vertical Horizontal Pipe Pipe Right Side Wall Right Side Wall Hampton H35E-11 Direct Vent Freestanding Gas Stove ®... -
Page 19: Optional Fan Installation
Do not cut or remove the grounding prong from this plug. 919-520a 04.13.15 Hampton H35E-11 Direct Vent Freestanding Gas Stove ®... -
Page 20: Rotating 45 O Elbow For Straight Horizontal Terminations
Phillips head screw driver. 5) Remove the safety screen. 2) Undo the top cast grill mounting bolts using 7/16" or 11mm socket. 3) Remove upper panel. 3) Remove light assembly and carefully set aside. Hampton H35E-11 Direct Vent Freestanding Gas Stove ®... -
Page 21: Front Cast Removal
7) Slide the casting out of the base plate and the side bracket key hole slots and lift the front casting off the unit. 3) Remove top cast grill by pulling it up. 4) Remove light assembly and carefully set aside. Hampton H35E-11 Direct Vent Freestanding Gas Stove ®... -
Page 22: Installation Precautions
1) Wear gloves and safety glasses for protection. Vertical Termination: Position "B" 2) Exercise extreme caution when using ladders or on roof tops. 3) Be aware of electrical wiring locations in walls and ceilings. Hampton H35E-11 Direct Vent Freestanding Gas Stove ®... -
Page 23: Exterior Vent Terminal Locations
* Clearance in accordance with local installation codes and the requirements of the gas supplier 3 feet (91cm) within a height of 15 feet (4.5m) above the meter / regulator assembly 3 feet (91cm) above - if within 10 feet (3m) horizontally Hampton H35E-11 Direct Vent Freestanding Gas Stove ®... -
Page 24: 4" X 6-5/8" Rigid Pipe Cross Reference Chart
4DWT SV4RSM VDV-WPT04 Wal l Thimble Cover/Ceiling Support 46DVA-DC SV4PF Firestop Spacer 46DVA-FS 4DT-FS 4DFSP 4DFS SV4BF TM-4CS VDV-FS04 Trim Plate-Black 4DT-TP 4DFPB 4DcP SV4LA TM-4TP VDV-WTC04 * Not available from Regency Hampton H35E-11 Direct Vent Freestanding Gas Stove ®... - Page 25 Note: Horizontal runs of vent must be level, or have a 1/4” rise for every 1 foot of run towards the termination. Never allow the vent to run downward - this could cause high temperatures and may present a possible fire hazard. Hampton H35E-11 Direct Vent Freestanding Gas Stove ®...
-
Page 26: Rigid Pipe Venting Systems Horizontal Or Vertical Terminations
American Metal Products Ameri Vent Direct Vent, Security Secure Vent , Selkirk Direct-Temp. AstroCap is a proprietary trademark of FPI Fireplace ® Products International Ltd. Dura-Vent® and Direct Vent Pro are registered and/or proprietary trademarks of Simpson Dura-Vent Co. Inc. Hampton H35E-11 Direct Vent Freestanding Gas Stove ®... -
Page 27: Venting Arrangements
Off, as required for manufactured homes. (Actual efficiency may be as high as 85%) May be installed in Manufactured (Mobile) Homes after first sale. NOTE: See "Vent Restrictor Position" section for installation instructions for the Vent Restrictor Position. Hampton H35E-11 Direct Vent Freestanding Gas Stove ®... -
Page 28: Venting Arrangements Horizontal Terminations Using Rigid Pipe
Riser Vent Termination *If this is an outside corner, the minimum distance between the vent and the outside corner is 6” (15cm). See “F” on the diagram in the "Exterior Vent Terminal Locations" section. Hampton H35E-11 Direct Vent Freestanding Gas Stove ®... - Page 29 4' Max. 7' Min. 7' Max. is required. 5' Max. 9' Min. 8' Max. Lengths do not include elbow indicated Vent restrictor position A (fully open), refer to the "Vent Restrictor Position" section. Hampton H35E-11 Direct Vent Freestanding Gas Stove ®...
- Page 30 90 elbows 5' Max. 5' Min. is required. 6' Max. 6' Min. Lengths do not include elbow indicated Vent restrictor position A (fully open), refer to the "Vent Restrictor Position" section. Hampton H35E-11 Direct Vent Freestanding Gas Stove ®...
-
Page 31: Vertical Termination With Co-Linear Flex System
Note: Must remove 4 screws from stove collar and rotate 180 to have collar facing straight back. Secure into place with 4 screws. Straight Vertical Terminations Vent Restrictor set at 1-3/4" open (fully open), Position "A" Hampton H35E-11 Direct Vent Freestanding Gas Stove ®... -
Page 32: Dv Stove Horizontal Termination Vent Kit
Cut a 9-1/2" x 9-1/2" (241mm x 241 mm) ing system. When using snow blow- terminal. square hole on both the interior and exterior ers, make sure snow is not directed wall. towards vent termination area. Hampton H35E-11 Direct Vent Freestanding Gas Stove ®... - Page 33 8) Cut the 4" dia. flex liner to the desired size. framing out a square that the cap can be mounted on. Hint: leave an extra 12" to 16" of length, this will make the final assembly easier to work with. Hampton H35E-11 Direct Vent Freestanding Gas Stove ®...
-
Page 34: Dura-Vent Termination Kit
Wall Thimble Alternate Pipe Length *Adj.Pipe Length Horizontal Termination Caps *90 Elbow *24" Pipe Length Dura-Vent Basic Horizontal Kit # 46DVA-KHA 1 90 Elbow 1 Wall Thimble Cover 1 Horiz. Sq. Term. Cap Hampton H35E-11 Direct Vent Freestanding Gas Stove ®... -
Page 35: Horizontal Installations Rigid Vent System
Black Pipe or fittings. They may be located by examining the inside of the female ends. **Note: Riser vent is only for use in above grade terminations. Diagram 2A Hampton H35E-11 Direct Vent Freestanding Gas Stove ®... -
Page 36: Vertical Termination Rigid Vent System
You may wish to Diagram 4 relocate the appliance or to offset, as shown in Diagram 8 to avoid cutting load bearing members. Diagram 6 Hampton H35E-11 Direct Vent Freestanding Gas Stove ®... - Page 37 16/12 to 18/12 2.13 of 1-1/4". Slip the flashing under the shingles over 18/12 to 20/12 2.29 (shingles should overlap half the flashing) as per Diagram 10. over 20/12 to 21/12 2.44 Hampton H35E-11 Direct Vent Freestanding Gas Stove ®...
-
Page 38: Converting Class-A Metal Chimney To Direct Vent System
(refer to Diagram 2). Diagram 5 7) The connection between the appliance and the Retro Connector may be completed with sections of black direct vent pipe, together with an adjustable length. Hampton H35E-11 Direct Vent Freestanding Gas Stove ®... -
Page 39: Cathedral Ceilings
3) Use appropriate roof flashing. Place the flash- ing under the upper shingles and on top of the lower shingles approximately half of the flashing should be under the shingles. Hampton H35E-11 Direct Vent Freestanding Gas Stove ®... -
Page 40: Aeration Adjustment
Note: Any damage due to carboning re- sulting from improperly setting the aeration controls is NOT covered under warranty. Note: Aeration Adjustment should only be performed by an authorized FPI Installer at the time of installation or service. Hampton H35E-11 Direct Vent Freestanding Gas Stove ®... -
Page 41: Conversion Kit From Ng To Lp
Assembly to the left and lift out. 18) Check inlet and outlet pressures. Pull off the pilot cap to expose the pilot 19) Check operation of flame control. orifice. Adjust air setting on burner to a minimum of 3/8'' (9.5mm) for LP. Installer Notice: These instructions must be left with the appliance. 920-087a 06.19.20 Hampton H35E-11 Direct Vent Freestanding Gas Stove ®... -
Page 42: Backup Battery Install
5. Reverse steps 3-1 to reinstall. Panel Panel NOTE: Remove the batteries when normal operation is resumed as the heat will drain the bat- tery power rapidly. 6) Install the brick tabs (refer to Diagram 2). Hampton H35E-11 Direct Vent Freestanding Gas Stove ®... -
Page 43: Log Set Installation
8) Place the Left Top Log D)02-46 on the pin on Log B)02-56 and on top of the cutout on Log A)02-43. A)02-43 A)02-43 D)02-46 Embers Embers B)02-56 E)02-45 C)02-44 Notch Cutout Hampton H35E-11 Direct Vent Freestanding Gas Stove ®... -
Page 44: Wall Thermostat
4. Install 3 AAA batteries into the handheld remote. 5. Press the ON/OFF button on the handheld remote within 10 seconds to code the remote to the IFC. After 4 beeps are heard, handheld is paired with IFC. Hampton H35E-11 Direct Vent Freestanding Gas Stove ®... -
Page 45: Wiring Diagram Without Thermostat
See battery back up instructions in this manual The fan and or lights tacle. Do not cut or remove the will not operate during a power outage. grounding prong from this plug. RESET SWITCH Hampton H35E-11 Direct Vent Freestanding Gas Stove ®... -
Page 46: Wiring Diagram With Optional Thermostat
Wiring Diagram with Optional thermostat Thermostat( Optional) (Millivolt) RESET SWITCH Hampton H35E-11 Direct Vent Freestanding Gas Stove ®... -
Page 47: First Fire
Image 3 accent light, flame height adjustment and fan will IMPORTANT: The remote control system supplied not be available. with this appliance has several options for starting/operating the appliance, please read the Hampton H35E-11 Direct Vent Freestanding Gas Stove ®... -
Page 48: Lighting / Shutdown Procedure
Manual mode: Fan will turn on and off immediately using the remote control transmitter if the fan function is in the "on" position. Continuous Pilot/Intermittent Pilot (CPI/IPI) selection See remote control instructions for details. Hampton H35E-11 Direct Vent Freestanding Gas Stove ®... -
Page 49: Copy Of The Lighting Plate Instructions
Keep burner and control compartment clean. See installation and operating instructions accompanying appliance. Hampton H35E-11 Direct Vent Freestanding Gas Stove Part #: 919-088 - Side B ® Colours: Black on white, except for parts indicated as being Red. -
Page 50: Normal Operating Sounds Of Gas Appliances
When cleaning the logs, use a soft clean paint Top View of Pilot Flame brush as the logs are fragile and easily dam- aged. Hampton H35E-11 Direct Vent Freestanding Gas Stove ®... -
Page 51: General Vent Maintenance
Do not tear or damage the flex pipe hands while handling glass. when removing the fan. Disconnect the green ground lug wire from the fan as soon as you can reach it. Hampton H35E-11 Direct Vent Freestanding Gas Stove ®... -
Page 52: Accent Light Bulb Replacement
3. Lift off cast top and place on a soft surface. 3. Undo the top cast grill mounting bolts using 7/16" or 11mm socket. 7. Replace screen and reverse steps to reinstall. Hampton H35E-11 Direct Vent Freestanding Gas Stove ®... -
Page 53: Removing Valve
90 elbow. 19) Remove two (2) phillips head M5 screws on each side of the valve. 20) Remove valve and remove gas out 90 brass fitting. Note orientation of fitting. Hampton H35E-11 Direct Vent Freestanding Gas Stove ®... -
Page 54: Gas Maintenance
Batteries (remote handheld, remote receiver, volt models) • Flame electrode DC sparker, change as needed) • Burner orifice • Burner media (change as needed) • Thermocouple (millivolt models) • Air shutter setting • Thermopile (millivolt models) • Wiring Gas Leak Tests • Check main gas line connection to valve • Check shut off valve connections • Check connection at gas valve outlet • Check connection at main burner orifice • Check pilot fuel line at valve and at pilot assembly 920-324 09.14.20 Hampton H35E-11 Direct Vent Freestanding Gas Stove ®... -
Page 55: Main Assembly
Cast Left Charcoal Grey 743-215 Cast Left Timberline Brown 743-217 Cast Left Seaside Sand 743-221 Cast Right Charcoal Grey 743-225 Cast Right Timberline Brown 743-227 Cast Right Seaside Sand 770-066F Top Pressure Relief Plate Hampton H35E-11 Direct Vent Freestanding Gas Stove ®... -
Page 56: Burner & Log Assembly
10 Foot Extension Cord 911-027 Battery Holder W/9V Snap in 4 AA Batteries 911-242 Reset Switch 730-528 Rear Log Bracket Assembly 730-565 Firebox Baffle / Restrictor Assembly *Note: Not available as a replacement part. Hampton H35E-11 Direct Vent Freestanding Gas Stove ®... - Page 57 Hampton H35E-11 Direct Vent Freestanding Gas Stove ®...
-
Page 58: Warranty
FPI is not responsible for results or costs of workmanship of unauthorized FPI dealers or agents in the negligence of their service work. Revision Date: February 2019 Regency Gas Products Warranty Hampton H35E-11 Direct Vent Freestanding Gas Stove ®... - Page 59 Products made or provided by other manufacturers and used in conjunction with the FPI appliance without prior authorization from FPI may void this warranty. Revision Date: February 2019 Regency Gas Products Warranty Hampton H35E-11 Direct Vent Freestanding Gas Stove ®...
- Page 60 To provide the best support for your product, we request that you complete a product registration form at http://www.regency-fire.com/Customer-Care/Warranty-Registration.aspx within ninety (90) days of purchase. Revision Date: February 2019 Regency Gas Products Warranty Hampton H35E-11 Direct Vent Freestanding Gas Stove ®...
- Page 61 For fireplace care and tips and answers to most common questions please visit our Customer Care section on our Web Site. Please feel free to contact your selling dealer if you have any questions about your Regency product. Hampton H35E-11 Direct Vent Freestanding Gas Stove ®...
- Page 62 Hampton H35E-11 Direct Vent Freestanding Gas Stove ®...
- Page 63 Hampton H35E-11 Direct Vent Freestanding Gas Stove ®...
- Page 64 Dealer Name & Address: ______________________________________________ ___________________________________________________________________ Installer: ___________________________________________________________ Phone #: ___________________________________________________________ Date Installed: ______________________________________________________ Serial #: ____________________________________________________________ H35E-11 Product Video Hampton and AstroCap™ are trademarks of FPI Fireplace Products International Ltd. ® Printed in Canada © Copyright 2021, FPI Fireplace Products International Ltd. All rights reserved.
Need help?
Do you have a question about the H35E-11 and is the answer not in the manual?
Questions and answers