Table of Contents
Advertisement
Quick Links
Advertisement
Table of Contents

Related Manuals for mikroElektronika Flip&Click PIC32MZ


Summary of Contents for mikroElektronika Flip&Click PIC32MZ
- Page 1 click boards meet Arduino ™...
- Page 2 To our valued customers I want to express my thanks to you for being interested in our products and for having confidence in MikroElektronika. The primary aim of our company is to design and produce high quality electronic products and to constantly improve the performance thereof in order to better suit your needs.
-
Page 3: Table Of Contents
Table of Contents Introduction to Flip&Click 1. What’s on board? 2. Programming Flip&Click Using Flip&Click with Arduino IDE Using Flip&Click with mikroC, mikroBasic and mikroPascal 4. Red side 5. USB ports 6. White side 7. click boards ™ 8. Schematic Page 3... -
Page 4: Introduction To Flip&Click
A maker’s sidekick Flip&Click PIC32MZ is a two-sided development board with a split personality. It can be used whit chipKIT core (Arduino-style development environment), but it can also be used with mikroC, mikroBasic and mikroPascal. With more than 300 bite-sized click boards™ to pick from (and more coming out every week), anything goes. -
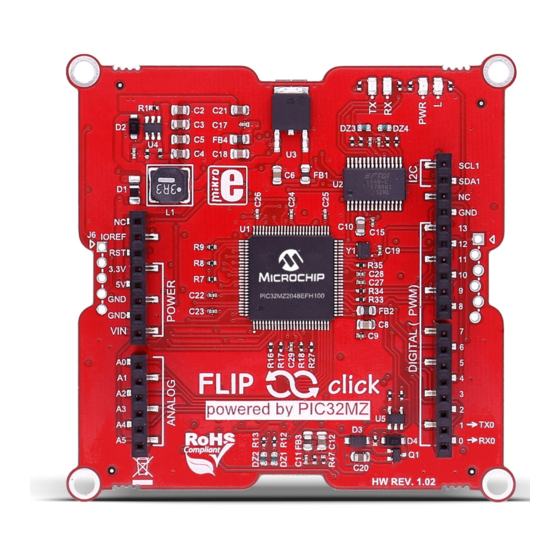
Page 5: What's On Board
1. What’s on board? 1 USB/UART port 6 24 MHz Crystal oscilator host/device USB port 7 PICkit 3 connector 8 mikroProg connector 3 Signal LEDs 4 PIC32MZ2048EFH100 MCU 5 Arduino pinout mikroBUS socket (one of 4) LED (one of 4) ™... -
Page 6: Programming Flip&Click
2. Programing Flip&Click PIC32MZ Using Flip&Click with Arduino IDE (chipKIT core) Plug in Flip&Click PIC32MZ (use the USB-UART port between C and D socket). Launch Arduino IDE From within the Arduino IDE, go to File->Preferences dialog box. Look at the text entry field called “Additional Boards Manager URLs:”... - Page 7 Close button to close the Board Manager window. Now choose a Mikroelektronika Flip N Click MZ board from the Tools -> Board menu and program your Flip&Click board! Start writing Arduino sketches.
-
Page 8: Using Flip&Click With Mikroc, Mikrobasic
Flip & click and click board ™ (see our bootloader Learn article: https://learn.mikroe.com/mikrobootloader/) combinations. All the code is available on Download your code on MCU. MikroElektronika’s GitHub channel. Keep visiting the link, as more code will be added in the future: www.github.com/mikroe/Flip_n_Click_Examples Page 8... -
Page 9: Red Side
4. Red side On the red side, Flip&Click PIC32MZ features a standard Arduino pinout, which makes it compatible with a range of Arduino shields. All the pins operate on 3.3V logic, just like with Arduino Due. DIGITAL (~PWM) POWER The four LEDs are the same as PINS PINS on Arduino Due. -
Page 10: Usb Ports
5. USB ports The USB/UART is for programming the board, in case you use the chipKIT bootloader. host/device USB port is for programming in case you use USB/UART mikroE bootloader. So, depending port on what project you are working on, you can set the board to be a USB device or a host. -
Page 11: White Side
6. White side On the white side, Flip&Click PIC32MZ has four mikroBUS sockets along with four LEDs and a reset button. The silkscreen markings clearly denote which microcontroller pins are used on each socket. The pinout provides both 3.3V and 5V power supplies. Page 11... -
Page 12: Click Boards
7. click boards ™ Buzzer, Relays, WiFi, RFid, GSM, GPS, OLED, Speech recognition — you name it, we got it! There are more than 300 click boards ™ available. Many of the chips on clicks already have their own Arduino libraries you can reuse. More and more will be coming out in the future. -
Page 13: Schematic
8. Schematic FM1 FM2 FM3 FM4 VCC-3.3V VCC-5V VCC-3.3V VCC-5V VCC-3.3V VCC-5V VCC-3.3V VCC-5V VCC-5V VCC-5V VCC-5V VCC-3.3V AN10 10nF RST4 INT4 RST3 INT3 RST1 INT1 RST2 INT2 SPI2_SS1 UART4_RX SPI2_SS0 UART3_RX SPI1_SS0 UART1_RX SPI1_SS1 UART2_RX BOOST SPI2_SCK UART4_TX SPI2_SCK UART3_TX SPI1_SCK UART1_TX... - Page 14 (including damages for loss of business profits and business information, business interruption or any other pecuniary loss) arising out of the use of this manual or product, even if MikroElektronika has been advised of the possibility of such damages.
- Page 15 If you want to learn more about our products, please visit our web site at www.mikroe.com. If you are experiencing some problems with any of our products or just need additional information, please place your ticket at helpdesk.mikroe.com. If you have any questions, comments or business proposals, do not hesitate to contact us at office@mikroe.com...
- Page 16 Mouser Electronics Authorized Distributor Click to View Pricing, Inventory, Delivery & Lifecycle Information: Mikroe MIKROE-2340...
Need help?
Do you have a question about the Flip&Click PIC32MZ and is the answer not in the manual?
Questions and answers