
Related Manuals for Kaixin MSU3


Summary of Contents for Kaixin MSU3
- Page 1 KAIXIN MSU3 Full Digital Mechanical Sector Scanning Ultrasonic Diagnostic Instruments (Vet) User’s Manual Xuzhou Kaixin Electronic Instrument Co., Ltd.
- Page 2 The qualified service personnel can repair the instrument out of warranty by themselves. But this should be agreed by Xuzhou Kaixin Electronic Instrument Co., Ltd. We will provide circuit diagrams, component part lists or other information to assist service personnel to repair those parts of our equipment that are designated by our company.
- Page 3 9. This user’s manual contains warnings for predictable dangers. Users shall also exercise care at any time to be aware of the dangers unforeseen in this manual. Kaixin shall not be liable for the damages and losses arising out of neglecting to follow the operation instructions herein described.
- Page 4 Full digital mechanical sector scanning ultrasonic diagnostic instruments (Vet) User’s Manual V1.07 Safety Cautions 1. Warning Symbols and Definitions The following warning symbols are used in this manual to indicate safety level and other important items. Please remember these symbols and understand the meaning as you read this user’s manual.
-
Page 5: Table Of Contents
Full digital mechanical sector scanning ultrasonic diagnostic instruments (Vet) User’s Manual V1.07 Contents Chapter 1 Technical Specifications ..................- 1 - 1.1 Technical parameters ....................- 1 - 1.2 Primary Functions ....................... - 1 - Chapter 2 Product appearance ....................- 2 - 2.1 Structure composition of the instrument .............. - Page 6 Full digital mechanical sector scanning ultrasonic diagnostic instruments (Vet) User’s Manual V1.07 6.4.1.1 Gain adjustment ........................ - 11 - 6.4.1.2 Dynamic range adjustment ....................- 11 - 6.4.1.3 Near field gain adjustment ....................- 12 - 6.4.1.4 Far field gain adjustment ....................- 12 - 6.4.1.5 Curve adjustment ......................
-
Page 7: Chapter 1 Technical Specifications
Full digital mechanical sector scanning ultrasonic diagnostic instruments (Vet) User’s Manual V1.07 Chapter 1 Technical Specifications 1.1 Technical parameters 1. Gray scale: 256 2. Monitor: 3.5” LCD 3. Adapter rating: 100-240V~, 1.2-0.6A, 50-60Hz (model: BJE01-40-001M) 4. Output of Adapter: DC12.8V 3.0A 5. -
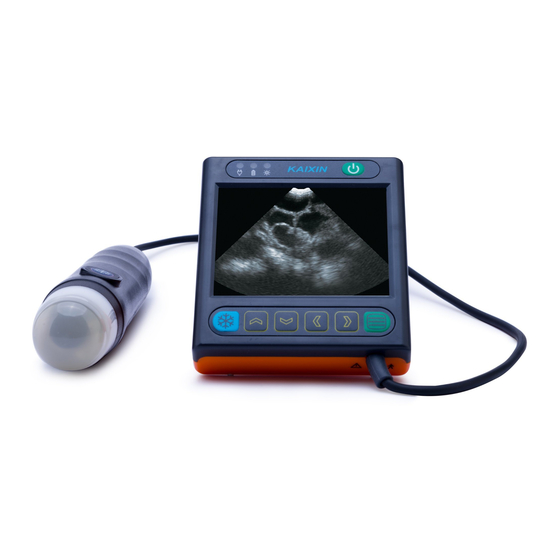
Page 8: Chapter 2 Product Appearance
User’s Manual V1.07 Chapter 2 Product appearance 2.1 Structure composition of the instrument MSU3 full digital mechanical sector scanning ultrasonic diagnostic instruments (Vet) are composed of main unit and probe, etc. 2.2 Components name Figure MSU3 main unit sketch map 2.3 Function keys description... -
Page 9: Chapter 3 System Configuration
Full digital mechanical sector scanning ultrasonic diagnostic instruments (Vet) User’s Manual V1.07 Chapter 3 System Configuration 3.1 Standard Configuration 1. Main unit 1 unit 2. 3.5MHz mechanical sector probe 1 PC 3. Power adapter 1 PC 4. Internal battery 1 PC 5. -
Page 10: Chapter 4 Operation Condition
Full digital mechanical sector scanning ultrasonic diagnostic instruments (Vet) User’s Manual V1.07 Chapter 4 Operation Condition 4.1 Power Requirements Adapter rating: 100-240V~, 1.2-0.6A, 50-60Hz Adapter model: BJE01-40-001M Output of adapter: DC12.8V 3.0A Main device rating: DC12V 3.0A Warning: AC/DC adapter is as a part of the equipment, please only use the AC/DC adapter provided by manufacturer. -
Page 11: Chapter 5 System Installation And Check
Warning: 1. When instrument works abnormally, do stop working, turn off the power and check the reason, then contacts the KAIXIN Company about it. 2. Turn off power and pull out of the plug from socket after each ultrasonic diagnostic operation. -
Page 12: System Installation
5.2 Install/Remove the battery Service personnel or operator can replace the battery. Before replacing the battery, please contact Kaixin Company; replace the battery under the guidance of Kaixin Company. Please use the battery provided by Kaixin Company. 1. Install the battery... -
Page 13: Connection To Shutter Release
EQUIPMENT the place where it is difficult to operate the disconnection device. 2. AC/DC adapter is as a part of the equipment, please only use the AC/DC adapter provided by Kaixin Company. 3. To avoid damaging power adapter or harming people by unexpected fallen, make sure the power adapter is placed on the leveled desk. -
Page 14: Inspection After Start-Up
Full digital mechanical sector scanning ultrasonic diagnostic instruments (Vet) User’s Manual V1.07 1. The temperature, humidity and atmospheric pressure shall meet the requirements of operation condition. 2. No condensation occurs. 3. No distortion, damage or contamination on system and peripheral. Clean the parts as specified in relevant sections, if the contaminant is present. -
Page 15: Chapter 6 Functional Operation
Full digital mechanical sector scanning ultrasonic diagnostic instruments (Vet) User’s Manual V1.07 Chapter 6 Functional Operation 6.1 Startup and Shutdown In shutdown status, hold down key, machine starts up, power indicator lights. In startup status, hold down key, machine shuts down, power indicator goes out. -
Page 16: Code Time Setting
Full digital mechanical sector scanning ultrasonic diagnostic instruments (Vet) User’s Manual V1.07 3. Screensaver time is “0-99” minutes, “0” stands for turn off the screensaver; 4. Press key to confirm this setting and quit system setting interface. Note: Go beyond the system setting screensaver time without pressing any key, the machine will automatically enter a black screen status. -
Page 17: Mode Switching
Full digital mechanical sector scanning ultrasonic diagnostic instruments (Vet) User’s Manual V1.07 6.3 Mode switching Diagnostic modes have 3 kinds, which respectively are B, 2B and A. B mode is default after starting up. 1. Press key to start up, the system will automatically enter into B mode; 2. -
Page 18: Near Field Gain Adjustment
Full digital mechanical sector scanning ultrasonic diagnostic instruments (Vet) User’s Manual V1.07 key to adjust the parameter within “27~90”; Press direction key 2. Press increase the value of dynamic range and press direction key to decrease the value of dynamic range so as to control the dynamic range of the entire image. 3. -
Page 19: Brightness Adjustment
Full digital mechanical sector scanning ultrasonic diagnostic instruments (Vet) User’s Manual V1.07 3. After waitting for 5-30s (“Menu Time” set in the System Set), the parameters will be saved and exit the image adjustment menu. 6.4.1.9 Brightness adjustment key to enter “Bright” item; 1. -
Page 20: Save Data In A Mode
Full digital mechanical sector scanning ultrasonic diagnostic instruments (Vet) User’s Manual V1.07 5. Press key to return to the real-time status. Note 1: The “IMAGE” folder includes “images folder” and “EXCEL” spreadsheet. Note 2: The “images folder” is automatically named by the machine current date; the image is automatically named by the machine current time. -
Page 21: Chapter 7 Fat Thickness And Lean Percentage Measurement
Full digital mechanical sector scanning ultrasonic diagnostic instruments (Vet) User’s Manual V1.07 Chapter 7 Fat thickness and Lean percentage measurement In A mode, you can measure the swine’s backfat thickness and lean percentage. Figure: A mode interface 7.1 Measurement items Name Abbreviation Unit... -
Page 22: Measurement Of Swine's Lean Percentage
Full digital mechanical sector scanning ultrasonic diagnostic instruments (Vet) User’s Manual V1.07 4. After the image is automatically frozen, or press key on the keyboard (or press the freeze on the probe) to freeze the image, the machine automatically displays four groups’ switch measurement data and the corresponding waveform;... -
Page 23: Chapter 8 System Maintenance
2. Clean the probe with sterile water to remove the residual chemicals after disinfection, because the residual chemicals may be harmful for humans. 3. Kaixin Company will not make any guarantee for the efficacy of disinfector. Please contact the appropriate manufacturer for details. - Page 24 Full digital mechanical sector scanning ultrasonic diagnostic instruments (Vet) User’s Manual V1.07 Non-glutaraldehyde-based disinfectant: Chemical Name Reagent Name Step Please refer to the Phthalaldehyde solution Cidex OPA instructions of the solution (0.55%) for details. Please follow the instructions about disinfectant concentration and disinfection method, as well as the precautions about disinfectants provided by disinfectant provider.
-
Page 25: Replace The Fuse
4. Fuse Type: T3.15AH250VAC. 8.1.3 Use and maintenance for the rechargeable battery 1. Only use the battery pack (model JQ0157-02L) provided by KaiXin Company; the battery pack can only be charged in the main unit. Service personnel or operator can replace the battery pack. - Page 26 Full digital mechanical sector scanning ultrasonic diagnostic instruments (Vet) User’s Manual V1.07 Attention: If do not intend to use the equipment within such a period of time, please remove the battery. Attention: Don’t throw away the exhausted battery anywhere; especially throw it in the fire.
-
Page 27: Replacement Of Power Supply Cord
International Trade Dept of Kaixin for support. If the following problems occur on starting up the machine, try to make corrections following the method in the table. If the problem remains unsolved, contact International Trade Dept of Kaixin for support. -
Page 28: Chapter 9 Storage And Transportation
Full digital mechanical sector scanning ultrasonic diagnostic instruments (Vet) User’s Manual V1.07 Chapter 9 Storage and Transportation Storage and Transportation 1. If the instrument is stored over 3 months, take out the instrument from the packing case, connect it to power supply for 4 hours, and then disconnect the power and place it in the case again following the direction indicated by arrows on the package. - Page 29 KAIXIN ELECTRONIC XUZHOU KAIXIN ELECTRONIC INSTRUMENT CO., LTD. Kaixin Mansion, C-01, Economic Development Zone, Xuzhou, Jiangsu, China Post Code: 221004 Tel: +86-516-87732932/87733758 Fax: +86-516-87732932/87792848 Website: http://www.kxele.com E-mail: info@kxele.com Shanghai International Holding Corp. GmbH (Europe) Eiffestrasse 80, 20537 Hamburg, Germany Information contained in this manual is subject to change without further notice.
Need help?
Do you have a question about the MSU3 and is the answer not in the manual?
Questions and answers