
Related Manuals for Kaixin K10


Summary of Contents for Kaixin K10
- Page 1 KAIXIN Ultrasonic Diagnostic Instrument (Vet) User’s Manual Xuzhou Kaixin Electronic Instrument Co., Ltd.
- Page 2 Statement Kaixin has the final explanation right of this user’s manual. Kaixin was considered responsible for the safety, reliability and performance in case of meeting all the following requirements: 1. Assembly, expansion, readjustment, improve and repair are all performed by professionals recognized by Kaixin;...
- Page 3 This user’s manual contains warnings for predictable dangers. Users shall also exercise care at any time to be aware of the dangers unforeseen in this manual. Kaixin shall not be liable for the damages and losses arising out of neglecting to follow the operation instructions herein described.
- Page 4 Ultrasonic Diagnostic Instrument (Vet) User’s Manual V1.01 Safety Cautions 1. Warning Symbols and Definitions The following warning symbols are used in this manual to indicate safety level and other important items. Please remember these symbols and understand the meaning as you read this user’s manual. These symbols convey specific meanings as detailed in the table below: Symbols &...
-
Page 5: Table Of Contents
Ultrasonic Diagnostic Instrument (Vet) User’s Manual V1.01 Contents Chapter One Technical Specifications………………………………………………………………1 Chapter Two System Outline………………………………………………………………………2 2.1 Structure composition of the instrument……………………………………………………2 2.2 Components name……………………………………………………………………………2 2.3 Parts of the probe……………………………………………………………………………2 2.4 Function keys description………………………………………………………………….. 3 Chapter Three System Configuration………………………………………………………………4 Chapter Four Operation Condition………………………………………………………………5 Chapter Five System Installation and Check…………………………………….……………6... - Page 6 Ultrasonic Diagnostic Instrument (Vet) User’s Manual V1.01 6.4.8 Frame Correlation Adjustment……………………………………………………………15 6.4.9 Image Post-process Adjustment……………………………………………………………15 6.4.10 Edge Enhancement Adjustment……………………………………………………………15 6.4.11 Focus Adjustment and Control……………………………………………………………15 6.4.12 Local Zoom and Local additive color……………………………………………………16 6.4.13 Image Left/right Reverse……………………………………………………………………16 6.4.14 Image Up/down Reverse……………………………………………………………………16 6.4.15 Color Selection……………………………………………………………………………16 6.4.16 Image Freeze/Unfreeze……………………………………………………………………16 6.5 Gain adjustment in A mode…………………………………………………………………16 6.6 Puncture guide line………………………………………………………………………16...
- Page 7 Ultrasonic Diagnostic Instrument (Vet) User’s Manual V1.01 10.3.2 Start using mobile ultrasound workstation software……………………………………31 10.3.2.1 Image view………………………………………………………………………………31 10.3.2.2 Check lists management………………………………………………………………32 10.3.2.3 Obstetric lists management……………………………………………………………33 10.3.2.4 Images and data on the workstation transfer to U disk……………………………34 10.3.2.5 Mobile album view images and reports of workstation………………………………35 10.3.2.6 Quit workstation software………………………………………………………………35 10.4 PC-side ultrasound workstation software kx_station_v………………………………………35 10.4.1 Preparation before use……………………………………………………………………35...
-
Page 8: Chapter One
Ultrasonic Diagnostic Instrument (Vet) User’s Manual V1.01 Chapter One Technical Specifications 1.1 Technical Data 1. Gray scale: 256 2. Monitor: 10.4” LED 3. Adapter ratings: 100-240V~, 1.2-0.6A, 50-60Hz 4. Output of adapter: DC12.8V 3.0A 5. Main device rating: DC12.8V 3.0A 6. -
Page 9: Structure Composition Of The Instrument
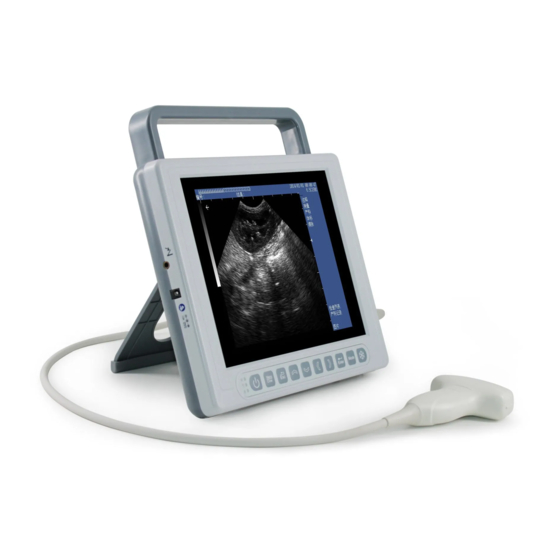
Chapter Two System Outline 2.1 Structure composition of the instrument K10 ultrasonic diagnostic instrument (Vet) is composed of main unit and probe, etc. 2.2 Components name Figure K10 main unit sketch map 2.3 Parts of the probe (Take 6.5MHz micro-convex probe for example) Figure Parts name of 6.5MHz micro-convex probe... -
Page 10: Function Keys Description
Ultrasonic Diagnostic Instrument (Vet) User’s Manual V1.01 Name Function To convert electric signal to ultrasonic signal based on principle of converse piezoelectric effect. The ultrasonic signal, after entering the human body, is (1) Acoustic lens reflected as echo wave and converted to electric signal again. The acoustic lens is on the probe surface. -
Page 11: System Configuration
Ultrasonic Diagnostic Instrument (Vet) User’s Manual V1.01 Chapter Three System Configuration 3.1 Typical configuration 1. Main unit 1 unit 2. 6.5 MHz micro-convex array probe 1 PC 3. Power adapter 1 PC 4. PC or mobile ultrasound workstation software 1 PC 3.2 Optional parts 1. -
Page 12: Operation Condition
Ultrasonic Diagnostic Instrument (Vet) User’s Manual V1.01 Chapter Four Operation Condition 4.1 Power supply Adapter ratings: 100-240V~, 1.2-0.6A, 50-60Hz Adapter model: BJE01-40-001M Output of adapter: DC12.8V 3.0A Main device rating: DC12.8V 3.0A Internal supply voltage: DC11.1V±10% 4.2 Operation Environment Ambient temperature: 10℃-40℃ Relative humidity: 30%-75% (without condensation) Atmospheric pressure: 700hPa-1060hPa. -
Page 13: System Installation And Check
Warning: 1. When instrument works abnormally, do stop working, turn off the power and check the reason, then contacts the KAIXIN Company about it. 2. Turn off power and pull out of the plug from socket after each ultrasonic diagnostic operation. -
Page 14: System Placement
The power adapter, probe, shutter release, battery and power supply cord as described in this section are replaced by operator. But these parts must be provided by KAIXIN or his authorized supplier. 5.1 System placement Please carefully read through and fully understand the safety cautions before moving and placing the system. -
Page 15: Install/Remove The Battery
Ultrasonic Diagnostic Instrument (Vet) User’s Manual V1.01 5.2.1 Ultrasonic probe connection Warning: Before connecting or using the probe, make sure that the probe, connecting cable and connector are in normal condition (free of cracks or drop). Use of defective probe may cause electric shock. 1. -
Page 16: Connect To The Mouse
1. Adapter has no switch. The isolation of the system with the MAINS used to unplug the adapter as the intended isolation means. 2. The device should be used only with power adapter provided by Kaixin Company. 3. To avoid damaging power adapter or harming people by unexpected fallen, make sure the power adapter is placed on the leveled desk. -
Page 17: System Reset
Ultrasonic Diagnostic Instrument (Vet) User’s Manual V1.01 3. Check the acoustic lens for abnormal heat when the probe is in use. This can be done by hand touching the probe to feel the temperature of the lens. 4. Check the image to ensure trouble-free display (no excessive noise or flicker). 5. -
Page 18: Startup And Shutdown
Ultrasonic Diagnostic Instrument (Vet) User’s Manual V1.01 Chapter Six Functional Operation 6.1 Startup and Shutdown In shutdown status, press key, machine starts up, power indicator lights. In startup status, hold down key, machine shuts down, power indicator goes out. Please note that when shut down the machine, the time of pressing key is a rather long than normal pressing key. -
Page 19: Image Filter Setting
Ultrasonic Diagnostic Instrument (Vet) User’s Manual V1.01 Note: Go beyond the system setting screensaver time without pressing any key, the machine will automatically enter a screensaver status. Press any key, the system will return to normal operation status. 6.2.5 Image Filter setting 1. -
Page 20: User Name Setting
Ultrasonic Diagnostic Instrument (Vet) User’s Manual V1.01 6.2.9 User name setting 1. In real-time mode, press key to enter main-menu, press direction keys to select “Preset”; 2. Press key to enter setting interface; 3. Press direction keys to select “User Name”; 4. -
Page 21: B/M Mode
Ultrasonic Diagnostic Instrument (Vet) User’s Manual V1.01 6.3.3 B/M Mode 1. In real-time mode, press key to enter B/M mode. 2. Move sample line. Press key to quit the current using status of direction keys. Press left/right direction keys or click left/right mouse to move sample line. 3. -
Page 22: Near Field Gain Adjustment
Ultrasonic Diagnostic Instrument (Vet) User’s Manual V1.01 6.4.3 Near Field Gain Adjustment In real-time mode, press key to enter main-menu, press direction keys to move cursor to “Near” in the display area. Press direction key to increase near field gain and direction key to reduce near field gain so as to control the gain in near field region. -
Page 23: Local Zoom And Local Additive Color
Ultrasonic Diagnostic Instrument (Vet) User’s Manual V1.01 6.4.12 Local Zoom and Local additive color In real time mode, press key to enter main-menu, press direction keys to move cursor to “Local Zoom” in the display area, press key, a box appears. Press direction keys or operate mouse to move the box to the position to be enlarged, the selected image be enlarged;... -
Page 24: One-Key Storage Image
Ultrasonic Diagnostic Instrument (Vet) User’s Manual V1.01 1. In frozen status, press direction keys to move cursor to “BodyMark”, press key, body marks will be showed in the image area, press direction keys to change pages; 2. Press direction keys to move to the position of desired body mark, press key to confirm the selected body mark;... -
Page 25: Read The Image
Ultrasonic Diagnostic Instrument (Vet) User’s Manual V1.01 6. Press key to quit saving status and press key to return to real-time status. Explanation: Images can be stored in the IMG folder of the U disk. In the IMG folder, up to 420 images can be stored. -
Page 26: Review The Image
Ultrasonic Diagnostic Instrument (Vet) User’s Manual V1.01 3. Press key, the image stored in the main unit will be deleted, “*” will automatically disappear; 4. Repeat the 2-3 steps, delete other images; 5. Press key to return to real-time mode. Note: If you want to delete the images in the U disk, please operate it on your computer. -
Page 27: Text Input
Ultrasonic Diagnostic Instrument (Vet) User’s Manual V1.01 Freeze the image, continuously press key three times to enter the automatic playback status; Press key to enter pause status when playing back; Press direction keys or click left/right mouse to view images frame by frame in pause status; Continuously press key three times again to return to automatic playback status. -
Page 28: Delete Check Lists
Ultrasonic Diagnostic Instrument (Vet) User’s Manual V1.01 3. Press direction keys to move cursor to “Checklist” and press key, or use the left mouse key to click “Checklist” to enter check list interface; 4. Press direction keys to view stored check lists; 5. -
Page 29: Delete Obstetric Lists
Ultrasonic Diagnostic Instrument (Vet) User’s Manual V1.01 6.13.2 Delete obstetric lists 1. In the B, B/B frozen status, press direction keys to move cursor to “OB List” and press key, or use the left mouse key to click “OB List” to enter obstetric list interface; 2. -
Page 30: Distance Measurement
Ultrasonic Diagnostic Instrument (Vet) User’s Manual V1.01 Chapter Seven General Measurement 7.1 Distance Measurement 1. In B, B/B mode, freeze desired image, press direction keys to move cursor to “Measure” position of display area; 2. Press key, the measurement methods are showed in the lower left of the screen, press direction keys to choose “1.Distance”, press key again, the cursor will show “+”;... - Page 31 Ultrasonic Diagnostic Instrument (Vet) User’s Manual V1.01 8. Press key again, repeat the steps from 3 to 7 to complete the multi-group data measurement; 9. Press key to quit the measurement status; 10. Press direction keys to choose “Clear” and press key, or use the mouse to click “Clear”...
-
Page 32: Slope/Heart Rate/Cycle Measurement
Ultrasonic Diagnostic Instrument (Vet) User’s Manual V1.01 circumference and area values are automatically displayed at the built-in mark “C: ----mm, A: 0.0mm ” on the right part of the screen; 5. Press key again, the cursor will show “+”, repeat steps 3, 4 to complete the multi-group data measurement;... -
Page 33: Chapter Eight
Ultrasonic Diagnostic Instrument (Vet) User’s Manual V1.01 Chapter Eight Obstetric Measurement 8.1 Measurement and Calculation items Obstetric tables of the system including: 1.Bovine, 2.Equine, 3.Ovine, 4.Canine, 5.Feline, 6.Goat, 7.Llama, 8. Swine, which is reference for doctor. 8.2 Measurement of Gestational Age (GA) and Estimated Date of Confinement (EDC) Follow the steps below: 1. - Page 34 Ultrasonic Diagnostic Instrument (Vet) User’s Manual V1.01 2. Press key to display the obstetric measurement animals on the lower part of the screen, “Select Animal: 1.Bovine, 2.Equine, 3.Ovine, 4.Canine, 5.Feline, 6.Goat, 7.Llama, 8. Swine”, press direction keys to select “8.Swine”, press key to confirm, measured parameters of swine are showed on the lower part of the screen;...
-
Page 35: Chapter Nine Backfat Thickness And Lean Percentage Measurement
Ultrasonic Diagnostic Instrument (Vet) User’s Manual V1.01 Chapter Nine Backfat thickness and Lean percentage measurement In A mode, you can measure the swine’s backfat thickness and lean percentage. Figure: A mode interface 9.1 Measurement items Name Abbreviation Unit Backfat thickness Loin thickness Loin Average thickness... -
Page 36: Measurement Of Swine's Lean Percentage
Ultrasonic Diagnostic Instrument (Vet) User’s Manual V1.01 Note: You can get accurate values of the three layers of backfat at the P2 site (the last rib). Many hogs have the thin third layer of backfat. As they increase in weight and age, the third layer becomes thicker and wider spread over the body. -
Page 37: Chapter Ten Ultrasound Workstation Software Instructions
Chapter Ten Ultrasound workstation software instructions The images and data stored on the K10 machine are transmitted to the ultimate consumers through a wired network or a wireless network, and the user only needs to install the ultrasonic workstation software provided by KAIXIN at the terminal. -
Page 38: Mobile Ultrasound Workstation Software Kx_Station_V
4. After the connection is successful, tap the icon “ kx_station_v” to enter ultrasound workstation interface, the wireless signal icon “ ” appears on the lower left corner of the K10 screen, then you can use the mobile ultrasound workstation software. -
Page 39: Check Lists Management
1. After the connection between K10 equipment and kx_station_v is successful, the lower left corner of K10 screen shows the wireless signal icon 2. The check lists stored inside of K10 equipment will be transferred to the ultrasound workstation: a. In the B, B/B mode, freeze the desired image;... -
Page 40: Obstetric Lists Management
1. After the connection between K10 equipment and kx_station_v is successful, the lower left corner of K10 screen shows the wireless signal icon 2. The obstetric lists stored inside of K10 equipment will be transferred to the ultrasound workstation: a. In the B, B/B mode, freeze the desired image;... -
Page 41: Images And Data On The Workstation Transfer To U Disk
Ultrasonic Diagnostic Instrument (Vet) User’s Manual V1.01 Explanation: 1.The stored obstetric lists are saved to your phone or Pad folder. View or delete the path: open Files/Local/Internal storage/kxStation “ob” folder on your phone or Pad. For example: Local /Internal Storage/kxStation/ob/2018-03-12 15: 54.db 2. -
Page 42: Mobile Album View Images And Reports Of Workstation
4. After the connection is successful, double-click the icon “ kx_station_v” to enter ultrasound workstation interface, the wireless signal icon “ ” appears on the lower left corner of the K10 screen, then you can use the PC-side ultrasound workstation software. -
Page 43: Start Using Pc-Side Ultrasound Workstation Software
4. In the Network Printer software, the default way “Direct Line to the Ultrasound”, without requiring the user to set network parameters of ultrasonic diagnostic instrument. After the connection between K10 equipment and network workstation is successful, the icon appears on the lower left corner of the K10 screen, then you can use the network workstation software Network Printer. -
Page 44: Start Using Pc-Side Network Workstation Software
1. In the Network Printer software, network setting has two ways: Direct Line to the Ultrasound, Line to the network. K10 equipment supports "Direct Line to the Ultrasound". In the “direct line to the Ultrasound” way, the computer cannot connect to the Internet network. -
Page 45: Chapter Eleven
Ultrasonic Diagnostic Instrument (Vet) User’s Manual V1.01 Chapter Eleven System Maintenance The system maintenance should be performed by the user and service engineer. Users shall be in full charge of maintenance and operation of the system after purchasing the product. Warning : The following parts of the equipment are not serviced or maintained while in use. - Page 46 Ultrasonic Diagnostic Instrument (Vet) User’s Manual V1.01 The soaking time of probe in the disinfectant is limited to the minimum time recommended by disinfectant manufacturer (e.g., Cidex OPA manufacturer recommended minimum 12 minutes). Please follow local laws and regulations to choice the disinfectants. (3) After disinfection, rinse the probe with a large number of sterile water (about 2 gallons) for at least one minute to remove the residual chemicals.
-
Page 47: Replace The Fuse
11.3 Replacement of power supply cord Before replacing the power supply cord, please contact Kaixin Company; replace the power supply cord under the guidance of Kaixin Company. Please use the power supply cord provided by Kaixin Company. 11.4 Use and maintenance for the rechargeable battery 11.4.1 Use and replacement for the rechargeable battery... -
Page 48: The Maintenance For The Rechargeable Battery Pack
Ultrasonic Diagnostic Instrument (Vet) User’s Manual V1.01 Attention: A power indicator will appear “ ” when the electric quantity is too low. Connect the main unit to external power supply and recharge the battery, or turn off the machine to recharge. 11.4.2 The maintenance for the rechargeable battery pack 1. -
Page 49: Troubleshooting
11.6 Periodic Safety Checks To ensure the system performance and safety, it must be checked after using 1 year. When check the instrument, please consult the International Trade Dept of Kaixin or its dealers, as they need to have professional technology engineers. -
Page 50: Chapter Twelve Storage And Transportation
Ultrasonic Diagnostic Instrument (Vet) User’s Manual V1.01 Chapter Twelve Storage and Transportation Storage and Transportation 1. If the instrument is stored over 3 months, take out the instrument from the packing case, connect it to power supply for 4 hours, and then disconnect the power and place it in the case again following the direction indicated by arrows on the package. - Page 51 KAIXIN ELECTRONIC XUZHOU KAIXIN ELECTRONIC INSTRUMENT CO., LTD. Kaixin Mansion, C-01. Economic Development Zone, Xuzhou, Jiangsu, China Post Code: 221004 Tel: +86-516-87732932/87733758 Fax: +86-516-87732932/87792848 Website: www.kxele.com E-mail: info@kxele.com Information contained in this manual is subject to change without further notice.
Need help?
Do you have a question about the K10 and is the answer not in the manual?
Questions and answers