Advertisement
Quick Links
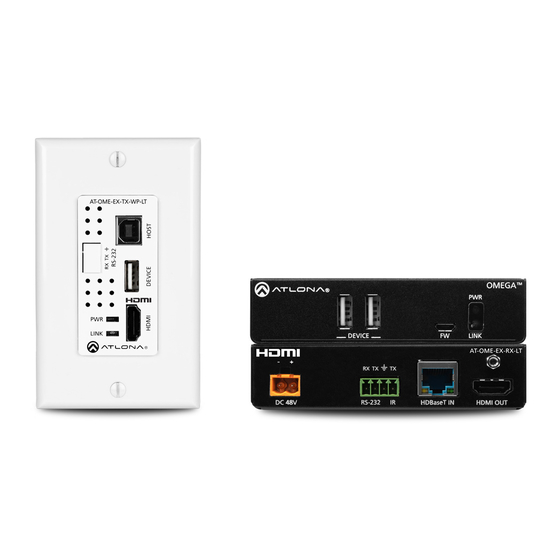
Omega
4K/UHD
™
Wallplate HDBaseT TX/RX for HDMI with USB
AT-OME-EX-WP-KIT-LT
The Atlona AT-OME-EX-WP-KIT-LT is an HDBaseT extender for video up to 4K/60 4:2:0, plus
embedded audio, control, and USB over distances up to 130 feet (40 meters) for 4K/UHD, and
up to 230 feet (70 meters) for 1080p/60 video. The transmitter features a US one-gang, wallplate
form factor, and includes interchangeable black and white wallplates and faceplates. Part of the
Omega™ Series of integration products for modern AV communications and collaboration, the
OME-EX-WP-KIT-LT is HDCP 2.2 compliant and extends RS-232 control signals. The integrated
USB extension addresses the challenge of connecting between USB devices at remote locations,
and is ideal for software video conferencing and touch or interactive displays. The transmitter
includes a USB 2.0 host interface for a PC, plus a peripheral device such as a speakerphone,
microphone, or keyboard and mouse. The receiver provides two USB interfaces for devices such
as a camera, soundbar, or display.
Package Contents
1 x AT-OME-EX-TX-WP-LT
1 x White faceplate
1 x White RS-232 cover
1 x White wallplate
1 x Black faceplate
1 x Black RS-232 cover
1 x Black wallplate
4 x Mounting screws (2x course thread, 2x fine
thread)
1 x 3-pin captive screw connector
1 x Installation Guide
IMPORTANT: Visit http://www.atlona.com/product/AT-OME-EX-WP-KIT-LT for
the latest firmware updates and User Manual.
1 x AT-OME-EX-RX-LT
1 x 4-pin captive screw connector
2 x Mounting plates
4 x Mounting screws
1 x 48 V DC power supply
1
Installation Guide
AT-OME-EX-WP-KIT-LT
Advertisement

Related Manuals for Panduit Atlona Omega AT-OME-EX-WP-KIT-LT


Summary of Contents for Panduit Atlona Omega AT-OME-EX-WP-KIT-LT
- Page 1 Installation Guide AT-OME-EX-WP-KIT-LT Omega 4K/UHD ™ Wallplate HDBaseT TX/RX for HDMI with USB AT-OME-EX-WP-KIT-LT The Atlona AT-OME-EX-WP-KIT-LT is an HDBaseT extender for video up to 4K/60 4:2:0, plus embedded audio, control, and USB over distances up to 130 feet (40 meters) for 4K/UHD, and up to 230 feet (70 meters) for 1080p/60 video.
- Page 2 Installation Guide AT-OME-EX-WP-KIT-LT AT-OME-EX-TX-WP-LT AT-OME-EX-TX-WP-LT HDBaseT LINK Front Rear HOST HDMI Connect a USB cable from the computer Connect an HDMI cable from this port to a to this port. UHD/HD source. RS-232 LINK Connect an RS-232 control system to this This LED indicator glows solid amber to port.
- Page 3 Installation Guide AT-OME-EX-WP-KIT-LT AT-OME-EX-RX-LT OMEGA OMEGA DEVICE LINK Front -OME-EX-TX-LT AT-OME-EX-RX-LT DC 48V RS-232 HDBaseT IN HDMI OUT HDMI IN Rear DEVICE Connect up to two USB 2.0 devices (e.g. mouse, keyboard, etc.) to these ports. These ports provide 2.5 W per USB device. Not used.
- Page 4 Installation Guide AT-OME-EX-WP-KIT-LT AT-OME-EX-TX-WP-LT RS-232 The AT-OME-EX-TX-WP-LT provides an RS-232 port which allows communication between a control system and an RS-232 device. This step is optional. Gently remove the RS-232 cover from the faceplate using the tip of a small regular screwdriver.
- Page 5 Installation Guide AT-OME-EX-WP-KIT-LT AT-OME-EX-RX-LT RS-232 and IR The AT-OME-EX-RX-LT provides pass-through transport of RS-232 protocol and/or IR over HDBaseT, which allows communication between a control system and an RS-232 or IR device. This step is optional. Use wire strippers to remove a portion of the cable jacket. Remove at least 3/16”...
- Page 6 Installation Guide AT-OME-EX-WP-KIT-LT Faceplate Removal and Assembly Removal of the faceplate requires that the AT-OME-EX-TX-WP-LT be disassembled from the electrical box or mud ring. A small Phillips-head screwdriver is required to remove the faceplate. Unscrew the four Phillips-head screws from the sides of the faceplate, as shown: P - L X - W X - T...
-
Page 7: Installation
Installation Guide AT-OME-EX-WP-KIT-LT Installation AT-OME-EX-TX-WP-LT Connect a category cable, from the HDBaseT OUT port on the rear of the AT-OME-EX-TX- WP-LT, to the HDBaseT IN port on the AT-OME-EX-RX-LT. Cable Max. Distance @ 4K Max. Distance @ 1080p CAT5e / CAT6 115 feet (35 meters) 200 feet (60 meters) CAT6a / CAT7... - Page 8 Installation Guide AT-OME-EX-WP-KIT-LT AT-OME-EX-TX-WP-LT LED Indicators The PWR and LINK LED indicator provide basic information on the current status of the AT- OME-EX-TX-WP-LT. Description Solid green Unit is powered. Normal operating mode. Blinking green Unit is in firmware update mode. Refer to Updating the AT- OME-EX-TX-WP-LT Firmware (page 12) for more information.
- Page 9 Installation Guide AT-OME-EX-WP-KIT-LT AT-OME-EX-RX-LT LED Indicators The PWR and LINK LED indicator provide basic information on the current status of the AT- OME-EX-RX-LT. Description Solid green AT-OME-EX-RX-LT is powered. AT-OME-EX-RX-LT is not powered. • Verify that the locking connector is securely fastened to the power receptacle.
-
Page 10: Mounting Instructions
Installation Guide AT-OME-EX-WP-KIT-LT Mounting Instructions The AT-OME-EX-RX-LT provides two mounting brackets, which can be used to attach the AT- OME-EX-RX-LT to any flat surface. Use the two enclosure screws, on the sides of the AT-OME- EX-RX-LT to attach the mounting brackets. Using a small Phillips screwdriver, remove the two screws from the left side of the enclosure. - Page 11 Installation Guide AT-OME-EX-WP-KIT-LT Repeat these steps to attach the second mounting bracket to the opposite side of the AT- OME-EX-RX-LT. Mount the AT-OME-EX-RX-LT to a flat surface using the oval-shaped holes, on each mounting bracket. If using a drywall surface, a #6 drywall screw is recommended. L I N V I C...
-
Page 12: Updating The Firmware
Installation Guide AT-OME-EX-WP-KIT-LT Updating the Firmware Requirements: • AT-OME-EX-TX-WP-LT • AT-OME-EX-RX-LT • Firmware file • Computer running Windows • USB-A to USB-B cable IMPORTANT: Both units must be connected to apply the firmware update to both the AT-OME-EX-TX-WP-LT and AT-OME-EX-RX-LT. The update process can take up to five minutes to complete. - Page 13 Installation Guide AT-OME-EX-WP-KIT-LT The USB UPDATE folder will be displayed. If this folder is not displayed, automatically, select the USB UPDATE drive from Windows Explorer. Refer to the next page for an illustration. Drag and drop the firmware file into the USB drive folder. After the firmware file has been placed in the folder, the firmware update process will begin.
- Page 14 Installation Guide AT-OME-EX-WP-KIT-LT Atlona, Inc. (“Atlona”) Limited Product Warranty Coverage Atlona warrants its products will substantially perform to their published specifications and will be free from defects in materials and workmanship under normal use, conditions and service. Under its Limited Product Warranty, Atlona, at its sole discretion, will either: •...
- Page 15 Installation Guide AT-OME-EX-WP-KIT-LT Remedy Atlona recommends that end-purchasers contact their authorized Atlona dealer or reseller from whom they purchased their products. Atlona can also be contacted directly. Visit www.atlona. com for Atlona’s contact information and hours of operation. Atlona requires that a dated sales or delivery receipt from an authorized dealer, reseller or end-purchaser is provided before Atlona extends its warranty services.
- Page 16 Installation Guide AT-OME-EX-WP-KIT-LT Exclusive Remedy To the maximum extent permitted by law, this limited product warranty and the remedies set forth above are exclusive and in lieu of all other warranties, remedies and conditions, whether oral or written, express or implied. To the maximum extent permitted by law, Atlona specifically disclaims all implied warranties, including, without limitation, warranties of merchantability and fitness for a particular purpose.
- Page 17 Installation Guide AT-OME-EX-WP-KIT-LT Notes...
- Page 18 Installation Guide AT-OME-EX-WP-KIT-LT Notes...
- Page 19 Installation Guide AT-OME-EX-WP-KIT-LT Notes...
- Page 20 Installation Guide AT-OME-EX-WP-KIT-LT English Declaration of Conformity The English version can be found under the resources tab at: https://atlona.com/product/at-ome-ex-wp-kit-lt/. Chinese Declaration of Conformity 中国RoHS合格声明 由SKU列出於: https://atlona.com/about-us/china-rohs/. ® The terms HDMI, HDMI High-Definition Multimedia Interface, and the HDMI Logo are trademarks or registered trademarks of HDMI licensing Administrator, Inc.
Need help?
Do you have a question about the Atlona Omega AT-OME-EX-WP-KIT-LT and is the answer not in the manual?
Questions and answers