ekwb EK-Quantum Vector FTW3 RTX 3080/3090 User Manual
Gpu water block
Hide thumbs
Also See for EK-Quantum Vector FTW3 RTX 3080/3090:
- User manual (15 pages) ,
- User manual (13 pages)
Table of Contents
Advertisement
Quick Links
Advertisement
Table of Contents

Related Manuals for ekwb EK-Quantum Vector FTW3 RTX 3080/3090


Summary of Contents for ekwb EK-Quantum Vector FTW3 RTX 3080/3090
- Page 1 EK-Quantum Vector FTW3 RTX 3080/3090 GPU WATER BLOCK USER GUIDE...
- Page 2 Before you start using this product, please follow these basic guidelines: Please carefully read the manual before beginning with the installation process! Please remove your graphics card from the computer to assure safest mounting process in order to prevent any possible damages to your GPU and/or graphics card circuit board (PCB).
-
Page 3: Table Of Contents
TABLE OF CONTENTS BOX CONTENTS WATER BLOCK DIMENSIONS TECHNICAL SPECIFICATIONS AND WATER BLOCK PARTS PREPARING THE GRAPHICS CARD REMOVING THE STOCK COOLER CLEANING THE PCB CUTTING AND PLACING THERMAL PADS APPLYING THERMAL COMPOUND INSTALLING THE WATER BLOCK PLACING THE BLOCK ON THE GRAPHICS CARD ATTACHING THE BLOCK TO THE GRAPHICS CARD CHECKING FOR CONTACT INSERTING THE GRAPHICS CARD INTO THE CHASSIS... -
Page 4: Box Contents
Universal Mounting Mechanism – You may not need every screw from this package. M2.5x4 AX1 Screw (20 pcs) M2.5x6 AX1 Screw (13 pcs) EK-Quantum Vector FTW3 RTX 3080/3090 M2.5x8 AX1 Screw (2 pcs) PVC Washer M2.5 (20 pcs) EK-Plug G1/4 (2 pcs) -
Page 5: Water Block Dimensions
WATER BLOCK DIMENSIONS 313.60 mm 223.13 mm 20.45 mm 194.13 mm 18.55 mm - 5 -... -
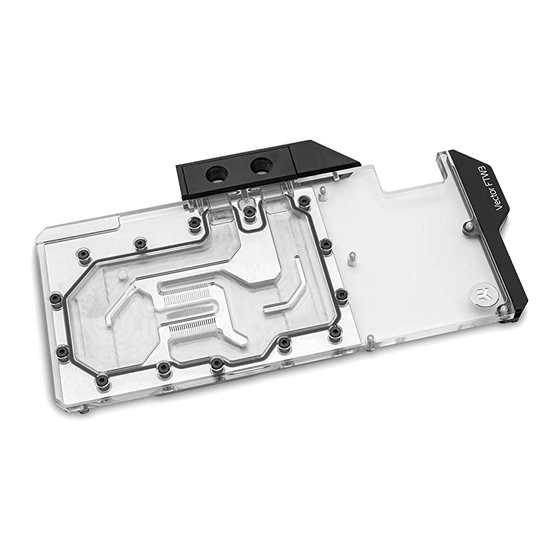
Page 6: Technical Specifications And Water Block Parts
TECHNICAL SPECIFICATIONS AND WATER BLOCK PARTS Technical Specification: - Dimensions (LxHxW): 314 x 155 x 21 mm TERMINAL COVER LED PANEL - D-RGB (Addressable RGB) Cable - Length: 500 mm TERMINAL COVER - D-RGB LED Count: Plexi – 8/Acetal – 8 - D-RGB Connector: Standard 3-Pin (+5V, Data, Blocked, Ground) TERMINAL COVER TERMINAL SCREW M4X20 DIN7984... -
Page 7: Preparing The Graphics Card
PREPARING THE GRAPHICS CARD STEP 1 REMOVING THE STOCK COOLER Place your graphics card on the flat surface and carefully remove the stock cooler. Do not forget to unplug all the LED and fan connectors. Pay attention to the following steps when installing the EK-Quantum Vector FTW3 RTX 3080/3090 water block onto your graphics card. -
Page 8: Cutting And Placing Thermal Pads
CUTTING AND PLACING THERMAL PADS STEP 1 Your GPU water block comes with thermal pads that have to be cut into smaller pieces to cover all the VRM components, such as COILs, Thermal Pad F – 1.0 mm (120 x 16 mm) MOSFETs, and drivers. -
Page 9: Applying Thermal Compound
APPLYING THERMAL COMPOUND STEP 1 Apply the enclosed EK-TIM Ectotherm thermal grease (thermal compound) on the CPU heat spreader – IHS – as shown in the image. The layer of the thermal compound must be thin and even over the entire surface of the IHS. The excessive or uneven application of thermal grease may lead to poor performance! For this Step, you will need:... -
Page 10: Attaching The Block To The Graphics Card
Then repeat Steps from the previous section to re-attach the block. In case you fail to obtain good contact, please check again or contact our support service at https://www.ekwb.com/customer-support/. - 10 -... -
Page 11: Inserting The Graphics Card Into The Chassis
INSERTING THE GRAPHICS CARD INTO THE CHASSIS Carefully lift your graphics card with the installed water block and insert it into your PC’s motherboard PCIexpress expansion slot. Please keep in mind that your graphics card is heavier than before it was equipped with the water block. -
Page 12: Connecting The D-Rgb Led Strip
CONNECTING THE D-RGB LED STRIP STEP 1 Plug the 4-pin D-RGB connector from the GPU water block to the D-RGB Header on your motherboard or controller. The LED strip will work only if the pin layout on the header is as follows: +5V, Data, Empty, Ground. -
Page 13: Testing The Loop
TESTING THE LOOP To make sure the installation of EK components was successful, we recommend you perform a 24-hour leak test. When your loop is complete and filled with coolant, connect the pump to a PSU outside of your system. Do not connect power to any of the other components. -
Page 14: Support And Service
SUPPORT AND SERVICE In case you need assistance, please contact: https://www.ekwb.com/customer-support/ EKWB d.o.o. Pod lipami 18 1218 Komenda Slovenia - EU SOCIAL MEDIA EKWaterBlocks @EKWaterBlocks ekwaterblocks EKWBofficial ekwaterblocks...
Need help?
Do you have a question about the EK-Quantum Vector FTW3 RTX 3080/3090 and is the answer not in the manual?
Questions and answers