Advertisement
Available languages
Available languages
Item # 1004181634
Model # EBTP1
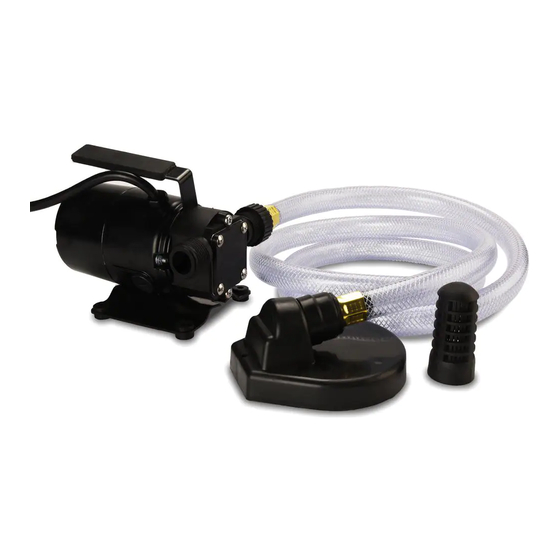
USE AND CARE GUIDE
1/10 HP NON-SUBMERSIBLE WATER TRANSFER PUMP
Questions, problems, missing parts? Before returning to the store,
call Everbilt Customer Service
8 a.m. - 5 p.m., EST, Monday-Friday
1-844-251-7446
HOMEDEPOT.COM
THANK YOU
We appreciate the trust and confidence you have placed in Everbilt through the purchase of this 1/10 HP non-submersible
transfer pump. We strive to continually create quality products designed to enhance your home. Visit us online to see our
full line of products available for your home improvement needs. Thank you for choosing Everbilt!
Advertisement
Table of Contents

Related Manuals for Everbilt EBTP1


Summary of Contents for Everbilt EBTP1
- Page 1 THANK YOU We appreciate the trust and confidence you have placed in Everbilt through the purchase of this 1/10 HP non-submersible transfer pump. We strive to continually create quality products designed to enhance your home. Visit us online to see our...
-
Page 2: Table Of Contents
Table of Contents Package Contents ............4 Table of Contents ............2 Performance ..............2 Specifications ............. 4 Safety Information ............2 Installation ..............5 Warranty ................. 3 Care and Cleaning ............7 Pre-installation .............. 4 Brush Replacement ............7 Application .............. -
Page 3: Warranty
Safety Information (continued) WARNING: Wear safety goggles at all times when IMPORTANT: For safety, this pump motor has an working with pumps. automatic resetting thermal protector that automatically turns the pump off if it becomes too hot. Overuse of this feature will damage the WARNING: When possible, connect the pump pump and will void the warranty. -
Page 4: Pre-Installation
Warranty (continued) This limited warranty is in lieu of any other warranties, express or implied, including any implied warranty of merchantability or fitness for a particular purpose, or otherwise, and of any other obligations or liability on the seller’s part. This limited warranty does not cover non-defect damage, damage caused by improper installation, or care (including but not limited to abuse, misuse, failure to provide reasonable and necessary maintenance, or dismantling or for reinstalling a repaired or replaced product or component). -
Page 5: Installation
Installation Attaching the strainer to Priming the pump suction hose □ □ Add water (approximately 1-2 teaspoons) into the Attach the suction hose (B) by pushing the male inlet or outlet to lubricate the impeller of the pump threaded end into the puddle suction strainer (C) (A). - Page 6 Installation (continued) Setting the pump on a Operating the pump sturdy base □ □ Set the pump (A) on a sturdy base (table, board, Plug the pump (A) into a GFCI outlet. etc.) to prevent it from tipping over. Make sure the □...
-
Page 7: Care And Cleaning
Care and Cleaning Do Not □ □ When the power is disconnected, inspect the pump Do not disassemble the motor housing. This motor suction screen and remove all debris, then plug the has NO repairable internal parts, and disassembly pump back into the GFCI outlet. may cause leakage or dangerous electrical wiring issues. -
Page 8: Troubleshooting
Brush Replacement (continued) Item Description Brush Brush cap NOTE: Use a flathead screwdriver or coin to remove the brush caps. NOTE: Replace both brushes at the same time to prevent uneven motor operation. Troubleshooting CAUTION: SHUT OFF POWER TO THE PUMP. Problem Possible Cause Corrective Action... - Page 9 Troubleshooting (continued) Problem Possible Cause Corrective Action The motor does not run or is humming. The impeller is stuck or jammed with Inspect the impeller area for any The pump is not running. debris. debris that may have entered. Remove as needed. Make sure impeller rotates freely.
- Page 10 Questions, problems, missing parts? Before returning to the store, call Everbilt Customer Service 8 a.m. - 5 p.m., EST, Monday-Friday 1-844-251-7446 HOMEDEPOT.COM Retain this manual for future use.
- Page 11 Nosotros agradecemos la confianza que Usted ha puesto en Everbilt por la compra de esta bomba de transferencia de agua no sumergible. Nos esforzamos continuamente para crear productos decalidad diseñados para mejorar su hogar. Visítenos en nuestra página de internet para ver la linea complete de productos disponibles para las mejoras de su hogar. ¡Gracias por escogar a Everbilt!
- Page 12 Contenido Del Paquete ..........4 Especificaciones ............5 Aplicaión ..............4 LPM de agua a un total de pies de elevación Elevación máx. 0 pies 5 pies 10 pies 20 pies 30 pies 40 pies 1004181634 1/10 HP 22,7 20,1 14,8 48 pi.
- Page 13 No desensamble la carcasa del motor. El motor NO tiene piezas internas reemplazables y, si se desensambla, puede causar peligrosos problemas de cableado eléctrico y anular la garantía. Cuando la bomba se esté secando, será EXTREMADAMENTE RUIDOSA. Esta es una señal de que debe desenchufar la bomba.
- Page 14 El fabricante garantiza al comprador original que este producto no presentará defectos en los materiales ni de fabricación durante un (1) año a partir de la fecha de compra. Esta garantía limitada se extiende SOLO al comprador original y solo cubre productos comprados como nuevos.
- Page 15 ESPECIFICACIONES Suministro de electricidad necesario 115 V, 60 HZ Rango de temperatura de los líquidos De 32 °F a 95 °F (de 0 °C a 35 °C) Se requiere circuito de derivación individual Mínimo 15 amperios Conexión de descarga Conexión de manguera para jardín de 3/4 pulg. se necesita manguera de descarga Manguera para jardín de 3/4 pulg.
- Page 16 Colocación de la bomba en una Funcionamiento de la bomba base resistente □ □ Coloque la bomba (A) a una base resistente Enchufe la bomba (A) en un tomacorriente con (mesa, tabla, etc.) para evitar que se vuelque. interruptor de circuito de falla de puesta a tierra. Asegúrese de que las mangueras estén lo más □...
- Page 17 □ □ Cuando desconecte la alimentación, inspeccione la No desensamble la carcasa del motor. Este motor malla de succión de la bomba y retire todos los NO tiene piezas internas reparables y, si se desechos, luego vuelva a enchufar la bomba al desensambla, puede causar una fuga o peligrosos tomacorriente con interruptor de circuito de falla de problemas de cableado eléctrico.
- Page 18 : En la caja de esta bomba, se incluye un conjunto de cepillos de reemplazo. Artículo Descripción Cant. Cepillo Tapa de cepillo : Retire las tapas del cepillo con un destornillador de cabeza plana o una moneda. CORTE LA ALIMENTACIÓN A LA BOMBA.
- Page 19 Problema Causa posible Acción correctiva El motor solo zumba y la El impulsor está atascado u obstruido Inspeccione el área del impulsor para detectar bomba no funciona. con desechos. cualquier residuo que pueda haber entrado. Retire los residuos según sea necesario. Asegúrese de que el impulsor rote libremente.
- Page 20 ¿Preguntas, problemas, piezas que galtan? Antes de devolverla a la tienda, llame a Servicio al Cliente de 8 a.m. a 5 p.m., EST, Lunes a Viernes 1-844-251-7446 HOMEDEPOT.COM Conserve este manual para uso futuro.
Need help?
Do you have a question about the EBTP1 and is the answer not in the manual?
Questions and answers
How do I change the impeller on a model ebtp1 pump
To change the impeller on an Everbilt EBTP1 pump:
1. Remove the impeller cover screws.
2. Remove the pump casing cover and metal spacer.
3. Inspect the O-ring and impeller.
4. If the impeller is worn out, replace it with the replacement impeller included in the box.
Normal impeller lifetime is about 360 hours.
This answer is automatically generated