FUTABA T16IZ Short Manual
Digital proportionl r/c system
Hide thumbs
Also See for T16IZ:
- Full manual (246 pages) ,
- Manual (228 pages) ,
- Setting manual (11 pages)

Related Manuals for FUTABA T16IZ


Summary of Contents for FUTABA T16IZ
- Page 1 SHORT MANUAL This manual is a simplified version. Details of the function are not described. Refer to country distributor WEB for detailed function explanation. http://www.futabausa.com (http://www.rc.futaba.co.jp/english) 1M23N36602...
-
Page 2: Table Of Contents
TABLE OF CONTENTS ●Introduction ������������������������������������������������������������������������������������������������������������������������������ 3 ●Support and Service ����������������������������������������������������������������������������������������������������������������� 3 ●Application, Export, and Modification ����������������������������������������������������������������������������������� 3 ●Compliance Information Statement ��������������������������������������������������������������������������������������� 4 ●Definitions of Symbols �������������������������������������������������������������������������������������������������������������� 5 ●Safety Precautions (do not operate without reading) ������������������������������������������������������������ 6 ●Features ������������������������������������������������������������������������������������������������������������������������������������ 9 ●Contents and Technical Specifications ������������������������������������������������������������������������������������ 9 ●Transmitter Controls ��������������������������������������������������������������������������������������������������������������... -
Page 3: Introduction
Outside North America Please contact your Futaba importer in your region of the world to assist you with any questions, problems or service needs. Please recognize that all information in this manual, and all support availability, is based upon the systems sold in North America only. -
Page 4: Compliance Information Statement
You may contact your local recycling center for information on where to return the spent battery. Please call 1-800-8-BATTERY for information on NiCd/NiMH battery recycling in your area. Futaba Corporation's involvement in this program is part of its commitment to protecting our environment and conserving natural resources. -
Page 5: Definitions Of Symbols
■ No part of this manual may be reproduced in any form without prior permission. ■ The contents of this manual are subject to change without prior notice. ■ The contents of this manual should be complete, but if there are any unclear or missing parts please contact a Futaba Service Center. -
Page 6: Safety Precautions (Do Not Operate Without Reading)
Flying Precautions WARNING Never grasp the transmitter antenna while flying. For safety, fly so that the aircraft is visible at all times. ■ The transmitter output may drop drastically. ■ Flying behind buildings or other large structures will not only Always make sure that all transmitter stick move- cause you to lose sight of the aircraft, but also degrade the RF ments operate all servos properly in the model prior to... - Page 7 Battery and Charger Handling Precautions DANGER Do not recharge a battery that is damaged, deterio- Always use the charger with the specified power rated, leaking electrolyte, or wet. supply voltage. Do not allow the charger or battery to become wet. If the battery liquid should get in your eyes, do not rub your eyes, but immediately wash them with tap wa- ■...
- Page 8 ESC, etc. ■ If left in such an environment, the plastic may be damaged. ■ Futaba is not responsible for damage sustained by combination with parts other than Futaba Genuine Parts. Use the parts ■ Since the metal parts of the case may corrode, always keep specified in the instruction manual and catalog.
-
Page 9: Features
FASSTest is a maximum 18 channels 2.4 GHz dedicated system. Color touch screen LCD T16IZ has an HVGA 4.3 inch, full-color, backlit LCD touch screen. The screen is transflective which enables both indoor and outdoor visibility. S.BUS2 system By using the S.BUS2 system multiple servos, gyros and telemetry sensors are easily installed with a minimum amount of cables. -
Page 10: Transmitter Controls
Transmitter Controls ● micro SD Slot ● Antenna ● PC Port T h e t r a n s m i t t e r c a n b e u s e d a s a game controller by c o n n e c t i n g i t t o a computer with a USB cable. - Page 11 ● Stick tension adjustment port Back ● Slide lever ● Slide lever ● Earpone Jack ● S.I/F Port (S.BUS setting) ● Trainer port ● Battery cover ● Swing Handle ● Charging Port The angle when the transmitter is placed can be changed by rotating the swing handle and tightening the screw.
-
Page 12: Transmitter's Antenna
Transmitter's Antenna As with all radio frequency transmissions, the strongest area of signal transmission is from the sides of the transmitter's antenna. As such, the antenna should not be pointed directly at the model. If your flying style creates this situation, easily move the antenna to correct this situation. Rotating antenna The antenna can be rotated 90 degrees and angles 90 degrees. -
Page 13: Transmitter Lipo Battery Lt2F2000B
Install the battery into the transmitter Click ! Click ! This 2P connector connects LT2F2000B to the transmitter. LiPo Battery Press the tab to close the battery cover. CAUTION T16IZ only supports LiPo LT2F2000B. LiFe and NiMH batteries cannot be used. - Page 14 This set is not equipped with an AC adapter for charging. Must be purchased separately. ● AC adapter USB-A type 5 V - 2 A ● Futaba option AC adapter USB type Charging connector by flipping the rubber cover on the bottom of the transmitter.
-
Page 15: How To Turn Transmitter Power On/Off
How to turn transmitter power ON/OFF When turning on the power, the T16IZ transmitter will begin emitting RF automatically after it confirms the surrounding RF conditions. The status of the transmitter is displayed by LED at the upper part of the front of a T16IZ. -
Page 16: Touch Panel
Touch Panel Tapping the settings buttons for Tap the panel with your finger to enter data. each value on the settings screen will cause value input buttons to *Plastic film is attached to the Touch Panel. Please be careful so that you don't scratch the Touch Panel appear at the top of the panel. -
Page 17: Panel Lock
1. Press the Home/Exit button for about 1 second, and the panel will then become unlocked. CAUTION The T16IZ's touch screen is very sensitive. To avoid accidentally activating it during a flight, it is suggested that it be locked. Due to the touch Panel unlock... -
Page 18: Digital Trims (T1-T4)
Digital Trims T1-T4 This transmitter is equipped with 4 digital trims. Each time you press a trim button, the trim position moves one step. If you continue pressing it, the trim position starts to move faster. In addition, when the trim position returns to the center, the tone will change. -
Page 19: Monitor Led Display
Monitor LED Display The status of the transmitter is displayed by LED at the upper part of the front of a T16IZ. Red LED Blue LED ◆ ON At startup ◆ ON Radio waves are being transmitted. ◆ Blinking Power switch is turned on with ◆... -
Page 20: Stick Mode
Stick Mode MODE1 MODE2 MODE3 MODE4 Default J2 stick J3 stick Spring → Hard Spring → Hard Spring → Soft Spring → Soft J2 stick J3 stick Spring → Free Spring → Free Spring → ACT Spring → ACT J3 stick J2 stick Ratchet →... -
Page 21: Micro Sd Card
The T16IZ transmitter model data can be stored by using any commonly found micro SD card. When T16IZ transmitter update software is released, the software is updated using an micro SD card. The T16IZ is capable of using SD and SDHC cards (SD:32MB-2GB SDHC:4GB-32GB). -
Page 22: Connector/Plug
-When an micro SD card is installed in CAUTION the T16IZ transmitter, a folder called "Fu- taba" is created. Folders called "LOG" and B e s u r e t o t u r n o f f t h e p o w e r t o "MODEL"... -
Page 23: Receiver Nomenclature
Receiver Nomenclature Before using the receiver, be sure to read the precautions listed in the following pages. Channels 1 ~ 6 Link/Mode Link/Mode Switch Channel 7 / Battery S.BUS2 : Telemetry sensor Use the small plastic screw driver that was included or S.BUS2 equipment Channel 8 or S.BUS with your receiver. - Page 24 Connection of a receiver battery WARNING Please make sure that you use a battery that can deliver enough capacity for the number and kind of servos used. Dry batteries cannot be used. DANGER Battery Switch 3.7 ~ 7.4 V Receiver A battery is connectable also with which port.
-
Page 25: Receiver's Antenna Installation
(EEPROM, etc.) Receiver's Antenna Installation The R7108SB has two antennas. In order to maximize signal reception and promote safe modeling Futaba has adopted a diversity antenna system. This allows the receiver to obtain RF signals on both antennas and fly problem-free. -
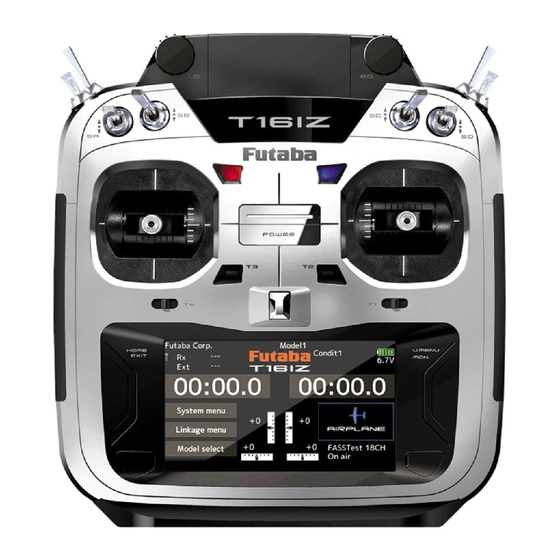
Page 26: Home Screen
Home Screen This is the Home screen and descriptions of its menus. Use your finger to operate the touch screen. Battery voltage for receivers Condition name Battery Indicator • In FASSTest/T-FHSS mode, it is • The condition name • When the low battery, the displayed. -
Page 27: Link Procedure
Link Procedure (T16IZ/R7108SB) Each transmitter has an individually assigned, unique ID code. In order to start operation, the receiver must be linked with the ID code of the transmitter to which it is being paired. Once the link is made, the ID code is stored in the receiver and no further linking is necessary unless the receiver is to be used with another transmitter. -
Page 28: After Setting
*When you use two receivers, please be sure to 9. ACT will be chosen if telemetry is used. setup a "Rx1" and "Rx2" in the "dual" mode. It is INH when not using it. *Telemetry function cannot be used for the 2nd receiver. -
Page 29: Model Id
Model ID FASSTest, T-FHSS For the sake of safety, this function does not operate the receiver if the model data of the model program settings that does not match the aircraft is used by mistake. Conventional system Model ID Rx 1 Rx 1 Operation Not Operation... - Page 30 It is extremely important to range check your models prior to each flying session. This enables you to ensure that everything is functioning as it should and to obtain maximum enjoyment from your time flying. The T16IZ transmitter incorporates a system that reduces its power output and allows you to perform such a range check.
-
Page 31: Servo Connection By Model Type
Servo Connection by Model Type The T16IZ transmitter channels are automatically assigned for optimal combination according to the type selected with the Model type function of the Linkage menu. The channel assignment (initial setting) for each model type is shown below. Connect the receiver and servos to match the type used. - Page 32 Airplane/glider ●Ailevator 1AIL 2AIL 2AIL+1FLAP 2AIL+2FLAP 2AIL+4FLAP 4AIL+2FLAP 4AIL+4FLAP Airplane Glider Airplane Glider Airplane Glider Airplane Glider Airplane Glider Airplane Glider Airplane Glider Aileron Aileron Aileron Aileron Aileron Aileron Aileron Aileron Aileron Aileron Aileron Aileron Aileron Aileron Elevator Elevator Elevator Elevator Elevator Elevator Elevator Elevator Elevator Elevator Elevator Elevator Elevator Elevator Throttle Motor Throttle...
- Page 33 Airplane/glider ●Tailless wing 2AIL 2AIL+1FLAP 2AIL+2FLAP 2AIL+4FLAP 4AIL+2FLAP 4AIL+4FLAP Airplane Glider Airplane Glider Airplane Glider Airplane Glider Airplane Glider Airplane Glider Aileron Aileron Aileron Aileron Aileron Aileron Aileron Aileron Aileron Aileron Aileron Aileron AUX4 AUX4 AUX4 AUX4 AUX4 AUX4 Aileron2 Aileron2 Aileron2 Aileron2 Aileron2 Aileron2 Throttle Motor Throttle...
- Page 34 Airplane/glider ●Tailless wing Winglet 2 Rudder 2AIL 2AIL+1FLAP 2AIL+2FLAP 2AIL+4FLAP 4AIL+2FLAP 4AIL+4FLAP Airplane Glider Airplane Glider Airplane Glider Airplane Glider Airplane Glider Airplane Glider Aileron Aileron Aileron Aileron Aileron Aileron Aileron Aileron Aileron Aileron Aileron Aileron Rudder2 Rudder2 Rudder2 Rudder2 Rudder2 Rudder2 Aileron2 Aileron2 Aileron2 Aileron2 Aileron2 Aileron2 Throttle Motor Throttle...
-
Page 35: Helicopter
Helicopter ●FASSTest 18CH / FASST MULTI / ●FASSTest 12CH FASST 7CH / S-FHSS H-4/H-4X Swash All other H-4/H-4X Swash All other Aileron Aileron Aileron Aileron Elevator Elevator Elevator Elevator Throttle Throttle Throttle Throttle Rudder Rudder Elevator2 Rudder Gyro Gyro Pitch Pitch Pitch Pitch... -
Page 36: System Menu
SYSTEM MENU The System menu sets up functions of the ● When the System menu button is tapped, the menu shown below is called up. Tap the transmitter. This does not set up any model data. function button that you want to enter. System menu functions table Display Display adjustment. -
Page 37: Model Menu(Airplane/Glider)
(Up to 8 conditions can be used) in this Model menu functions section. First use Note: The T16IZ is designed so that the airplane and glider model types can handle aircraft of the same the Model type function of the Linkage menu to wing type. -
Page 38: Model Menu(Helicopter)
MODEL MENU (Helicopter functions) This section contains information on the commands Also, add flight conditions at the Condition Select that apply to helicopters only. For instructions screen if necessary before setting the model data at on airplane, glider and multicopter, refer to the each function. -
Page 39: Model Menu(Multicopter)
CONSEQUENTIAL DAMAGES, WHETHER IN AN ACTION OF CONTRACT, TORT OR OTHERWISE, ARISING FROM, OUT OF THE USE OR INABILITY TO USE THE FONT SOFTWARE OR FROM OTHER DEALINGS IN THE FONT SOFTWARE. FUTABA CORPORATION Hobby Radio Control Business Center Sales & Marketing Department...
Need help?
Do you have a question about the T16IZ and is the answer not in the manual?
Questions and answers