Table of Contents
Advertisement
Quick Links
I
Startup
10
General startup instructions
0 0
10
Startup
10.1 General startup instructions
Prerequisites
VFC operating
modes without
speed control
402
DANGER!
Uncovered power connections.
Severe or fatal injuries from electric shock.
•
Install the touch guard according to the regulations.
•
Never start the unit if the touch guard is not installed.
The drive must be configured correctly to ensure that startup is successful. Refer to the
®
MOVIDRIVE
MDX60/61B System Manual for detailed project planning notes and an
explanation of the parameters.
®
MOVIDRIVE
MDX60/61B drive inverters are designed to be taken into operation with
the SEW motor which is adapted to the correct power level. The motor can be connected
and the drive started immediately in accordance with the section "Starting the motor"
(→ page 409) .
NOTE
The startup functions described in this section are used for setting the inverter so it can
be adapted optimally to the motor that is connected and to suit the basic conditions.
System Manual – MOVIDRIVE® MDX60B/61B Drive Inverters
Advertisement
Table of Contents

Related Manuals for SEW-Eurodrive MOVIDRIVE MDX60/61B


Summary of Contents for SEW-Eurodrive MOVIDRIVE MDX60/61B
- Page 1 Startup General startup instructions Startup 10.1 General startup instructions DANGER! Uncovered power connections. Severe or fatal injuries from electric shock. • Install the touch guard according to the regulations. • Never start the unit if the touch guard is not installed. Prerequisites The drive must be configured correctly to ensure that startup is successful.
-
Page 2: General Startup Instructions
Startup General startup instructions Inverter/motor The following tables indicate which inverter/motor combinations this applies to. combinations 400/500 V units ® MOVIDRIVE MDX60/61B in VFC mode SEW motor 0005-5A3-4 DT80K4 0008-5A3-4 DT80N4 0011-5A3-4 DT90S4 0014-5A3-4 DT90L4 0015-5A3-4 DT90L4 0022-5A3-4 DV100M4 0030-5A3-4 DV100L4 0040-5A3-4 DV112M4... -
Page 3: Preliminary Work And Resources
Startup Preliminary work and resources 10.2 Preliminary work and resources • Check the installation. DANGER! Risk of crushing if the motor starts up unintentionally. Severe or fatal injuries. • Ensure that the motor cannot start unintentionally, for example, by removing the electronics terminal block X13. -
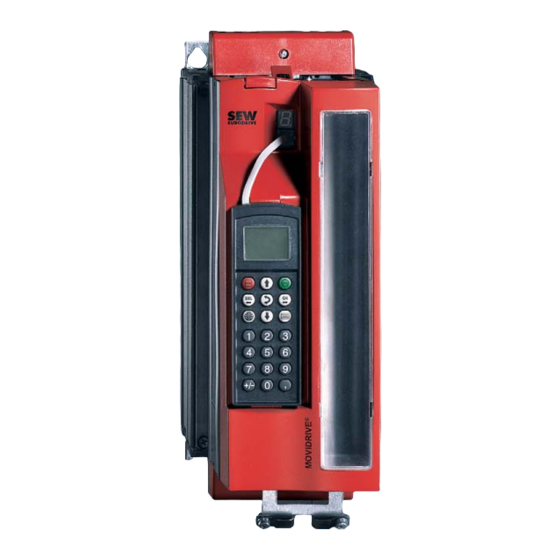
Page 4: Startup With The Dbg60B Keypad
Startup Startup with the DBG60B keypad 10.3 Startup with the DBG60B keypad General Startup with the DBG60B keypad is only possible in VFC operating modes. Startup ® information in CFC and SERVO operating modes is only possible using the MOVITOOLS software. - Page 5 Startup Startup with the DBG60B keypad Select language The figure below shows the keys for selecting the language. 60008AXX Move up to the next menu item Confirm entry Move down to the next menu item A list of languages is displayed The following text appears on the display when the keypad is switched on for the first time or after activating the start mode: EURODRIVE...
- Page 6 Startup Startup with the DBG60B keypad Startup The figure below shows the keys required for startup. 60010AXX Move up to the next menu item Confirm entry Activate the context menu Move down to the next menu item Change the menu, display mode ↔ edit mode Cancel or abort startup DE L Startup...
- Page 7 Startup Startup with the DBG60B keypad 4. Press the key to begin the startup procedure. The first STARTUP PARAMET. parameter appears. The flashing cursor under the parameter PREPARE FOR STARTUP number indicates that the keypad is in display mode. • Use the key to change to edit mode.
- Page 8 Startup Startup with the DBG60B keypad 10. Enter the rated power supply voltage (C05* for SEW motor, C05* MAINS RAT. VOLT. 1 C14* for non-SEW motor). +400.000 11. If no TF/TH is connected to X10:1/2 or X15 → Set "NO 835* RESP.
- Page 9 Startup Startup with the DBG60B keypad Starting up the Startup is performed without the speed controller first (→ Section "Startup procedure, speed controller steps 1 through 17"). Important: Set the VFC-n-CONTROL mode. C01*OPER. MODE 1 VFC1&FLYSTART VFC1-n-CONTROL VFC-n-CTRL.GRP 1. Commence startup for the speed controller by choosing "YES". C09*STARTUPn-CTRL.
- Page 10 Startup Startup with the DBG60B keypad 8. Enter the mass moment of inertia of the load (gear unit + driven C20* 10e–4kgm LOAD MOMENT OF INER- machine) extrapolated for the motor shaft. +0.200 9. Enter the time for the shortest ramp you want. C21* SHORTEST RAMP +0.100...
- Page 11 Startup Startup with the DBG60B keypad DANGER! Parameter settings incorrect due to unsuitable data sets. Severe or fatal injury. Make sure that the data set you copy is suitable for the application. • Enter parameter settings that differ from the factory setting in the parameter list (→...
-
Page 12: Startup With Pc And Movitools
Startup Startup with PC and MOVITOOLS® ® 10.4 Startup with PC and MOVITOOLS ® MOVITOOLS software version 4.20 or higher is required for startup with a PC. General • Terminal X13:1 (DIØØ "/CONTROL.INHIBIT") must receive a "0" signal! information ® •... - Page 13 Startup Startup with PC and MOVITOOLS® Startup for HTL Adhere to the following startup instructions for starting an HTL motor encoder on the ® ® motor encoders optional HIPERFACE encoder card DEH11B of MOVIDRIVE MDX61B. 60101AEN Figure 158: Settings for startup of a motor with HTL motor encoder Dropdown menu "SEW encoder type"...
-
Page 14: Starting The Motor
Startup Starting the motor 10.5 Starting the motor Analog setpoint The following table shows the signals that must be present on terminals X11:2 (AI1) and selection X13:1...X13:6 (DIØØ...DIØ5) when the "UNIPOL/FIX.SETPT" setpoint is selected (P100) to operate the drive with an analog setpoint selection. X11:2 (AI11) X13:1 (DIØØ) X13:2 (DIØ1) - Page 15 Startup Starting the motor Fixed setpoints The following table shows the signals that must be present on terminals X13:1 to X13:6 (DIØØ to DIØ5) when the "UNIPOL/FIX.SETPT" setpoint is selected (P100) to operate the drive with the fixed setpoints. X13:1 (DIØØ) X13:2 (DIØ1) X13:3 (DIØ2) X13:4 (DIØ3)
- Page 16 Startup Starting the motor Manual operation The inverter can be controlled using the DBG60B keypad with the manual operation function (Context menu → Manual operation). The 7-segment display on the unit shows "H" during manual mode. The binary inputs are then without any functions for the duration of manual operation, with the exception of X13:1 (DIØØ...
- Page 17 Startup Starting the motor Startup in "VFC & The parameter P320 Automatic adjustment is deactivated in the "VFC & Flying start" Flying start" mode. It is important that the stator resistance ( P322 IxR compensation 1) is set operating mode correctly to ensure that the flying start function is performed properly.
-
Page 18: Complete Parameter List
Startup Complete parameter list 10.6 Complete parameter list General • The parameters in the quick menu are marked by a "/" (= display on the DBG60B information keypad). • The factory setting for the parameter is highlighted in bold. Par. Name Value range Par. - Page 19 Startup Complete parameter list Name Setting range Par. Comment Selectable par. Factory setting Parameter set 1/2 SETPOINTS / RAMP GENERATORS Setpoint selection \100 Setpoint source UNIPOL/FIX.SETPT Control signal source TERMINALS Frequency scaling 0.1 .. 10 ... 65 kHz Analog input AI1 AI1 scaling -10 ...
- Page 20 Startup Complete parameter list Name Setting range Par. Comment Selectable par. Factory setting Parameter set 1/2 CONTROLLER PARAMETERS Speed control (only parameter set 1) P-gain 0.01 ... 2 ... 32 n-controller Time constant n-controller 0 ... 10 ... 300 ms Gain 0 ...
- Page 21 Startup Complete parameter list Name Setting range Par. Comment Selectable par. Factory setting Parameter set 1/2 Scaling setpoint –32.767 ... 1 ... 32.767 Actual value source Analog 1 / Analog 2 / IPOS variable IPOS actual value address 0 ... 1023 Actual scaling factor –32.767 ...
- Page 22 Startup Complete parameter list Name Setting range Par. Comment Selectable par. Factory setting Parameter set 1/2 Delay time 0 ... 1 ... 9 s n ≠ n setp Signal = “1“ if: n = n setp Current reference message Current reference value 0 ...100 ...
- Page 23 Startup Complete parameter list Name Setting range Par. Comment Selectable par. Factory setting Parameter set 1/2 Gear unit/motor monitoring Response drive vibration/warning Display fault The following error responses can be programmed: Response drive vibration/fault Rapid stop/Warning NO RESPONSE • DISPLAY FAULT • Response oil aging/warning Display fault IMM.
- Page 24 Startup Complete parameter list Name Setting range Par. Comment Selectable par. Factory setting Parameter set 1/2 Optional analog outputs Analog output AO1 ACTUAL SPEED Scaling AO1 -10 ... 0 ... 1 ... 10 The following functions can be pro- grammed: Operating mode AO1 OFF / -10 ...
- Page 25 Startup Complete parameter list Name Setting range Par. Comment Selectable par. Factory setting Parameter set 1/2 Energy-saving function Energy-saving function Ethernet configuration IP address 000.000.000.000 ... 192.168.10.x ... 223.255.255.255 Subnetwork mask 000.000.000.000 ... 255.255.255.000 ... 223.255.255.255 Standard gateway 000.000.000.000 ... 223.255.255.255 Baud rate Display value that cannot be changed (0 ...
- Page 26 Startup Complete parameter list Name Setting range Par. Comment Selectable par. Factory setting Parameter set 1/2 Modulation 4 kHz 8 kHz 860 / 861 PWM frequency 1 / 2 VFC 12 kHz 16 kHz 862 / 863 PWM fix 1/2 4 kHz PWM frequency CFC 8 kHz...
- Page 27 Startup Complete parameter list Name Setting range Par. Comment Selectable par. Factory setting Parameter set 1/2 Positioning speed CCW 0 ... 1500 ... 6000 1/min Speed feedforward -199.99 ... 0 ... 100 ... 199.99 % LINEAR SINE SQUARED BUS RAMP Ramp function JERK LIMITED ELECTRONIC CAM...
- Page 28 Startup Complete parameter list Name Setting range Par. Comment Selectable par. Factory setting Parameter set 1/2 IPOS synchronization DRAM synchronization NO / YES Synchronization phase –2 ... 0 ...2 ms System Manual – MOVIDRIVE® MDX60B/61B Drive Inverters...
Need help?
Do you have a question about the MOVIDRIVE MDX60/61B and is the answer not in the manual?
Questions and answers