Table of Contents
Advertisement
Quick Links
Installation and
Operation Manual
Retro
Congratulations on making a right choice - the choice
of high quality heaters!
Compliance with this Manual guarantees excellent quality
and maximum service life of the Grill'D brand heaters.
Read the manual carefully before commencing installation and
operating the heater. Keep it for future use.
Retro Long / Retro AISI 310 Long
Retro Short / Retro AISI 310 Short
Retro World Long / Retro World AISI 310 Long
Advertisement
Table of Contents

Related Manuals for Grill'D Soul Steel Retro Short


Summary of Contents for Grill'D Soul Steel Retro Short
- Page 1 Installation and Operation Manual Retro Congratulations on making a right choice - the choice of high quality heaters! Compliance with this Manual guarantees excellent quality and maximum service life of the Grill’D brand heaters. Read the manual carefully before commencing installation and operating the heater.
-
Page 2: Table Of Contents
CONTENTS Technical data GENERAL DATA OPERATION MANUAL 2.1. Safety measures 2.2. Heater design and operation 2.3. Heater commissioning 2.4. Combustion material 2.5. Stones for stone heater 2.6. Heater operation 2.7. Water in the bath house 2.8. Maintenance 2.9. Typical faults and troubleshooting methods INSTALLATION MANUAL 3.1. -
Page 4: General Data
1. GENERAL DATA IMPORTANT! Carefully select the heater for the volume of the room. A heater with a small heating capacity will require a more intensive heating during a longer time, which will shorten its service life. Kindly note that: When selecting a heater, it is necessary to give consideration to the material of the walls and the ceiling of the room of installation. -
Page 5: Heater Design And Operation
2.2. Heater design and operation Note: overall view and location of the heater main elements are shown in Appendix 2. Internal design and operation of the heater is shown in Appendix 3. Firebox, as well as other critical elements of the heater, is made of corrosion-resistant steel of AISI 439 grade. -
Page 6: Heater Commissioning
of burns), as well as has a greater heat capacity compared to metal cladding, which allows a longer heat retention. Stone cladding has the form of panels with a fastening system, which significantly speeds up the heater assembly and installation. IMPORTANT! Unauthorized modification of the heater is prohibited. -
Page 7: Stones For Stone Heater
The moisture contained in the firewood has a significant impact on the combustion process and the heater efficiency, hence to reduce the rate of soot formation on the walls of the chimney and the flues of the firebox, it is necessary to use the recommended fuel types. Owing to the special design, Retro has an economical fuel consumption, from 2-5 kg/h, depending on the selected operating mode, characteristics and thermal insulation of the room, combustion material quality, etc. - Page 8 5. Partly close the ash drawer after heating up of the chimney and development of stable draft (usually after burning of the first load of firewood, approximately in 30-45 minutes), leaving a gap within 10 mm. It is necessary to constantly ensure sufficient draft, while avoiding the development of excessive one (it can manifest itself as humming of the heater, too erratic flame), that leads to heating of the firebox red hot, which significantly reduces the heater service life.
-
Page 9: Water In The Bath House
IMPORTANT! Partial burning out of heat-resistant enamel is possible on the most thermally loaded • elements of the heater during operation, which is not a manufacturing defect. The firebox metal may become slightly deformed during operation, which is not a •... -
Page 10: Typical Faults And Troubleshooting Methods
The stones deteriorate with time as the heater is operated, this is why it is necessary to turn them over and reposition in the stone heater at least once a year, when the heater is frequently operated. Remove the destroyed stones and their parts from the stone heater, replace them with new ones. -
Page 11: Installation Manual
stone chips and replace them with intact stones. Replace the stones with diameters less than the ones specified in Table 1 with larger ones. 4) Fault: The operating mode of the heater cannot be controlled during wind /heater firing/ low chimney draft during operation. Smoke partly escapes through the firebox door. Smoke enters the bath house. - Page 12 Figure 1. Self-ventilation � � А А 50-100 50-100 А ɸ50-100 Естественная вентиляция Естественная вентиляция Figure 2. Mechanical exhaust ventilation � � А А 50-100 50-100 А ɸ50-100 Естественная вентиляция Естественная вентиляция 3.1.2. Bath house floor protection Figure 3. A) Concrete floor without finish. The heater can be installed on the floor without any special precautions, if the concrete thickness is not less than 60 mm.
- Page 13 Figure 3. Bath house floor protection min 60 mm min 60 mm min 60 mm min 60 mm min 60 mm min 60 mm min 60 mm min 60 mm min 60 mm B) Floor with tile finish. The materials laid under the tiles, such as: glue, waterproofing and so on, are not resistant to heat radiation of the heater.
-
Page 14: Heater Installation
Table 2. Safety distances A min. B min. C min. D min. 1000 Note: dimensions are in millimeters. Figure 4. Safety distances 3.2. Heater installation IMPORTANT! Ensure proper floor levelling for the heater installation; possible slants of the heater and the chimney are precluded. 3.2.1. - Page 15 Figure 5. Stone chimney connection Figure 6. Steel chimney connection...
-
Page 16: Warranty
IMPORTANT! Familiarize yourself with the manufacturer’s detailed instructions on the safe distances and installation of steel chimney elements, as well as the water tank. Some installation options are depicted in Figure 5. 3.2.2. Heater connection to a steel chimney that can be coupled with each other, and that form a single duct for flue gas withdrawal. Chimneys can be installed directly from the heater through the ceiling and roof, or at an angle through the wall. - Page 17 requirements of the operation manual is at least 10000 hours. Commercial usage: The service life of models with fireboxes made of AISI 439 grade steel while meeting the requirements of the operation manual is at least 3500 hours. The service life of models with fireboxes made of AISI 310 grade steel while meeting the requirements of the operation manual is at least 7000 hours.
-
Page 18: Appendix 1. Heater Dimensions
APPENDIX 1. Heater dimensions Note: dimensions are in millimeters ɸ100 ɸ100 ɸ115 Retro Short / Retro AISI 310 Short... - Page 19 835÷915 ɸ100 ɸ100 ɸ115 220÷300 Retro Long / Retro AISI 310 Long...
- Page 20 ɸ115 ɸ100 ɸ100 ɸ115 220÷300 Retro World Long / Retro World AISI 310 Long...
-
Page 21: Appendix 2. Heater Structural Elements
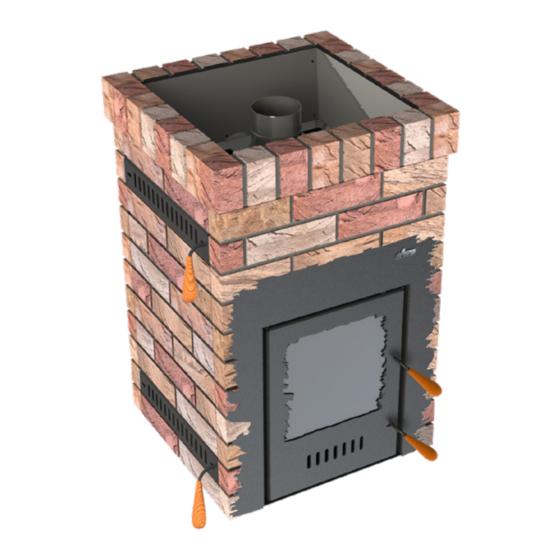
APPENDIX 2. Heater structural elements Retro 1 - Cladding panel 2 - Heater flue outlet connection 3 - Heating flue 4 - Thermal glass door Window Max Retro 5 - Air supply damper 6 - Decorative screen 7 - Outer stone heater 8 - Air duct plug 9 - Lid of the inner stone heater 10 - Filling funnel... -
Page 22: Appendix 3. Internal Design And Operation Of Heaters
APPENDIX 3. Internal design and operation of heaters Retro... - Page 23 Retro...
-
Page 24: Appendix 4. Heater Parts Installation
APPENDIX 4. Heater parts installation IMPORTANT! Before commencing assembling and installation of the heater, make sure the complete delivery package is present, as well as the installed parts, namely: funnels for water supply, lid of inner stone heater, cleanout cap, ash drawer. IMPORTANT! The works shall be carried out in an extremely careful way, eliminating the possibility of damage to the paint coating and cladding panels. - Page 25 Install the heater on the place of permanent operation. Assemble the cladding sequentially. The panels are connected to each other via hooks on some of them and grooves on others. Install the front panel, then hang one and then the other side panel on it, and finally hang the back panel.
- Page 26 х6 1) The retractable part of heating flue to be removed before starting assembly and installation of the cladding. х2 2) Install the heater on the place of permanent operation. Assemble the cladding sequentially. The panels are connected to each other via hooks on some of them and grooves on others.
- Page 29 х2 х6 х2 х6 х6 х2 х6 Bowl of the outside stone Retro Short/Long heater Install the heater flue outlet connection onto the heater terminal. Assemble and install the bowl of the outside stone heater (fixing system is included). Note: in case it was not manageable to avoid damage to stone cladding and a brick fell out of the brickwork, set...
- Page 30 8õ 4õ Retro World Long...
- Page 31 Repair mortar mixing procedure: Apply the mix into a container with clean water (assuming 40 ml of water per 200 g of dry mix), and stir mechanically until smooth (around 5 minutes). Let the mortar settle for 3-5 minutes, after that mix 2-3 minutes. The consistency of the mortar is rigid-plastic. Introduction of any foreign additives or filling matters into the mix is not allowed.
- Page 32 Telescopic part Sealant Fixed part Note: in case the surface of the flue was not properly cleaned of leftover sealant after application, then it can peel off after hardening and further heating of the furnace. Clean with a plastic brush and waste cloth. Clean after complete cooldown of the heater.
- Page 33 Retro decorative screen If necessary, the screen can be dismounted х2 х2 via unscrewing the six self-tapping screws on the side. The order will be reversed when installing: match the mounting holes on the screen õ2 and on the heating flue frame, fix with self- tapping screws.
- Page 34 Control handle Each of the four handles has a mounting thread with the help of which the handles are attached to the heater elements at an angle of 45. After installation, each handle must be locked on the reverse side with another nut (included into delivery package). When installing the handles, they to be placed over the least heated parts of the heater: do not place them in front of convection holes, metal surface and door glass.
- Page 35 Air duct system In order to arrange the system, the installed air duct plugs to be removed from the side of the heater, two pipes to be purchased and connected: lower one for supply of air for heating, upper one for discharge of hot air into the room. The parts, their lengths and design are selected based on the system arrangement project, its extension.
- Page 36 Retro Long / Retro AISI 310 Long Retro World Long / Retro World AISI 310 Long...
-
Page 37: Appendix 5. Delivery Packages
APPENDIX 5. Delivery packages Retro Short Retro Retro Long Retro Retro World Long Retro Delivery package AISI 310 Short AISI 310 Long World AISI 310 Long Heater firebox without shield Cladding panel Door Window Max Retro Ash drawer Fill funnel Grate plate Decorative screen Self-tapping screw for the... - Page 38 Notes...
- Page 39 Notes...
- Page 40 QCD mark: __________________________________________________________________ (Name, signature, stamp) Date of sale: _________________________________________________________________ (Date, Seller’s signature, store stamp) I have read and understood this manual: __________________________________________ (Buyer’s signature) IMPORTANT! The Manufacturer disclaims warranty liability in the absence of a store stamp.
Need help?
Do you have a question about the Soul Steel Retro Short and is the answer not in the manual?
Questions and answers