
Related Manuals for Loctite EQ PU20


Summary of Contents for Loctite EQ PU20
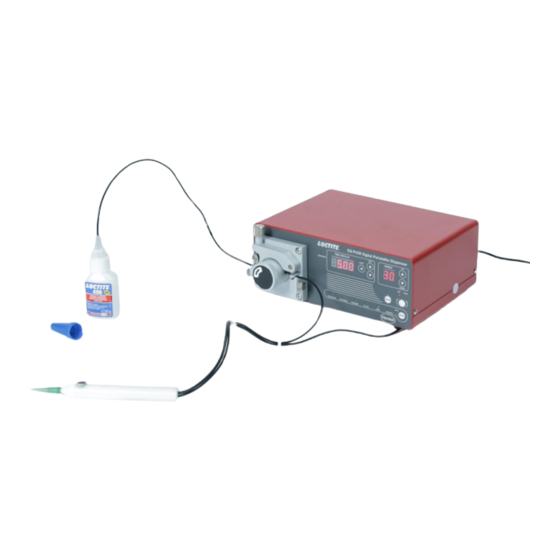
- Page 1 Operation Manual Equipment Operation Manual Loctite EQ PU20 Digital Peristaltic Dispenser Part Number: 2265279...
-
Page 2: Table Of Contents
Operation Manual Table of Contents Please Observe the Following ......................3 Emphasized Sections ..........................3 For Your Safety ............................3 Safety Precaution ..........................4 Item Supplied ............................4 Description ............................5 Overview ..............................5 Theory of Operations ...........................7 Technical Data .............................7 Setup Operation ...........................9 Environmental Conditions ........................9 Connecting the Unit ..........................9 Setup and Operation ..........................12 Mounting the feedline to the dispenser ....................12... -
Page 3: Please Observe The Following
Damage to the power cord or the housing can result in contact with live electrical parts. Check the power cord and housing before each use. If the power cord or unit is damaged, do not operate. The unit may be repaired only by a Loctite® authorized service technician. - Page 3 -... -
Page 4: Safety Precaution
Operating Manual 1.3 Safety Precaution • Make sure the dispenser is connected to a properly grounded power source before operating. • Changing of tubes must be done with the power source disconnected. • The PU20 Digital Peristaltic Dispenser should only be operated in an environment between 5 and 50 degrees Celsius with humidity under 80 percent and no visible condensation. -
Page 5: Description
Operating Manual 2 Description 2.1 Overview - Page 5 -... - Page 6 Operating Manual 1. Guide Lock 2. TIME Display 3. Timer Buttons-To adjust dispense time from 0.01 ~ 99.99 sec. Shot Button- Tigger dispensing 4. Speed Display 5. Speed adjust buttons-To adjust dispensing speed 6. Teach Button 7. CW/CCW Indicator 8. CW/CCW Button 9.
-
Page 7: Theory Of Operations
Operating Manual 2.2 Theory of Operations The EQ PU20 Digital Peristaltic Dispenser transfers low viscosity liquids by pressure displacement applied by a turning rotor against a tube carrying the material. Usually these pumps are chosen because the liquids are hazardous or difficult to work with and it is advisable to limit operator contact. - Page 8 Operating Manual - Page 8 -...
-
Page 9: Setup Operation
Operating Manual 4 Setup Operation 4.1 Environmental Conditions ⚫ No direct sunlight; no UV light! ⚫ No condensing humidity. ⚫ No splashing water. ⚫ Indoor use only. ⚫ Use in areas of an altitude up to 2000 m (6,550 ft). 4.2 Connecting the Unit Foot Switch (optional) Power Adapter... - Page 10 Operating Manual Manual Applicator Finger Switch - Page 10 -...
- Page 11 Operating Manual Caution! Switch off the unit before connecting the finger switch - Page 11 -...
-
Page 12: Setup And Operation
Operating Manual 5 Setup and Operation 5.1 Mounting the feedline to the dispenser Selector Chart Feedline Adapter Feedline 2737714 2737715 2737716 2737717 – – – 1.0x0.3 1109147 – – – 1087219 – – – 1.4x0.3 1109318 – – – 1001830 –... -
Page 13: Mounting The Feedline To The Applicator
Operating Manual 5.1.1 Tube Guide adjustment If a large diameter feedline is used and the Pump head 12 does not rotate then follow the procedure below: 1. Lift Guide Lock 1. 2. Unscrew the bigger lock grip from the smaller one. 3. -
Page 14: Dispensing Quantity Setup
Operating Manual ⚫ Cut the tube in the way described in the right graphic. ⚫ Insert the tube into the bottle. 5.4 Dispensing Quantity Setup Use Mode Button 9 to switch different operation mode. Mode descriptions: • Program – Enables different parameters to be set and saved to suit different applications •... -
Page 15: Program
Operating Manual 5.4.1 Program Dispenser running data can be saved in a defined program. When start to edit running data, operator need to defined a program number. 1. Press MODE Button 9, switch to PROGRAM. (PROGRAM indictor on) 2. Press SET, edit program number. 00~29 are available. 3. -
Page 16: Cycle Mode
Operating Manual 5.4.4 Cycle Mode In CYCLE mode, you will need to setup interval time which is the delay between the end of dispense and the Vacuum suck back. . To setup interval time: 1. Press MODE Button 9, switch to CYCLE mode. (TIME indictor on) 2. -
Page 17: Shutdown
Operating Manual In Continue Mode, operator will need to setup an interval time between end of vacuum and the next dispense cycle. Dispenser will run as TIME→INTERVAL Time→Vacuum Time→Continue Interval Time, and then run cycle by cycle. 1. Press MODE Button 9, switch to CONTINUE mode. (CONTINUE indictor on) 2. -
Page 18: Diagrams
Operating Manual 7 Diagrams XS1 START Interface - Page 18 -... -
Page 19: Accessories And Spare Parts
Order Code No. Foot Switch (Replacement) 88653 EQ PU20 Applicator Assembly 18mm (note 1) 2737712 EQ PU20 Tip Adapter 18mm x 1.6mm (note 2) 2737714 EQ PU20 Tip Adapter 18mm x 2.0mm 2737715 EQ PU20 Tip Adapter 18mm x 2.5mm 2737716 EQ PU20 Tip Adapter 18mm x 3.2mm... -
Page 20: Declaration Of Conformity
Operating Manual 9 Declaration of Conformity - Page 20 -... - Page 21 Operating Manual - Page 21 -...
-
Page 22: Equipment Warranty
Operating Manual 10 Equipment Warranty Henkel expressly warrants that all products referred to in this Instruction Manual for 2265279 EQ PU20 Digital Peristaltic Dispenser (hereafter called “Products”) shall be free from defects in materials and workmanship. Liability for Henkel shall be limited, as its option, to replacing those Products which are shown to be defective in either materials or workmanship or to credit the purchaser the amount of the purchase price thereof (plus freight and insurance charges paid therefor by the user). - Page 23 Madison Heights, MI 48071 Diadema/SP, Brazil www.loctite.com ® and ™ designate trademarks of Henkel Corporation or its affiliates. ® = registered in the U.S. and elsewhere. © Henkel Corporation, 2009. All rights reserved. Data in this operation manual is subject to change without notice.
Need help?
Do you have a question about the EQ PU20 and is the answer not in the manual?
Questions and answers