
Related Manuals for GLP YPOC 250 Color


Summary of Contents for GLP YPOC 250 Color
- Page 1 Instruction Manual from software version 1.19 (instruction version 1.42) e-mail: service@glp.de Internet: http://www.GLP.de...
- Page 2 This side is intentionally unlabelled. German Light Production (V1.42)
-
Page 3: Table Of Contents
Table of contents Description of Device ..................... 5 1.1 Safety Instructions.................... 6 Preparation and Installation .................. 7 2.1 Mounting ......................7 2.1.1 Clamps....................7 2.1.2 Mounting plate ..................8 2.2 Secure the R ................ 8 2.3 Connections ..................... 9 2.3.1 Power supply ..................9 2.3.2 DMX....................... - Page 4 DMX Channel Selection (DMX Protocol) ............. 18 Change the Lamp....................20 5.1 Safety Regulations ..................20 5.2 Realize the Lamp Change ................20 Maintenance and Cleaning the R ..........20 6.1 Safety Regulations ..................21 6.2 Circumference and Interval (rule-of-thumb)............ 21 6.3 Cleaning the Optical System ................
-
Page 5: Description Of Device
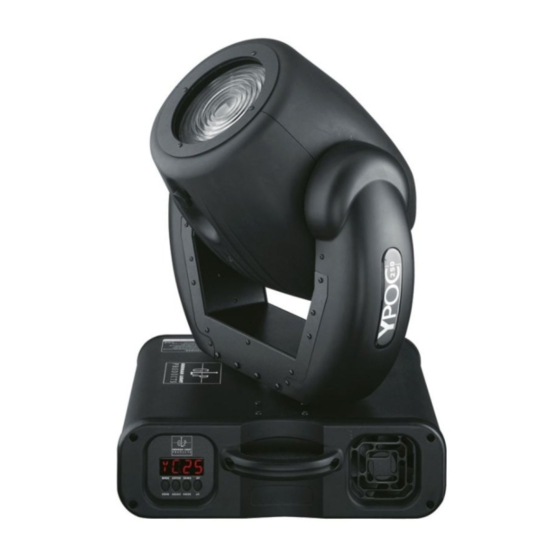
1 Description of Device 1. Moving Head 2. Arm 3. Base 4. Carrying handles 5. Up- button 6. Down- button 7. Enter- button 8. Mode- button DMX IN DMX OUT POWER 210V~ FUSE: 230V~ T3.15A @250V 250V~ LAMP: 50Hz MSD 250W 9. -
Page 6: Safety Instructions
1.1 Safety Instructions R is a High-Tech Product. To guarantee a smooth operation, it is necessary to keep following rules. The manufacturer of this device will not take responsibility of damages through disregard of the information in this manual. Warranty adjustments will be canceled. 1. -
Page 7: Preparation And Installation
2 Preparation and Installation 2.1 Mounting R is fully operational whether it hangs or is mounted to the wall. It can also be operated while standing on the floor. Keep a safety distance of 0.5 m towards any easy inflammable materials (decoration etc.). Install a safety wire that can hold at least 10 times the weight of the fixture. -
Page 8: Mounting Plate
2.1.2 Mounting plate For a permanent installation of the R you can use a optional mounting plate to fix the unit on a wall. The plate uses 4x screws M6x20. 2.2 Secure the Regardless of the rigging of the R you have to use a stipulated safety wire. -
Page 9: Connections
2.3 Connections 2.3.1 Power supply 230 Volt, 50 Hz, Connected load 500W <=> 2,2 A (blind current compensation). or 115V, 60 Hz Connected load 500W <=> 4,4 A (blind current compensation). Please see printing on the case for the right Power supply! 2.3.2 DMX DMX 512 Standard input/output. -
Page 10: The Menu Field
The Menu Field LED-Display You find the control board on the side part of the base. It allows you to make all necessary adjustments of the . With the Mode-key you get into the main menu. Afterwards you can navigate through the menu with the Up/Down-keys. -
Page 11: Adjust The Dmx- Address
(D001) 3.1 Adjust the DMX- Address Right after turning on the R you can see the current DMX- Address. If there is no DMX- Signal the display flashes. D001 For the address setting please follow this procedure: 1. Switch On the R and wait until the fixture reset has finished RESE ' is flashing in the display). -
Page 12: Lamp On/Off (Lamp)
switched as the master. All others must be "Slave" Master = OFF. Notice: The Audio function is only working when no DMX is connected. This function can work e.g. on small events or as an emergency program. (LAMP) 3.4 Lamp On/Off LAMP Use the Up/Down-keys to select lamp or lamp... -
Page 13: Invert Tilt Movement (Rtlt)
This function allows you to invert the Pan movement. Use the Up/Down-keys to select invert . Press Enter to confirm or Mode to cancel and return to the main menu. (RTLT) 3.9 Invert Tilt Movement RTLT This function allows you to invert the Tilt movement. Use the Up/Down-keys to select invert . -
Page 14: Lamp On Automatically
(LAAU) 3.10.2 Lamp On automatically LAAU This function enables to switch On the lamp automatically after switching On the fixture. Use the Up/Down-keys to select if you want to switch on the lamp automatically after switching on the fixture or if you don't want this function. -
Page 15: Display (Disp)
(DISP) 3.10.5 Display DISP Use this function to choose between different display indications. Use the Up/Down-keys to select desired function and press Enter to confirm or Mode to cancel and return to the menu. D ON Display On/Off (If you've chosen , the display will go out within 15 seconds after the last input. -
Page 16: Adjustments And Calibrations
(ADJU) 3.10.8 Adjustments and Calibrations ADJU By this function you can adjust and calibrate the positions of the different wheels and other motors. This can be necessary after a service or repair work. For this function you have to entry the fixture code. This work should be done only by authorized persons. -
Page 17: Feedback (Feed)
(FEED) 3.10.10 Feedback FEED R is provided with a automatic position correction (feedback) for the Pan and Tilt movement. Use the Up/Down-keys to select if you want to enable the feedback function or if you don't want this function. Press Enter to confirm or Mode to cancel and return to the menu. -
Page 18: Dmx Channel Selection (Dmx Protocol)
4 DMX Channel Selection (DMX Protocol) Channel Function Time and Value 1) PAN-coarse 0 .. 530° min. 2.65 s 0..255 00..FF 0..100 2) PAN-fine Low- Pos ... High- Pos + 2.1° (16 Bit) 0..255 00..FF 0..100 3) Tilt-coarse 0 .. 285° min. - Page 19 Channel Function Time and Value 12) Special No function 0..15 00..0F 0..6 Audio CMY chaser slow 16..23 10..17 7..9 Audio CMY chaser fast 24..31 18..1F 10..12 Rotating color chaser 32..63 20..3F 13..24 Color chaser C / C+1 64..79 40..4F 25..31 slow –...
-
Page 20: Change The Lamp
5 Change the Lamp For a frictionless operation pleas read this chapter carefully and follow all instructions. 5.1 Safety Regulations • Pull out the main plug! • Wait min. 20 minutes after the last operation to cool down the fixture. •... -
Page 21: Safety Regulations
A soft lint-free cloth moistened with any good glass cleaning fluid is recom- mended, under no circumstances should alcohol or solvents be used! The inside optical system should be maintained only by authorized persons. Please contact your local dealer. 6.1 Safety Regulations •... -
Page 22: Cleaning The Optical System
6.3 Cleaning the Optical System 1. Pull out the main plug! 2. Wait min. 20 minutes after the last operation to cool down the fixture. 3. Open the upper shell of the head casing by loosening the 4 Phillips screws. Two on the front side and 2 on the back side of the head. -
Page 23: Technical Specification
7 Technical Specification Power supply Power consumption 500 Watt (blind current compensated) EU- model AC 230V / 50 Hz~ Fuse protection T3,15A, 250V, 5x20 mm (fine-wire fuse) US-model AC 115V / 60 Hz~ Fuse protection T6,3A, 115V, 5x20 mm (fine-wire fuse) Lamp MSD 230V/250W, socket GY-9,5 Type 1... -
Page 24: Index
8 Index Lamp ON ............19 Audio Program ..........11 Maintenance ........... 20 Manual Drive............ 13 BGV C1 ..............7 Measures ............23 Blind current compensation........9 Menu Field ............10 Mounting ............7 Mounting plate ........... 8 Calibrations ............16 Circumference..........21 Clamps ...............7 Pan- Movement .......... - Page 25 German Light Production (V1.42)
Need help?
Do you have a question about the YPOC 250 Color and is the answer not in the manual?
Questions and answers