
Related Manuals for GLP YPOC CMY 700


Summary of Contents for GLP YPOC CMY 700
- Page 1 Instruction Manual from software version 1.53 (instruction version 1.33) e-mail: service@glp.de Internet: http://www.glp.de...
- Page 2 Notes: German Light Products GmbH (instruction version 1.33 / from software version 1.53)
-
Page 3: Table Of Contents
Table of content Description of Device....................5 1.1 Safety Instructions ....................6 Preparation and Installation ...................7 2.1 Mounting ......................7 2.1.1 Clamps ....................7 2.2 Secure the Y ................8 2.3 Connections......................8 2.3.1 Power supply..................8 2.3.2 DMX ......................8 2.4 Fuses ........................9 The Menu Field ......................9 3.1 Adjust the DMX- Address (D001) ..............10 3.2 The Test Program (TEST)................11 3.3 The Audio Program (AUDI)................11... - Page 4 5.2 Realize the Lamp Change ................27 5.3 Adjusting the lamp position (Hotspot) .............28 Optical plug-in module (inside the fixture) ............29 6.1 Safety regulations ...................29 6.2 Taking out and opening optical plug-in ............29 6.3 Changing Gobos and Color filters..............31 6.3.1 General remarks for changing Gobos and Colors .......31 6.3.2 Changing rotating Gobos ..............32 6.3.3 Changing Color filters................33 6.3.4 Changing the Effect wheel ..............34...
-
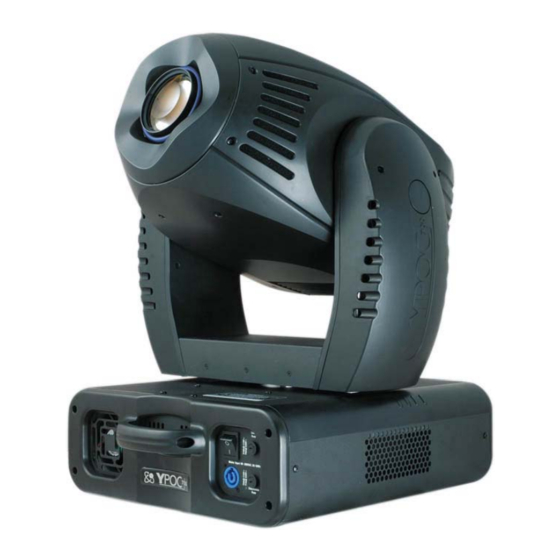
Page 5: Description Of Device
1 Description of Device 1. Moving Head 2. Carrying handles 3. LED- Display (Data entry) 4. Head locking system (single-side n 45° steps) 5. Camlock mounting system 6. Software-Update connector DM X IN DM X OU T 7. Microphone- Intensity 1 .Gr oun d 2 .Data - 3 .Data +... -
Page 6: Safety Instructions
1.1 Safety Instructions Y is a High-Tech Product. To guarantee a smooth operation, it is necessary to respect the following rules. The manufacturer of this device will not take responsibility of damages through disregard of the information in this manual. Warranty claims will be cancelled. -
Page 7: Preparation And Installation
2 Preparation and Installation 2.1 Mounting Y is fully operational whether it hangs or is mounted to the wall. It can also be operated while standing on the floor. Keep a safety distance of 0.5 m towards any easily inflammable materials (decoration etc.). Pay attention to the regulations of: BGV C1 (former VBG 70) and DIN VDE 0711-217. -
Page 8: Secure The Y P O C 7 C My
a) Camlock system: This system allows you a fast and efficient setup of clamps. Attach the two camlocks to designated position (C1 and C2) on the bottom side of the case and close the locks by turning them 90°. Verify the secure fit of the camlock system. The clamps themselves are directly attached permanently on the camlocks. -
Page 9: Fuses
The DMX- Addressing starts at the DMX- Address [001]. See also printing on the case for the right pin assignment. 2.4 Fuses Y electronic system is protected by two 5x20 mm fine-wire fuses. Lamp: 230V / T 5A Lamp: 115V / T 10A Electronic: 230V / T 1A Electronic: 115V / T 2A Attention:... -
Page 10: Adjust The Dmx- Address (D001)
A rest will be performed right after switching on the Y (the display shows the following information: GLP - Y700 - software version of the unit - YSTD for standard module/Spot setup or YCMY for CMY module/CMY setup). The reset can last up to 30 seconds. -
Page 11: The Test Program (Test)
3. Use the Up/Down-keys to select the desired address. Confirm the setting by pressing the Enter-key (the display shows OK) or press the Mode-key to cancel. The DMX- Address is stored also while switching off the 3.2 The Test Program (TEST) Test The Test-Program allows you to run a complete self test procedure of all functions. -
Page 12: Reset (Rese)
3.5 Reset (RESE) RESE Press the Enter-key to run a reset of all fixture functions (RST is shown in the display). Performing a Reset will last approximately 30 seconds. 3.6 Running time of lamp and unit (TIME) TIME With this function you can read out three different running times of the fixture. Complete running time of the fixture (non-erasable). -
Page 13: Manual Drive (Manu)
3.9.1 Manual Drive (MANU) MANU This function allows you to drive all fixture functions manually. Select the desired function with the Up/Down-keys and confirm with Enter. Now choose the desired value with the Up/Down-keys and confirm again with Enter or cancel and return to the menu with the Mode-key. Attention: The DMX cable must be disconnected during this operation. -
Page 14: Lamp Off Via Dmx (Dlof)
3.9.3 Lamp Off via DMX (DLOF) DLOF This function enables to switch off the lamp via DMX or not. Use the Up/Down-keys to select ON if you want to switch off the lamp via DMX or Off if you don't want this function. Press Enter to confirm or Mode to cancel and return to the menu. -
Page 15: Fixture Temperature (Temp)
Use this function to choose between different display indications. Use the Up/Down-keys to select desired function and press Enter to confirm or Mode to cancel and return to the menu. Display On/Off (If you've chosen off, the display will go out with- D ON in 15 seconds after the last menu input. -
Page 16: Adjustments And Calibrations (Adju)
3.9.8 Adjustments and Calibrations (ADJU) ADJU By this function you can adjust and calibrate the positions of the different effects, wheels and other motors. This can be necessary after a service or a repair work. For this function is secured by a fixture code. This work should be done by authorized persons only. -
Page 17: Automatic Position Control / Feedback (Feed)
Function Display Default Settings DMX Address D001 D001 Pan reverse RPAN Tilt reverse RTLT Automatic lamp on LAAU Lamp on via DMX DLOF Display DISP D ON Cooling fan FANS HIGH REG LOOF LOHI Feedback FEED 3.9.10 Automatic position control / Feedback (FEED) FEED Y is equipped with a automatic position correction (feedback) for the Pan and Tilt movement. -
Page 18: Dmx Channel Selection (Dmx Protocol)
After the error "IG E" respectively "LAER" it is not anymore possible the start the lamp via Shutter = 255. Nevertheless if a renewed ignition attempt is desired, first run a Reset (at the fixture or via DMX). Afterwards you can try again to strike the lamp. - Page 19 Channel Function Time and Value Color 6 / Color 7 (fast) 26..27 1A..1B 10.4 Color 7 Green 206 (fast) 28..29 1C..1D 11.2 Color 7 / Color 8 (fast) 30..31 1E..1F 12.0 Color 8 Purple 509 (fast) 32..33 20..21 12.7 Color 8 / Color 9 (fast) 34..35 22..23 13.5...
- Page 20 Channel Function Time and Value Audio gobo chase, slow each 4 sound impulse new gobo Audio gobo chase, fast each sound impulse new gobo Gobo Position 0 ... 540° 0..127 00..7F 0..49 10) Gobo 1 Posi./Rot Gobo Rotation STOP 128..129 80..81 Gobo Rotation, slow-fast, CW min.
- Page 21 Channel Function Time and Value Prism position 0 ... 540° 6..129 06..7F 0..50 Prism rotation stop 130..191 80..BF 51..75 Prism rotation, slow-fast, CW min. 1,6 turns/h 192..253 C0..FD 76..100 Prism rotation, fast-slow, CCW max. 4,4 turns/sec. Audio prism rotation, slow each 4 sound impulse new prism...
- Page 22 Channel Function Time and Value 23) Move- No movement ment Movement Size Phase 0° 01..01 01..01 90° 02..03 02..03 180° 04..05 04..05 270° 06..07 06..07 0° 08..09 08..09 90° 10..11 0A..0B 180° 12..13 0C..0D 270° 14..15 0E..0F 0° 16..17 11..11 90°...
- Page 23 Channel Function Time and Value 1) PAN- 0 .. 530° min. 2.65 s 0..255 00..FF 0..100 coarse 2) PAN-fine High- Pos ... High- Pos + 2.1° (16 Bit) 0..255 00..FF 0..100 3) Tilt-coarse 0 .. 285° min. 1.8 s 0..255 00..FF 0..100 4) Tilt-fine...
- Page 24 Channel Function Time and Value 11/12) Yellow Color mixing system - Yellow 0 - 100% 0..255 00..FF 0..100 16 Bit 13) Gobo 1 Gobo 1 (open, fast) Chaser from gobo to 0..7 0..7 0..2.9 gobo max. 100 BPM Gobo 2 (fast) 8..15 8..F 3..5.9...
- Page 25 Channel Function Time and Value Gobo rotation, slow-fast, CW min. 1,4 turns/h 130..191 82..BF 51..75 Gobo rotation, fast-slow, CCW max. 1.0 turns/sec. 192..253 C0..FD 76..98 Audio gobo chase, slow each 4 sound impulse new gobo Audio gobo chase, fast each sound impulse new gobo 17) Shutter Shutter closed...
- Page 26 Channel Function Time and Value Color1-Chaser C / C+1 0.7 BPS ... 2.3 BPS 112..127 70..7F 44..50 slow – fast => 1.43 s ... 0.43 s Color1-Chaser C / C+2 0.7 BPS ... 2.0 BPS 128..143 80..8F 51..56 slow – fast =>...
-
Page 27: Changing The Lamp
Lamp ON Shutter open Channel 17 240..255 F0..FF 94..100 Special channel Lamp OFF 1 Channel 31 and 230..249 6E..9F 92..97 Lamp OFF 1 if Shutter channel = closed DMX ´000` Channel 17 (min. 3 sec.) Special channel Lamp OFF 2 Channel 31 and Lamp OFF 2 if Shutter channel = DMX ´240..253`... -
Page 28: Adjusting The Lamp Position (Hotspot)
3. Open the four quick release fasteners (1, 2, 3 and 4) of the backside lamp sheet and remove it carefully. 4. Remove the old or broken lamp from the two sidewise lamp clip fasteners. Attention: The glass bulb of the lamp can splinter. For that reason remove the lamp with safety gloves or some cloth. -
Page 29: Optical Plug-In Module (Inside The Fixture)
6 Optical plug-in module (inside the fixture) Y is equipped with an optical plug-in which can removed completely. This allows you a very comfortable and fast way to do all types of services inside the fixture like as changing gobos and colors, cleaning or maintenance. Please apply for this the following procedure: 6.1 Safety regulations •... - Page 30 4) Open the two locking screws one on the left and one on the right side by 1-2 turns (it is not necessary to remove them completely). Press them inwards to open the lateral locking and pull out the plug-in carefully. The plug-in is lead by two lateral tracks.
-
Page 31: Changing Gobos And Color Filters
11) Connect the "Data Bus" cable with the corresponding socket again. 12) Close the Y in reverse order. 6.3 Changing Gobos and Color filters The is Y equipped both with Aluminum- and Glass gobos (outside diameter 27 mm, image size 23 mm). When using customized Gobos like company logos and writing the recommended image size is 20 mm. -
Page 32: Changing Rotating Gobos
Attention: Customized Gobos like company logos and writing do also have a right reading assembly direction so that they are not right-left- reversed. The readably side must in any case mounted towards the lamp. To have here also the reflecting side at the same moment the Gobos must be fabricated accordingly. -
Page 33: Changing Color Filters
4) Pull the Gobo holder back into the central spring-holder jig in the middle of the Gobo wheel and snap it in. You can open the central spring- holder with a bent screwdriver through a hole from the opposite side of the wheel. -
Page 34: Changing The Effect Wheel
OPEN 29.8mm Mag net Gobo wheel 1 with rotating Gobos Gobo wheel 2 with fixed Gobos 6.3.4 Changing the Effect wheel 1) The fixture is open as described above. It is now not necessary to take out the optical plug-in module. 2) Open the knurled screw in the middle of the module which is screwed in the inclined aluminum bar. - Page 35 6) Both wheels can now gently be removed. Attention: Don't strip the wheels off sideways as the magnet could get detached and could get stuck in the arm! 7) Change Effect wheel as desired and close the module in reverse order again.
- Page 36 Effect wheel insertion and spares: 25-022-1102 STANDARD 25-022-1094 SPARE 25-022-1096 SPARE 25-022-1098 SPARE 25-022-1095 SPARE German Light Products GmbH (instruction version 1.33 / from software version 1.53)
-
Page 37: Maintaining And Cleaning The
7 Maintaining and Cleaning the It is absolutely essential that the fixture is kept clean and that dust, dirt and smoke-fluid residues must not built up on or within the fixture. Otherwise the fixture's light-output will be significantly reduced or damages can occur. Regular cleaning will not only ensure the maximum light-output, but will also allow the fixture to function reliable throughout its life. -
Page 38: Cleaning The Optical System
Attention: • Never let optical parts come into contact with oil or fat. • Before running the fixture wait until all parts are dried up. • Clean lenses only with dry clothes. Never use water or other cleaners. • Change lenses if they look milky. For that please contact your local dealer. - Page 39 Gobos outside diameter 27 mm, picture size max. 23 mm. For customized Gobos like company logos and writing the recommended image size is 20 mm. Gobo wheel 2: 9 fixed aluminum Gobos plus "open" (not exchangeable) CMY Color mixing unit (8/16 Bit) Cyan color filter 0 - 100% Magenta color filter 0 - 100% Yellow color filter 0 - 100%...
-
Page 40: Index
9 Index Installation ............7 instruction version ..........1 Audio..............11 Internet .............. 1 BGV C1.............. 7 Lamp adjustment..........28 Lampe OFF..........22, 27 Lampe ON ..........22, 27 Calibrations............16 Camlock system ..........8 Changing Colors..........33 Maintenance............ 37 Changing Effect wheel ........ - Page 41 German Light Products GmbH (instruction version 1.33 / from software version 1.53)
Need help?
Do you have a question about the YPOC CMY 700 and is the answer not in the manual?
Questions and answers