Table of Contents
Advertisement
Quick Links
Advertisement
Table of Contents

Related Manuals for GLP JDC2 IP


Summary of Contents for GLP JDC2 IP
- Page 1 JDC2 IP Document revision: 20241001-03 Fixture software version : v.6.0.1...
-
Page 2: Document Revisions
GLP® JDC2 IP User Manual © 2024 German Light Products GmbH. All rights reserved. The marks ‘GLP’ and ‘German Light Products’ are trademarks registered as the property of German Light Products GmbH in Germany, in the United States of America and in other countries. -
Page 3: Table Of Contents
Table of Contents Safety ............................5 Key to symbols ......................5 GLP Service and Support ..................6 Avoiding damage to the fixture ..............7 JDC2 IP overview ......................8 Features ..........................9 Controlling the fixture ................... 9 Control options ......................9 Control Modes ...................... - Page 4 Load Setting Preset....................32 Information ....................... 33 Manual Control ....................... 33 Manual DMX ......................33 Service .......................... 33 Advanced Service ....................34 Load Factory Defaults ..................34 Factory Menu ......................34 Control panel ........................36 Default information screen ................36 Using the control panel ..................
-
Page 5: Safety
If you have any doubts or questions about how to use the GLP® JDC2 IP lighting fixture safely, contact your GLP supplier for assistance. Your GLP supplier will be happy to help. -
Page 6: Glp Service And Support
DMX commands available in the fixture. This information is also included in the User Manual. The JDC2 IP is intended for use by experienced professionals with the knowledge and skills to set up, operate, and maintain high-powered, remotely controlled lighting equipment safely and efficiently. -
Page 7: Avoiding Damage To The Fixture
German Light Products® JDC2 IP Avoiding damage to the fixture The Quick Start and Safety Manual contains important information that is intended to help you avoid possible damage to the fixture from other light sources, during transportation, etc. Read that information before storing, transporting or using the fixture. -
Page 8: Jdc2 Ip Overview
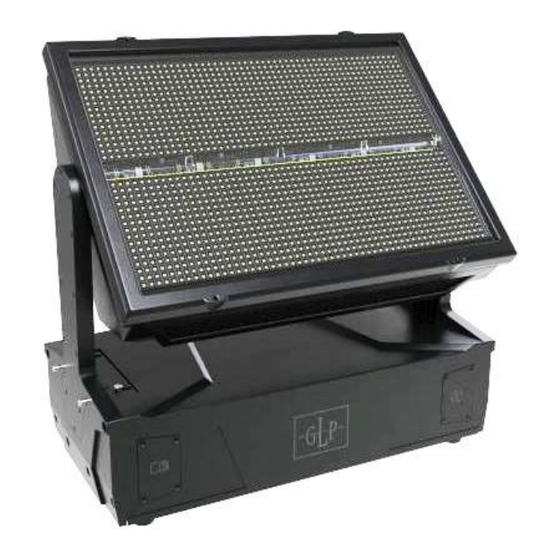
JDC2 IP 2. JDC2 IP overview Figure 1. JDC2 IP overview A - Head H – Safety cable attachment point (underside of base) B – Cooling vent I – Control panel with backlit display C – Tilt lock J – NFC Sensor (behind display) D –... -
Page 9: Features
NDI video streams from live video or content from a media server. Controlling the fixture The GLP JDC2 IP is controlled as if it was a number of separate modules: The main White Strobe Module (BEAM) which gives you control over the White Strobe LED Line. -
Page 10: Control Modes
JDC2 IP Control Modes You can choose from five different DMX control modes. M1 - Dual Strobe (CH24) a.) White Strobe Main Module (BEAM) with global fixture control b.) RGB Strobe Main Module (PLATE): Dimmer, Shutter, Duration, Intensity Effect, RGB-Colormix c.) Sub Module (2nd Layer Fixture): Submaster Dimmer, RGB+W-Colormix... - Page 11 German Light Products® JDC2 IP M3 - Segment 12-12 (CH91) a.) White Strobe Main Module (BEAM) with PatternFX and global fixture control b.) RGB Strobe Main Module (PLATE): Dimmer, Shutter, Duration, Intensity Effect, RGB-Colormix, DigiFX, NDI c.) Sub Module Beam (2nd Layer Fixture): Submaster Dimmer Beam with 12x Beam Segment Control d.) Sub Module Plate (2nd Layer Fixture): Submaster Dimmer Plate with 12x Plate...
- Page 12 Segment Control M5 - JDC1 Spix Patch (CH68) This mode allows the patch of a JDC2 IP with the same DMX footprint as a JDC1 in CH68 SPix Mode. Using the same DMX footprint a JDC1 → JDC2 IP Fixture swap is possible...
-
Page 13: Powering On
(tilt center). Tilt The JDC2 IP has 16-bit motorized tilt movement with coarse and fine control channels. Direction of tilt movement With the fixture standing on the ground, increasing the tilt DMX value moves the head towards the front (the side away from the display/connectors) from its home position. -
Page 14: Intensity Effects (Shutter Mode)
White Point The white point is the default white that is obtained when the shutter is opened. The JDC2 IP offers a choice of fixed white points. For details of setting the white point, see ‘White point’ on page 27. -
Page 15: Fx Pattern Select
German Light Products® JDC2 IP Note: The Mix Priority channel lets you decide how the output of the Main module and the Sub module (pattern or pixel mapping) should be merged. FX Pattern Select The dynamic patterns offers multiple pattern steps for individual step selection or continuous step-chasers. -
Page 16: Digifx And Ndi Control
JDC2 IP ● Main + Sub additive – The Sub module color value is added to the Main module color value. The fixture uses the sum of both values. ● Main - Sub subtractive – The Sub module color value is subtracted from the Main module color value. - Page 17 JDC2 IP DigiFX operation The internal DigiFX function of the GLP JDC2 offers a completely new way to generate breathtaking effects in a short time. In order to offer you the best possible performance and easy control, the DigiFX are sorted into different quality categories.
- Page 18 JDC2 IP • If you want each fixture to show part of the larger DigiFX pattern, set the fixture capture area to a grid of individual positions. The DigiFX positioning can be set from -100% ← 0% (Default position) → +100%.
- Page 19 If higher resolution, very dynamic content, a high amount of devices or low latency is needed, please add a GLP FVP Decoder to the system (in development. If needed please contact your local GLP Support) FVP Decoder is in development and will be available soon.
- Page 20 NDI Stream 4 GLP-JDC2-4 up to 640x480px (VGA)* For higher resolution the system can be run in combination with a GLP FVP Decoder (under development). For renaming an NDI Stream Name you can use the free software tool “NDI Tool”...
- Page 21 German Light Products® JDC2 IP Position Capture frame is in the lop left corner of the NDI Stream 100% Capture frame is in the lop right corner of the NDI Stream Capture frame is in the center of the NDI Stream (DEFAULT)
- Page 22 JDC2 IP The slices are then placed in segments next to each other arranged like this. By using the X-Y Position Channels the user can select the row ( X ) and the column ( Y ) as follow:...
- Page 23 German Light Products® JDC2 IP • See also “Flex positioning option” and “Fix positioning option” on the next page. c.) Absolute capture frame position Selecting a NDI Stream with absolute capture frame position, will place the capture frame in a defined individual pixel position. Each fixture uses a virtual capture frame of 54x36 pixel.
- Page 24 FVP Decoder is in development and will be available soon. The GLP FVP Decoder ( FVP = Fixture Video Protocol ) is an optional hardware unit which can be added to the JDC2 NDI-Stream Network. The device will capture NDI Streams and convert them into the four GLP FVP Streams.
-
Page 25: Special/Control Dmx Channel
German Light Products® JDC2 IP NDI (FVP) 1 NDI GLP-JDC2-1 FVP Stream 1 NDI (FVP) 2 NDI GLP-JDC2-2 FVP Stream 2 NDI (FVP) 3 NDI GLP-JDC2-3 FVP Stream 3 NDI (FVP) 4 NDI GLP-JDC2-4 FVP Stream 4 DigiFX Presets DigiFX Presets will be available in a future firmware update. -
Page 26: Fixture Configuration And Settings
JDC2 IP 4. Fixture Configuration and Settings The settings described in this chapter let you customize how the JDC2 IP operates. Settings can be modified from the onboard control panel, via DMX and/or via RDM. DMX Address Set DMX Address of Main Module Channels 001…512 Control Modes Select the control mode (DMX channel layout) you want to use. -
Page 27: White Point
The white point is the default white that is obtained when the shutter is opened. The JDC2 IP offers a choice of fixed white points for the RGB Plate, allowing convenient use in different environments. The following fixed white points (color temperatures) are available: ●... -
Page 28: Duration Control
JDC2 IP Duration Control The Duration Control let you define how the duration channel will behave. • Normal (Default) - the duration timing is fix from short to long independent from the rate channel setting. • Percentage - the duration timing will be calculated percentage to the selected flash rate. -
Page 29: Capture Frame Position
German Light Products® JDC2 IP Note: In all fan modes, if fixture temperature reaches a dangerous level, the LEDs are shut down for a period until the fans have brought the temperature down to a safe level. Capture Frame Position... -
Page 30: Pixel Mirror
JDC2 IP Pixel mirror This setting allows the operator to change the layout of the pixels in the RGB Plate and the Segments in the white strobe line. OFF - Fixture standing on the floor with Tilt >50%. The first pixel/segment is left position of the top row. -
Page 31: Display Mode
German Light Products® JDC2 IP ● Scene (Stand-alone) sets the fixture to play its stored stand-alone scene (see Capture DMX Values below) when the fixture is not receiving a DMX signal. If no stand-alone scene is stored in memory, the fixture will black out. -
Page 32: Tilt Disable
JDC2 IP Tilt disable In v0.6.1 this feature is only available from display menu and cannot be set by DMX Control channel. This feature will be added in a future update. Tilt disable is normally OFF. Changing the Tilt disable setting to "Current disable" de- activates tilt by disabling the tilt motor current. -
Page 33: Information
● Live Diagnostic: Calls up an overview of all main fixture information, signal quality and settings. This can be helpful while troubleshooting or talking to GLP Service. ● iQ.Service Connect: Wakes up the integrated GLP iQ.Mesh Module for 5 minutes and enables connectivity to the GLP iQ.Service App. -
Page 34: Advanced Service
The Load Factory Defaults command does not affect device counters and calibration. Factory Menu Important! Do not enter the Factory Menu if you are not a trained service professional with service documentation or clear instructions from GLP Service. JDC2 IP User Manual... - Page 35 German Light Products® JDC2 IP Read the user and service documentation carefully before entering this menu. In the Factory Menu you can apply critical settings which can damage the fixture. The Factory Menu is a hidden menu for the manufacturer or professional service technicians only.
-
Page 36: Control Panel
JDC2 IP 5. Control panel Warning! DMX control is disabled when the control menus are active. Be prepared for the head to move as soon as you exit the control menus. The control panel and backlit graphic LCD display with self-charging battery allow you to change fixture settings, view readouts and use utilities quickly and intuitively, even when the fixture is disconnected from power. - Page 37 German Light Products® JDC2 IP See Figure 3. The top line of the default information screen consists of, from left to right: ● Main CPU firmware version ● DMX Mode The center of the screen shows the following information: ● Signal source.
-
Page 38: Using The Control Panel
JDC2 IP Using the control panel The four control panel buttons under the display have the following functions. In the main screen: QUICK MENU – Activates the Quick Menu UP/DOWN – Press three times to open the live diagnostic tool MENU –... -
Page 39: Live Diagnostics
No Signal setting – see ‘No signal’ on page 30). Service and maintenance See the separate JDC2 IP Quick Start and Safety Manual supplied with the fixture and available for download from www.glp.de for information on service and maintenance. Rev. 20241001-03... -
Page 40: Setting Up The Control Protocol
LumenRadio functionality will be added in a future firmware update. LumenRadio CRMX module is an optional extra to be fitted in the JDC2 IP’s FPO port. If you want to control the fixture via LumenRadio CRMX you must install the module. -
Page 41: Control Menus
Calls up overview of all main Live Diagnostic fixture information, signal quality and settings. Enables connectivity to the iQ.Service Connect >>>Connect<<< GLP iQ.Service App for 5 minutes. User Setting >>>Confirm<<< Preset 1 User Setting >>>Confirm<<< Loads custom user settings... -
Page 42: Main Menu
JDC2 IP Main menu The following menus and commands are available in the JDC2 IP control panel. Greyed-out options will be added in a future firmware update. Menus Notes DMX Address Set fixture’s DMX start address. Highest possible 001-512 address depends on control mode. - Page 43 German Light Products® JDC2 IP Menus Notes Normal pixel layout Pixel Mirror Pixels mirrored over y- Mirror Y axis Fixture blacks out if no Blackout DMX signal received Fixture continues to Hold display current effect if No Signal Mode no DMX signal received...
- Page 44 Service Shows overview of fixture Live diagnostic information Enables connectivity to iQ.Service Connect >>> Connect <<< the GLP iQ.Service app. Run test sequence of all Test All effects including tilt. Stop with BACK. Run test sequence of tilt Test Tilt only.
- Page 45 German Light Products® JDC2 IP Menus Notes Normal operation Disable tilt and display Service Mode timeouts (exit by cycling power off and on.) Lamp Confirm 2 Hours seconds Advanced Service Confirm 2 Reset counters Reset to zero (Press and Timer...
-
Page 46: Error Messages
GLP service agent. 9. Pixel layout The JDC2 IP pixels are located as shown below, seen from the front of the fixture (connectors and display facing away from you) with tilt at >50% and Pixel mirror set to Off. - Page 47 German Light Products® JDC2 IP 24 Segment mode Rev. 20241001-03...
- Page 48 JDC2 IP Full pixel mode This control mode will be added in a future firmware update. The pixels are arranged in 32 rows of 54 pixels. The top row is pixels 1-54, the next row 55- 108 etc. The central beam LEDs are divided into 12 segments.
Need help?
Do you have a question about the JDC2 IP and is the answer not in the manual?
Questions and answers