
Subscribe to Our Youtube Channel
Related Manuals for DIG 710A Series


Summary of Contents for DIG 710A Series
- Page 1 710A Series Single Station Irrigation Battery Operated Controller 710A-XXX | 710A-ASV-XXX | 710A-011 I N S T R U C T I O N M A N U A L...
-
Page 2: Table Of Contents
TABLE OF CONTENTS INTRODUCTION ……………………………………………………………… 1 1. About the controller …………………………………………………… 1 2. Component identification ……………………………………………… 2 3. LCD display and controls ……………………………………………… 4 4. Valve or wall mounting ………………………………………………… 5 5. Installing the batteries ………………………………………………… 6 6. Valve adapter installation 710A-000 …………………………………… 6 7. -
Page 3: Introduction
The 710A series is available in single station with a rain sensor connection, and is powered by two AA batteries that can last up to three years [using name brand alkaline batteries]. -
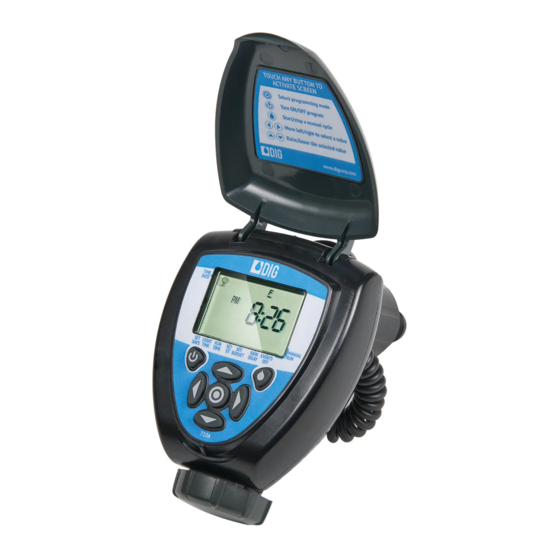
Page 4: Component Identification
2. COMPONENT IDENTIFICATION 1. Controller cover 2. Quick reference label TOUCH ANY BUTTON TO ACTIVATE SCREEN ENTER/EXIT ADJUSTMENT MODE TURN ON/OFF PROGRAM 3. LCD displays the icon-based START/STOP A MANUAL CYCLE SCROLL TO SELECT PROGRAM RAISE/LOWER THE SELECTED VALUE applications / programs 4. - Page 5 Anti-siphon valve 14. Anti-siphon cap 15. 3/4″ or 1″ pipe thread outlet (FNPT) 16. Manual flow control knob 17. External bleed screw 18 3/4″ or 1″ pipe thread inlet (FNPT) Manual valve actuator 20. Manual flow control knob 21. External bleed screw 22.
-
Page 6: Lcd Display And Controls
3. LCD DISPLAY AND CONTROLS LCD Display 1. Time and Date – Indicates current time and day 2. Set Watering Days – Choose either specific days, odd/even days, or up to once every 30 days 3. Start Time – Up to five start times per day available 4. -
Page 7: Valve Or Wall Mounting
Control Buttons Enter/Exit adjustment mode Turn On/Off program* Start/Stop a manual cycle Scroll to select a program setting to adjust Raise/Lower the selected value *NOTE: Turning the controller OFF using the button will suspend all scheduled programming and OFF will appear on the display. The Manual Run feature will still function when the controller is OFF. -
Page 8: Installing The Batteries
6. VALVE ADAPTER INSTALLATION 710A-000 The 710A-000 (only) controller includes four adapters to retrofit Rainbird, Hunter, DIG and Irritrol valves. Follow the instructions below to install. 1. Shut off the main water supply 2. Remove the existing solenoid if applicable. - Page 9 8. Program the 710A-series controller (see section 11). CHART A Model Compatible Valves DIG, BERMAD series 200, HIT series 500, DOROT series 80, 30 - 920* GRISWOLD series 2000, DW and BUCKNER series VB valves 30 - 921 RAIN BIRD DV, DVF, PGA, PEB ( 1″ only ) , GB, EFB - CP, BPE, PESB ( 1″...
- Page 10 Figure D SOLENOILD ADAPTER...
-
Page 11: In-Line Valve Installation 710A
7. IN-LINE VALVE INSTALLATION 710A Operating pressure: 10-150 PSI Recommended operating pressure: 10-80 PSI Warning: Wrap all fittings with Teflon tape. Do not use pipe cement on the valve as this will damage the valve and void the warranty. 1. Shut off main water supply. 2. -
Page 12: Anti-Siphon Valve Installation
8. ANTI-SIPHON VALVE INSTALLATION Operating pressure: 20-150 PSI Recommended operating pressure: 10-80 PSI The 710A-ASV controller can be installed directly to PVC pipe with two PVC male adapters (not included). Inlet 3⁄4″ FNPT, outlet 3⁄4″ FNPT. NOTE: The 710A-ASV or 710A-011 must be installed at least 6″... -
Page 13: Changing Actuator Adapters
5. To test the 710A, push the button. A click will be heard, indicating the valve is open. A droplet icon on the upper left of the screen and the run time remaining will appear on the display in 5 seconds. Check that the system is operating correctly and push the button again to turn it off. - Page 14 4. Next, place your thumb on one side of the retainer clip and with a pair of pliers grip the other side of the retainer clip and pull outwards, away from your thumb, and upwards, removing it from the base of the 3/4″ threaded adapter then, remove Figure L the adapter (see Figure L).
-
Page 15: Manual Valve Actuator Installation
10. MANUAL VALVE ACTUATOR INSTALLATION Operating pressure: 20-125 PSI Recommended operating pressure: 20-80 PSI 1. Shut off main water supply. 2. Remove the manual stem from the existing valve and temporarily remove the anti-siphon cap (Figure P). 3. Replace any existing worn washers with the new ones provided (Figure Q). 4. - Page 16 5. Turn actuator flow control knob clockwise until it stops (Figure S). 6. Turn on main water supply. 7. Activate the solenoid through the controller manual button, a click will be heard indicating the valve is open (The manual symbol will appear on the display). 8.
-
Page 17: Programming
11. PROGRAMMING This section explains the programming features and the steps necessary to assign irrigation schedules. To program the controller use the buttons to select the desired programming mode, then push to make the entry flash and the buttons to change the value. Only a flashing value can be changed. NOTE: If the last data entered stops flashing, push again to resume programming and repeat the steps. -
Page 18: Setting Watering Frequency
1. Push to select the hour and adjust using . AM/PM is changed by increasing or decreasing the hour. 2. Continue to push to set the minutes, and current month, day, then year. MONTH DAY YEAR 3. Push to confirm your settings. The current day is selected automatically. Push to proceed to the next step Set Days 13. - Page 19 2. Push and M will begin to flash. Advance through days of the week using . Deselect or select a day to water using WATERING DAY NON-WATERING DAY 3. Push to confirm your settings. Option 2 – Setting Even or Odd Days: 1.
- Page 20 Option 3 – Watering once every X hours (cyclical watering) Please note that only 1 start time is available in this mode. 1. Push to select Set Days 2. Push and M will begin to flash then advance through days of the week using until appears flashing.
-
Page 21: Setting Start Times
To set the controller back to specific days mode: 1. Push to select Set Days . Previously selected days will be saved. 2. Push and then push until the days of the week can be seen at the top of the LCD screen. -
Page 22: Setting Watering Run Times
Note: Only 1 start time is available in hourly cyclical mode. The 710A will begin hourly cyclical mode upon arriving at the set start time. The start time will then update to show the next time the 710A will start defined by what hourly program is set. -
Page 23: Option (Set Et)
(ET) from various climate regions. How DIG’s 710A controller operates using Historical Evapotranspiration (ET): After programming the watering schedule, watering start time and watering duration, the user can select one of the preset SimpleSmart evapotranspiration ™... - Page 24 NOTE: If using one of the SimpleSmart presets we recommend evaluating ™ the plants’ health for the first month and making adjustments to the system as needed. If an adjustment or fine tuning of the SimpleSmart programming ™ is required, this adjustment can be made for each month in the SEASONAL ADJUSTMENT (%) SETTING (see section 17).
- Page 25 For example: The user entered watering run time will be adjusted monthly based upon the forecast ET pattern for the selected region. By selecting SP02, the controller may adjust the programmed run time of 10 minutes in the month of January to 3 minutes, or less. This reduces the irrigation run time by 7 minutes, providing a water savings of nearly 70% for the month of January.
-
Page 26: Setting Seasonal Adjustment (Monthly Budget)
To deactivate the preset program: 1. Push and the program # appears flashing. 2. Push until OFF appears. 3. Push to confirm settings. Push the button to proceed to the next step Set Budget 17. SETTING SEASONAL ADJUSTMENT (MONTHLY BUDGET) The Seasonal Adjustment percentage feature can be utilized to alter the programmed watering run time on a monthly basis. -
Page 27: Rain Delay Setting
4. Repeat the steps to set the desired seasonal adjustment % for each month by pushing and following the previous steps for each month. 5. Push to confirm settings. Push the button to proceed to the next step Rain Delay 18. -
Page 28: Events Off Setting
To cancel the Rain Delay, set the days to OFF using Note: OFF appears in between numeric value of 99 and 1. Push the button to proceed to the next step Events Off 19. EVENTS OFF SETTING This mode allows the user to program the controller to not water during specific months of the year, or to program the controller to not water on specific days of the week during a specific month. - Page 29 To turn off an entire month: 1. Push to select Events Off You can review all events off settings by pushing 2. Push and advance through each day of the week using until the desired month and MO is displayed on the right side of the screen. 3.
-
Page 30: Manual Watering
20. MANUAL WATERING The manual mode allows the user to test the system and water for a specified run time. The controller will automatically close the valve at the end of the defined irrigation period. The originally programmed irrigation schedules will continue to function at the times assigned. -
Page 31: Connecting A Rain Sensor
21. CONNECTING A RAIN SENSOR Most “normally closed” rain or soil moisture sensors can be connected to the 710A controller. The function of the sensor is to prevent automatic watering by the set program due to excessive rainfall or when the soil is too moist. To connect the sensor to the controller, please follow these steps: 1. -
Page 32: Maintenance, Troubleshooting And Repairs
To restore the controller to the default settings 1. Push the button until START EVERY is displayed and the icon appears on the bottom left of the screen. 2. Push and hold down the button for three seconds. 3. The screen returns to the home screen (clock) and all the default settings are restored. - Page 33 PROBLEM: The display is blank CAUSE: No buttons have been pushed in the previous 15 minutes SOLUTION: Push any button PROBLEM: Valve fails to close CAUSE: Valve is installed backwards SOLUTION: Check flow arrow and verify arrows points away from water source CAUSE: Debris is blocking solenoid port SOLUTION: Shut off water supply, unscrew and remove solenoid, then open water supply and flush out solenoid port, re-install solenoid...
-
Page 34: Warranty
Repair of damaged units not otherwise within warranty may be refused or done at a reasonable cost or charge at the option of DIG CORPORATION. This warranty gives you specific legal rights, and you may also have other rights, which vary... -
Page 35: Technical Assistance
TECHNICAL SERVICE USA • DIG’s Technical Service Team is available to answer questions in from 8:00 AM to 5:00 PM (PST) Monday-Friday (except holidays) at 760-727-0914. • Questions in English and Spanish can be emailed to: questions@digcorp.com or faxed to 760-727-0282. - Page 36 26-246 REVC 012318 1210 Activity Drive Printed in the USA Vista, CA 92081-8510, USA DIG is a Registered Service Mark of DIG Corporation...
Need help?
Do you have a question about the 710A Series and is the answer not in the manual?
Questions and answers