
Related Manuals for DIG LEIT1-000


Summary of Contents for DIG LEIT1-000
- Page 1 Ambient Light Powered Smart Irrigation Controller LEIT1 - 000 LEIT1 ILV - 075 LEIT1 ILV - 100 LEIT1 ILV - 150 LEIT1 ILV - 200 I N S T R U C T I O N M A N U A L...
-
Page 2: Table Of Contents
16. Connecting a rain sensor ………………………………………………………………………………… 24 17. Maintenance, troubleshooting and repairs ………………………………………………………… 25 18. Warranty, technical service ……………………………………………………………………………… 27 1. ABOUT THE CONTROLLERS Thank you for purchasing DIG’s LEIT1 ambient light powered irrigation controller. ™ The LEIT1 is a one-station, ambient light (solar) powered smart controller that uses a ™... -
Page 3: Component Identification
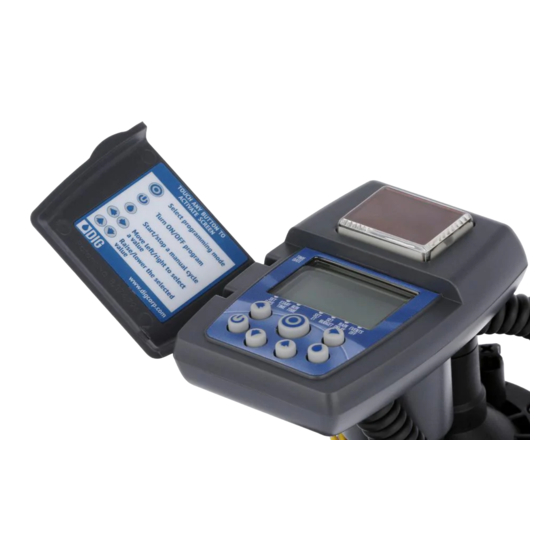
2. COMPONENT IDENTIFICATION 1. Solar PVM 6. Collapsible solenoid wire 2. LCD screen 7. DC Solenoid 3. 7 button keypad 8. Solenoid adapters 4. Rain sensor connection 9. Solenoid adapters 5. Quick reference label 10. Professional grade inline valve in 3/4 ″... -
Page 4: Lcd Display And Controls
3. LCD DISPLAY AND CONTROLS LCD Display Control Buttons 1. Time and Date Indicates current time and day Select programming mode 2. Set Watering Days Turn program(s) ON/OFF Choose either specific days, odd/even days, or up to once every 30 days Start/stop a manual cycle 3. -
Page 5: Valve Adapter Installation
4. VALVE ADAPTER INSTALLATION 1. Shut off the main water supply 2. Remove the existing solenoid if applicable. NOTE: If adapting to an IRRITROL valve, remove the solenoid but leave the existing solenoid adapter installed. 3. Select the appropriate solenoid adapter associated with the valve. (see chart A) 4. -
Page 6: Valve Installation
VALVE INSTALLATION The LEIT1 controller with a valve features a female-threaded inlet and outlet. The controller is ™ generally installed above the ground to allow it to power itself using light. Operating pressure: 10 to 125 PSI (.7 to 8.6 BAR) Recommended operating pressure: 10 to 80 PSI (.7 to 5.5 BAR) NOTE: Wrap all fittings with Teflon tape. -
Page 7: Programming
30 - 9XX ADAPTER WATER FLOW 6. PROGRAMMING In order to program the LEIT1 , you must first let the unit sit out in the light to charge. In ™ bright light conditions (full sun) this will take under 30 minutes. In shaded conditions this could take up to 2 hours. -
Page 8: Setting Time And Date
7. SETTING TIME AND DATE The controller can display the time in either a 12 or 24 hour format. To change the time format, from the home screen: 1. Press and hold the button for three seconds until the display switches format (AM/PM disappears). - Page 9 5. Repeat the steps to set the current date, including month, day and year. When the date is selected and updated, the day of the week will be updated at the same time to correspond with the date. MONTH DAY YEAR 6.
-
Page 10: Setting Watering Day Schedules
8. SETTING WATERING DAY SCHEDULES Option 1 - Setting Specific Days of the Week: This setting determines which days the LEIT-1 controller will operate. Choose either watering ™ on specific days of the week, EVEN/ODD days or cyclical from daily up to once every 30 days. The controller’s default setting is to water on all specific days of the week. - Page 11 Option 2 - Setting Even or Odd Days: To select EVEN days, ODD days or cyclical days from one day up to every 30 days refer to the following example. Example: setting the controller to water every 10 days: 1. Press the button until the icon and the days of the week appear.
-
Page 12: Setting Watering Start Times
9. SETTING WATERING START TIME The LEIT1 smart controller can have up to five separate irrigation start times per day. ™ To set a start time, 1. Press the button until the icon appears. START 1 displays OFF, or the last start time programmed in START 1 appears. - Page 13 7. To set the desired second start time hour (note AM and PM designations), press 8. Press again and the minutes begin blinking, press to select the watering start time in minutes. Repeat the steps to set the third, and if needed, the fourth and fifth start times.
-
Page 14: Setting Watering Run Times
10. SETTING WATERING RUN TIMES Note: If you have already set a SimpleSmart ET preset (example: SP02) and then change ™ the run time, your SimpleSmart program will be turned OFF. You must reactivate the ™ SimpleSmart programming each time you adjust your run time (see section 10). ™... - Page 15 5. To set the desired watering duration in minutes (example of 10 minutes), press to select minutes. When programming the watering duration, the screen will also show the days the controller will operate. NOTE: If the last data entered stops blinking after 10 seconds, press again to resume or to move backward.
-
Page 16: Setting The Simplesmart ™ Option
20 preset programs for sprays and drip ™ irrigation based on three years of historical evapotranspiration (ET) from various climate regions. How DIG’s LEIT1 smart controller operates using Historical Evapotranspiration (ET): ™ After programming the watering schedule, watering start time and watering duration, the user can... - Page 17 CHART A - SELECTING HISTORICAL ET PROGRAM PROGRAM REGIONS IRRIGATION METHOD SP01 Cool Mediterranean Drip Systems SP02 Cool Mediterranean Sprinkler Systems SP03 Humid Continental Drip Systems SP04 Humid Continental Sprinkler Systems SP05 Warm Mediterranean Drip Systems SP06 Warm Mediterranean Sprinkler Systems SP07 Humid Sub-Tropical Drip Systems...
- Page 18 For example: The user entered watering run time will be adjusted monthly based upon the forecast ET pattern for the selected region. By selecting SP02, the controller may adjust the programmed run time of 10 minutes in the month of January to 3 minutes, or less. This reduces the irrigation run time by 7 minutes, providing a water savings of nearly 70% for the month of January.
-
Page 19: Setting Seasonal Adjustment
12. SETTING SEASONAL ADJUSTMENT ( MONTHLY BUDGET ) The amount of water required by plants varies throughout the year. The Seasonal Adjustment percentage feature can be utilized to alter the programmed watering run time on a monthly basis. This program features two options: A. -
Page 20: Rain Delay Setting
13. RAIN DELAY SETTING The Rain Delay setting is used to temporarily suspend all irrigation for a defined number of days. For example, during rainy weather, regularly scheduled programs can be turned off from 1-99 days. At the end of the designated period, regularly scheduled programming will resume automatically. -
Page 21: Events Off Setting
14. EVENTS OFF SETTING This mode allows the user to program the timer to not water during specific months of the year, or to program the timer to not water on specific days of the week during a specific month. To turn off specific days of a month: 1. - Page 22 The controller is now fully programmed. Press the button to review the program or to return to the home screen. Here is an example of the home screen showing all the icons of the programs that are currently (SET ET), monthly budget, rain delay and events off set and active, which is the SimpleSmart ™...
-
Page 23: Manual Watering
15. MANUAL WATERING The manual mode allows the user to test the system and water for a specified run time. The controller will automatically close the valve at the end of the defined irrigation period. The originally programmed irrigation schedule continues to function at the times assigned. The sensor condition is disregarded in this mode. -
Page 24: Connecting A Rain Sensor
16. CONNECTING A RAIN SENSOR Most “normally closed” rain or soil moisture sensors can be connected to the LEIT1 controller. The function of the sensor is to prevent automatic watering by the set ™ program due to excessive rainfall or when the soil is too moist. To connect the sensor to the controller, please follow these steps: 1. -
Page 25: Maintenance, Troubleshooting And Repairs
17. MAINTENANCE, TROUBLESHOOTING AND REPAIRS To restore the controller to the default settings (Budgeting and Rain Delay settings will remain): 1. Press the button until the START EVERY is displayed and the icon appears on the bottom left of the screen. 2. - Page 26 SOLUTION: Check sensor and wire splices and verify sensor is normally closed PROBLEM: The display is blank CAUSE: No buttons have been pushed in the previous 15 minutes SOLUTION: Push any button PROBLEM: Valve fails to close CAUSE: Valve is installed backwards SOLUTION: Check flow arrow and verify arrows points away from water source CAUSE: Debris is blocking solenoid port SOLUTION: Shut off water supply, unscrew and remove solenoid, then open water supply and...
-
Page 27: Warranty, Technical Service
Allow four weeks for repairs and shipping time. Repair of damaged units not otherwise within warranty may be refused or done at a reasonable cost or charge at the option of DIG CORPORATION. - Page 28 26-209 REVC 080420 1210 Activity Drive Printed in the USA Vista, CA 92081-8510, USA DIG is a Registered Service Mark of DIG Corporation...
Need help?
Do you have a question about the LEIT1-000 and is the answer not in the manual?
Questions and answers