Table of Contents
Advertisement
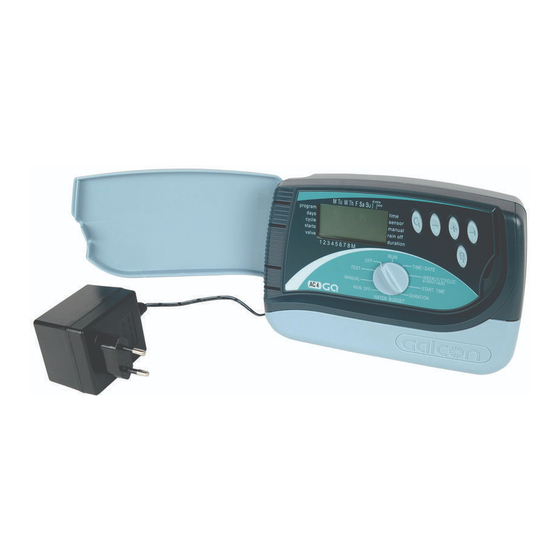
GQ-AC4, GQ-AC6, GQ-AC8
Indoor Mounting AC Irrigation Controllers
Features
• Three (3) programs A B C to select
• Watering durations from 1 minute to up to 4 hours in 1-minute
increments
• Three (3) programs with four (4) start times per program with delay
options in weekly mode and one start time per day in cyclical mode
• Auxiliary X program in a weekly mode used for lights and ponds
through the use of a relay
• Custom programming with 7-day calendar or intervals of 1-31 days
in odd/even or every day rotation
• Operate four (4), six (6) or eight (8) stations with master valve or
pump start
• Five (5) buttons with a large dial and large integrated liquid crystal
display (LCD) for easy view and programming
• Off mode option on the dial allows the system to be shut off for an
unlimited time
• Includes testing feature of valve or
zone, making sure that the zone is
operating correctly
• Dedicated sensor terminal allows
operation with rain, freeze or moisture
sensors
• One 9-volt backup battery with battery
icon alert if battery is low and needs to
be replaced
• Reset button is available for a total reset
of the controller; in this option all programs
will be erased
• Full 3-year warranty
Advertisement
Table of Contents

Related Manuals for DIG GQ-AC4


Summary of Contents for DIG GQ-AC4
- Page 1 GQ-AC4, GQ-AC6, GQ-AC8 Indoor Mounting AC Irrigation Controllers Features • Three (3) programs A B C to select • Watering durations from 1 minute to up to 4 hours in 1-minute increments • Three (3) programs with four (4) start times per program with delay options in weekly mode and one start time per day in cyclical mode •...
-
Page 2: Table Of Contents
TABLE OF CONTENTS 1. Introduction …………………………………………………………… 3 2. About the GQ-AC controller …………………………………………… 3 3. Mounting the controller ………………………………………………… 4 4. Connecting the valve wires to the controller …………………………… 5 5. Connecting a master valve or pump start relay ………………………… 5 6. -
Page 3: Introduction
1. INTRODUCTION Thank you for purchasing one of DIG’s GQ-AC 4, 6 or 8 station-controllers. This manual describes how to get the GQ-AC controller up and running quickly. After reading this manual and having been familiarized with the basic functionality of the controller, the manual can be used as a reference for less common tasks in the future. -
Page 4: Mounting The Controller
3. MOUNTING THE CONTROLLER Before installing the controller, make sure you have a Phillips screwdriver, one 9-volt battery 18-gauge color-code, multi-strand, direct burial wire and WATERPROOF SPLICE CONNECTOR. 1. Select an indoor location near a 120 VAC outlet. The location should be protected from moisture and sunlight. -
Page 5: Connecting The Valve Wires To The Controller
4. CONNECTING THE VALVE WIRES TO THE CONTROLLER 1. Select and use suitable 16, 18 or 20-gauge direct burial, strand gauge sprinkler wire between the valve location and the controller. 18-gauge direct burial, strand multi-color coded Figure 1 wire is recommended. 2. -
Page 6: Connecting A Rain Sensor
6. CONNECTING A RAIN SENSOR An interrupt type normally open rain sensor can be connected to the controller. The sensor connects directly to the two controller sensor terminals “SNS”. 1. Connect either wire from the sensor to the two sensor terminals on the controller (see figure below). -
Page 7: Connecting The Backup Battery
7. CONNECTING THE BACKUP BATTERY • Remove the cover. (see # 1) • Pull out the 9-volt battery clip wire found on the right side of the controller. • Insert the 9-volt alkaline battery into the clip. (see # 2) •... -
Page 8: Connecting The Transformer Wire To The Controller
8. CONNECTING THE TRANSFORMER WIRE TO THE CONTROLLER WARNING: Do not plug transformer into power source until the controller is mounted. After connecting all valve wires and installing the battery, you are ready to connect the transformer. Use only the supplied transformer, or a transformer with 110 VAC power input, 50 Hertz and 24 VAC output. - Page 9 PROGRAMMING CONT. The controller is programmed with the aid of a 10-mode dial selector and 5 buttons. Dial selector: used to select the desired programming mode - includes clock setting mode Switch button: move throughout the various display options to be used Data increment button decreased: lowers the value of the selected parameter (example, hours selected are changed from 06:00 to 05:00) Data increment button increased: raises the value of the selected parameter...
-
Page 10: Setting Current Time, Day Of Week And Date
10. SETTING CURRENT TIME, DAY OF THE WEEK AND DATE To enable the controller to operate the system at the correct times, the current time and current day of the week must first be set. Steps below explain how to set the day and time. -
Page 11: Selecting Watering Frequency
12. SELECTING WATERING FREQUENCY This controller has three operation methods of activating programs A, B, or C. This setting determines how often the controller will operate with each program. After selecting the program, choose either program according to the days of the week, a cyclical irrigation cycle, which waters once every certain number of days (i.e. - Page 12 Cyclic Program Example: Program the controller to operate every 5 days Turn the to WEEKLY/CYCLIC mode. Press and select cyclic irrigation appears with EVERY 1 DAY. To select every 1 days, press and 1 is blinking. Press and change the blinking 1 to EVERY 5 DAYS.
-
Page 13: Setting A Start Time
13. SETTING A START TIME In a Weekly mode setting, it is possible to set up to 4 start times per day for each program (A, B, C) and in Cyclic mode setting only one start time per day is available. -
Page 14: Programming Water Duration
blinking. Press to set the desired start time hour (12), please note and select AM or PM. Press the minute is blinking, press to set the desired start time minute (30). Press and 1 day is blinking. Press the to select the number of days to delay the start time. -
Page 15: Setting Budget
15. SETTING BUDGET The amount of irrigation water applied during seasonally dry or wet periods changes throughout the year. Instead of changing the duration for each program, the Budget feature can be utilized to reflect the seasonal changes. Budgeting is programmed once to increase or decrease the irrigation on a monthly basis for an entire year. -
Page 16: Setting "Rain Off" (Shutdown)
16. SETTING “RAIN OFF” (SHUTDOWN) This option is used to temporarily suspend the controller program A, B or C or all of them. The irrigation schedule remains stored in the controller memory, but is not implemented until the suspension is canceled. The suspension option can be from 1 day up to 240 days. - Page 17 Option 1: Open all the valves via the MANUAL using one of the programs. Turn the to MANUAL mode. Program A appears first with above the valves operates by the program with the word OFF and the icon. To open press , the word ON will appear and a will appear above the first valve, a few second later a will appear if the master valve...
-
Page 18: Mode X Support Program For Pump, Lighting And Fountains
Option 3: Manual operation of all valves via the 3 programs. Turn the to MANUAL mode. Program A appears first with above the valves operates by the program with the word OFF and the icon. To select A, B, and C program, press until ABC program appears with word STOP, with above the valves and the... -
Page 19: Valve Testing
Turn the to WEEKLY/CYCLIC mode. Press the button and program A appears first with above the active valves with the word OFF and the . To select program X, press until program X appears with word OFF. To activate program X, use the same method to activate any other program. -
Page 20: Off Mode
20. OFF MODE OPTION The OFF mode option allows for the immediate shutdown of all the programs for an unlimited time. Turn the to OFF mode. The word OFF will appear on the screen blinking. Press , OFF will stop flashing and the active program will discontinue immediately. -
Page 21: Low Battery Warning
PROGRAM RESET: If confused or would like to change or reset all the programs, remove the lower cover and press the RESET button with the aid of a screwdriver. The screen with all the icons appears momentary then, press immediately and for 2 seconds. -
Page 22: Trouble-Shooting And Repair
23. TROUBLE-SHOOTING AND REPAIR PROBLEM/SYMPTOM CAUSE REPAIR The valve doesn’t open: neither Water is not reaching Ensure that Master- automatically per program nor by the system: Electric valve is open: clean manually-operated computer command not reaching filter; check the activation. the valve. -
Page 23: Warranty
The obligation of DIG CORPORATION under this warranty is limited to repairing or replacing at its factory this product which shall be returned to the factory within three years after the original purchase and which on examination is found to contain defects in material and workmanship. -
Page 24: Technical Assistance
25. TECHNICAL ASSISTANCE Should you encounter any problem(s) with this product or if you do not understand its many features, please refer to this instruction manual first. If further assistance is required, DIG offers the following customer support: TECHNICAL SERVICE USA •...
Need help?
Do you have a question about the GQ-AC4 and is the answer not in the manual?
Questions and answers