
Subscribe to Our Youtube Channel
Related Manuals for DIG 710AP Series


Summary of Contents for DIG 710AP Series
- Page 1 710AP - XXX Single Station Propagation and Irrigation Battery Operated Controller I N S T R U C T I O N M A N U A L...
-
Page 2: Table Of Contents
TABLE OF CONTENTS INTRODUCTION ……………………………………………………………… 1 1. About the controller …………………………………………………… 1 2. Component identification ……………………………………………… 2 3. LCD display and controls ……………………………………………… 3 4. Valve or wall mounting ………………………………………………… 4 5. Installing the batteries ………………………………………………… 5 6. Valve adapter installation 710AP ………………………………………… 5 7. -
Page 3: Introduction
The 710AP series is available in single station with a rain sensor connection, and is powered by two AA batteries that can last up to 3 years in irrigation mode (using name brand alkaline batteries). -
Page 4: Component Identification
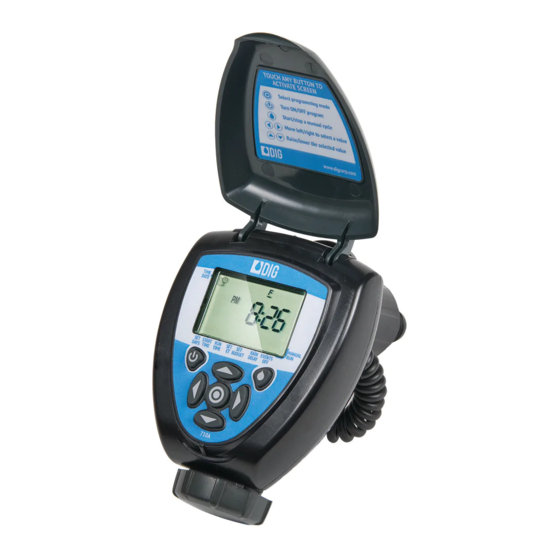
2. COMPONENT IDENTIFICATION 1. Controller cover 2. Quick reference label TOUCH ANY BUTTON TO ACTIVATE SCREEN ENTER/EXIT ADJUSTMENT MODE TURN ON/OFF PROGRAM 3. LCD displays the icon-based START/STOP A MANUAL CYCLE SCROLL TO SELECT PROGRAM RAISE/LOWER THE SELECTED VALUE applications / programs 4. -
Page 5: Lcd Display And Controls
3. LCD DISPLAY AND CONTROLS LCD Display 1. Time and Date icon – Indicates current time and day 2. Set Watering Days icon – Indicates the scheduling setting 3. Start Time icon – Indicates the start time setting 4. Run Time icon – Indicates the run time setting 5. -
Page 6: Valve Or Wall Mounting
Control Buttons Enter/Exit adjustment mode Turn On/Off program* Start/Stop a manual cycle Scroll to select a value to adjust Raise/Lower the selected value *NOTE: Turning the controller OFF using the button will suspend all scheduled programming and OFF will appear on the display. The Manual Run feature will still function when the controller is OFF. -
Page 7: Installing The Batteries
3. Select the appropriate solenoid adapter associated with the valve (see chart A). (Available through your distributor) 4. Screw the solenoid adapter into the valve bonnet by hand, tighten with pliers if necessary – but do not over tighten. 5. Thread the 710AP series solenoid into the valve adapter. Hand tighten only. - Page 8 (or see section 16). To turn the valve on via the solenoid, lift the 710AP series controller from the solenoid and turn the solenoid counter clockwise 1/2 to 3/4 of a turn, or until you hear or see water flowing through the valve.
-
Page 9: In-Line Valve Installation 710Ap
7. IN-LINE VALVE INSTALLATION 710AP Operating pressure: 10-150 PSI Recommended operating pressure: 10-80 PSI Warning: Wrap all fittings with Teflon tape. Do not use pipe cement on the valve as this will damage the valve and void the warranty. 1. Shut off main water supply. 2. -
Page 10: Programming
8. PROGRAMMING This section explains the programming features and the steps necessary to assign irrigation or propagation schedules. To program the controller use the buttons to select the desired program setting, then push to make the entry flash and the buttons to change the value. -
Page 11: Setting Time And Date
9. SETTING TIME AND DATE The controller can display the time in either a 12 or 24 hour format. To change the time format, from the current time (after it has been set): 1. Push and hold the button for three seconds until the display switches format (AM/PM disappears). -
Page 12: Setting Watering Frequency
3. Continue to push to set the minutes, and current month, day, then year. MONTH DAY YEAR 4. Push to confirm your settings. The current day is set automatically. Push to proceed to the next step Set Days 10. SETTING WATERING FREQUENCY This setting determines how often (in days, hours, or minutes) the 710AP controller will operate. - Page 13 Option 1 – Setting Specific Days of the Week: 1. Push to select Set Days . By default all days are set to water. 2. Push and M will begin to flash. Advance through days of the week using . Deselect or select a day to water using WATERING DAY NON-WATERING DAY 3.
- Page 14 Option 3 – Propagation Mode, Watering by Minute or Hour 1. This option is used to program the controller to operate the system in a cyclical (propagation mode) manner from once every 1 minute up to every 12 hours. Example: If a 5 minute watering frequency is selected, the controller will water for the selected run time every 5 minutes from the entered start time until the entered stop time every day until canceled by changing the program or turning off irrigation.
-
Page 15: Setting Start Times
To set the controller back to specific days mode: 1. Push to select Set Days . Previously selected days will be saved. 2. Push and then push until the days of the week can be seen at the top of the LCD screen. - Page 16 4. To set additional start times push then push through the hours and minutes to the next desired Start Time. Up to 5 start times can be programmed. To delete a start time: 1. Push to select Start Time and push to enter adjustment mode.
-
Page 17: Setting Watering Run Times
12. SETTING WATERING RUN TIMES This setting determines the length of time the 710AP controller will allow the valve to remain open (run time is from 1 minute up to 5 hours and 59 minutes in Irrigation Mode and from 5 seconds up to 59 minutes and 59 seconds in Propagation Mode). -
Page 18: Setting Seasonal Adjustment (Monthly Budget)
13. SETTING SEASONAL ADJUSTMENT (MONTHLY BUDGET) The Seasonal Adjustment percentage feature can be utilized to alter the programmed watering run time on a monthly basis. NOTE: This setting is not available while in Propagation Mode. To set seasonal adjustment in %: 1. -
Page 19: Rain Delay Setting
14. RAIN DELAY SETTING This feature is used to shut down the controller in winter or when it is raining. It can also be used to delay starting any programming until a later date. Set schedules will be retained and programmed watering will resume after the set delayed time is completed. -
Page 20: Propagation Mode
15. PROPAGATION MODE To set the controller into propagation mode: 1. Push until Set Days is selected. 2. Push to edit this setting and push until 1:00 and HRS appears flashing. 3. This setting allows an interval of every 1 minute up to 12 hours to be set as the watering frequency. - Page 21 To set start time: 1. Push to select (START will appear on the display on the left). 2. Push to cause the hours digit to flash and adjust it using then push to set minutes. 3. Push to confirm your settings. The stop time is located on this screen as well.
- Page 22 NOTE: To start the program outside of the set start time, you can push the button from this screen to start it. Once started, the program will function as normal, stopping at the stop time and starting again the next day at the set start time.
-
Page 23: Manual Watering
16. MANUAL WATERING The manual mode allows the user to test the system and water for a specified run time. The controller will automatically close the valve at the end of the defined irrigation period. The originally programmed irrigation schedules will continue to function at the times assigned. -
Page 24: Connecting A Rain Sensor
17. CONNECTING A RAIN SENSOR Most “normally closed” rain or soil moisture sensors can be connected to the 710AP controller. The function of the sensor is to prevent automatic watering by the set program due to excessive rainfall or when the soil is too moist. To connect the sensor to the controller, please follow these steps: 1. -
Page 25: Maintenance, Troubleshooting And Repairs
To restore the controller to the default settings 1. Push the button until START EVERY is displayed and the icon appears on the bottom left of the screen. 2. Push and hold down the button for three seconds. 3. The screen returns to the home screen (clock) and all the default settings are restored. -
Page 26: Technical Assistance
TECHNICAL SERVICE USA • DIG’s Technical Service Team is available to answer questions in from 8:00 AM to 5:00 PM (PST) Monday-Friday (except holidays) at 760-727-0914. • Questions in English and Spanish can be emailed to: questions@digcorp.com or faxed to 760-727-0282. -
Page 27: Warranty
Repair of damaged units not otherwise within warranty may be refused or done at a reasonable cost or charge at the option of DIG CORPORATION. This warranty gives you specific legal rights, and you may also have other rights, which vary from... - Page 28 26-248 REVA 110315 1210 Activity Drive Printed in the USA Vista, CA 92081-8510, USA DIG is a Registered Service Mark of DIG Corporation...
Need help?
Do you have a question about the 710AP Series and is the answer not in the manual?
Questions and answers