Table of Contents
Advertisement
Quick Links
Advertisement
Table of Contents

Related Manuals for Schuchmann rifton tram


Summary of Contents for Schuchmann rifton tram
- Page 1 tram. Instructions for use. tram. The transfer and mobility aid from Rifton.
- Page 2 Instructions for use may deviate from your product due to differing equipment. We reserve the right to make technical modifications. Important information! Ensure that these Instructions for use remain with the product. Your schuchmann Team...
-
Page 3: Table Of Contents
Contents. 1. Preparation................. 05 1.1 Delivery ..........................05 1.2 Safety measures prior to use ................05 1.3 Safe disposal .......................06 1.3.1 Packaging ......................06 1.3.2 Product ........................06 1.4 Where to store the Instructions for use ............06 2. Product description..............06 2.1 Material information ....................06 2.2 Handling / transport .................... - Page 4 Contents. 5. Technical data................23 6. Guarantee................... 24 7. Troubleshooting................. 24 8. Battery pack and charger.............. 25 8.1 Assembly of the charger ..................25 8.2 Charging the battery pack ................25 9. Identification................26 9.1 EU Declaration of Conformity................26 9.2 Serial number / date of manufacture .............27 9.3 Product version ......................27 9.4 Issue of the document ....................27...
-
Page 5: Preparation
1. Preparation. 1.1 Delivery On receiving the product, please check it for completeness, lack of faults and any trans- port damage. Inspect the goods in the presence of your forwarder Should transport damage have occurred, please arrange for an inventory (determina- tion of the faults) to be made in the presence of the forwarder. -
Page 6: Safe Disposal
Please store these Instructions for use carefully and ensure that these Inst- ructions for use remain with the product in case of re-use. Should you lose the instructions, you can always download an updated version at www. schuchmann.de . 2. Product description. 2.1 Material information All steel elements (screws, nuts...) are galvanised, nickel-plated or made... -
Page 7: Handling / Transport
2. Product description. 2.2 Handling / transport The mobility and transfer aid is not intended for carrying, since it is equipped with castors. Should you have to carry the equipment due to obstacles, ensure that all moving parts are tightened. Subsequently, two persons should stand each on one side of the transfer and mobility aid, grab the front and rear at the side frame and carry it to the desired loca- tion. -
Page 8: Use Not In Accordance With The Intended Purpose / Warning Gui
• Do not use the transfer and mobility aid if it has defective, worn or missing parts. Only use accessories and spare parts made by Schuchmann, otherwise you will endanger the patient. • Only use the transfer and mobility aid if all components have been correctly mounted and adjusted. -
Page 9: Equipment For Basic Model
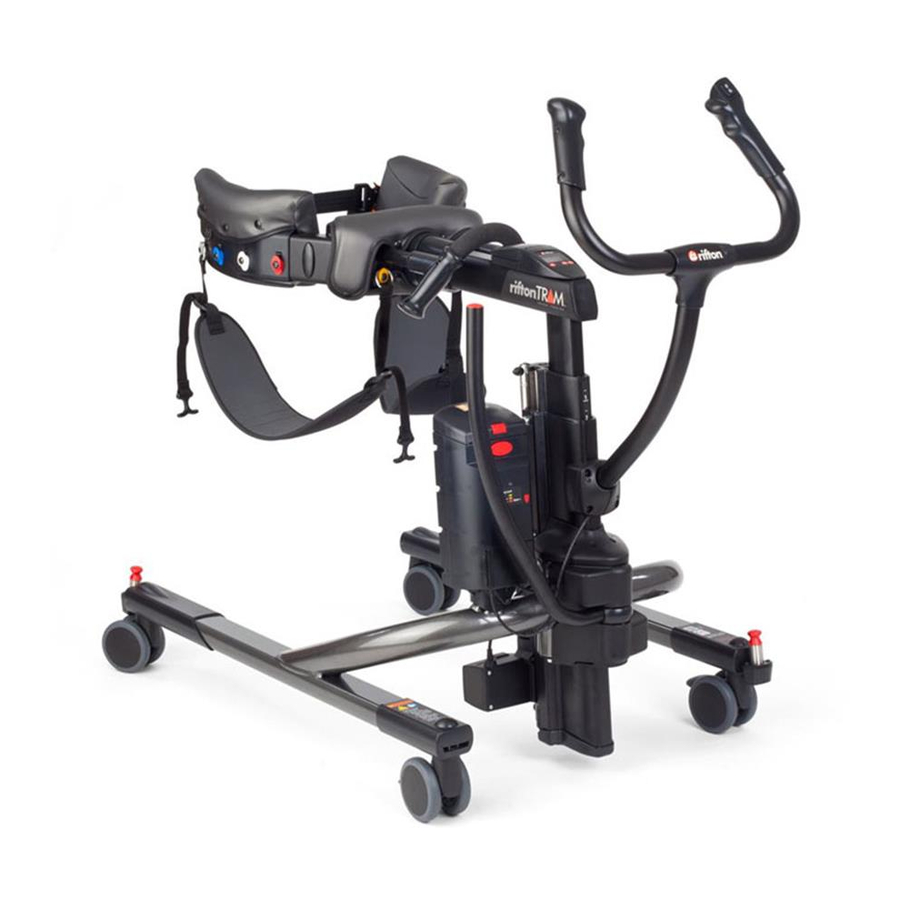
2. Product description. 2.5 Equipment for basic model • Basic model with abductable • Push handle frame (leg expander) • 2 leg straps • Padded torso guide • Battery pack and charger • Electrical height adjustment • 4 double castors 100mm •... -
Page 10: Settings
3. Settings. Settings and adjustments to the product or accessories may only be made by people who have been given the necessary instructions by a medical product advisor. Please ensure that none of the user's extremities are in the respective area when making adjustments of any kind to minimise the risk of injury. -
Page 11: Battery Pack Box
3. Settings. 3.2 Battery pack box The battery pack box contains the micro- processor required for the drive and the con- trol as well as the battery pack. To use the battery pack, please press the red button / emergency stop button (A) on the battery pack box and lift the cover. -
Page 12: Emergency Off Button
3. Settings. 3.4 Emergency off button Press the red emergency off button on the front side of the battery pack to immediately stop the drive of the tram. in the event of an emergency. Close the cover to resume operation of the tram. 3.5 Emergency lowering button The emergency lowering button (A) is located on the front of the battery... - Page 13 3. Settings There are two methods of measuring strain experienced during supported walking. Method 1 - Determination of the load borne by tram. : Set the scales to zero as previously described and bring the patient into the walking posi- tion using the body support system and the groin harness (see Point 3.12).
-
Page 14: Direction Locks (Optional)
3. Settings 3.7 Direction locks (optional) Direction locks ensure straight running of the tram. without lateral drifting. The use of the direction locks in the front castors make it easier for the accom- panying person to steer during trans- fer. The use of the direction locks in the rear castors, on the other hand, stabi- lise the tram.during gait training. -
Page 15: Body Support System
3. Settings 3.9 Body support system The innovative body support system has a padded torso guidance which secures and stabilises the patient. Accompanying per- sons are thus able to prepare the patient quickly for safe transport. It includes a pad- ded torso guidance (A), handles (B), clips with colour markings (C) and a safety strap (D). - Page 16 3. Settings Adjustments to the padded forearm supports Height adjustment: Press the button (A) and bring the fo- rearm supports to the required height. By loosening the screw connection (B), the following adjustments can be made on the forearm supports: •...
-
Page 17: Leg Straps For Seated Transfer
3. Settings 17 17 3.11 Leg straps for seated transfer Step 1: While the patient sits upright and with slightly raised arms, position the supports of the tram. body sup- port system around the chest of the patient, some centimetres below the armpits. Step 2: Secure the patient tightly with the buckle by closing the belt lock and tightening the strap. -
Page 18: Groin Harness (Optional) For Standing Up Or Walking
3. Settings 3.12 Groin harness (optional) for standing up or walking Step 1: Position the groin harness underneath the patient, either by lifting the patient using the leg straps (see the first four steps under Point 3.11) or by moving the patient on one side and positioning the groin har- ness in the meantime underneath the patient. -
Page 19: Using The Toilet With The Tram
3. Settings 19 19 3.13 Using the toilet with the tram. Step 1: Position the patient over the toilet seat using the tram. . Leave enough spa- ce to be able to take off the necessary clothing. Lock the brakes on the front castors of the tram.. -
Page 20: Cleaning And Servicing
Please also attention general cleaning and hygiene advice. This can be found at www.schuchmann.de/mediathek 4.1.2 Disinfection Various products can be used for surface disinfection of metal and plastic parts. Liquid disinfectants are available as ready-to-use solutions that are spray- ed on and evenly applied with a soft cloth. Alternatively, wipes pre-soaked with disinfectant can be used to wipe the products over the entire surface. -
Page 21: Maintenance Specifications
4. Cleaning and maintaining. 4.3.1 Maintenance specifications • Basic cleaning according to the manufacturer's specifications • Disinfect according to the manufacturer's specifications as required • Damages to the frame, mounting parts and accessories (cracks, breaks, corrosion, bent or missing parts) •... -
Page 22: Spare Parts
4. Cleaning and maintaining. 4.4 Spare parts Use only original accessories and original spare parts from Schuchmann, as otherwise the safety of the user is endangered and the warranty expires. To order spare parts, please contact the supplying specialist dealer (see point 7.5) stating the serial number of the product. -
Page 23: Technical Data
5. Technical data. tram. Total width 70 cm max. total width 102 cm Width of torso guidance 56 cm min. height torso guidance 110 cm max. height torso guidance 147 cm Total length 116 cm Height to push handle 110 cm Body circumference 56 - 152 cm Turning radius... -
Page 24: Guarantee
6. Guarantee. The two-year statutory guarantee period shall apply for all products. This begins with the delivery or handover of the goods. Should a verifiable material or manufacturing fault occur within this time period, we shall, after carriage paid return to us, view the indicated damage and, if applicable, either repair or deliver a new product at our discretion. -
Page 25: Battery Pack And Charger
8. Battery pack and charger. 8.1 Assembly of the charger 1. Take the battery pack out of the charger to get to the assembly bracket. 2. Using the two screws included in delivery, mount the charger on a wall close to a socket (A). -
Page 26: Identification
EU Konformitätserklärung EU Declaration of Conformity Firma / Company Schuchmann GmbH & Co. KG Rudolf-Runge-Str. 3 · 49143 Bissendorf · Deutschland / Germany Tel. +49 (0) 5402 / 40 71 00 · Fax +49 (0) 5402 / 40 71 109 erklärt in alleiniger Verantwortung, dass das nachfolgend genannte Produkt der Risikoklasse 1... -
Page 27: Serial Number / Date Of Manufacture
Date of manufacture Barcode UDI-DI Barcode UDI-PI schuchmann.de • info@schuchmann.de • Fon +49 (0) 5402 / 40 71 00 Product labelling in accordance with MDR 9.3 Product version The tram. mobility and transfer aid is available in one variant and can be supplemented through a diverse range of accessories (see Point 2.6). - Page 28 schuchmann.de...
Need help?
Do you have a question about the rifton tram and is the answer not in the manual?
Questions and answers