
Related Manuals for Schuchmann fridolin 1.


Summary of Contents for Schuchmann fridolin 1.
- Page 1 fridolin 1. & fridolin 2. Instructions for use. fridolin 1. & fridolin 2. The functional sub-frame for interior use.
- Page 2 Please note that gui- delines and representations in these Instructions for use may deviate from your product due to differing equipment. We reserve the right to make technical modifications. Important information! Ensure that these Instructions for use remain with the product.. Your schuchmann-Team...
-
Page 3: Table Of Contents
Contents. 1. Preparation..................04 1.1 Delivery ........................04 1.2 Safety measures prior to use ................04 1.3 Safe disposal ......................04 1.3.1 Packaging ....................04 1.3.2 Product ....................04 1.4 Where to store the Instructions for use ............. 04 2. Product description................05 2.1 Material information .................... -
Page 4: Preparation
1. Preparation. 1.1 Delivery On receiving the product, please check it for completeness, lack of faults and check it for any transport damage. Inspect the goods in the presence of your forwarder Should transport damage have occurred, please arrange for an inventory (determination of the faults) to be made in the presence of the forwarder. -
Page 5: Product Description
• Correct usage of the sub-frame requires precise and careful training of the accompanying person. • The max. load (see Point 5) may not be exceeded. • Do not use the respective sub-frame if it has defective, worn or missing parts. • Only use accessories and spare parts made by Schuchmann, otherwise you will endanger the child. • Only use the sub-frame if all components have been correctly mounted and adjusted. • Please read out the Instructions for use for users suffering from a visual or reading impairment, so that they can use the sub-frame safely. -
Page 6: Basic Model Equipment
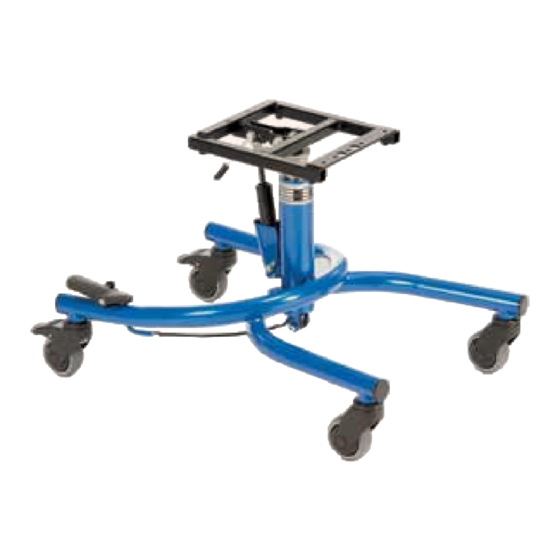
2. Product description. 2.5 Basic model equipment • Tilt adjustment of the seat unit via gas pressure spring 500N fridolin 1. • Mechanical height adjustment (on fridolin 2. • Height adjustment via gas pressure spring (on • 4 castors 75 mm, 2 with locking devices • Incl. support head for trapezoidal and external adapter and foot bench plug-in mechanism 2.6 Auflistung Zubehör • Push bar / handle • Release lever with fastening plate for assembly on back of pan • Release lever – with fixing plate for assembly on back of pan • Wheel base extension • Tube adapter • Central locking brake on the rear castors • Trapezoidal adapter (lower and upper part) • Support head for standard adapter • Foot bench / rests 2.7 Product overview The Fig. below is intended to show you the designation of the most important components as well as the terms which you will find in these Instructions for use. -
Page 7: Settings
2. Product description. Trapezoidal adapter Hand release for seat angle adjustment Foot pedal for Central column height adjustment Castors 3. Settings. Settings and adjustments to the product or accessories may only be made by people who have been given the necessary instructions by a medical product advisor. -
Page 8: Seat Height
3. Settings. 3.2 Seat height fridolin 1. : To adjust the seatr height, loosen the clamps (B) on the uprights and bring the seat pan into the re- quired position. The height of the gas pressure spring must then be adjusted. To do this, loosen the two screws (C) in the centre between the two uprights and adjust the gas pressure spring to... -
Page 9: Seat Angle Adjustment
3. Settings. 3.3 Seat angle adjustment In order to adjust the angle of the seat unit, the hand trigger (A) at the rear below the seat pan support must be actuated (by pulling it). To do this, the rear part of the lever must be pressed into the key lock. -
Page 10: Zentrale Feststellbremse
3. Settings. Seat pan adapter, trapezoidal shape: Place the seat pan with the trapezoidal shaped mounted adapter piece on the trapezoidal shaped seat pan adapter plate and push back. Here the paten- ted closure engages automatically. Now tighten the knurled knob (A) of the patented closure. -
Page 11: Push Bar Handling
3. Settings. 3.7 Push bar handling The push bar makes it easier to reloca- te the room frame, and can be adjus- ted in depth and angle. The angle is adjusted by releasing the quickrelease clamp (A) on both sides. Then bring the push bar into the correct position and tighten the quick-release clamp (A) again. -
Page 12: Repairs And Cleaning
Please also pay at- tention to our general cleaning and hygiene advice. You can find them at www.schuchmann.de/fridolin 4.2 Repairs Please carry out a daily visual inspection and check the sub-frame regularly for cracks, breaks, missing parts and malfunctions. -
Page 13: Technical Data
5. Technical data. Dimensions - basic model fridolin 1. Size 1 Size 2 Height of seat pan support 41 - 53 cm 41 - 53 cm Seat angle (-) 5° - 35° (-) 5° - 35° Total length 66 cm 77 cm Total width 43 cm... -
Page 14: Guarantee
5. Technical data. Dimensions - basic model fridolin 2. Size 1 Size 2 Height of seat pan support 41 - 53 cm 41 - 53 cm Seat angle (-) 5° - 35° (-) 5° - 35° Total length 66 cm 77 cm Total width 45 cm... -
Page 15: Identification
7. Identification. 7.1 EG-Konformitätserklärung Company Schuchmann GmbH & Co.KG Dütestr. 3 D-49205 Hasbergen Tel.: +49 (0) 54 05 / 909 - 0 Fax: +49 (0) 54 05 / 909 - 109 declares on their sole responsibility that the product named below is classified as product class 1 fridolin 1 &... -
Page 16: Serial Number / Date Of Manufacture
- Change status C; Issue 09.2018 7.5 Name and address of the manufacturer, specialist dealer supplying the product This product was manufactured by: Schuchmann GmbH & Co. KG Dütestraße 3 · 49205 Hasbergen Tel. +49 (0)5405/909-0 · Fax +49 (0)5405/909-109 info@schuchmann.de · www.schuchmann.de...
Need help?
Do you have a question about the fridolin 1. and is the answer not in the manual?
Questions and answers