Table of Contents
Advertisement
Quick Links
Advertisement
Table of Contents

Related Manuals for RCNTEC RPCM Series


Summary of Contents for RCNTEC RPCM Series
-
Page 2: Table Of Contents
Contents Contents Contents....................................2 Congratulations on purchase of your RPCM!......................4 1. Introduction to RPCM..............................5 1.1. Main Functions..............................5 1.2. RPCM DC Features............................... 6 2. Installing RPCM................................8 2.1. Operating Instructions and Specifications....................9 2.2. Mounting RPCM DC ATS 76A, RPCM DC 232A..................12 3. - Page 3 Contents 6. Command Reference of RPCM CLI........................231 6.1. General Description of the Command System..................232 6.2. Command help ..............................233 6.3. Exit commands for exit and quit....................... 235 6.4. Commands: add and delete......................... 236 6.5. Command restart for "Cold Restarting" of Connected Devices............250 6.6.
-
Page 4: Congratulations On Purchase Of Your Rpcm
We have tried to make interfaces as intuitive as possible and prepared detailed documentation to assist you in every case that may be not obvious or expected for this class of equipment. Bon voyage! We hope you enjoy it! RCNTEC Team. -
Page 5: Introduction To Rpcm
1. Introduction to RPCM 1. Introduction to RPCM 1.1. Main Functions RPCM stands for Resilient Power Control Module. It was designed in response to market demand for managed and switched PDU that could protect individual outlets from short circuits. During its development, we decided to add features, such as power metering and proper ground- ing diagnostics. -
Page 6: Rpcm Dc Features
1. Introduction to RPCM 1.2. RPCM DC Features Remote power management of individual outlets — operations team can turn on/off and re- set any of the 10 outlets without visiting the site where the equipment is installed and they can control unauthorized connection/disconnection of the equipment, accidental disconnection of power cables or PSU failure on the powered equipment. - Page 7 Use the latest version for information about new features and methods of work. You can ask technical support to get latest version this documentation. Contacts of technical support for the RPCM product: Tel: 8 (800) 302 87 87, +7 (495) 009 87 87. E-mail: info@rcntec.com Technical support https://rpcm.pro Feedback https://rpcm.pro/#contacts...
-
Page 8: Installing Rpcm
2. Installing RPCM 2. Installing RPCM Brief description of the section: 2.1. Operating Instructions and Specifications — This section contains information on the op- erating conditions of the Resilient Power Control Module (RPCM). 2.2. Mounting onto rack— detailed instructions for preparing for installing and connecting the Resilient Power Control Module (RPCM). -
Page 9: Operating Instructions And Specifications
2. Installing RPCM 2.1. Operating Instructions and Specifications 2.1.1. Before You Begin The RPCM must not be connected to an electrical system where voltage exceeds the limits specified in the RPCM datasheet. Do not operate without grounding. Switches or circuit breakers used to provide power towards the RPCM must be easily ac- ... - Page 10 2. Installing RPCM 2.1.3. General Technical Characteristics Table 2.1.1. Technical Characteristics RPCM DC ATS 76A, RPCM DC 232A RPCM DC ATS 76A RPCM DC 232A Characteristics Inputs Power 3.648 kVA @ 48VDC 11.136 kVA @ 48VDC Connection 2 DC inputs 1 DC input Connection Type Spring terminals (1.5-16...
- Page 11 -20 ~ +60 ° С Relative air humidity 45 ~ 85% (no condensation) 45 ~ 85% (no condensation) Contacts of technical support for the RPCM product: Tel: 8 (800) 302 87 87, +7 (495) 009 87 87. E-mail: info@rcntec.com Technical support https://rpcm.pro Feedback https://rpcm.pro/#contacts...
-
Page 12: Mounting Rpcm Dc Ats 76A, Rpcm Dc 232A
(RPCM) and is intended for personnel with the appropriate qualifications. Before you begin, read this guide to help you complete the installation process. If necessary, con- tact RCNTEC support for assistance. Adhere strictly to the safety precautions listed below. 2.2.2. Installation and Operation Requirements Power and ground requirements for RPCM DC ATS 76A: voltage -42 - -58 VDC;... - Page 13 2. Installing RPCM CAUTION! To reduce the risk of injury, before connecting the power, check the grounding. To avoid personal injury, adhere strictly to the power current requirements for occupational safety and health. 2.2.4. Acclimatization The maximum permissible temperature range for storage during storage is 20°C/h. Before turn- ing on the Resilient Power Management Module (RPCM), it takes time to adapt to the new condi- tions at least 24 hours for acclimatization.
- Page 14 2. Installing RPCM Figure 2.2.1. Inserting rack nuts. Figure 2.2.2. Mounting the Resilient Power Control Module (RPCM).
- Page 15 2. Installing RPCM Figure 2.2.3. Connecting RPCM DC ATS 76A. Figure 2.2.4. Connecting RPCM DC 232A. 2.2.7. Terminals for input and output connections Input terminals of RPCM DC ATS 76A and RPCM DC 232A have significant differences in design, dimensions and cross-sectional area of wires. These differences originate from the difference in maximum current values.
- Page 16 2. Installing RPCM 2.2.7.1. Connecting wires to RPCM DC ATS 76A inputs The procedure for connecting wires to input terminals of RPCM DC ATS 76A. Carefully study the labeling and polarity of the connection. Remove the insulation from the wire. Before inserting wire into terminal, you must first open the clamp.
- Page 17 2. Installing RPCM 2.2.7.2. Connecting wires to the inputs RPCM DC 232A To connect the input to the electrical circuit use two terminals with screws for the positive and negative conductors. To connect cable to the screw terminal: Remove insulation from wire. Insert the wire into the contact hole.
- Page 18 2. Installing RPCM Figure 2.2.7. Connecting the conductor to the RPCM DC ATS 76A or RPCM DC 232A outlet terminal.
-
Page 19: Start Setting Up
3. Start Setting Up 3. Start Setting Up Brief description of this chapter: 3.1. Setting Up a Network, Assigning IP Addresses — This section describes the procedure for displaying information about the available IP and MAC addresses, and the procedure for assign- ing IP addresses using various methods. -
Page 20: Getting Primary Information, Network Configuration
3. Start Setting Up 3.1. Getting primary information, network configuration 3.1.1. Getting Information via the RPCM Display The RPCM display is a matrix of luminous segments for displaying alphanumeric messages. Note. For more information on the appearance and display device of the RPCM, it is recom- mended that you read the information in section "4.1. - Page 21 3. Start Setting Up 3.1.3. Assigning IP Address by DHCP Assigning IP address by DHCP is used for RPCM by default. If the DHCP server is missing or temporarily down, RPCM will receive an address from the range 169.254.xxx.xxx. For more details, see "3.1.4. Auto Assign IP Address through Zero Configuration (APIPA)"...
-
Page 22: System Requirements
3. Start Setting Up 3.2. System Requirements 3.2.1. Power and Ground Requirements Power and Ground Requirements for RPCM DC ATS 76A: voltage -42 - -58VDC; grounding is required; input circuit breakers should be easily accessible to disconnect in case of danger. Power and Ground Requirements for RPCM DC 232A: ... -
Page 23: Modes Of Operation
3. Start Setting Up 3.3. Modes of Operation 3.3.1. Scheme for RPCM DC ATS 76A RPCM DC ATS is generally designed to be powered by two sources, including batteries. The power is provided from the input with higher voltage. At equal voltage, the power comes from both inputs. -
Page 24: Description Of The Rpcm Device
4. Description of the RPCM Device 4. Description of the RPCM Device Brief description of this chapter: 4.1. Physical Interface — A description of the external control elements of the Resilient Power Control Module (RPCM), electrical connections and devices on the outlets. 4.2. -
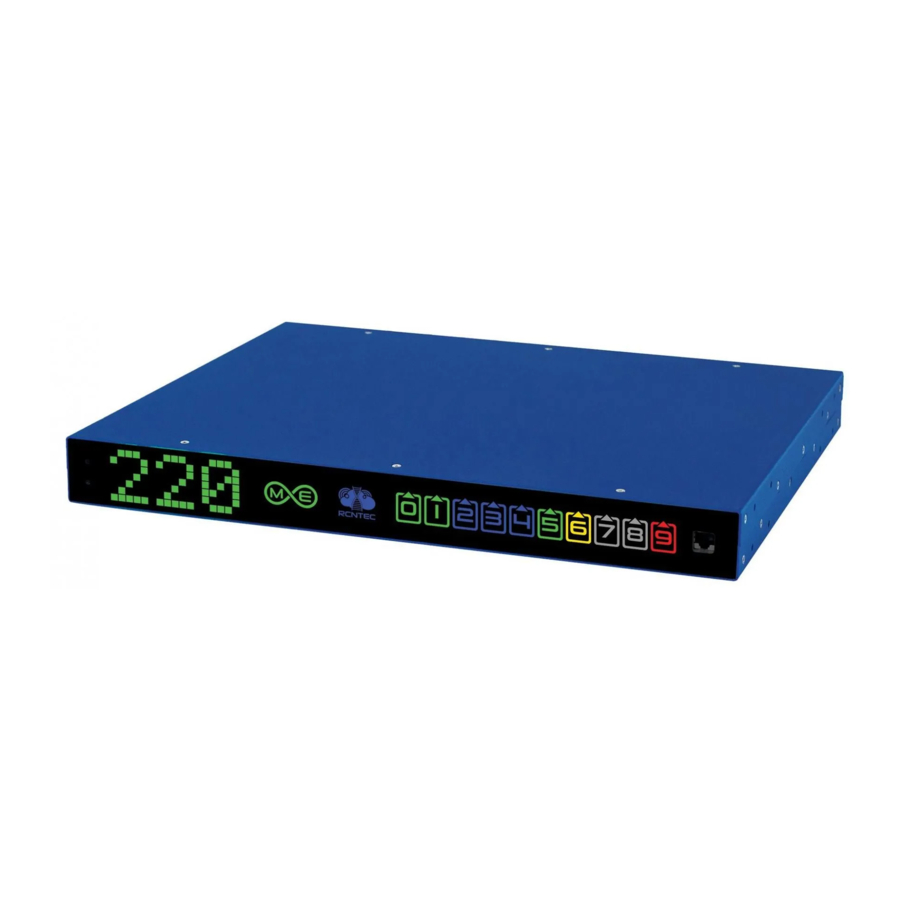
Page 25: Physical Interface
4. Description of the RPCM Device 4.1. Physical Interface 4.1.1. General Information about Appearance and Control Elements Resilient Power Control Module (RPCM) is an electronic device in a 1U form factor case for mounting on a standard 19" server rack. Overall dimensions are height 44 x width 440mm x depth 365mm. - Page 26 4. Description of the RPCM Device Legend: 1 — top control button; 2 — bottom control button; 3 — LED display. 4 — input indicator 1; 5 — input indicator 2; 6 — outlet indicators 0-9; ...
- Page 27 4. Description of the RPCM Device Figure 4.1.3. Front panel with indicators and controls RPCM DC 232A. Legend: 1 — top control button; 2 — bottom control button; 3 — display; 4 — input indicator; 5 —...
- Page 28 4. Description of the RPCM Device Legend: 1 — outlets; 2 — outlet indicators; 3 — input; 4 — input indicator; 5 — grounding screw; 6 — serial sticker. 4.1.2. Displaying information on the display The left part of the indicator is used to display the status of the device: ...
- Page 29 Incorrect or untimely use of controls can lead to failure and emergency situations. Please, con- tact RCNTEC support, if you have any non-standard scenarios. The left side of the display panel is used to represent the status of the input and outlet channels: ...
- Page 30 4. Description of the RPCM Device Description of input color signals: green — input is active, voltage within specified ranges; blue — input is reserve (for models RPCM with ATS), voltage within specified ranges; red — there is no voltage on this input; ...
- Page 31 4. Description of the RPCM Device Figure 4.1.5. Appearance of the model RPCM DC ATS 76A with an active display. Front panel shown on top, rear panel shown at the bottom. Figure 4.1.6. Appearance of the model RPCM DC 232A with an active display.
- Page 32 4. Description of the RPCM Device 4.1.3. Front panel device control 4.1.3.1. Basic Principles An indicator is used to obtain information about the status of devices. When controlling RPCM through a physical interface (upper and lower buttons), the following ac- tions are used: ...
- Page 33 ATTENTION! Do not press the control buttons of the module control unnecessarily! Erroneous or untimely use of controls can lead to unpredictable actions, such as disabling the client device and creating an emergency. Please, in case of unusual situations, contact RCNTEC support service. 4.1.3.4. Objects and Functions of Control Mode When working in Control Mode, the concepts of "object"...
- Page 34 4. Description of the RPCM Device 4.1.3.5. Control Mode Actions: Troubleshooting and Regular Operations All operations Control Mode for the physical interface can be divided as: troubleshooting and reg- ular. The need for troubleshooting operations arises due to non-standard situations, such as the occurrence of a short circuit or an active sound signal.
- Page 35 4. Description of the RPCM Device Table 4.1.2. Available operations in Control Mode. Function / Message Object Mode Description Control Mode! Be Message alerting that Control Mode Careful! has been entered Return To View Mode Regular Menu item to return to View Mode Operations for RPCM Beeper Switch OFF...
-
Page 36: Web Interface Of Rpcm
4. Description of the RPCM Device 4.2. Web Interface of RPCM 4.2.1. General Information This type of management is based on use of application-level protocols: HTTP (HTTPS). The con- nection is made via any Internet browser on the standard 80 (443) port. For access to the web-interface RPCM's enter the IP address or domain name in the address bar. - Page 37 4. Description of the RPCM Device Legend: 1 — menu for selecting the language of the web interface; 2 — field for entering the user name; 3 — field for entering password; 4 — LOGIN button to confirm entered details and log in to the of RPCM's web interface; 5 —...
- Page 38 4. Description of the RPCM Device Figure 4.2.2. Dashboard in View Mode for RPCM DC ATS 76A. 4.2.3. Description of RPCM's Color Signal System To quickly obtain information, a color coding of inlets and outlets status is used. Below is a brief description of the color options.
- Page 39 Legend: 1 — menu button; 2 — RCNTEC logo (click to visit the RCNTEC website — rcntec.com); 3 — RPCM name (click to visit the RPCM product site — rpcm.pro); 4 — light identification button depicted as a lightbulb image;...
- Page 40 4. Description of the RPCM Device The display unit in turn shows: Voltage value at the active input Status of inputs 1 and 2. Status of the outlets from 0 to 9. 4.2.5. Information about the Status of Inputs in View Mode For active input in View Mode, the following information is displayed: input voltage in volts;...
- Page 41 4. Description of the RPCM Device 4.2.6. Information on the Status of Outlets in View Mode Figure 4.2.6. Block of information about the outlets status in the View Mode. Legend: 1 — outlet number; 2 — outlet name; 3 — status message; 4 —...
- Page 42 4. Description of the RPCM Device 4.2.7. Control Mode To activate Control Mode, you need to press the Unlock Control button on the Top Control Bar. After this, the graphs near each object (input or outlet) are simultaneously replaced by controls. Caution! Be careful when operating in Control Mode.
- Page 43 4. Description of the RPCM Device Legend: 1 — input number; 2 — instant input voltage value; 3 — TURN ON button — turns on the input; 4 — TURN OFF button — turns off the input; 5 — IDENTIFY button — activates input indicator blinking to help locate it quickly in the rack; 6 —...
- Page 44 4. Description of the RPCM Device Legend: 1 — outlet number; 2 — outlet name; 3 — status message; 4 — instant outlet current consumption value (milliamps); 5 — TURN ON button— turns on the outlet; 6 — TURN OFF button — turns off the outlet; 7 —...
- Page 45 4. Description of the RPCM Device Figure 4.2.11. Menu for jumping between sections of the RPCM's web interface. 4.2.12 Warning for Unsecured Connections When you try to access RPCM via unsecured HTTP protocol, RPCM will show a warning bar sug- gesting to switch to an encrypted HTTPS connection.
- Page 46 4. Description of the RPCM Device Figure 4.2.13. Dashboard in View Mode RPCM DC 232A. Figure 4.2.14. Dashboard in Control Mode RPCM DC 232A. 4.2.14. Showing Current Limits on graphs By default current/voltage values scales in web-interface’s graphs are getting automatically ad- justed to the maximum values appeared during the time interval shown on the graph.
- Page 47 4. Description of the RPCM Device Figure 4.2.15. The Dashboard control panel in the Show Limits mode RPCM DC with ATS. After switching on the required switches click “Show Limits” button again to have graphs dis- played with the scales set according to the required configuration. Figure 4.2.16.
- Page 48 4. Description of the RPCM Device Figure 4.2.17. Settings for demonstrating the established limits RPCM DC ATS 76A. Legend of the Figure 4.2.17. 1 — number of the outlet; 2 — name of the outlet; 3 — instant current consumption value (milliamps); 4 —...
- Page 49 4. Description of the RPCM Device Figure 4.2.18. The Dashboard control panel in the "Show Limits mode”.
-
Page 50: Rpcm Ssh Interface
4. Description of the RPCM Device 4.3. RPCM SSH Interface 4.3.1. General Information Secure Shell (SSH) — Industry standard protocol for encrypted access to remote terminals. SSH uses tcp port 22 by default. RPCM uses SSH to provide access to its CLI interface (command line interface) for text based re- mote control. - Page 51 4. Description of the RPCM Device Figure 4.3.1. Express information output. Input information: voltage for 1 and 2 inputs; primary and active is input 1; input 2 in the redundant secondary input; total current consumption (on active input 1); ...
- Page 52 4. Description of the RPCM Device 4.3.3. Description of the Color System for RPCM CLI Coding To obtain information quickly, a color indication of the status of inputs and outlets is used. (See Figure 4.3.1.) Below is a brief description of the color signals (designations). Description of input color signals: ...
- Page 53 4. Description of the RPCM Device Figure 4.3.2. General scheme of the command line interface. The built-in help is invoked by the help command. After entering the command, the system displays the available commands: help RPCM Commands description: exit - exit from command line interface help - show this help add-add configuration for rpcm subsystems: snmp, etc.
- Page 54 4. Description of the RPCM Device disable failback enable failback set all outputs - set all outputs state turn them off turn them on set api - set api options generate-new-key generate new API access key enables or disables existing key set automation - set automation parameters device-name <name>...
- Page 55 4. Description of the RPCM Device adminState enable/disable snmp community adjust SNMP community settings trap adjust SNMP traps settings user adjust SNMP users settings set time - set new time value value zone zone synchronization toggle ntp synchronization set user <username> - set parameters for username authenticator set Authenticator for user...
- Page 56 4. Description of the RPCM Device 4.3.6. Interface Features for RPCM without ATS RPCM without ATS have only one input, for example RPCM DC 232A. RPCM without ATS does not have the ability to disable / enable a single input. In other aspects of its management via SSH CLI it is similar to working with RPCM DC ATS 76A.
-
Page 57: Input Operation
4. Description of the RPCM Device 4.4. Input Operation 4.4.1. Short Description This chapter describes how to configure inputs. You can switch into this section using the menu entry Inputs or by typing https:// <name_or_IP_RPCM>/inputs in the browser address line (provided that authentication was pre- viously successful). - Page 58 Legend: 1 — menu button; 2 — RCNTEC logo (click to visit the RCNTEC website — rcntec.com); 3 — RPCM name (click to visit the RPCM product site — rpcm.pro); 4 — light identification button depicted as a lightbulb image;...
- Page 59 4. Description of the RPCM Device 4.4.4. Information Area of the Inputs Section There are areas of information and controls for each input below the top bar of the Top Control Bar. These areas can be divided into left and right parts. On the left part of each area the information in text values and graphs is presented: ...
- Page 60 4. Description of the RPCM Device Legend: 1 — number of the inlet; 2 — current value graphs area ; 3 — “INFORMATION” block; 4 — “LIMITS“ block; 5 — “gear” button to call the “INPUT SETTINGS” window; 6 — “COUNTERS“ block. 4.4.5.
- Page 61 4. Description of the RPCM Device Figure 4.4.5. INPUT SETTINGS pop-up window (entering the main parameters). Note: Input 2 is configured in the same way. 4.4.6. Management of Inlets in Control Mode Figure 4.4.6. Control Mode of the Input Section. Legend: 1 —...
- Page 62 4. Description of the RPCM Device 5 — TURN OFF button — to turn off input (if it’s on); 6 — instant current value (milliamps); 7 — instant power consumption value (watts); 8 — INFORMATION block with Name, Description and Recognition state; 9 —...
- Page 63 4. Description of the RPCM Device Legend: 1 — input indicator; 2 — graph area; 3 — INFORMATION block; 4 — LIMITS block with the thresholds; 5 — gear button to show the “INPUT SETTINGS” pop-up window; 6 — “COUNTERS“ block. In Control Mode Control, input has an IDENTIFY button to help quickly locate the device.
- Page 64 4. Description of the RPCM Device Figure 4.4.10. Showing Current Limits on graphs configuration for RPCM DC ATS 76A. After enabling Showing Current Limits, selected areas of the set limits are turned on for the se- lected parameters. Figure 4.4.11. The setting items for Showing Current Limits. Legend: 1 —...
- Page 65 4. Description of the RPCM Device 7 — current limit value; 8 — instant power consumption. 9 — “INFORMATION” block; 10 — LIMITS block with the thresholds; 11 — gear button to open the INPUT SETTINGS pop-up window; 12 — ”COUNTERS” block with parameters of power consumption. Figure 4.4.12.
-
Page 66: Outlet Operation
4. Description of the RPCM Device 4.5. Outlet Operation 4.5.1. Short Description This section describes how to configure the outlets (outputs) to provide power to consumers. You can access this section via Outputs menu item or by typing: https://<name_or_IP_RPCM>/ outputs directly in web-browser address bar (provided that authentication passed successfully before). - Page 67 4. Description of the RPCM Device 4.5.2. Output (Outlets) section Figure 4.5.2. Main window of the section Outputs...
- Page 68 Legend: 1 — menu button; 2 — RCNTEC logo (click to visit the RCNTEC website — rcntec.com); 3 — RPCM name (click to visit the RPCM product site — rpcm.pro); 4 — light identification button depicted as a lightbulb image;...
- Page 69 4. Description of the RPCM Device Survival priority — outlets with higher absolute values will turn off first in the event of input overload. "COUNTERS" contain the following data: kWh — accumulated value of kilowatt hours (active power); "ALARM LIMIT"...
- Page 70 4. Description of the RPCM Device Legend: 1 — outlet number; 2 — instant current value; 3 —graph of current and active power; 4 — instant power value; 5 — "INFORMATION" values block; 6 — "COUNTERS" block with accumulated power consumption counters;; 7 —...
- Page 71 4. Description of the RPCM Device overcurrent turn off limit, mA — maximum permissible current capacity; when ex- ceeded, the system initiates a procedure turning off the outlet due to overload; overcurrent turn off limit, s — delay in seconds, after which the outlet is turned off; ...
- Page 72 4. Description of the RPCM Device 4.5.7. Management of Outlets in Control Mode Figure 4.5.6. Outlet panel in Control Mode. Legend: 1 — outlet number; 2 — instant current value; 3 — TURN ON button — use to turn on the outlet; 4 —...
- Page 73 4. Description of the RPCM Device Figure 4.5.7. General view of the Outputs section in Control Mode. 4.5.8. Showing Current Limits on graphs By default current/voltage values scales in web-interface’s graphs are getting automatically ad- justed to the maximum values appeared during the time interval shown on the graph. Sometimes to evaluate actual current flowing through the RPCM on different channels you might want to see current consumption of several outlets in the same scale based on maximum set lim- its.
- Page 74 4. Description of the RPCM Device Figure 4.5.8. Showing Current Limits configuration. Figure 4.5.9. Showing Current Limits configuration – switches for outlet 1 are on. Legend: 1 — number of the outlet; 2 — instant current consumption value (milliamps); 3 — switch on/off Showing Current Limits for notification;...
- Page 75 4. Description of the RPCM Device 4 — switch on/off Showing Current Limits for turning off; 5 — instant power consumption value (watts); 6 — “INFORMATION” block; 7 — "COUNTERS" block; 8 — "OVERVOLTAGE PROTECTION" block; 9 — “ALARM LIMIT" block; 10 —...
-
Page 76: Rpcm Configuration Section
4. Description of the RPCM Device 4.6. RPCM Configuration Section 4.6.1. General Information This chapter describes the configuration of device level settings of the Resilient Power Control Module (RPCM). Almost all the necessary tools for it are found in the "Configuration" section of the web interface. You can reach this section by using the Configuration menu item or by typing: https:// <name_or_IP_RPCM>/configuration/ in the browser address string (provided that authentica- tion was previously successful). - Page 77 4. Description of the RPCM Device Figure 4.6.2. "Configuration" section — main window. Control panels can be collapsed to fit all panels on screen for easy navigation. Figure 4.6.3. "Configuration" section with collapsed panels. 4.6.3. Top Control Bar in Configuration Section Figure 4.6.4.
- Page 78 Legend: 1 — menu button; 2 — RCNTEC logo (click to visit the RCNTEC website — rcntec.com); 3 — RPCM name (click to visit the RPCM product site — rpcm.pro); 4 — light identification button depicted as a lightbulb image;...
- Page 79 4. Description of the RPCM Device Figure 4.6.5. "Configuration" section— management panels.
- Page 80 4. Description of the RPCM Device Legend: 1 — Users and Groups panel; 2 — Location and Tech contact panel; 3 — Network settings panel; 4 — SNMP settings panel; 5 — Date/Time and NTP settings panel; 6 — SMTP Setting panel; 7 —...
- Page 81 4. Description of the RPCM Device Figure 4.6.6. — Users and groups management panel. The "Users" tab is active. By default, only one user account rpcmadmin is created (with the default password rpcmpass- word). To enter a new user, press the ADD button. The following fields are available in the ap- peared window: ...
- Page 82 4. Description of the RPCM Device Figure 4.6.7. "New User" pop-up window for creating an RPCM system user account. To edit an existing account, click on the username and the account settings editing window will open. Figure 4.6.8. "Edit User" window for RPCM system user account editing.
- Page 83 4. Description of the RPCM Device The following input fields are available in this window: Password — password; Confirm password — confirmation of the password; Expiration seconds — time in seconds after which the session opened under the user's ac- count is expired and interrupted;...
- Page 84 4. Description of the RPCM Device Figure 4.6.10. User and group management panel. Active tab "Group". To enter a new group, press the ADD button. This window serves to fill a group name and set UNIX-like permission Read-Write-eXecute (RWX). Objects for set permission is following: ...
- Page 85 4. Description of the RPCM Device Figure 4.6.11. "New Group" window. To create a group, click on the CREATE button. To cancel, use the CANCEL button. To edit an existing group, click on the groupname and the group settings editing window will open.
- Page 86 4. Description of the RPCM Device Figure 4.6.12. "Edit Group" window. To update group information with new settings click UPDATE button. To cancel changes, use the CANCEL button. DELETE button is intended to remove the group. After clicking DELETE button a confirmation window will appear to confirm the deletion of this group.
- Page 87 4. Description of the RPCM Device Figure 4.6.13. "Delete Group" window. 4.6.6. Information about Technical Support Location and Contacts This area serves to fill reference information in order to obtain it quickly in order that it may be quickly obtained when needed. The following fields are displayed in the Location tab: ...
- Page 88 4. Description of the RPCM Device Figure 4.6.15. The “Edit Location” pop-up window. To save the information entered click the UPDATE button. To cancel changes click the CANCEL button. The "Tech Contact" tab is intended for specifying technical support details, in particular contact number, email and name of the company providing support (or name of the contact person).
- Page 89 4. Description of the RPCM Device Figure 4.6.17. The "Edit Tech Contact" window. 4.6.7. Network Settings By default RPCM is configured to obtain IP address via DHCP protocol. In case it cannot obtain IP address via DHCP (for example if DHCP server is not available), RPCM will self-assign the IP ad- dress from IP Link Local range (169.254.0.0/16).
- Page 90 4. Description of the RPCM Device Figure 4.6.18. "Network Settings” panel. To assign the static IP address, click the EDIT button, then in the pop-up window that appears choose Static in Configure IPv4 field and enter static IP address parameters in fields below. Figure 4.6.19.
- Page 91 4. Description of the RPCM Device 4.6.8. SNMP Settings 4.6.8.1. General Settings of SNMP The SNMP panel contains four tabs: SNMP agent — general settings of the SNMP agent; v1/v2c — set up the community-based authentication for SNMP versions 1 and 2c; ...
- Page 92 4. Description of the RPCM Device Context — name of context (ContextName). The only available change is to enable the use of SNMP by enabling the SNMP agent. To do this, use the ENABLE SNMP button. After activating it, a pop-up window with a green header with the title "Change SNMP agent administrative state"...
- Page 93 4. Description of the RPCM Device Also you can disable SNMP agent. To do this, use the DISABLE SNMP button. After clicking DIS- ABLE SNMP, a pop-up window with the red title "Change SNMP agent administrative state" will ask you to confirm disabling SNMP. Additional information.
- Page 94 4. Description of the RPCM Device This tab has the following action buttons: DELETE — to delete the current SNMP community record; EDIT — to edit the current SNMP community record; RELOAD — to refresh information in the SNMP management panel. ...
- Page 95 4. Description of the RPCM Device Figure 4.6.26. SNMP management panel, "v1/2c" tab. The new SNMP community "management" was created. Note. Tab title contains number of configured records in parentheses. Use EDIT button within the record to open the pop-up window to make the necessary changes. For example, set the community entry to "Enabled: ON"...
- Page 96 4. Description of the RPCM Device 4.6.8.3. Access management via SNMPv3 protocol Access control via SNMPv3 protocol is located in the tab "v3". As it was said above, the basis of the SNMP protocol version 3 security is authentication using user accounts.
- Page 97 4. Description of the RPCM Device This tab has the following action buttons: DELETE — to delete the current SNMP user record; EDIT — to edit the current SNMP user record; ADD USER — to create a new SNMP user record; ...
- Page 98 4. Description of the RPCM Device Figure 4.6.31. SNMP management panel. "SNMP v3 Users" tab. A new SNMP user record has been created. If you need to make changes to SNMP user configuration, click the EDIT button within the SN- MPv3 user record to open “Edit SNMP User”...
- Page 99 4. Description of the RPCM Device Figure 4.6.33. Window confirming the removal of the current SNMPv3 user account. 4.6.8.4. Configuring SNMP Traps SNMP traps are configured in the Traps tab. Additional information: An SNMP trap is a special message, which is sent by the SNMP agent to the receiver (monitoring server). Such messages are sent to alert the administrator about critical events, e.g., a short circuit, outlet turn of due to overcurrent and so on.
- Page 100 4. Description of the RPCM Device Each SNMP trap configuration record contains the following buttons: DELETE — to delete the SNMP trap configuration record; DISABLE/ENABLE — to disable/enable sending messages to this destination. When you click DELETE button, a deletion confirmation window will open. Figure 4.6.35.
- Page 101 4. Description of the RPCM Device Port — UDP port of the destination address (default is 162); Community — SNMP community string; Enabled — On/Off switch. To confirm the creation of a new SNMP Trap configuration record click the CREATE button. To cancel the creation, click the CANCEL button.
- Page 102 4. Description of the RPCM Device Figure 4.6.38. "Date/Time settings" pop-up windows for adjusting system time and time zone. Note. The time zone has to be selected from a predefined list. To see full list of options you need to clear the field. To sim- plify selection of a correct time zone, when you start entering letters into the “Device time zone”...
- Page 103 4. Description of the RPCM Device Figure 4.6.40. Time change pop-up - clock adjustment. To set time, just click on hour value first, the interface will remember hour and switch to min- utes, click on minutes and you’re all set. Figure 4.6.41.
- Page 104 4. Description of the RPCM Device Figure 4.6.42. "NTP" tab for setting up time servers. Click EDIT button to open NTP server list pop-up window to configure up to 5 ntp server ad- dresses. Click RELOAD button to refresh information in tab from RPCM (in case it was changed from an- other interface like CLI or another browser session).
- Page 105 4. Description of the RPCM Device Figure 4.6.44. SMTP management panel, "SMTP Settings" tab. SMTP Settings tab has the following fields: Server — server name (FQDN) or IP address; Port — TCP port number on which the server is waiting for the connection; ...
- Page 106 4. Description of the RPCM Device Figure 4.6.45. "New SMTP Server" pop-up window. To finalize creation of SMTP server configuration click CREATE button. To cancel, press CANCEL. If you need to change the SMTP server settings, click the EDIT in the SMTP server configuration record, which will open the Edit SMTP Server pop-up window.
- Page 107 4. Description of the RPCM Device Figure 4.6.46. "Edit SMTP server" pop-up window. Click DELETE button to delete SMTP Server configuration. A confirmation window will appear. Figure 4.6.47. Confirmation pop-up window "Delete SMTP server". In the Mail recipients tab, you can configure up to 5 e-mail recipients records. Email recipient records have following fields: ...
- Page 108 4. Description of the RPCM Device Figure 4.6.48. SMTP management panel. The "Mail recipients" tab. Click ADD button to configure a new mail recipient record, it will open the "New recipient" pop- up window. Figure 4.6.49. "New recipient" pop-up window. To finalize configuration of the new mail recipient record, click the CREATE button.
- Page 109 4. Description of the RPCM Device Figure 4.6.50. "Delete recipient" confirmation pop-up window. Click the RELOAD button to refresh mail recipient records from the RPCM (in case the list of records was changed from another interface like CLI or another browser session). 4.6.11.
- Page 110 4. Description of the RPCM Device Figure 4.6.55. RPCM Cloud configuration panel —"Cloud Registration" tab. 4.6.12. API Service Settings RPCM features REST API service listening on TCP Port number 8888. Figure 4.6.53. The "API Settings" area. This panel includes the following fields and controls: ...
- Page 111 4. Description of the RPCM Device 4.6.13. Front Panel Display Settings Note. For more information on the appearance and display device of the RPCM, it is recommended that you read the infor- mation from the section "4.1. Physical Interface". The RPCM display is a matrix of light segments for displaying alphanumeric messages. To configure it via the web-interface, use the "Display Settings for Device"...
- Page 112 4. Description of the RPCM Device What to show by default — use this field to select what will be shown on physical display upon start-up of the RPCM (see Table 4.6.1). Figure 4.6.55. Select the default message to display. 4.6.14.
- Page 113 4. Description of the RPCM Device The "Restore" tab is used to restore the RPCM configuration from a backup copy. It contains a sin- gle button named “CHOOSE FILE...” Clicking “CHOOSE FILE...” opens the standard file selection window of the operating system. You need to select the configuration backup file to proceed.
- Page 114 4. Description of the RPCM Device Figure 4.6.59. Restore tab — the progress indicator. Figure 4.6.60. Restore tab — a confirmation of RESTART RPCM HLC. In the final window of the recovery procedure, the following buttons are available: RESTORE ANOTHER CONFIG; RESTART RPCM HLC.
- Page 115 4. Description of the RPCM Device 4.6.16. RADIUS server setting Panel of number 12 (see Figure 4.6.9.) — for entering and editing RADIUS server information setting. RADIUS servers (Remote Authentication in Dial-In User Service) use RADIUS protocol for au- thentication, authorization and data collect about using resources. Figure 4.6.62.
- Page 116 4. Description of the RPCM Device Fields are available: Server — IP or FQDN Port — TCP port, default number is 1812 Priority — the server priority, some RADIUS servers are available; Secret — the password phrase for authentification; ...
-
Page 117: Updating The Rpcm Software
4. Description of the RPCM Device DELETE button is intended to remove the server. After clicking DELETE button a confirmation window will appear to confirm the deletion of this RADIUS server record. Figure 4.6.65. “Delete RADIUS server” window. 4.6.17. Restart RPCM HLC Panel of number 13 (see Figure 4.6.9.) —... - Page 118 4. Description of the RPCM Device Note. Screenshots of the RPCM DC 232A are shown as an illustration. For other models of RPCM DC, the basic principles of working are preserved. Figure 4.7.1. Navigation to the "Software Update" menu. Note. Some details about RPCM Software and Firmware. RPCM uses 3 controllers: High Level Controller (HLC), which runs Software;...
- Page 119 4. Description of the RPCM Device Figure 4.7.2. Main window of the "Software Update" section. Information fields contains the following: Model; Model Number; Serial Name; Software version; Software release date; Firmware version; Firmware date. Update file selection and process control area contains the following: ...
- Page 120 4. Description of the RPCM Device UPLOAD. In the Information area, the sequence of the update is shown graphically: Select the firmware file; Upload the file to the device; Start the update process; Restart the device. At the bottom of the window there is a button CLOSE, which is pressed to go to the section Con- trol Panel (Dashboard).
- Page 121 4. Description of the RPCM Device The file upload stage — Stage 1 — consists of two successively starting processes: the process of uploading a file; verification process. By clicking on the UPLOAD button, a copy of the update file is transferred to the RPCM and its subsequently verified.
- Page 122 4. Description of the RPCM Device Figure 4.7.5. File upload process After the upload, RPCM starts verification of the update file. In the main window "Software up- date" at this stage, the PAUSE button changes to UPDATE. At this stage, the new UPDATE button is inactive and will become active only after the verification procedure is finished.
- Page 123 4. Description of the RPCM Device Figure 4.7.6. RPCM is ready to be updated. Clicking on the UPDATE button starts the process of installation of the new Software. Figure 4.7.7. Applying the update.
- Page 124 4. Description of the RPCM Device After the update is applied, the update validation step occurs. Externally, there are no changes except for the message Verifying applied update... Figure 4.7.8. Verifying an update. After successful completion of the update and validation procedure, the high level control mod- ule needs to be restarted.
- Page 125 4. Description of the RPCM Device Figure 4.7.9. Window with the "RESTART TO FINALIZE UPDATE" button. After clicking on the active item, a window with a confirmation message will appear to restart the device. Figure 4.7.10. A window confirming restart. If you press "YES"...
- Page 126 4. Description of the RPCM Device 4.7.2. Update via SSH CLI This section describes the procedure for updating via the SSH CLI (Command Line Interface). Ap- plying this method is especially important if there is no possibility to use a channel with a band- width for updating via web interface.
- Page 127 4. Description of the RPCM Device Successful authentication response: Last login: Wed Jan 5 01:36:33 2000 from 192.168.1.10 RPCMCli version 0.3.25 is starting user rpcmadmin successfully authenticated from 192.168.1.10, access level superuser Auto-logout time is set to 3600 seconds [Serial Name]: SuperGeroy [Temperature]: 27C [Serial Number]: RU2017101100000001MO01DN01 [Ground]: GOOD...
- Page 128 4. Description of the RPCM Device In the response to the input command: show update The system responds with following: Software update has started ... Type 'help' to get suggestions Note. If you type start update before the update file is finished, the system will respond with: We are not ready to start update, software update file should be uploaded and verified...
- Page 129 4. Description of the RPCM Device You will receive a proposal to restart the SSH CLI session: Please disconnect your SSH session manually... Restarting High Level Controller in 5 sec- onds... WARNING! If RPCM gets an IP address via DHCP or via Zero Configuration Networking, then the IP address after the restart may change.
-
Page 130: System Journal
4. Description of the RPCM Device 4.8. System Journal 4.8.1. General Information This section describes the Resilient Power Control Module (RPCM) event log. You can access to this section by using the menu item Navigation System journal or by typing: https://<name_or_IP_RPCM>/logs/ in the browser line (provided that authentication was suc- cessful before). - Page 131 4. Description of the RPCM Device Figure 4.8.2. Main window of the "System Journal". 4.8.3. Filter Bar It is located immediately under the heading "System journal". It serves to control the demonstration mode. Figure 4.8.3. Filter bar of the "System journal" Below is a list of items from the Filter bar.
- Page 132 4. Description of the RPCM Device critical — critical error; error — non-critical error; warning — warning; notice — comment about the condition; info — information message; debug — information for debugging. Figure 4.8.4. Drop-down menu for "Type of messages". The field "Include"...
- Page 133 4. Description of the RPCM Device The field "Exclude" is intended to filter of output records, but opposite in action, i.e. only mes- sages that do not contain keywords are displayed.igure 4.8.5. Action of the Include item. Only mes- sages that contain words "has dropped" are displayed. Use the LOAD and RESET buttons to load messages and reset to the original values, respectively.
-
Page 134: Network Utilities
4. Description of the RPCM Device 4.9. Network Utilities 4.9.1. General Information This section describes the "Network Utilities" section of the Resilient Power Control Module (RPCM). You can get to this section using the menu item Navigation Network Utilities or by typing: https://<name_or_IP_RPCM>/netutils/ in the browser string (assuming that authentication was successful before). - Page 135 4. Description of the RPCM Device Figure 4.9.2. Window of the "Network Utilities" section. 4.9.3. Description of the "Command Area" The "Command Area" contains the following fields and controls: Select command - when pressed, the drop-down menu is invoked, where the command is se- lected, e.g.
- Page 136 4. Description of the RPCM Device 4.9.4. Description of other elements of the "Network Utilities" window The following is a description of all other areas with controls (see Figure 4.9.2.) History area collects and presents information about previous requests. Clicking on the selected item demonstrates the status of the "Network Utilities" section at the time of the completion of this command and allows you to re-execute it if necessary.
-
Page 137: Documentation
4. Description of the RPCM Device 4.10. Documentation This chapter describes the "Documentation" section of the Resilient Power Control Module (RPCM). You can access to this section by using the menu item Navigation Documentation or by typing https://<name_or_IP_RPCM>/docs/ in the browser string (provided that authentication was suc- cessful before). - Page 138 4. Description of the RPCM Device Figure 4.10.2. The window of the "Documentation" section. All operations: viewing, copying a document, copying a link to a document are performed in ac- cordance with features of the interface and settings of the web browser used. For additional in- formation, please, see the documentation of your web browser.
-
Page 139: Automation Tools
4. Description of the RPCM Device 4.11. Automation Tools 4.11.1. Short Description This chapter describes the "Automation" section of the Resilient Power Control Module (RPCM). You can go to this section using the menu item "Automation" or by typing: https:// <name_or_IP_RPCM>/automation/ in the browser string (assuming that authentication was pre- viously successful). - Page 140 4. Description of the RPCM Device Figure 4.11.2. The Automation section window (PING, TCP PORT, and MINER STATUS subsections are not shown, scrolling is required). In case of violation of the predetermined conditions (the drop in the level of power consumption or hashrate, the unavailability of the TCP port or the network interface for ICMP echo/reply (ping)), a power reset is performed.
- Page 141 1 — the call button of the jump menu; 2 — RCNTEC logo, (click on the link to RCNTEC company website — rcntec.com); 3 — name of RPCM (by clicking on the link it goes to RPCM product site — rpcm.pro);...
- Page 142 4. Description of the RPCM Device 4.11.3. Sub-sections of the Main Window (General Description) The main window of the "Automation" section is divided into 11 subsections. Figure 4.11.3. "Automation" section — with numbered subsections.
- Page 143 4. Description of the RPCM Device Description of subsections in Figure 4.11.3: 1 — outlet number; 2 — general parameters of a watchdog — name, device type (for mining modules), description (extended comment up to 254 characters inclusive); 3 — date and time of the last reboot and estimated time to a next reboot; 4 —...
- Page 144 4. Description of the RPCM Device red — the output was disconnected due to input overload, overcurrent, input overcurrent, short circuit at the output, overvoltage at the output (accompanied by appropriate mes- sages); yellow — output is on, but has an overload condition (accompanied by corresponding messages);...
- Page 145 4. Description of the RPCM Device Restart in progress — if the consumer device is in the process of rebooting, this will be displayed in this field; Auto restart initiated at: — the date and time the device reset procedure was started; ...
- Page 146 4. Description of the RPCM Device A summary of the monitoring settings for "HASHRATE" subsection is displayed. Monitoring — has two values "NO" or "YES", the field is intended to indicate the watch- dog status; Current value, GH/s — the number of calculated hashes per second; ...
- Page 147 4. Description of the RPCM Device The test based on ICMP echo requests/replies (pings). If the ICMP packets reach the device under test, and the test passes within specified timing parameters, the device is considered available. Monitoring — has two values "NO" or "YES", the field is intended to indicate the watch- dog status;...
- Page 148 4. Description of the RPCM Device 4.11.4.7. "TCP port" Subsection In Figure 4.11.4., this section is marked with the number "7". It demonstrates information about the TCP port watchdog status. Figure 4.11.8. "Automation" section — "TCP port" subsection. A summary of the monitoring settings for the TCP port status is displayed. ...
- Page 149 4. Description of the RPCM Device 4.11.4.8. "MINER STATUS" Subsection In Figure 4.11.4., this section is marked with the number "8". This section shows more detailed information about the status of the miner. Figure 4.11.9. "Automation" section — "MINER STATUS" subsection. ...
- Page 150 4. Description of the RPCM Device 4.11.4.9. “Edit device” Window In Figure 4.11.4., this section is indicated by the number "9". Click the “gear” button on the top right of the subsection to open the pop-up editing window. Figure 4.11.10. “Edit device” pop-up window. There are following buttons at the bottom right corner of the window: "DELETE", "CLOSE", "SAVE".
- Page 151 4. Description of the RPCM Device 4.11.4.10. "LIST OF DEVICES" Subsection In Figure 4.11.4., this section is marked with the number "10". This area shows list of devices that are being monitored and has "ADD DEVICE" button to open the new watchdog configuration pop-up window. Clicking on any of the configured devices automatically positions the interface web page on the parameters area of this device.
- Page 152 4. Description of the RPCM Device 4.11.5. Managing Parameters 4.11.5.1. Parameters Common to All Types of Monitoring To configure a new watchdog automation, click "ADD DEVICE" button to open a configuration pop-up windows. This pop-up window has more parameters than than are available in view mode of the "Automation"...
- Page 153 4. Description of the RPCM Device Figure 4.11.13. Pop-up window "Add device" with the called Device type. Figure 4.11.14. Selecting Output 8 and Output 9 outputs in the "Add Device" pop-up window with the "Output.
- Page 154 4. Description of the RPCM Device The outputs selection drop-down menu does not disappear after selecting the output. In order to confirm outputs selection you need to click outside the drop-down menu area. This is organized in such way to simplify configuration of multiple outputs for a single device for which the watch- dog is being configured.
- Page 155 4. Description of the RPCM Device You can use one type of monitoring, as well as two, three or all four simultaneously. To do this, you need to activate appropriate check boxes. When the desired monitoring type is activated, fields with parameters specific for this particular test type appear.
- Page 156 4. Description of the RPCM Device To configure monitoring of the TCP port, you need to enter parameters in the following fields: IP address or FQDN; TCP Port — port being checked for successful connection; Connection timeout, s — the time interval during which the service has to respond; ...
- Page 157 4. Description of the RPCM Device Hashrate alarm minimum limit, GH/s — the bottom threshold of the hashrate value, reaching of which triggers an alarm; Hashrate alarm minimum limit, s — stabilization delay in seconds for alarm; Hashrate restart minimum limit, GH/s — the bottom threshold of the hashrate value, reaching of which triggers a restart;...
- Page 158 4. Description of the RPCM Device 4.11.6. Combination of Tests Different devices may have different symptoms of failure. For example, if a device responds to ICMP packets, it does not necessarily mean that the service is working. If the TCP port responds to requests — it does not always mean that the system is working properly.
-
Page 159: About This Rpcm
4. Description of the RPCM Device 4.12. About This RPCM This chapter describes the "About This RPCM" section of the Resilient Power Control Module (RPCM). You can go to this section by using the menu item Documentation or by typing https:// <name_or_IP_RPCM>/about/ in the browser (if authentication was successful before). -
Page 160: The Reference For Rpcm Rest Api
5. The Reference for RPCM REST API 5. The Reference for RPCM REST API 5.1. General information 5.1.1 Accessing REST API REST API is available on TCP port 8888 using non-encrypted HTTP protocol. The REST API is available over the protocols for HTTP —... -
Page 161: Protocol Commands
5. The Reference for RPCM REST API 5.1.3 Parameters There are two notations of parameters: 1 REST API parameters in the URL directly; 2 JSON parameters in a queries (commands). Example: {"id": 18} 5.2. Protocol Commands 5.2.1. Get Device Status 5.2.1.1. - Page 162 5. The Reference for RPCM REST API "aL": 1, "gG": 0, "lines": { "1": { "mV": 48119, "admS": "ON", "rS": "OFF", "iMa": 0, "iWa": 0, "aKWh": 0.385 "2": { "mV": 0, "admS": "ON", "rS": "OFF", "iMa": 0, "iWa": 0, "aKWh": 0.385 "channels": { "0": { "admS": "ON",...
- Page 163 5. The Reference for RPCM REST API "iWa": 0, "aKWh": 0.0 "3": { "admS": "ON", "actS": "ON", "tC": "ON", "cbFS": "OFF", "oAFS": "OFF", "oTFS": "OFF", "loTFS": "OFF", "rS": "OFF", "ovTFS": "OFF", "iMa": 0, "iWa": 0, "aKWh": 0.033889 "4": { "admS": "ON", "actS": "ON", "tC": "ON", "cbFS": "OFF",...
- Page 164 5. The Reference for RPCM REST API "admS": "ON", "actS": "ON", "tC": "ON", "cbFS": "OFF", "oAFS": "OFF", "oTFS": "OFF", "loTFS": "OFF", "rS": "OFF", "ovTFS": "OFF", "iMa": 0, "iWa": 0, "aKWh": 0.0 "8": { "admS": "ON", "actS": "ON", "tC": "ON", "cbFS": "OFF", "oAFS": "OFF", "oTFS": "OFF", "loTFS": "OFF",...
- Page 165 5. The Reference for RPCM REST API REPLY: "rOLC": "OK", "sNa": "OpernyiPevets", "sNu": "RU2019060400000003MO01AM01", "MAC": "B8F74A000306", "hwV": 232, "fwV": "0.10.41", "fwRD": "20200926103429", "rtcB": "20100104230141", "rtc": "20110605150544", "r": 255, "LR": 40, "R": 32, "p": "YES", "g": 150, "temp": 37, "b": 0, "exB": { "top": { "pr": "NO",...
- Page 166 5. The Reference for RPCM REST API "oAFS": "OFF", "oTFS": "OFF", "loTFS": "OFF", "rS": "OFF", "ovTFS": "OFF", "iMa": 0, "iWa": 0, "aKWh": 0.0, "name": "TEST", "description": "bla bla", "restartDelay": 3 "1": { "admS": "ON", "actS": "ON", "tC": "ON", "cbFS": "OFF", "oAFS": "OFF", "oTFS": "OFF", "loTFS": "OFF",...
- Page 167 5. The Reference for RPCM REST API "description": "", "restartDelay": 3 "4": { "admS": "ON", "actS": "ON", "tC": "ON", "cbFS": "OFF", "oAFS": "OFF", "oTFS": "OFF", "loTFS": "OFF", "rS": "OFF", "ovTFS": "OFF", "iMa": 0, "iWa": 0, "aKWh": 0.0, "name": "output_4", "description": "", "restartDelay": 3 "5": { "admS": "ON",...
- Page 168 5. The Reference for RPCM REST API "oTFS": "OFF", "loTFS": "OFF", "rS": "OFF", "ovTFS": "OFF", "iMa": 0, "iWa": 0, "aKWh": 0.0, "name": "output_7", "description": "", "restartDelay": 3 "8": { "admS": "ON", "actS": "ON", "tC": "ON", "cbFS": "OFF", "oAFS": "OFF", "oTFS": "OFF", "loTFS": "OFF", "rS": "OFF", "ovTFS": "OFF",...
- Page 169 5. The Reference for RPCM REST API "lAKWh": { "1": 0.385, "2": 0.385 "cAKWh": { "0": 0.0, "1": 0.350833, "2": 0.0, "3": 0.033889, "4": 0.0, "5": 0.0, "6": 0.0, "7": 0.0, "8": 0.0, "9": 0.0 "cbFF": { "0": 0, "1": 0, "2": 0, "3": 0, "4": 1,...
- Page 170 5. The Reference for RPCM REST API "6": 0, "7": 0, "8": 0, "9": 0 "cOAF": { "0": 0, "1": 0, "2": 0, "3": 0, "4": 0, "5": 0, "6": 0, "7": 0, "8": 0, "9": 0 "cOTLM": { "0": 8000, "1": 30000, "2": 30000, "3": 30000,...
- Page 171 5. The Reference for RPCM REST API "6": 0, "7": 0, "8": 0, "9": 0 "cAS": { "0": 1, "1": 1, "2": 1, "3": 1, "4": 1, "5": 1, "6": 1, "7": 1, "8": 1, "9": 1 "cTOD": { "0": 3, "1": 3, "2": 4, "3": 5,...
- Page 172 5. The Reference for RPCM REST API "6": 60, "7": 60, "8": 60, "9": 60 "cRaOVS": { "0": 65535, "1": 3, "2": 4, "3": 5, "4": 6, "5": 7, "6": 8, "7": 9, "8": 10, "9": 11 "cOVTF": { "0": 65535, "1": 65535, "2": 65535, "3": 65535,...
- Page 173 5. The Reference for RPCM REST API REPLY: "resultOfLastCommand": "OK", "serialName": "OpernyiPevets", "serialNumber": "RU2019060400000003MO01AM01", "MAC": "B8F74A000306", "hardwareVersion": 232, "firmwareVersion": "0.10.41", "firmwareReleaseDate": "20200926103429", "rtcBoot": "20100104230141", "rtc": "20110605151335", "restartReason": 255, "llcResetsCount": 40, "restartsCount": 32, "displayModePrintFromHLC": "YES", "globalFlagsOfLLC": 150, "temperature": 37, "buzzerState": 0, "externalButtons": { "top": { "pressed": "NO",...
- Page 174 5. The Reference for RPCM REST API "overcurrentAlarmFiredState": "OFF", "overcurrentTurnOffFiredState": "OFF", "lineOvercurrentTurnOffFiredState": "OFF", "recognitionState": "OFF", "overvoltageTurnOffFiredState": "OFF", "instantMilliamps": 0, "instantWatts": 0, "accumulatedKWh": 0.0, "name": "TEST", "description": "bla bla", "restartDelay": 3 "1": { "adminState": "ON", "actualState": "ON", "triggerControl": "ON", "circuitBreakerFiredState": "OFF", "overcurrentAlarmFiredState": "OFF", "overcurrentTurnOffFiredState": "OFF", "lineOvercurrentTurnOffFiredState": "OFF",...
- Page 175 5. The Reference for RPCM REST API "description": "", "restartDelay": 3 "4": { "adminState": "ON", "actualState": "ON", "triggerControl": "ON", "circuitBreakerFiredState": "OFF", "overcurrentAlarmFiredState": "OFF", "overcurrentTurnOffFiredState": "OFF", "lineOvercurrentTurnOffFiredState": "OFF", "recognitionState": "OFF", "overvoltageTurnOffFiredState": "OFF", "instantMilliamps": 0, "instantWatts": 0, "accumulatedKWh": 0.0, "name": "output_4", "description": "", "restartDelay": 3 "5": { "adminState": "ON",...
- Page 176 5. The Reference for RPCM REST API "overcurrentTurnOffFiredState": "OFF", "lineOvercurrentTurnOffFiredState": "OFF", "recognitionState": "OFF", "overvoltageTurnOffFiredState": "OFF", "instantMilliamps": 0, "instantWatts": 0, "accumulatedKWh": 0.0, "name": "output_7", "description": "", "restartDelay": 3 "8": { "adminState": "ON", "actualState": "ON", "triggerControl": "ON", "circuitBreakerFiredState": "OFF", "overcurrentAlarmFiredState": "OFF", "overcurrentTurnOffFiredState": "OFF", "lineOvercurrentTurnOffFiredState": "OFF", "recognitionState": "OFF", "overvoltageTurnOffFiredState": "OFF",...
- Page 177 5. The Reference for RPCM REST API "lineAccumulatedKWh": { "1": 0.385, "2": 0.385 "channelAccumulatedKWh": { "0": 0.0, "1": 0.350833, "2": 0.0, "3": 0.033889, "4": 0.0, "5": 0.0, "6": 0.0, "7": 0.0, "8": 0.0, "9": 0.0 "circuitBreakerFiringFacts": { "0": 0, "1": 0, "2": 0, "3": 0, "4": 1,...
- Page 178 5. The Reference for RPCM REST API "6": 0, "7": 0, "8": 0, "9": 0 "channelOvercurrentAlarmFired": { "0": 0, "1": 0, "2": 0, "3": 0, 100 10470 100 10470 36228 0 --:--:-- --:--:-- --:--:-- 36354 "4": 0, "5": 0, "6": 0, "7": 0, "8": 0, "9": 0...
- Page 179 5. The Reference for RPCM REST API "6": 0, "7": 0, "8": 0, "9": 0 "channelAdministrativeStatus": { "0": 1, "1": 1, "2": 1, "3": 1, "4": 1, "5": 1, "6": 1, "7": 1, "8": 1, "9": 1 "channelTurnOnDelayOnStartup": { "0": 3, "1": 3, "2": 4, "3": 5,...
- Page 180 5. The Reference for RPCM REST API "6": 60, "7": 60, "8": 60, "9": 60 "recoverAfterOvervoltageSeconds": { "0": 65535, "1": 3, "2": 4, "3": 5, "4": 6, "5": 7, "6": 8, "7": 9, "8": 10, "9": 11 "channelOvervoltageTurnOffFacts": { "0": 65535, "1": 65535, "2": 65535, "3": 65535,...
- Page 181 5. The Reference for RPCM REST API REPLY: {"resultOfLastCommand":"OK","softwareVersion":"0.3.25"} 5.2.3. Outlet Status Getting Command: GET /api/channel/channelNumber It returns the current status of the outlet in JSON format. Synonyms: GET /api/output/[channelNumber] GET /api/outlet/[channelNumber] Parameter: channelNumber = Outlet number of interest The return is: {"admS":"ON","actS":"ON","t1C":"ON","t2C":"ON","cbFS":"OFF","fSC1":0,"fSC2":0,"oAFS":"OFF"...
- Page 182 5. The Reference for RPCM REST API 5.2.4. Outlet Status Setting 5.2.4.1. Change the Outlet Status Command: PUT /api/channel/channelNumber/newState Parameters: channelNumber = [0-9] (Outlet number of interest (single digit)) newState = on|off (desired state) Example: curl -X PUT http://10.210.1.52:8888/api/channel/0/on curl -X PUT http://10.210.1.52:8888/api/channel/0/off REPLY: "rOLC": "OK", "ats": {...
- Page 183 5. The Reference for RPCM REST API Parameters: mask - bit outlet mask if mask = 3 — set inlets: 0 and 1 to ON if mask = 1023 — set all inlets (0 - 9) to ON state = [on, off] REPLY: GET /api/status is used as a system response.
- Page 184 5. The Reference for RPCM REST API 5.2.4.5 Reboot of All Outlets Command: PUT /api/(channels|outputs|outlets)/off Example: curl -X PUT http://192.168.1.24:8888/api/outputs/off 5.2.4.6 Reboot of an Outlet Command: PUT /api/(channel|output|outlet)/channelNumber/restart Parameters: channelNumber = [0-9] Examples: curl -X PUT http://192.168.1.24:8888/api/output/1/restart 5.2.4.7 Outlet Reboot with a Delay Command: PUT /api/(channel|output|outlet)/(channelNumber)/restart/restartDelay Parameters:...
- Page 185 5. The Reference for RPCM REST API 5.2.5. Input Status Setting 5.2.5.1. Change Input State Command: PUT /api/input/[inputNumber]/[state] Parameter: inputNumber — the number of an input[1, 2] state - [on, off] REPLY: GET /api/status is used as a system response. Example: curl -X PUT http://192.168.1.24:8888/api/input/1/on 5.2.5.2.
- Page 186 5. The Reference for RPCM REST API Parameters: inputNumber — input number [1, 2] state — [on, off] REPLY: GET /api/status is used as a system response Example: curl -X PUT http://192.168.1.24:8888/api/input/1/recognition/on 5.2.6. Date and Time Operations 5.2.6.1. How to Get Information about Time and Date Command: GET /api/time Example:...
- Page 187 5. The Reference for RPCM REST API Parameters: state - [on, off, alternate, disable, enable] REPLY: is used as a system return. GET /api/status Example: curl -X PUT http://192.168.1.24:8888/api/beeper/on 5.2.8. Front Display Messages Settings 5.2.8.1. User Message Setting Command: PUT /api/display/user-message Parameters: message fgColor...
- Page 188 5. The Reference for RPCM REST API REPLY: {"message":"hello","fgColor":"grey"} Example curl -X GET http://192.168.1.42:8888/api/display/user-message 5.2.8.4. Get current display message Command: GET /api/display/what-is-shown REPLY: "userMessage" Example curl -X GET http://192.168.1.42:8888/api/display/what-is-shown 5.2.8.5. Information About Allowed Colors Command: GET /api/display/allow-colors REPLY: ["red","green","blue","yellow","purple","grey"] Example: curl -X GET http://192.168.1.42:8888/api/display/allow-colors 5.2.8.6.
- Page 189 5. The Reference for RPCM REST API REPLY: "resultOfLastCommand": 'OK', "state": { "1": { "hashRate": { "alarm": true, "lastAlarmTime": '2019-09-19 22:44:21', "restartRequested": false, "restartRequestedTime": null, "lastCheckTime": '2019-09-21 14:38:34', "lastAlarmHashRate": 'ghsAv=11846.88, ghs5s=13143.71', "lastRestartHashRate": null, "instantValues": { "hashRateValues": { "ghsAv": 12020.02, "ghs5s": 13799.6 "minHashRateValue": 12020.02 "consumption": { "alarm": false,...
- Page 190 5. The Reference for RPCM REST API "Type": 'DragonMint_T1' "GHS 5s": 13799.6, "GHS av": 12020.02, "miner_count": 3, "frequency": null "lastSuccessUpdateMinerState": '2019-09-21 14:38:34', "minerStats": { "Model": 'DragonMint_T1', "table": { "column_names": [ 'ASC', 'Enabled', 'Status', 'MHS av', 'MHS 5s' "rows": [ 'Y', 'Alive', 3560577.23, 2060526.22...
- Page 191 5. The Reference for RPCM REST API "hashRateValues": { "ghsAv": 189.32, "ghs5s": 68.467 "minHashRateValue": 68.467 "consumption": { "alarm": false, "lastAlarmTime": null, "restartRequested": false, "restartRequestedTime": null, "lastCheckTime": null, "lastAlarmMilliamps": null, "lastRestartMilliamps": null, "instantValues": { "instantOutputsMilliamps": [], "sumInstantOutputsMilliamps": null "ping": { "alarm": false, "lastAlarmTime": null, "restartRequested": false, "restartRequestedTime": null,...
- Page 192 5. The Reference for RPCM REST API "STATS": 0, "ID": 'BC50', "Elapsed": 2846215, "Calls": 0, "Wait": 0, "Max": 0, "Min": 99999999, "GHS 5s": '68.46700', "GHS av": 189.32, "miner_count": 3, "frequency": '606', "fan_num": 2, "fan1": 0, "fan2": 0, "fan3": 0, "fan4": 0, "fan5": 2760, "fan6": 2760, "fan7": 0,...
- Page 193 5. The Reference for RPCM REST API "temp3_7": 0, "temp3_8": 15, "temp3_9": 0, "temp3_10": 0, "temp3_11": 0, "temp3_12": 0, "temp3_13": 0, "temp3_14": 0, "temp3_15": 0, "temp3_16": 0, "temp_pcb_1": '-', "temp_pcb_2": '-', "temp_pcb_3": '-', "temp_pcb_4": '-', "temp_pcb_5": '-', "temp_pcb_6": '0-0', "temp_pcb_7": '-', "temp_pcb_8": '0-0', "temp_pcb_9": '-', "temp_pcb_10": '-',...
- Page 194 5. The Reference for RPCM REST API "total_acn": 168, "total_rate": 68.46, "chain_rateideal1": 0, "chain_rateideal2": 0, "chain_rateideal3": 0, "chain_rateideal4": 0, "chain_rateideal5": 0, "chain_rateideal6": 5750.38, "chain_rateideal7": 0, "chain_rateideal8": 5751.07, "chain_rateideal9": 0, "chain_rateideal10": 0, "chain_rateideal11": 0, "chain_rateideal12": 0, "chain_rateideal13": 0, "chain_rateideal14": 0, "chain_rateideal15": 0, "chain_rateideal16": 0, "temp_max": 0, "Device Hardware%": 0.0013,...
- Page 195 5. The Reference for RPCM REST API "chain_hw8": 12, "chain_hw9": 0, "chain_hw10": 0, "chain_hw11": 0, "chain_hw12": 0, "chain_hw13": 0, "chain_hw14": 0, "chain_hw15": 0, "chain_hw16": 0, "chain_rate1": '', "chain_rate2": '', "chain_rate3": '', "chain_rate4": '', "chain_rate5": '', "chain_rate6": '68.4670', "chain_rate7": '0.00000', "chain_rate8": '0.00000', "chain_rate9": '', "chain_rate10": '', "chain_rate11": '',...
- Page 196 5. The Reference for RPCM REST API 'RATE', 'HW' "rows": [ '68.4670', 20899 '0.00000', "Rate": 68.467 Example: curl -X GET http://192.168.1.10:8888/api/automation/state 5.2.9.2. Get Automation Device Types List Command: GET /api/automation/device-types REPLY: "1": { "name": "Bitmain_D3", "settings": { "checkIntervalSeconds": 6, "interRestartIntervalSeconds": 600, "consumption": { "alarmBottomLimitMilliamps": 4500, "restartBottomLimitMilliamps": 4300,...
- Page 197 5. The Reference for RPCM REST API "2": { "name": "Bitmain_L3+", "settings": { "checkIntervalSeconds": 6, "interRestartIntervalSeconds": 600, "consumption": { "alarmBottomLimitMilliamps": 3900, "restartBottomLimitMilliamps": 3700, "alarmSeconds": 60, "restartSeconds": 300 "hashRate": { "hashrateMeasurementUnit": "GH/s", "api": { "port": 4028, "unavailabilityTimeoutSeconds": 3 "alarmBottomLimit": 500, "restartBottomLimit": 490, "alarmSeconds": 60, "restartSeconds": 300 "3": {...
- Page 198 5. The Reference for RPCM REST API "restartSeconds": 300 "hashRate": { "hashrateMeasurementUnit": "GH/s", "api": { "port": 4028, "unavailabilityTimeoutSeconds": 3 "alarmBottomLimit": 12500, "restartBottomLimit": 12400, "alarmSeconds": 60, "restartSeconds": 300 "5": { "name": "Claymore", "settings": { "checkIntervalSeconds": 6, "interRestartIntervalSeconds": 600, "consumption": { "alarmBottomLimitMilliamps": 5400, "restartBottomLimitMilliamps": 4500, "alarmSeconds": 60, "restartSeconds": 300...
- Page 199 5. The Reference for RPCM REST API "7": { "name": "Bitmain_S11", "settings": { "checkIntervalSeconds": 6, "interRestartIntervalSeconds": 600, "consumption": { "alarmBottomLimitMilliamps": 6600, "restartBottomLimitMilliamps": 6300, "alarmSeconds": 60, "restartSeconds": 300 "hashRate": { "hashrateMeasurementUnit": "GH/s", "api": { "port": 4028, "unavailabilityTimeoutSeconds": 3 "alarmBottomLimit": 20400, "restartBottomLimit": 20300, "alarmSeconds": 60, "restartSeconds": 300 "8": {...
- Page 200 5. The Reference for RPCM REST API "restartSeconds": 300 "hashRate": { "hashrateMeasurementUnit": "GH/s", "api": { "port": 4028, "unavailabilityTimeoutSeconds": 3 "alarmBottomLimit": 26900, "restartBottomLimit": 26800, "alarmSeconds": 60, "restartSeconds": 300 "10": { "name": "Small-Router", "settings": { "checkIntervalSeconds": 6, "interRestartIntervalSeconds": 600, "consumption": { "alarmBottomLimitMilliamps": null, "restartBottomLimitMilliamps": null, "alarmSeconds": null, "restartSeconds": null...
- Page 201 5. The Reference for RPCM REST API "12": { "name": "Large-Router", "settings": { "checkIntervalSeconds": 6, "interRestartIntervalSeconds": 600, "consumption": { "alarmBottomLimitMilliamps": null, "restartBottomLimitMilliamps": null, "alarmSeconds": null, "restartSeconds": null "hashRate": { "hashrateMeasurementUnit": null, "api": { "port": null, "unavailabilityTimeoutSeconds": null "alarmBottomLimit": null, "restartBottomLimit": null, "alarmSeconds": null, "restartSeconds": null "13": {...
- Page 202 5. The Reference for RPCM REST API "restartSeconds": null "hashRate": { "hashrateMeasurementUnit": null, "api": { "port": null, "unavailabilityTimeoutSeconds": null "alarmBottomLimit": null, "restartBottomLimit": null, "alarmSeconds": null, "restartSeconds": null "15": { "name": "Large-Switch", "settings": { "checkIntervalSeconds": 6, "interRestartIntervalSeconds": 600, "consumption": { "alarmBottomLimitMilliamps": null, "restartBottomLimitMilliamps": null, "alarmSeconds": null, "restartSeconds": null...
- Page 203 5. The Reference for RPCM REST API "17": { "name": "Medium-Server", "settings": { "checkIntervalSeconds": 6, "interRestartIntervalSeconds": 600, "consumption": { "alarmBottomLimitMilliamps": null, "restartBottomLimitMilliamps": null, "alarmSeconds": null, "restartSeconds": null "hashRate": { "hashrateMeasurementUnit": null, "api": { "port": null, "unavailabilityTimeoutSeconds": null "alarmBottomLimit": null, "restartBottomLimit": null, "alarmSeconds": null, "restartSeconds": null "18": {...
- Page 204 5. The Reference for RPCM REST API "restartSeconds": null "hashRate": { "hashrateMeasurementUnit": null, "api": { "port": null, "unavailabilityTimeoutSeconds": null "alarmBottomLimit": null, "restartBottomLimit": null, "alarmSeconds": null, "restartSeconds": null "20": { "name": "Custom", "settings": { "checkIntervalSeconds": 6, "interRestartIntervalSeconds": 600, "consumption": { "alarmBottomLimitMilliamps": null, "restartBottomLimitMilliamps": null, "alarmSeconds": null, "restartSeconds": null...
- Page 205 5. The Reference for RPCM REST API "consumption": { "alarmBottomLimitMilliamps": null, "restartBottomLimitMilliamps": null, "alarmSeconds": null, "restartSeconds": null, "enabled": false "hashRate": { "api": { "ipAddress": "192.168.1.37", "port": 4028, "unavailabilityTimeoutSeconds": 3 "alarmBottomLimit": 15700, "restartBottomLimit": 8000, "alarmSeconds": 60, "restartSeconds": 300, "enabled": true "ping": { "ipAddress": null, "connectTimeout": null, "upperLimitMilliseconds": null,...
- Page 206 5. The Reference for RPCM REST API "alarmBottomLimit": 19000, "restartBottomLimit": 10, "alarmSeconds": 60, "restartSeconds": 300, "enabled": true "ping": { "ipAddress": null, "connectTimeout": null, "upperLimitMilliseconds": null, "alarmPacketLossPercentage": null, "restartPacketLossPercentage": null, "alarmSeconds": null, "restartSeconds": null, "enabled": false "tcpPortAvailability": { "ipAddress": null, "port": null, "connectTimeout": null, "alarmSeconds": null, "restartSeconds": null,...
- Page 207 5. The Reference for RPCM REST API consumptionRestartBottomLimitMilliamps — the bottom threshold of the current consumption value, reaching of which triggers for restart, mA (number 1 to 5 digits); consumptionAlarmSeconds — stabilization delay in seconds for alarm, s (number 1 to 5 digits);...
- Page 208 5. The Reference for RPCM REST API tcpPortAvailabilityIPAddress — IP address or FQDN; tcpPortAvailabilityPort — TCP port; tcpPortAvailabilityConnectTimeout — the time interval during which the service has to respond, s (from 1 to 5 digits); tcpPortAvailabilityAlarmSeconds — stabilization delay in seconds for alarm, s (from 1 to 5 digits);...
- Page 209 5. The Reference for RPCM REST API If test is ON, following parameters are necessary: consumptionAlarmBottomLimitMilliamps — the bottom threshold of the current consumption value, reaching of which triggers for alarm, mA (number 1 to 5 digits); consumptionRestartBottomLimitMilliamps — the bottom threshold of the current consumption value, reaching of which triggers for restart, mA (number 1 to 5 digits);...
- Page 210 5. The Reference for RPCM REST API tcpPortAvailabilityEnabled —TCP Port Availability monitoring (true/false). If test is ON, following parameters are necessary: tcpPortAvailabilityIPAddress — IP address or FQDN; tcpPortAvailabilityPort — TCP port; tcpPortAvailabilityConnectTimeout — the time interval during which the service has to respond, s (from 1 to 5 digits);...
- Page 211 5. The Reference for RPCM REST API 5.2.10 Additional commands for automation 5.2.10.1 General information This section contains automation commands in REST API notation using keys. Parameters used: Automation-Name-value — the name of the automation settings — you can use numbers, upper and lower case characters, and signs —...
- Page 212 5. The Reference for RPCM REST API API-Unavailability-Timeout-Seconds-Hasrate-value — control interval (delay) in seconds before the notification, an integer from 1 to 99999, or the default service word for the default value. IP-Address-Value — the IP address of the device to be checked for availability. Connect-Timeout-Value —...
- Page 213 5. The Reference for RPCM REST API Example: curl -X PUT http://192.168.1.24:8888/api/automation/name/Automation1/default 5.2.10.5 Changing the Name of Automation Test Settings Command: PUT /api/automation/name/Automation-Name-value/name/a Example: curl -X PUT https://192.168.1.24:8888/api/automation/name/Automation1/name/a 5.2.10.6 Changing the Description of Automation Test Settings Command: PUT /api/automation/name/Automation-Name-value/description/Description-Text-value Example: curl -X PUT http://192.168.1.24:8888/api/automation/name/Automation1/description/desc 5.2.10.7 Changing the Device Type Command:...
- Page 214 5. The Reference for RPCM REST API 5.2.10.10 Changing Inter Restart Interval Seconds (Value or Default) Command: PUT /api/automation/name/Automation-Name-value/inter-restart-interval-seconds/Restart- Interval-Seconds-value Examples: curl -X PUT http://192.168.1.24:8888/api/automation/name/Automation1/inter-restart- interval-seconds/120 curl -X PUT http://192.168.1.24:8888/api/automation/name/Automation1/inter-restart- interval-seconds/default 5.2.10.11 Deleting Automation Test Settings by Name Command: DELETE /api/automation/name/Automation-Name-value Example: curl -X DELETE http://192.168.1.24:8888/api/automation/name/AntMiner-1 5.2.10.12 Setting a Consumption test in One Command...
- Page 215 5. The Reference for RPCM REST API Examples: curl -X PUT http://192.168.1.24:8888/api/automation/name/Automation1/consumption/enabled/ curl -X PUT http://192.168.1.24:8888/api/automation/name/Automation1/consumption/enabled/ 5.2.10.15 Setting Alarm Bottom Limit Milliamps for a Consumption Test Command: PUT /api/automation/name/Automation-Name-value/consumption/alarm-bottom-limit-milliamps/ Alarm-Bottom-Limit-Milliamps-value Example: curl -X PUT http://192.168.1.24:8888/api/automation/name/Automation1/consumption/alarm- bottom-limit-milliamps/120 curl -X PUT http://192.168.1.24:8888/api/automation/name/Automation1/consumption/alarm- bottom-limit-milliamps/default 5.2.10.16 Configuring Restart Bottom Limit Milliamps for a Consumption Test Command:...
- Page 216 5. The Reference for RPCM REST API Examples: curl -X PUT http://192.168.1.24:8888/api/automation/name/Automation1/consumption/restart- seconds/120 curl -X PUT http://192.168.1.24:8888/api/automation/name/Automation1/consumption/restart- seconds/default 5.2.10.19 Configuring a Hash-Rate Test in One Command Command: PUT /api/automation/name/Automation-Name-value/hash-rate/enabled/Enabled-value/alarm- bottom-limit/Alarm-Bottom-Limit-Hashrate-Value/restart-bottom-limit/Restart-Bottom-Limit- Hashrate-Value/alarm-seconds/Timeout-Alarm-Seconds-value/restart-seconds/Timeout-Restart- Seconds-value/api-ip-address/API-IP-Address-Value/api-port/API-TCP-Port-Value/api- unavailability-timeout-seconds/API-Unavailability-Timeout-Seconds-Hasrate-value Example: curl -X PUT http://192.168.1.24:8888/api/automation/name/Automation1/hash-rate/enabled/ on/alarm-bottom-limit/default/restart-bottom-limit/default/alarm-seconds/20/restart- seconds/40/api-ip-address/192.168.0.1/api-port/default/api-unavailability-timeout- seconds/default 5.2.10.20 Setting Hash Rate with Default Parameters Command:...
- Page 217 5. The Reference for RPCM REST API Examples: сurl -X PUT http://192.168.1.24:8888/api/automation/name/Automation1/hash-rate/alarm- bottom-limit/100 curl -X PUT http://192.168.1.24:8888/api/automation/name/Automation1/hash-rate/alarm- bottom-limit/default 5.2.10.23 Configuring the Restart Bottom Limit for a Hash-Rate Test Command: PUT /api/automation/name/Automation-Name-value/hash-rate/restart-bottom-limit/Restart- Bottom-Limit-Hashrate-Value Examples: curl -X PUT http://192.168.1.24:8888/api/automation/name/Automation1/hash-rate/restart- bottom-limit/100 curl -X PUT htts://192.168.1.24:8888/api/automation/name/Automation1/hash-rate/restart- bottom-limit/default 5.2.10.24 Configuring Alarm Seconds for a Hash-Rate Test Command:...
- Page 218 5. The Reference for RPCM REST API Example: curl -X PUT http://192.168.1.24:8888/api/automation/name/Automation1/hash-rate/api-ip- address/192.168.1.1 5.2.10.27 Configuring API Port for a Hash-Rate Test Command: PUT /api/automation/name/Automation-Name-value/hash-rate/api-port/API-TCP-Port-Value Examples: curl -X PUT http://192.168.1.24:8888/api/automation/name/Automation1/hash-rate/api-port/ curl -X PUT http://192.168.1.24:8888/api/automation/name/Automation1/hash-rate/api-port/ default 5.2.10.28 Configuring the API Unavailability Timeout Seconds Parameter for a Hash-Rate Test Command: PUT https://192.168.1.24:8888/api/automation/name/Automation-Name-value/hash-rate/api-...
- Page 219 5. The Reference for RPCM REST API Examples: curl -X PUT http://192.168.1.24:8888/api/automation/name/Automation1/ping/enabled/on curl -X PUT http://192.168.1.24:8888/api/automation/name/Automation1/ping/enabled/off 5.2.10.31 Configuring IP Address for a Ping Command: PUT /api/automation/name/Automation-Name-value/ping/ip-address/IP-Address-Value Example: curl -X PUT http://192.168.1.24:8888/api/automation/name/Automation1/ping/ip-address/ 192.168.1.1 5.2.10.32 Configuring Connect Timeout Seconds for a Ping Command: PUT /api/automation/name/Automation-Name-value/ping/connect-timeout-seconds/Сonnect- Timeout-Value...
- Page 220 5. The Reference for RPCM REST API PUT /api/automation/name/Automation-Name-value/ping/restart-packet-loss-percentage/ Restart-Packet-Loss-Percentage-Value Example: curl -X PUT http://192.168.1.24:8888/api/automation/name/Automation1/ping/restart-packet- loss-percentage/77 5.2.10.36 Configuring Alarm Seconds for a Ping Command: PUT /api/automation/name/Automation-Name-value/ping/alarm-seconds/Alarm-Seconds-Value Example: curl -X PUT http://192.168.1.24:8888/api/automation/name/Automation1/ping/alarm-seconds/32 5.2.10.37 Configuring Restart Seconds for a Ping Command: PUT /api/automation/name/Automation-Name-value/ping/restart-seconds/Restart-Seconds-Value Example: curl -X PUT http://192.168.1.24:8888/api/automation/name/Automation1/ping/restart- seconds/62...
- Page 221 5. The Reference for RPCM REST API 5.2.10.40 Configuring IP Address for a TCP Port Availability Test Command: PUT /api/automation/name/Automation-Name-value/tcp-port-availability/ip-address/IP- Address-Value Example: curl -X PUT https://192.168.1.24:8888/api/automation/name/Automation1/tcp-port- availability/ip-address/192.168.11.11 5.2.10.41 Configuring TCP Port for a TCP Port Availability Test Command: PUT /api/automation/name/Automation-Name-value/tcp-port-availability/port/TCP-Port-Value Example: curl -X PUT http://192.168.1.24:8888/api/automation/name/Automation1/tcp-port- availability/port/2222...
-
Page 222: Json Return In Case Of Unrecognized Command
5. The Reference for RPCM REST API Example: curl -X PUT http://192.168.1.24:8888/api/automation/name/Automation1/tcp-port- availability/restart-seconds/63 5.3. JSON Return in Case of Unrecognized Command {“resultOfLastCommand":"FAILED","reason":"UNKNOWN_COMMAND"} 5.4 Translation of Fields in JSON Returns # Serial Name of the device 'sNa' => 'serialName', # Serial Number of the device 'sNu' =>... - Page 223 5. The Reference for RPCM REST API # Actual output state 'actS' => 'actualState', # Flag of the short-circuit protection 'cbFS' => 'circuitBreakerFiredState', # Overload flag without disconnecting output 'oAFS' => 'overcurrentAlarmFiredState', # Overload flag with output disconnection 'oTFS' => 'overcurrentTurnOffFiredState', # Instantaneous current 'iMa' =>...
- Page 224 5. The Reference for RPCM REST API 'hwV' => 'hardwareVersion', # Firmware version 'fwV' => 'firmwareVersion', # Real time clock value at the time of device startup 'rtcB' => 'rtcBoot', # Flag of necessity to return to priority input after its restoration 'fF' =>...
-
Page 225: Command Reference Of Rpcm Cli
6. Command Reference of RPCM CLI 6. Command Reference of RPCM CLI A brief description of the section: 6.1. General Description of the Command System 6.2. Command: help 6.3. Commands: exit and quit — these are two analogous commands that serve to properly conclude an SSH session. -
Page 226: General Description Of The Command System
6. Command Reference of RPCM CLI 6.1. General Description of the Command System The basis of the command line interface is command. If necessary, the command can be successively supplemented with keys (one or more). At the end of the command line, specify the parameter, which specifies the scope or object of the application. -
Page 227: Command Help
6. Command Reference of RPCM CLI 6.2. Command help 6.2.1. Getting List of Commands At the prompt, enter or the question mark help Example: help The return is: PCM Commands description: - add configuration for rpcm subsystems: ntp, snmp, etc. cancel - cancel update procedure delete... - Page 228 6. Command Reference of RPCM CLI turn it off turn it on disabled disabled it set display - set RPCM display settings set output 0-9 - set output 0-9 state turn it off turn it on overcurrent tune overcurrent limits recognition make it blink survival priority...
-
Page 229: Exit Commands For Exit And Quit
6. Command Reference of RPCM CLI Following the command (already with the indication of the number) upon double set output 0 pressing Tab a hint about the available functions will appear: ? description help mode name off on overcurrent recognition 6.3. -
Page 230: Commands: Add And Delete
6. Command Reference of RPCM CLI 6.4. Commands: add and delete These commands are used to create or delete entities in the RPCM management system, such as user accounts, automation settings, and so on. ATTENTION! Since the CLI command line interface uses the auto-completion function for param- eters, including when deleting, it is recommended to refrain from using similar names, for exam- ple, user accounts, device names for automation, e-mail addresses, and so on. - Page 231 6. Command Reference of RPCM CLI 6.4.1 Commands: add automation and delete automation Serves to set or remove a device for automatic monitoring and control (reboot). Note. For more detailed information, it is recommended to refer to the sections: "4.11 Automation tools" and "5.6. Monitor- ing and monitoring of specialized devices for mining using RPCM".
- Page 232 6. Command Reference of RPCM CLI Example: add automation device-name Name device-type Bitmain_D3 outputs "1, 2, 4" --d escription TestDevice --default add automation device-name Name device-type Bitmain_D3 outputs "1" --descrip tion TestDevice --default add automation device-name Name device-type Bitmain_D3 outputs "1" --descrip tion TestDevice --check-interval-seconds 10 --inter-restart-interval-seconds 100 Type 'help' to get suggestions The command...
- Page 233 6. Command Reference of RPCM CLI Since we have two devices with similar names: "DEVICE-2" and "DEVICE-12". When deleting the desired element with autocompletion, you must enter a unique combination of symbols, the de- terminant. In this case, it will be "DEVICE-1". To delete, just enter the command delete automation device-name DEVICE-1 The return is:...
- Page 234 6. Command Reference of RPCM CLI 6.4.3 Command add cloud This command submit offline registration data form RCNTEC. Help ask add cloud ? The return is: add cloud certificate - command to submit offline registration data from RCNTEC Type 'help' to get suggestions 6.4.4 Commands: add mail and delete mail...
- Page 235 6. Command Reference of RPCM CLI The return regarding deletion of recipient: Recipient user@yandex.ru deleted 6.4.5 Commands: add ntp server and delete ntp server Commands: is used to specify the NTP server (time service). add ntp server The command is used to remove the NTP server (time service) from the RPCM delete ntp server settings.
- Page 236 6. Command Reference of RPCM CLI AuthType — authentication method by the server. Standard values for the SMTP protocol are used: PLAIN, LOGIN, CRAM_MD5; SSL — encryption parameter; the default values are: enable, disable, enable-dontverify-cert. The return is: add smtp server ? The return is: Required parameters: Server...
- Page 237 6. Command Reference of RPCM CLI The return is: Server smtp.yandex.ru deleted 6.4.7 Commands: add and delete with snmp Additional information. The first version of the protocol SNMPv1 is organized most simply and least safely. The basis of SNMPv1 security is the Com- munity-based Security Model, i.e.
- Page 238 6. Command Reference of RPCM CLI 6.4.7.1. Commands: add and delete with snmp community Commands: is used to create a community of * SNMP v1 and v2c * proto- add snmp delete snmp cols. When you create one, the required parameters are filled in: --accessList —...
- Page 239 6. Command Reference of RPCM CLI When you create the required parameters are filled in: --accessList — the allowed subnet or a separate IP address; --accessType — access type, the values of are used; --authPass — SNMP user account password string; --authProt —...
- Page 240 6. Command Reference of RPCM CLI command with the `user is for deleting a user account in the SNMPv3 frame- delete snmp work. To delete, just specify the name of the SNMPv3 user account. Example: Deleting the SNMPv3 account newrpcmuser delete snmp user newrpcmuser The return is: User newrpcmuser deleted.
- Page 241 6. Command Reference of RPCM CLI In the return, the system displays a prompt with a suggestion to remove the available SNMP Trap target settings: Please provide existing destination to delete: 192.168.1.100:162 Deletion these goal settings: delete snmp trap 192.168.1.100: 162 Confirmation of deletion: Trap destination 192.168.1.100:162 deleted 6.4.8 Commands: add and delete...
- Page 242 6. Command Reference of RPCM CLI The return is: Please provide groupname to add Help ask: delete group ? The return is: Please provide username of one of existing users Example. Create and delete tescli2. To create group: add group testcli2 The return is: Group testcli2 added with default permissions, please dont forget to adjust them To delete group:...
- Page 243 6. Command Reference of RPCM CLI The return is: RPCM Commands description: add radius server <ip> secret <secret> - add radius-server shared secret can contain alphanumeric, punctuation, minimum 8 maximum 128 characters --port <0-65534> - radius server's UDP port (1812 by default) --enabled <yes|no>...
-
Page 244: Command Restart For "Cold Restarting" Of Connected Devices
6. Command Reference of RPCM CLI 6.5. Command restart for "Cold Restarting" of Connected Devices This command is used to reset (reboot) the following devices: internal RPCM controllers; external devices connected to the RPCM outlets. 6.5.1. Command restart output This allows you to restart the device (provided that the connected device allows it and the cor- rect settings are configured on it). - Page 245 6. Command Reference of RPCM CLI 6.5.2. Command restart high-level-controller Additional information. RPCM uses 3 controllers: High Level Controller (HLC), where is the software is running, Low Level Controller (LLC), which operates under the firmware Display Controller, where the Display Firmware is running. Low Level Controller is responsible for electronic operations such as input and outlet management, ATS (except RPCM ME 1563 ), meters, overload and short circuit protection.
-
Page 246: Command Show - Information About The Status Of Rpcm
6. Command Reference of RPCM CLI 6.6. Command show — Information about the Status of RPCM 6.6.1 General Information about the show command Below is a brief list of the keys of Command show with comments: action confirmation — show confirmation of critical actions for the web-interface; ... - Page 247 6. Command Reference of RPCM CLI user — shows the detailed information about the user, including the list of entered com- mands; version — firmware version and system time; help — Help displays. You can also use the question mark ? 6.6.2 Using show help General view (example): show ?
- Page 248 6. Command Reference of RPCM CLI 6.6.3 Command show action-confirmation It show a status of critical operations confirmation: disconnecting and resetting power outlets. In the web interface, this function corresponds to the setting in the menu Configuration -> Global option -> Get second confirmation from user for Turn Off/Reset requests:. Example: show action-confirmation The return is:...
- Page 249 6. Command Reference of RPCM CLI 6.6.5 Command show api It is used for display information about REST API setting. Information: API Interface enabled / disabled API Authentication enabled / disabled Key — a key value. Command: show api The return is API Interface:...
- Page 250 6. Command Reference of RPCM CLI The return is: [ID]: 2 [Device Type]: Bitmain_S9 [Name]: Antminer_S9 [Description]: [Outputs]: 1 [Check Interval Seconds]: 6 [Inter Restart Interval Seconds]: 600 [Consumption Test Enabled]: OFF [Hash Rate Test Enabled]: ON [Hash Rate Alarm Bottom Limit]: 13500 [Hash Rate Restart Bottom Limit]: 13300 [Hash Rate Alarm Seconds]: 60 [Hash Rate Restart Seconds]: 300...
- Page 251 6. Command Reference of RPCM CLI 6.6.9 Command show configuration This command displays a status of restoring from a backup confuguration. Help ask: show configuration ? The return is: show configuration restore status - show current status of configuration restoration show configuration last restore result - show the result of the last configuration restore Type 'help' to get suggestions...
- Page 252 6. Command Reference of RPCM CLI Default message content may be following : voltage, current, power, ipAddress, macAddress, serialName, serialNumber, userMessage. Help ask: show display? The return is: show display user message - show custom message to be displayed show display default message - show parameter that will be displayed Type 'help' to get suggestions Example 1.
- Page 253 6. Command Reference of RPCM CLI Example: show everything The return is: [Serial Name]: OpernyiPevets [Temperature]: 36C [Serial Number]: RU2019060400000003MO01AM01 [Ground]: GOOD [Firmware Version]: 0.10.41 [Firmware Release Date]: 20200926103429 [Software Version]: 0.8.66 [Software Release Date]: 20200930095251 [Model/Hardware Version]: 4232/RPCM DC 232A [Uptime]: 01:59:34 -------------------------------------------------------------------------------- [Input 1]:...
- Page 254 6. Command Reference of RPCM CLI [Output 2]: Read access, Write access [Output 3]: Read access, Write access [Output 4]: Read access, Write access [Output 5]: Read access, Write access [Output 6]: Read access, Write access [Output 7]: Read access, Write access [Output 8]: Read access, Write access [Output 9]: Read access, Write access [System Logs]: Read access...
- Page 255 6. Command Reference of RPCM CLI --reverse - show logs in reverse order show logs help - show this help Type 'help' to get suggestions Parameters: --since <date> — display log entries from the specified date; --severity <level> —show log entries the selected severity level; --include <string>...
- Page 256 It display a list of mail recipients for messages about system events. Command: show mail recipients The return is: SMTP Mail Recipients: -------------------------------------------------------------------------------- to: igor@smtp.com cc: duty@example.com, ivan@example.com, ivan@example.com to: evgenii.zemchik@rcntec.com cc: duty@example.com, ivan@example.com to: 12das@inbox.ru cc: 12das@inbox.ru bcc: 12das@inbox.ru to: info@example.com cc: duty@example.com, ivan@example.com bcc: security@example.com...
- Page 257 6. Command Reference of RPCM CLI 6.6.16 Command show nearby-devices Nearby devices — another RPCMs in this network, they are accessible and can be detected via Bonjour protocol. Use command show nearby-devices for collecting information about these devices. Example: show nearby-devices The return is: Nearby RPCM devices: RPCM mDNS Name...
- Page 258 6. Command Reference of RPCM CLI 6.6.19 Command show output It displays outlet status information. As a parameter it is required to specify the outlet number from 0 to 9 Example: show output 3 Information about this outlet (3): [Output]: 3 [Actual State]: ON [Admin State]: ON [Name]: Output_3...
- Page 259 6. Command Reference of RPCM CLI Example. Show an information about RADIUS server with IP 192.168.1.1. Command: show radius server 192.168.1.1 The return is: [Server]: 192.168.1.1 [Priority]: 10 [UDP Port]: 1812 [Secret Key]: ** hidden ** [Disabled]: NO [Use Group VSA]: NO [Use Session Timeout VSA]: NO Detailed information about Vendor Specific Attributes supported by RPCMs is available in documentation...
- Page 260 6. Command Reference of RPCM CLI SSL: enable Login Type: plain HELO Domain: yandex.ru Username: user@yandex.ru Password: MyPassword SMTP Recipients: ----------------------------------------------------------------------- 1. to: user@yandex.ru Type 'help' to get suggestions 6.6.22 Command show snmp It is used to provide detailed information about SNMP access settings. key is available for displaying hidden passwords.
- Page 261 6. Command Reference of RPCM CLI 6.6.23 Command show temperature It displays the temperature value in degrees Celsius inside the device. Example: show temperature Temperature value: Temperature : 32C 6.6.24 Command show time It displays the system time or displays a list of time zones The available keys are zones help...
- Page 262 6. Command Reference of RPCM CLI Antarctica/Mawson Antarctica/Troll Antarctica/Davis GMT-0 Iceland Cuba Libya Indian/Christmas Indian/Kerguelen Indian/Reunion Indian/Maldives Indian/Mayotte Indian/Mahe Indian/Cocos Indian/Antananarivo Indian/Mauritius Indian/Chagos Indian/Comoro Singapore Arctic/Longyearbyen Japan Navajo Mexico/BajaSur Mexico/General Mexico/BajaNorte EST5EDT US/Mountain US/Samoa US/Pacific-New US/East- Indiana US/Aleutian US/Eastern US/Alaska US/Pacific US/Michigan US/Central...
- Page 263 6. Command Reference of RPCM CLI Indiana/Petersburg America/ Indiana/Tell_City America/Indiana/Vincennes America/ Indiana/Marengo America/Indiana/Winamac America/Indiana/ Indianapolis America/Indiana/Vevay America/Managua America/Toronto America/Dawson America/Inuvik America/Thunder_Bay America/Boise America/Lower_Princes America/Barbados America/Argentina/Jujuy America/Argentina/San_Juan America/Argentina/Catamarca America/Argentina/Tucuman America/Argentina/Cordoba America/Argentina/Rio_Gallegos America/Argentina/Mendoza America/Argentina/Ushuaia America/Argentina/San_Luis America/Argentina/La_Rioja America/Argentina/Salta America/Argentina/Buenos_Aires America/Argentina/ComodRivadavia America/Cambridge_Bay America/Fortaleza America/Atikokan America/Buenos_Aires America/Martinique America/Tortola...
- Page 264 6. Command Reference of RPCM CLI Australia/Hobart Australia/South Australia/Queensland Australia/Currie Australia/Lord_Howe Australia/West Australia/NSW Australia/LHI Australia/ACT Australia/Perth Australia/Darwin Australia/Victoria Australia/Melbourne Australia/Canberra Australia/Adelaide Australia/Eucla Australia/Sydney Australia/Tasmania GMT0 Kwajalein GB-Eire Poland Pacific/Fiji Pacific/Tahiti Pacific/Auckland Pacific/Kosrae Pacific/Wallis Pacific/Truk Pacific/Efate Pacific/Tongatapu Pacific/Samoa Pacific/Apia Pacific/Marquesas Pacific/Fakaofo Pacific/Niue Pacific/Wake Pacific/Norfolk...
- Page 265 6. Command Reference of RPCM CLI Asia/Barnaul Asia/Baku Asia/Vladivostok Asia/Ulan_Bator Asia/Hong_Kong Asia/Ho_Chi_Minh Asia/Baghdad Asia/Dushanbe Asia/Aqtau Asia/Chongqing Asia/Makassar Asia/Jerusalem Asia/Omsk Asia/Hovd Asia/Amman Asia/Jayapura Asia/Oral Asia/Phnom_Penh Asia/Colombo Asia/Muscat Asia/Macau Asia/Kolkata Asia/Irkutsk Asia/Ashkhabad Asia/Ujung_Pandang Asia/Calcutta Asia/Nicosia Asia/Yerevan Asia/Taipei Asia/Sakhalin Asia/Rangoon Asia/Kamchatka Asia/Pyongyang Asia/Ust-Nera Asia/Istanbul Asia/Katmandu Asia/Kuwait...
- Page 266 6. Command Reference of RPCM CLI Current update status: -------------------------------------------------- -------------------------- Status: Recovery procedure is in progress ... Progress: 5.73% -------------------------------------------------- -------------------------- Application update: Current update status: -------------------------------------------------- -------------------------- Status: Applying update ... Progress: 14.88% -------------------------------------------------- -------------------------- The update application is being checked: Current update status: -------------------------------------------------- -------------------------- Status: Verifying applied update ...
- Page 267 6. Command Reference of RPCM CLI Example. Getting detailed information about the user rpcmadmin: Command: show user rpcmadmin The return is: [Username]: rpcmadmin [User Disabled]: NO [Authenticator]: LOCAL [Group]: superuser [Last Login Time]: 2020-04-21 20:52:22 [User Changed At]: 2019-12-12 01:19:58 [User Created At]: 2019-12-12 01:19:58 [Session Expiration Timeout]: 3600 Active user's sessions:...
- Page 268 6. Command Reference of RPCM CLI List of used commands: History for user: rpcmadmin 1: add user testuser 2: whoami 3: add user? 4: delete user? 5: delete user testuser 6: add? 7: exit 6.6.27 Command show version It displays information about the firmware version and device software, as well as the serial name, serial number, uptime and system time.
-
Page 269: Command Show All
6. Command Reference of RPCM CLI 6.7. Command show all It serves to display various information about RPCM elements. It includes the following: automation — a list of all connected devices for automation management (on/off or reboot); counters — values of power counters for connected devices set thresholds for preliminary notifications and shutdown;... - Page 270 6. Command Reference of RPCM CLI servers - show all configured radius servers show all users - show all users accounts logs show all users login and logout logs show all help - show this help Type 'help' to get suggestions 6.7.1 Command show all automations Displays information about automated devices.
- Page 271 6. Command Reference of RPCM CLI Information about the meters: Over- Over- current Over- current Over- Circuit Alarm current Turn Off current Breaker Limit Alarm Limit Turn Off Fired Reached Fired Reached Fired Facts Times Facts Times Facts [Output 0]: [Output 1]: [Output 2]: 29164...
- Page 272 6. Command Reference of RPCM CLI The return is: Groupname Glb Inp Ou0 Ou1 Ou2 Ou3 Ou4 Ou5 Ou6 Ou7 Ou8 Ou9 Log Aut Utl -------------------------------------------------------------------------------- administrators RWX RWX RWX RWX RWX RWX RWX RWX RWX RWX RWX RWX superuser RWX RWX RWX RWX RWX RWX RWX RWX RWX RWX RWX RWX nightgroup1 rpcmadmingroup Newusers RWX RWX RWX RWX RWX RWX RWX RWX RWX RWX RWX RWX...
- Page 273 6. Command Reference of RPCM CLI 6.7.4.2 Command show all inputs descriptions It shows the descriptions of inputs. Example of use: show all inputs descriptions Description of inputs: show all inputs descriptions [Input 1] Main [Input 2] Reserve 6.7.4.3 Command show all inputs limits It shows the current limits for inputs.
- Page 274 6. Command Reference of RPCM CLI readings - show all outputs instant and accumulated meter readings show all outputs recover turn on limits - show recover turn on limits and action delays for outputs show all outputs startup delays - show turn on startup delays for outputs show all outputs turn off limits - show turn off limits and action delays for outputs...
- Page 275 6. Command Reference of RPCM CLI [Output 8]: 9500 [Output 9]: 9500 6.7.5.2 Command show all outputs turn off limits It displays the current limits after which the outlets are disconnected. Use: show all outputs turn off limits Limit value information: Over- Over- current...
- Page 276 6. Command Reference of RPCM CLI Over- Over- Over- current Over- Over- current current Turn Off current current Turn Off Turn Off Limit Turn Off Instant Turn Off Limit Limit Reached Fired Milliamps Active Milliamps Seconds Times Times [Output 0]: 10000 [Output 1]: 10000...
- Page 277 6. Command Reference of RPCM CLI 6.7.5.5 Command show all outputs startup delays it indicates information about the delay in applying voltage to the outlets when the power is turned on. Use: show all outputs startup delays Turn On Delay At Startup [Output 0]: 3 seconds [Output 1]: 3 seconds [Output 2]: 4 seconds...
- Page 278 6. Command Reference of RPCM CLI [Output 8]: 8 output_8 [Output 9]: 9 output_9 With prioritization: show all outputs survival priorities sorted The return is: Output Priority Name --------------------------------------------------------------------------- [Output 1]: 1 output_1 [Output 2]: 2 output_2 [Output 3]: 3 output_3 [Output 4]: 4 output_4 [Output 5]: 5 output_5 [Output 6]: 6 output_6...
- Page 279 6. Command Reference of RPCM CLI 6.7.7 Command show all users 6.7.7.1. General Information about Command show all users It displays information about users. The available keys are: log, help. Help displays: show all users ? The return is: RPCM Commands description: show all users - show all existing users show all users log...
- Page 280 6. Command Reference of RPCM CLI The return is: --last Example 1. Command Show all users logs without parameter: show all users logs The return is: Username Type Login time Logout Time ------------------------------------------------------------------------ rpcmadmin 2019-04-12 07:17:59 2019-04-12 07:21:15 rpcmadmin 2019-04-12 10:21:26 2019-04-16 19:52:52 +0000 rpcmadmin 2019-04-12 10:23:07...
-
Page 281: Command Set
6. Command Reference of RPCM CLI 6.8. Command set 6.8.1. General Description of the Command set It is the main command to set the required values within the RPCM work setup. Below is a brief list of keys for the command set with comments: ... - Page 282 6. Command Reference of RPCM CLI disable failback enable failback set all outputs - set all outputs state turn them off turn them on set api - set api options generate-new-key generate new API access key enables or disables existing key set automation - set automation parameters device-name <name>...
- Page 283 6. Command Reference of RPCM CLI adminState enable/disable snmp community adjust SNMP community settings trap adjust SNMP traps settings user adjust SNMP users settings set time - set new time value value zone zone synchronization toggle ntp synchronization set user <username> - set parameters for username authenticator set Authenticator for user...
- Page 284 6. Command Reference of RPCM CLI 6.8.3. Command set all Help ask : set all ? The return is: RPCM Commands description: set all inputs - set input force failback force failback configuration (available on RPCM1502/RPCM1532) delay set stabilization delay disable failback enable failback set all outputs...
- Page 285 6. Command Reference of RPCM CLI 6.8.3.2. Command set all outputs It is used to administratively turn off or turn off all outlets at once. The available options are : on and off. Help ask: set all outputs ? The return is: RPCM Commands description: set all outputs off - set all outputs state to off...
- Page 286 6. Command Reference of RPCM CLI [Output 4]: ON <admin: ON> [Output 5]: ON <admin: ON> [Output 6]: ON <admin: ON> [Output 7]: ON <admin: ON> [Output 8]: ON <admin: ON> [Output 9]: ON <admin: ON> Type 'help' to get suggestions 6.8.4.
- Page 287 6. Command Reference of RPCM CLI To re-enable the use of this key, enter the command: set api key 659d8a7a78f701c7ae139a14fa5cfc48 enable The return is: Key: 659d8a7a78f701c7ae139a14fa5cfc48 successful enabled Type 'help' to get suggestions Example 3. Disable the service API authentication. Command: set api authentication disable The return is:...
- Page 288 6. Command Reference of RPCM CLI Example. Turn OFF and turn ON switching to Control mode Command (turn OFF): set button-control disabled The return is: Button control mode is DISABLED Type 'help' to get suggestions Command (turn ON): set button-control enabled The return is: Button control mode is ENABLED Type 'help' to get suggestions...
- Page 289 6. Command Reference of RPCM CLI Example: set buzzer on The return is: Buzzer turned ON Example 3. Command set buzzer off It enables the sound of the internal speaker of the RPCM module. Example: set buzzer off The return is: Buzzer turned OFF 6.8.7.
- Page 290 6. Command Reference of RPCM CLI 6.8.8. Command set display 6.8.8.1. General information About Using set display Used to set or change the default message on the screen. Available options: user message — sets the user message. default message — allows you to select the data to be shown on the display by default. By default, the display shows the network voltage.
- Page 291 6. Command Reference of RPCM CLI The return is: User Message changed from 'RPCM-1' to 'RPCM # 1' Foreground color is 'red' Background color is 'black' 6.8.8.3. Selection of Information for the Default Message Help: set display default message ? The return is: Please enter the display.
- Page 292 6. Command Reference of RPCM CLI The return is: Default Message changed from 'ipAddress' to 'voltage' Type 'help' to get suggestions 6.8.9. Command set group For setting UNIX-group permission: Read-Write-eXecute. Also there is UNIX-like notation: rwx Required parameter: group name. Available parameters: --global_config —...
- Page 293 6. Command Reference of RPCM CLI Example. Disabling to change global configuration for new_group. The command is: set group new_group --global_config r The return is: New permissions applied to group: new_group Type 'help' to get suggestions 6.8.10. Command set input Use command for configuration inputs.
- Page 294 6. Command Reference of RPCM CLI description - Extented description, 256 characters long description. Should contain alphanumerical, punctuation characters and spaces frequency - Set Frequency limits for input current - Set Current limit for input voltage - Set Voltage limits for input on | off - Administrative status of input prioritized - Set input as prioritized input to be used...
- Page 295 6. Command Reference of RPCM CLI The return is: Description for Input 1 has been updated Type 'help' to get suggestions Attention. You can use command for check results. show input Check configuration of input 2 after commands from examples 3 and 4. Command: show input 1 The return is:...
- Page 296 6. Command Reference of RPCM CLI 6.8.10.1. Command set input frequency limit Not for RPCM DC. Use this command for frequency top and bottom limits in RPCM AC. Help ask (also the input number is necessary): set input 1 frequency ? The return is: RPCM Commands description: set input 1-2 frequency limit min - minimum allowed frequency at...
- Page 297 6. Command Reference of RPCM CLI 6.8.10.3 Command set input voltage limit Use this command for voltage top and bottom limits. Help ask (also the input number is necessary): set input 1 voltage ? The return is: set input 1-2 voltage limit min - minimum allowed voltage at specified on input max - maximum allowed voltage at specified on input...
- Page 298 6. Command Reference of RPCM CLI Help ask: set radius server ? The return is: RPCM Commands description: set radius server <ip> secret <secret key> - set shared secret priority <priority> 1-100, server usage priority higher is more priority port <port> port 1-65534 enabled <yes|no>...
- Page 299 6. Command Reference of RPCM CLI 6.8.12.1 Command set snmp adminState It administratively enables or disables the SNMP agent, allowing or denying work with this pro- tocol. The available values are: on or off. Help displays: set snmp adminState ? The return is: Please set 'on' or 'off'.
- Page 300 6. Command Reference of RPCM CLI Example. Allowing access by community public by setting the option --enabled to yes set snmp community public --enabled yes The return is: Community public updated 6.8.12.3. Command set snmp user Command set for editing the properties of the user account in the framework of using snmp user the protocol SNMPv3 Options available are the following:...
- Page 301 6. Command Reference of RPCM CLI 6.8.13. Command set time It set the system time and time zone. The available keys are: value zone help Help displays: set time ? The return is: RPCM Commands description: set time value - set time for RPCM set time zone - set time zone set time synchronization - toggle synchronization via NTP protocol...
- Page 302 6. Command Reference of RPCM CLI 6.8.13.2. Command set time zone It set the time zone. Help displays: set time zone ? The return is: Invalid timezone has been provided, please use <tab> suggestions to select valid timezone or use 'show time zones' command to see complete list of time zones The return follows that you need to use the command to get information about show time zones...
- Page 303 6. Command Reference of RPCM CLI If you want to add new user, use add command. Type 'help' to get suggestions 6.8.14.2. Setting privilege level For example user newuser will get set superuser level: Help ask: set user newuser accessLevel ? The return is: Please provide correct Access Level, the one of: superuser, administrators Type 'help' to get suggestions...
- Page 304 6. Command Reference of RPCM CLI The return is: User 'newuser' is now enabled Type 'help' to get suggestions 6.8.14.4. Change password How to change password. The command is: set user newuser password The return is: Please enter password: Please enter password: Please enter password again for confirmation: The return is after successfully confirmation: Password has been successfully changed...
-
Page 305: Command Set Output
6. Command Reference of RPCM CLI 6.9. Command set output This command serves to control the outlet by setting various parameters. Help ask: set output 0 ? The return is: RPCM Commands description: set output 0-9 description - set output description set output 0-9 name - set output name set output 0-9 off... - Page 306 6. Command Reference of RPCM CLI 6.9.2 Command set output name This command set an outlet name. Example of use: set output 0 name "Out-0" The return is: Description for Output 0 has been updated Type 'help' to get suggestions 6.9.3 Command set output off It administratively disables the specified outlet from Example of use:...
- Page 307 6. Command Reference of RPCM CLI 6.9.5.1. Command set output overcurrent alarm limit Available level 1 parameters indicating current units are: , and time unit seconds` amps milliamps for the delay parameter of the signal. Available are level 2 parameters, indicating the numerical values of the parameters. Help ask: set output 9 overcurrent alarm limit The return is:...
- Page 308 6. Command Reference of RPCM CLI The return is: RPCM Commands description: set output 0-9 overcurrent turn off limit - tune overcurrent turn off limits amps 0.000-10.000 set limit in amps milliamps 0-10000 set limit in milliamps seconds 0-65535 set turn off confirmation delay in seconds set output 0-9 overcurrent turn off help - show this help Example 1.
- Page 309 6. Command Reference of RPCM CLI The return is: RPCM Commands description: set output 0-9 overvoltage turn off limit - tune overvoltage turn off volts 0-65534 set limit in volts disabled disable overvoltage turn off set output 0-9 overvoltage turn help - show this help Type 'help' to get suggestions Example 1.
-
Page 310: Command Set Automation
6. Command Reference of RPCM CLI 6.10. Command set automation 6.10.1. General Information The command is intended for editing the properties of automation for selected set automation device. Required: name — the name of the connected device for which the automation rules are configured; Available options: ... - Page 311 6. Command Reference of RPCM CLI device-type - type of device, 1 to 25 characters inter-restart-interval-seconds - interval between restarts of device in seconds new-name - new name of device, 1 to 25 characters outputs - number of RPCM outputs ("[0-9]" or "[0-9], [0-9], ...") test - configure Automation test...
- Page 312 6. Command Reference of RPCM CLI 6.10.2.1. Command set automation device test consumption Used to specify the monitoring of the current consumption level. Available options: enabled — answer "yes" or "no" to enable (enable) this control method; alarm-bottom-limit-milliamps — the lower limit of current consumption in mA, upon which the notification occurs (a warning is sent);...
- Page 313 6. Command Reference of RPCM CLI set automation device name testName test consumption --enabled yes --alarmBottomLimitMil- liamps 4500 --restartBottomLimitMilliamps 4300 --alarmSeconds 60 --restartSeconds 300 set automation device name testName test consumption --alarmBottomLimitMilliamps 4600 set automation device name testName test consumption --enabled no Example 1.
- Page 314 6. Command Reference of RPCM CLI alarm-seconds — the delay time in seconds before the notification (sending a warning); restart-seconds — delay time in seconds before rebooting the device; default — set all parameters to the default value. Note.
- Page 315 6. Command Reference of RPCM CLI Hash Rate API Port set to '4028' Hash Rate API Unavailability Timeout Seconds set to '3' Hash Rate Alarm Bottom Limit set to '13500' Hash Rate Restart Bottom Limit set to '13300' Hash Rate Alarm Seconds set to '60' Hash Rate Restart Seconds set to '300' Type 'help' to get suggestions Example 2.
- Page 316 6. Command Reference of RPCM CLI The return is: set automation device-name DEVICE-NAME test ping Parameters: --enabled yes|no - enables Ping test --ip-address - IP Address of the remote device --connect-timeout-seconds - connect timeout in seconds --upper-limit-milliseconds - limit in milliseconds after which echo reply is considered lost --alarm-packet-loss-percentage - alarm packet loss percentage...
- Page 317 6. Command Reference of RPCM CLI 6.10.2.4. Command set automation device test tcp-port-availability Used to specify the settings for monitoring by accessibility of the selected TCP port. Available options: enabled — answer "yes" or "no" to enable (enable) this control method; ...
- Page 318 6. Command Reference of RPCM CLI The return is: Automation Device ID: 5, Name: 'nonexistent_claymore' has been updated TCP Port Availability Enabled changed from 'OFF' to 'ON' TCP Port Availability IP Address set to '10 .210.1.243 ' TCP Port Availability Port set to '80' TCP Port Availability Connect Timeout set to '3' TCP Port Availability Alarm Seconds set to '10' TCP Port Availability Restart Seconds set to '60'...
-
Page 319: Command Start
6. Command Reference of RPCM CLI 6.11. Command start 6.11.1. General information It is used to run additional procedures. Help ask: start ? Output of information about the command: RPCM Commands description: start firmware update - start firmware update procedure start update - start software update procedure (software update file should already be uploaded) - Page 320 6. Command Reference of RPCM CLI 6.11.4 Command start configuration restore Use this command to restore of configuration from a backup file. You can upload a backup file before start configuration restore. For example: scp RPCM_FirstBatchSeven_20181128_194640.config rpcmadmin@10.0.0.1:RPCM_FirstBatchSeven_20181128_194640.config Help ask: start configuration restore ? The return is: start configuration restore - start configuration restoration procedure...
- Page 321 6. Command Reference of RPCM CLI The return is: Process of restoring the configuration... Progress: 6% Type 'help' to get suggestions Next step you need to restart High Level Controller (HLC) Command: restart high-level-controller...
-
Page 322: Command Whoami
6. Command Reference of RPCM CLI 6.12. Command whoami Displays the name of the active user account in which the system is running. Example: whoami The return is: Current username is 'rpcmadmin' 6.13. Command ping It is used to diagnose network connections. Help displays: ping ? Information about the command:... -
Page 323: Command Cancel
6. Command Reference of RPCM CLI 6.14. Command cancel Use to cancel the update. Parameters: update — interrupts the update procedure deletes all downloaded data and starts the re- covery procedure; configuration restore — interrupts the restore procedure, deletes all loaded configuration file. -
Page 324: Appendices
Appendices Appendices Brief description of these appendices: Appendix 1. Troubleshooting contains information about the main ways to eliminate minor problems, as well as about contacting support services. Appendix 2. Specifications describes the technical characteristics, functions of the device and various requirements, including safety and environmental protection. -
Page 325: Appendix 1. Troubleshooting
Appendices Appendix 1. Troubleshooting ATTENTION! Before you start any action, you need to check whether the grounding is properly connected. ATTENTION! If any abnormal situation not described in this section occurs, please contact tech- nical support. Do not attempt to open or repair the Resilient Power Control Module (RPCM) yourself. - Page 326 Appendices Faults when connecting to the control interface Possible malfunctions when connecting to the control interface are included in Table A1.2. Table A1.2. Fault Connecting to the Control Interface. Name of the characteristic Recommended actions The device can not obtain an Check the following: the cable (patch cord) is working properly IP address.
- Page 327 Try to turn off the outlet and then turn it on. Other malfunctions In the event of any malfunction, contact technical support. Contacts of technical support for the RPCM product: Tel: 8 (800) 302 87 87, +7 (495) 009 87 87. E-mail: info@rcntec.com Technical support https://rpcm.pro Feedback...
-
Page 328: Appendix 2. Specifications
Appendices Appendix 2. Specifications Table A2.1. Technical characteristics of RPCM DC ATS 76A and RPCM DC 232A. Name of the characteristics RPCM DC ATS 76A RPCM DC 232A Inputs Power 3.648 kVA (at 48V) 11.136 kVA (at 48V) Connection 2 DC inputs 1 DC input Connection Type Clamp terminals (1.5-16 mm2) Screw terminals: rigid cable... - Page 329 Appendices Name of the characteristics RPCM DC ATS 76A RPCM DC 232A Channel Status On / off / short / overcurrent at On / off / short / overcurrent at the output / overcurrent at the the output / overcurrent at the input;...
- Page 330 Appendices List of functions of the device ATS without interruption of power supply (in RPCM DC ATS 76A). Per outlet short circuit isolation. In the event of a fault on one of the connected devices, RPCM will automatically cut off only the power supply to the device where the fault oc- curred, preventing the disconnection of the rest of the equipment —...
- Page 331 Appendices The quality of the connections of the modules must ensure reliable contact of the connecting parts and prevent their inadvertent disconnection. Electrical connectors should provide reliable operation of the technical components; the external connectors must allow for multiple disconnection and connection of peripherals in normal mode without loss of connection quality, provide reliable electrical and mechanical contact.
- Page 332 Appendices Disposal should be carried out in accordance with the procedure established in the enterprise operating the product. It is allowed to dispose of utilizations materials on a contractual basis with an organizations that has a license for ecological utilizations. After the conclusion of the term of use the product does not pose a danger to life, human health and the environment.
-
Page 333: Glossary
Glossary Glossary General Terms RPCM — Resilient Power Control Module — a device combining the functions of power moni- toring, automatic transfer switch (ATS) without interrupting the operation of the connected equipment, short-circuit protection and power metering on each port. Serial Name —... -
Page 334: Network
Glossary Network DHCP — Dynamic Host Configuration Protocol is based on the TCP / IP stack. It is used to auto- matically assign an IP address and other network parameters to network nodes. DHCP server — service to support the DHCP protocol in the network. Zero Configuration (Networking) —... - Page 335 Glossary Virtual Front Panel — information area on the Top Control Bar and serves for relaying the in- dicator on the front panel of the device. Reflection Block — see Virtual Front Panel. Unlock Control Button — intended for switching the Main Window between View Mode and Control Mode.
-
Page 336: Disclaimer
RCNTEC LLC accepts no responsibility for any expenses incurred by or due to be made by the buyer, loss or damage to his property (real damage) due to use of the Resilient Power Control... - Page 337 Resilient Power Control Module User Manual (RPCM). © 2020 RCNTEC LLC. All rights reserved. Without the written permission of RCNTEC LLC, no part of this documentation may be reproduced or transmitted in any form or by any means, electronic, mechanical, photocopying or recording on magnetic or other media.
Need help?
Do you have a question about the RPCM Series and is the answer not in the manual?
Questions and answers