
Related Manuals for SHOWTEC ColorCue 4


Summary of Contents for SHOWTEC ColorCue 4
- Page 1 USER MANUAL ENGLISH ColorCue 4 Product code: 50706 Highlite International B.V. – Vestastraat 2 – 6468 EX – Kerkrade – the Netherlands...
- Page 2 ColorCue 4 Preface Thank you for purchasing this Showtec product. The purpose of this user manual is to provide instructions for the correct and safe use of this product. Keep the user manual for future reference as it is an integral part of the product. The user manual shall be stored at an easily accessible location.
-
Page 3: Table Of Contents
ColorCue 4 Table of contents Introduction ................................4 Before Using the Product ..........................4 Intended Use ............................... 4 Product Lifespan ..............................4 Text Conventions ..............................4 Symbols and Signal Words ..........................5 Symbols on the Information Label ........................5 Safety ..................................6 Warnings and Safety Instructions ........................ - Page 4 ColorCue 4 Programming Mode ............................24 Record a Scene ............................24 Record a Chase ............................25 Chase Parameters ............................26 Direction ...............................26 Speed ..............................26 Fade ..............................26 Delete a Chase/Scene ..........................27 Delete a Step in a Chase ..........................28 Edit a Step in a Chase ..........................29 Insert a Step in a Chase ..........................30...
-
Page 5: Introduction
After unpacking, check the contents of the box. If any parts are missing or damaged, contact your Highlite International dealer. Your shipment includes: ● Showtec ColorCue 4 ● AC power adapter with 4 interchangeable AC plugs (Europe, UK, US/JP, AUS/NZ) ●... -
Page 6: Symbols And Signal Words
ColorCue 4 Symbols and Signal Words Safety notes and warnings are indicated throughout the user manual by safety signs. Always follow the instructions provided in this user manual. Indicates an imminently hazardous situation which, if not avoided, will result in DANGER death or serious injury. -
Page 7: Safety
ColorCue 4 Safety Important Read and follow the instructions in this user manual before installing, operating or servicing this product. The manufacturer will not accept liability for any resulting damages caused by the non-observance of this manual. Warnings and Safety Instructions... -
Page 8: Requirements For The User
ColorCue 4 Attention This device shall be used only for the purposes it is designed for. This device is designed to be used as a LED DMX controller. Any incorrect use may lead to hazardous situations and result in injuries and material damage. -
Page 9: Description Of The Device
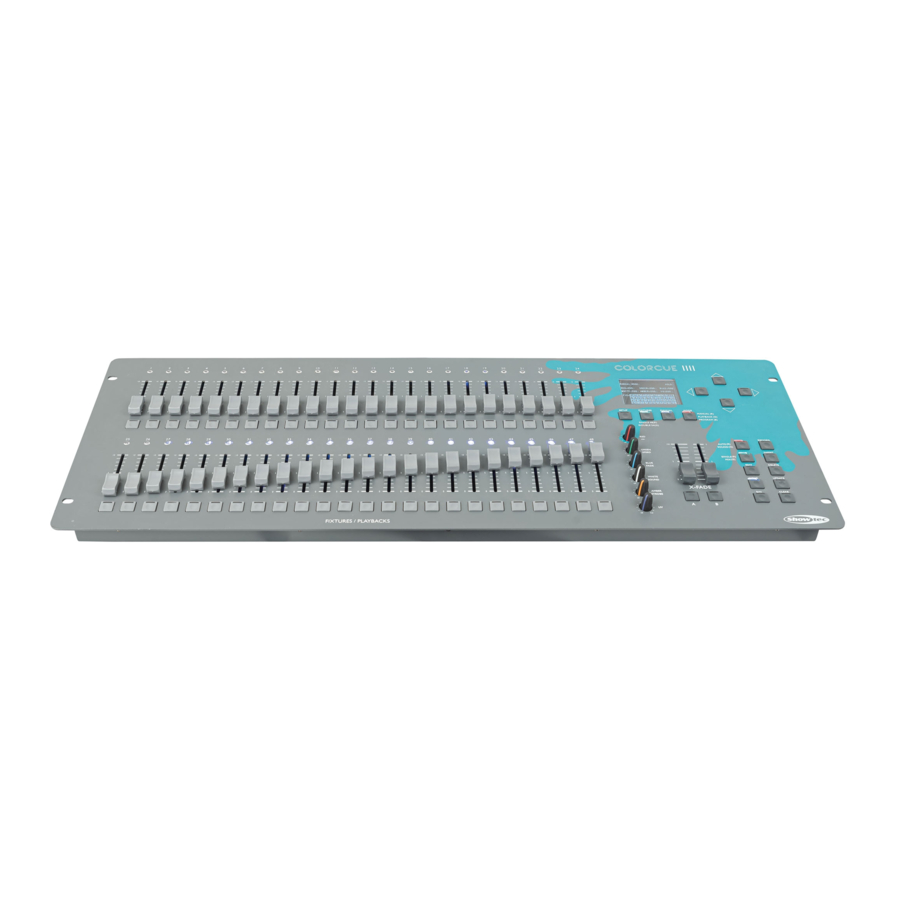
ColorCue 4 Description of the Device The Showtec ColorCue 4 is a LED DMX controller featuring 2 master faders, 48 fixture intensity faders, 6 color rotary encoders, 48 memory buttons for colors/chases/user memories. It can control up to 48 RGBWA-UV fixtures. -
Page 10: Top View - Modes/Functions Section
ColorCue 4 Top View – Modes/Functions Section Fig. 03 C) LCD display AMBER/STROBE control D) Modes buttons with LEDs (53)–(56) UV control RED/DIRECTION control BANK A master fader and flash button with LED (57) GREEN/SPEED control BANK B master fader and flash button with LED (58) G) BLUE/FADE control M) Function buttons with LEDs (59)–(68) -
Page 11: Back View
ColorCue 4 Back View Fig. 04 O) MIDI connector THRU MIDI connector OUT Q) MIDI connector IN USB connector (no function) Microphone 3-pin DMX connector OUT DC input connector Power switch ON/OFF Product code: 50706... -
Page 12: Product Specifications
Maximum housing temperature t 40 °C Optional Accessories There is flight case available for ColorCue 4. The flight case can be purchased separately. Contact your Highlite International dealer for more information. Product code: D7408 (Case for ColorCue 4) Product code: 50706... -
Page 13: Dimensions
ColorCue 4 Dimensions Fig. 05 Fig. 06 Mounting Dimensions Fig. 07 Product code: 50706... -
Page 14: Installation
ColorCue 4 Installation Installation Site Requirements ● The device must be installed only indoors. ● The device can be placed on a stable, flat surface, or mounted vertically or horizontally in an opening. ● The device can be operated from the optional flight case. See 3.5. Optional Accessories on page 11 for more information. -
Page 15: Setup
ColorCue 4 Setup Warnings and Precautions Attention Connect all data cables before supplying power. Disconnect power supply before connecting or disconnecting data cables. DMX Connection DMX-512 Protocol DMX-512 is a communication protocol used to control stage lighting and effects. Devices on a serial data link must be daisy-chained in a single line. To comply with the TIA-485 standard, no more than 32 devices should be connected on one data link. -
Page 16: Setup Example
Setup Example The ColorCue 4 can control up to 48 fixtures with up to 6 channels (RGBWA/UV) per fixture. It is suitable for small theatres and venues. Fig. 09 and Fig. 10 show a typical setup with ColorCue 4 as a LED controller. -
Page 17: Operation
Any other use, not mentioned under intended use, is regarded as non-intended and incorrect use. Start-up The device has a power switch. ● Press the power switch (V) in ON position to turn on the ColorCue 4. ● Press the power switch (V) in OFF position to turn off the ColorCue 4. Setup Mode In this mode you can select the type of the LEDs of the connected lighting fixture(s) and the MIDI address of the device. -
Page 18: Leds Type Setup
04) Repeat steps 1–3 to set up the LEDs types for the remaining fixtures, which have different LEDs type. DMX Starting Address of the Connected Fixtures The ColorCue 4 calculates automatically the starting DMX address of each connected fixture depending on the LEDs type setup. Each color is controlled on a separate DMX channel. However, there are no reserved DMX channels for each color and only the active channels are used. -
Page 19: Midi Address Setup
There are no functional differences between Approach 1 and 2. MIDI Address Setup In setup mode press the UP/DOWN buttons (49)/(52) to assign the MIDI address of the ColorCue 4. The selection range is 1–16. Refer to 6.10. MIDI Implementation Chart on page 32 for more information. -
Page 20: Operating Functions
ColorCue 4 In single (48-fixtures) mode: ● The FIXTURES buttons and faders (01)–(48) control the connected up to 48 fixtures. ● The BANK A master fader and flash button (K) act as master fader and flash button for all connected fixtures. -
Page 21: Strobe
ColorCue 4 Strobe You can add strobe effect at any time during playback of a scene or a chase. 01) Make sure that parameter selection mode is enabled. See 6.5.1.2. Parameter Selection Mode on page 19. 02) Turn the STROBE control (I) to add strobe effect. The adjustment range is from OFF to FULL, from low to high frequency. -
Page 22: Manual Operating Mode
ColorCue 4 Manual Operating Mode In this mode you can manually create scenes and transition between the scenes. The manual mode screen provides information about the color values and the selected fixtures. Press the MODE button (56) repeatedly until the LED on the button lights up in red to select manual mode. -
Page 23: Create A Scene In Bank B (Double Control Mode)
ColorCue 4 Create a Scene in Bank B (Double Control Mode) Fig. 17 01) Make sure that the device is in double (24-fixture) control mode. See 6.4. Control Modes on pages 18–19 for more information. 02) Set the BANK B master fader (L) to 0, if you do not want to output the scene live while you are creating it. -
Page 24: Create A Scene (Single Control Mode)
ColorCue 4 Create a Scene (Single Control Mode) Fig. 18 01) Make sure that the device is in single (48-fixture) control mode. See 6.4. Control Modes on pages 18– 19 for more information. 02) Set the master fader (K) to 0, if you do not want to output the scene live while you are creating it. If you set the master fader (K) to any other value, any changes you make will be output live. -
Page 25: Programming Mode
ColorCue 4 Programming Mode In this mode you can program and edit scenes and chases. The scenes and chases can be assigned to the 48 PLAYBACKS buttons (A)–(B). The programming mode screen provides information about the selected PLAYBACKS button number, the step number, the direction of the chase, the playback speed of the chase in bpm (beats per minute) and the fade percentage. -
Page 26: Record A Chase
ColorCue 4 Note: If a PLAYBACKS button (01)–(48) is not free and has a scene assigned to it, the LED on the button will be on. 04) Press the RECORD button (60) once again to store the scene. The LED on the button will turn off. -
Page 27: Chase Parameters
ColorCue 4 Chase Parameters When you create a chase you can additionally set the following parameters: ● direction in which the steps will be played back ● playback speed of a step ● fade percentage between the steps. You can adjust those parameters after you have created the first step in the chase. The settings will be applied to all steps in the chase. -
Page 28: Delete A Chase/Scene
ColorCue 4 Delete a Chase/Scene Fig. 21 01) In programming mode, press and hold down the DELETE button (64) for 3 seconds. The LED on the button will light up. 02) Press the PLAYBACKS button (01)–(48) for which you want to delete the chase/scene. The LED on the button will start blinking. -
Page 29: Delete A Step In A Chase
ColorCue 4 Delete a Step in a Chase Fig. 22 01) In programming mode, press and hold down the DELETE button (64) for 3 seconds. The LED on the button will light up. 02) Press the PLAYBACKS button (01)–(48) for which you want to delete a step in a chase. The LED on the button will start blinking. -
Page 30: Edit A Step In A Chase
ColorCue 4 Edit a Step in a Chase Fig. 23 01) In programming mode, press and hold down the EDIT button (63) for 3 seconds. The LED on the button will light up. 02) Press the PLAYBACKS button (01)–(48) for which you want to edit a step in the chase. The LED on the button will start blinking. -
Page 31: Insert A Step In A Chase
ColorCue 4 Insert a Step in a Chase Fig. 24 01) In programming mode, press and hold down the INSERT button (62) for 3 seconds. The LED on the button will light up. 02) Press the PLAYBACKS button (01)–(48) for which you want to insert a step in the chase. The LED on the button will start blinking. -
Page 32: Playback Mode
ColorCue 4 Playback Mode In this mode you can play back the recorded scenes/chases. The playback mode screen provides information about the selected PLAYBACKS button number, the total number of steps in the chase, the step which is being played, the playback speed of the chase in bpm (beats per minute) and the fade percentage. -
Page 33: Midi Implementation Chart
ColorCue 4 MIDI Implementation Chart Function Transmitted Recognized Remarks Default Basic channel Changed 1–16 1–16 Default Mode Messages Altered 00–111 00–110 Note number True voice Note ON Velocity Note OFF Key's After touch Channel Pitch bend Control change Prog Change... -
Page 34: Troubleshooting
ColorCue 4 Troubleshooting This troubleshooting guide contains solutions to problems which can be carried out by an ordinary person. The device does not contain user-serviceable parts. Unauthorized modifications to the device will render the warranty void. Such modifications may result in injuries and material damage. -
Page 35: Corrective Maintenance
Store the device in the original packaging, if possible. There is flight case available for ColorCue 4. You can store and transport the device in the flight case. The flight case can be purchased separately. See 3.5. Optional Accessories on page 11 for more information. - Page 36 ©2021 Showtec...
Need help?
Do you have a question about the ColorCue 4 and is the answer not in the manual?
Questions and answers