Table of Contents
Advertisement
Quick Links
Advertisement
Table of Contents

Related Manuals for SHOWTEC LCP-60


Summary of Contents for SHOWTEC LCP-60
- Page 1 LCP-60 ORDERCODE 50420...
- Page 2 Congratulations! You have bought a great, innovative product from Showtec. The Showtec LCP-60 brings excitement to any venue. Whether you want simple plug-&-play action or a sophisticated DMX show, this product provides the effect you need. You can rely on Showtec, for more excellent lighting products.
-
Page 3: Table Of Contents
Showtec Showtec LCP-60 Product Guide ™ Warning.................…...……………..…………………………….………..…. Safety-instructions……………………………………………………………………………………………………….. Operating Determinations.…………………………………………………………………………………………….. Description................…...………………………………………….………..… Features and Overview ………………………………...….……………….………….……….……….…………….. Backside…………………………………………………...…...….……………….…………………...….…………….. Installation................…...…………………………………………..……..….. Set Up and Operation..............……..…………………………………………….. Connection / Making the XLR-RJ11 cable……………………………………………………………………………… Menu Overview…...........…………………………………………………………………….… 2.1 CONTROL KEY lock / unlock....……………………………………………………………………………… 2.2 SCENE setting ..……………………………………………………………………………………………….. 2.2.1 Scene setting......………………………………………………………………………………... -
Page 4: Warning
WARNING CAUTION! Keep this device away from rain and moisture! Unplug mains lead before opening the housing! FOR YOUR OWN SAFETY, PLEASE READ THIS USER MANUAL CAREFULLY BEFORE YOUR INITIAL START-UP! SAFETY INSTRUCTIONS Every person involved with the installation, operation and maintenance of this device has to: be qualified follow the instructions of this manual CAUTION! Be careful with your operations. -
Page 5: Operating Determinations
For adult use only. The device must be installed out of the reach of children. Never leave the unit running unattended. The user is responsible for correct positioning and operating of the LCP-60. The manufacturer will not accept liability for damages caused by the misuse or incorrect installation of this device. -
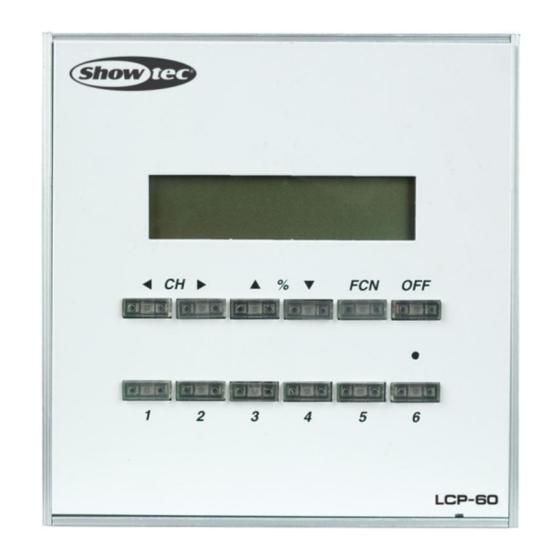
Page 6: Description
1) Channel Up/Down 2) %/Down 3) FCN 4) OFF 5) 1-6 Chases Note: You have to buy an external power adapter (12v 500mA) and a XLR plug and solder them together to use your LCP-60 (See Page 6 how to connect). -
Page 7: Backside
Backside Fig. 2 Installation Damages caused by non-observance are not subject to warranty. Set Up and Operation Follow the directions below, as they pertain to your preferred operation mode. Before plugging the unit in, always make sure that the power supply matches the product specification voltage. -
Page 8: Connection / Making The Xlr-Rj11 Cable
Connection / Making the XLR-RJ11 cable While you are using LCP-60 as control Panel to connect between ECP control panel and EDX dimmer pack by phone Jack cable. The definition of DMX connection pin for ECP-101(A)/ECP-102(A)/ECP-103(A) is same as those of EDX series dimmer pack , please refer to drawing beside. -
Page 9: Menu Overview
Menu Overview Press the FCN button and then press ▲ or ▼ to scroll through the menu. 2.1 CONTROL KEY lock / unlock STEP-1 First press and hold ◄ + ► , then press FCN to lock / unlock the buttons. 2.2 SCENE setting 2.2.1 Scene setting STEP-1... -
Page 10: Scene Loading
2.2.2 Scene Loading STEP-1 Press the FCN button and then press ▲ or ▼ to select F7. STEP-2 Press the FCN button to enter the menu. STEP-3 Press ▲ or ▼ to select a scene SC:001 - SC:040 ,and then press FCN to load the desired scene. 2.3 CHASER Edit &... -
Page 11: Chaser Edit & Modify
Press ▲ or ▼ to change the Chase Speed time. Press ◄ or ► to change the Keep Time (=Wait Time). Press the FCN button to continue. Change Chase Mode Speed Time becomes Fade Time when set ON Press ▲ or ▼ to change the Chase Mode. Press ◄... -
Page 13: Making A Timer
2.5 Making a TIMER 2.5.1 TIMER Switch on / off STEP-1 Press the FCN button and then press ▲ or ▼ to select F6. STEP-2 Press the FCN button to enter the menu. STEP-3 Press ▲ or ▼ to select ON or OFF, and press the FCN button to save and exit. - Page 14 STEP-6 Press ► go to MOD, and press ▲ or ▼ to adjust the mode (1-4). STEP-7 Press ► to go to CHS, press ▲ or ▼ to adjust the chase (00-06). STEP-8 Press ► to go to SPD, press ▲ or ▼ to adjust the chase (0.1Sec-99Min.). STEP-9 Press ►...
-
Page 15: Timer Modify
2.5.3 TIMER modify STEP-1 Press the FCN button and then press ▲ or ▼ to select F4. STEP-2 Press the FCN button to enter the menu. STEP-3 Press 4 to edit the TIMER. STEP-4 Press ◄ or ► to select, and press ▲ or ▼ to adjust(please refer to 2.5.2). STEP-5 Press the FCN button to confirm and save the setting. -
Page 16: System Timing Modify
STEP-4 Press 1 to confirm and save the setting, or 2 to skip. 2.5.5 System timing modify STEP-1 Press the FCN button and then press ▲ or ▼ to select F5. STEP-2 Press the FCN button to enter the menu. STEP-3 Press ►... -
Page 17: Control Channel Switch
STEP-2 Press the FCN button to enter the menu. Press ▲ or ▼ to select the DMX starting address (001-512)of the LCP-60. Press the FCN button to save and exit. Maintenance The operator has to make sure that safety-relating and machine-technical installations are to be inspected by an expert after every four years in the course of an acceptance test. -
Page 18: Troubleshooting
Once the unit operates properly, do not carry out following steps. If the LCP-60 does not operate properly, refer servicing to a technician. Problem area: the power supply. 1. Power supply. Check that the unit is plugged into an appropriate power supply. -
Page 19: Product Specifications
Product Specification Model: Showtec LCP-60 Voltage: AC 230V-50Hz (CE) Dimensions: 117 x 120 x 45 mm (LxWxH) Weight: 0,36 kg Operation and Programming DMX-control via standard DMX-controller Signal pin OUT : pin 1 earth, pin 2 (-), pin 3 (+)
Need help?
Do you have a question about the LCP-60 and is the answer not in the manual?
Questions and answers