
Subscribe to Our Youtube Channel
Related Manuals for SHOWTEC Showmaster 48 MKII


Summary of Contents for SHOWTEC Showmaster 48 MKII
- Page 1 MANUAL ENGLISH Showmaster 48 MKII V1 Ordercode: 50831 Highlite International B.V. – Vestastraat 2 – 6468 EX – Kerkrade – the Netherlands...
-
Page 2: Table Of Contents
Showmaster 48 MKII Table of contents Warning ....................................2 Safety Instructions ................................. 2 Operating Determinations ............................3 Connection with the mains............................3 Return Procedure ................................4 Claims ....................................4 Description of the device ..............................5 Features ..................................5 Overview ..................................5 Frontside.................................. -
Page 3: Warning
Showmaster 48 MKII Warning Unpacking Instructions Immediately upon receiving this product, carefully unpack the carton and check the contents to ensure that all parts are present, and have been received in good condition. Notify the dealer immediately and retain packing material for inspection if any parts appear damaged from shipping or the carton itself shows signs of mishandling. -
Page 4: Operating Determinations
● If your Showtec device fails to work properly, discontinue use immediately. Pack the unit securely (preferably in the original packing material), and return it to your Showtec dealer for service. -
Page 5: Return Procedure
Showmaster 48 MKII Return Procedure Returned merchandise must be sent prepaid and in the original packing, call tags will not be issued. Package must be clearly labeled with a Return Authorization Number (RMA number). Products returned without an RMA number will be refused. Highlite will not accept the returned goods or any responsibility. -
Page 6: Description Of The Device
Showmaster 48 MKII Description of the device Features The Showmaster 48 MKII is a light controller from Showtec. ● Input voltage: 100-240V, 60/50 Hz ● Power supply: DC 12-20V 500mA ● 48 channels ● 96 scenes or 96 chase programs with 999 steps ●... -
Page 7: Frontside
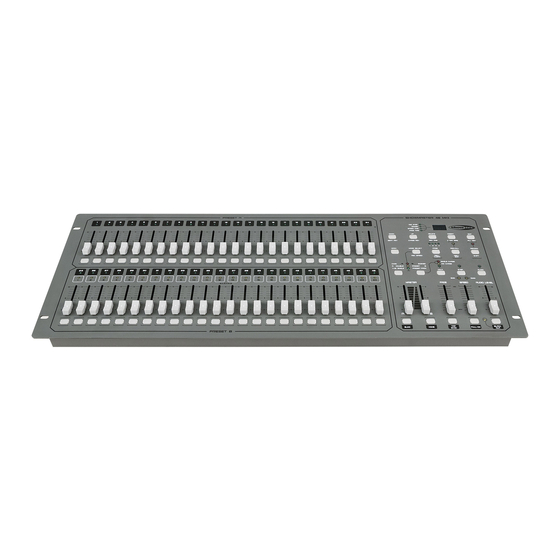
Showmaster 48 MKII Frontside 01) Preset A LEDs: Show the current intensity of the relevant channels, numbered from 1-24. 02) Channel/playback faders 1-24: These faders are used to control and/or program the intensity of channels 1-24. 03) Flash buttons 1-24: These 24 buttons are used to set an individual channel to full intensity. -
Page 8: Backside
Showmaster 48 MKII Backside Fig. 02 34) Power switch ON/OFF 35) DC Input: DC 12-20V, 500 mA. 36) MIDI Thru: MIDI port, used for connection to a sequencer or a MIDI device. 37) MIDI Out: MIDI port, used for connection to a sequencer or a MIDI device. -
Page 9: Set Up And Operation
Showmaster 48 MKII Set Up and Operation Before plugging the unit in, always make sure that the power supply matches the product specification voltage. Do not attempt to operate a 120V specification product on 230V power, or vice versa. 1. Begin Programming 1.1 Recording Mode... - Page 10 Showmaster 48 MKII Press the Page button to select a page (Page 1-4) to store your scenes. Press the Mode Select button to select CHASE SCENES. 09) Press and hold down the Record button and press the flash button between 25-48. All LEDs will flash, indicating that the scenes have been stored under that flash button/playback fader, providing that there was more than one scene in the memory.
-
Page 11: Editing
Showmaster 48 MKII 2. Editing 2.1 Edit Mode 01) Enter the Recording mode. 02) Press the Page button to select the page containing the chase or scene which you would like to edit. 03) Press the Mode Select button to select CHASE SCENES. -
Page 12: Modifying Steps
Showmaster 48 MKII 2.3 Modifying Steps 01) Enter the Edit mode. 02) Press Step button to find the step which you wish to modify. 03) Press and hold down the Up or Down button to increase/decrease the channel intensity and press repeatedly the flash button corresponding with the the scene which you wish to modify, until you reach the desired result. -
Page 13: Removing Programs
Showmaster 48 MKII 2.6 Removing Programs 01) Enter the Recording Mode. 02) Press the Page button to select the page which contains the program which you wish to erase. 03) Press and hold down the Record button and press the corresponding flash button (25-48) twice. -
Page 14: Running
Showmaster 48 MKII 3. Running 3.1 Running Programs 01) Press the Mode Select button to select CHASE SCENE. 02) Press the Page button to select the page containing the program which you wish to run. 03) Move the Master fader B to its maximum position (full down). -
Page 15: Running A Program To Audio
Showmaster 48 MKII 3.2 Running a Program to Audio 01) Use the built-in microphone or plug the audio source into the RCA audio jack connector. 02) Select your created program. 03) Press the Audio button. The LED indicator will light up. -
Page 16: Running A Program With The Standard Beat
Showmaster 48 MKII 3.4 Running a Program With the Standard Beat 01) Make sure that the Audio mode is inactive. 02) Press the Mode Select button to select CHASE SCENE Mode. 03) Press the Park button to select the Mix Chase mode. The LED indicator will light up. -
Page 17: Midi-Operation
Showmaster 48 MKII 4. MIDI-Operation 4.1 Setting MIDI IN 01) Press and hold down the Record button and press flash button 1 three times. The display shows "CHI" indicating that MIDI IN channel setup is available. Tap 3x 02) Press the flash button numbered from 1-16 to assign MIDI IN channel 1-16. -
Page 18: Exit Midi Setting
Showmaster 48 MKII 4.3 Exit MIDI Setting 01) Press and hold down the Record button and press the Rec Exit button to exit MIDI setting. 4.4 Receiving MIDI File Dump 01) Press and hold down the Record button and press the flash button 3 three times. -
Page 19: Implementation
Showmaster 48 MKII 4.6 Implementation 01) During receiving and sending MIDI data, all MIDI scenes and channels will be automatically paused, if there is no response within 10 minutes. 02) During receiving and sending file dump, the controller will automatically search for or send Device ID of 55H (85), a file named DC2448 with an extension of "BIN (SPACE)". -
Page 20: Briefly On Main Functions
Showmaster 48 MKII 5. Briefly on Main Functions Reverse the direction of the scene 01) Reverse the scene direction: Press the All Rev button, all the scenes should change their directions. 02) Reverse the chase direction of all the programs with speed control. - Page 21 Showmaster 48 MKII Blind and Home 01) Blind function temporarily deactivates channels in a chase, when the chase is running, and gives you manual control of the channel. 02) Press and hold down the Blind button and press the flash button, corresponding with the channel which you want to temporarily deactivate.
-
Page 22: Maintenance
Showmaster 48 MKII Maintenance The Showtec Showmaster 48 MKII requires almost no maintenance. However, you should keep the unit clean. Disconnect the mains power supply, and then wipe the cover with a damp cloth. Do not immerse in liquid. Do not use alcohol or solvents. - Page 23 Showmaster 48 MKII Ordercode: 50831...
- Page 24 ©2015 Showtec...
Need help?
Do you have a question about the Showmaster 48 MKII and is the answer not in the manual?
Questions and answers