Table of Contents
Advertisement
Advertisement
Table of Contents

Related Manuals for SHOWTEC SCANMASTER 3


Summary of Contents for SHOWTEC SCANMASTER 3
- Page 1 Scanmaster 3 ORDERCODE 50337...
- Page 2 For more information: iwant@showtec.info You can get some of the best quality, best priced products on the market from Showtec. So next time, turn to Showtec for more great lighting equipment. Always get the best -- with Showtec ! Thank you!
-
Page 3: Table Of Contents
Showtec Showtec Scanmaster 3 Product Guide ™ Warning..…...................…………………………………………. Safety-instructions………………………………………………………………………………………….…. Operating Determinations……………………………………………………………………………………. Description..…................……….………………………………… Features…….……………………………………………………………………………………….……...…. Overview……………………………………………………………………………………………………….. Back side..………………………………………………………………………………………..……….…… Installation................…...…………………………………….…... Set Up and Operation..............……..…………………………….…… Display Information……..………………………………………………………………….……...………….. Unit Set Up………………………………………….……...………………………………….……...……….. Set Up Joystick…………………………………….……...………………………………….……...……….. SCENES………………………………………….……...………………………………….……...………….. - Programming a Scene........…………......……………………..……. - Example Scene Program..........…..…………..…………………. - Editing a Scene.………………….....…………......……………………...…. - Page 4 FILE TRANSFER……………………………….…………………………………………………………….. - To Send a File Dump.……………………..……….…….…………….…………..……….………… - Receive a File Dump...……………………..……….……………….………………..……….……… - MIDI Channel Setting....……………………..…………………….………………..……….. MIDI Implementation Chart…………………………………………………………………………………..…. Maintenance...................………..………….…….…………….. Troubleshooting................………………….………………….…. Product Specifications..............……………….…….………………….
-
Page 5: Warning
WARNING CAUTION! Keep this device away from rain and moisture! FOR YOUR OWN SAFETY, PLEASE READ THIS USER MANUAL CAREFULLY BEFORE YOUR INITIAL START-UP! SAFETY INSTRUCTIONS Every person involved with the installation, operation and maintenance of this device has to: be qualified follow the instructions of this manual CAUTION! Be careful with your operations. -
Page 6: Operating Determinations
The arising condensation water might damage your device. Leave the device switched off until it has reached room temperature. If your Showtec device fails to work properly, discontinue use immediately. Pack the unit securely • (preferably in the original packing material), and return it to your Showtec dealer for service. -
Page 7: Description
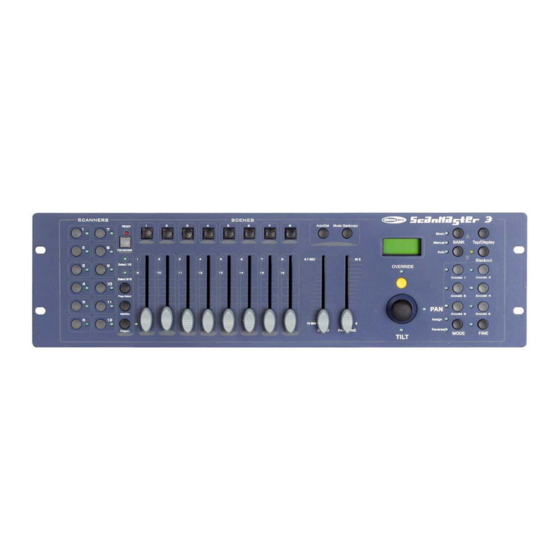
Description of the device Features Scanmaster 3 is a lightcontroller from Showtec. 192 DMX channels • 12 Scanners of 16 channels each • 30 Banks of 8 programmable scenes • 6 Programmable chases of 240 scenes • 8 Sliders for manual control of channels •... - Page 8 1) SCANNER buttons To select scanners for setting, programming or recording. 2) FOG MACHINE button This button is used to control the Fog machine. Relevant LED will show you the working state (READY). 3) SCENE buttons Press the scene buttons to load or store relevant Scenes. There is a maximum of 240 programmable scenes.
-
Page 9: Backside
Do not attempt to operate a 120V specification product on 230V power, or vice versa. The Scanmaster 3 allows you to program 12 scanners with 16 DMX channels each; 30 banks of 8 programmable scenes, 6 chases of 240 scenes using 8 channel sliders, a joystick and other buttons. With the ease of the joystick, you can easily and more accurately control the movement of a fixture. -
Page 10: Display Information
Display Information The LCD Display contains a maximum of 2 lines, each containing 8 characters. Below are the definitions. LCD Display Message Scene 1 Bank 1 CHASE1 Chase 1 is activated STEP 009 The ninth step of a chase DATA 184 DMX Value (000-255) SP: 1M54s The current speed is 1 minute 54 seconds... -
Page 11: Scenes
SCENES Programming a Scene 1) Enter program mode (See Enabling Program Mode).. 2) Check the blackout key and verify that the LED is not lit, if it is, press it once to exit blackout mode. 3) Verify that the speed and fade time sliders are positioned at zero. 4) Press the SCANNER button corresponding to the unit wish to control. -
Page 12: Copy A Scene
Copy a Scene 1) Enable Program Mode. 2) Tap the BANK Up/Down button, to select the bank containing the scene you wish to copy. 3) Select the scene you wish to copy, by pressing its SCENE button. 4) Using the BANK Up/Down button, select the bank you wish to copy the scene to. 5) Tap the MIDI/Rec button. -
Page 13: Chases
CHASES Programming a Chase Note: You must have already programmed scenes in order to program a chase. This function allows you to cycle through up to 240 scenes in a preselected order. It is recommended to delete all chases in the controller, before programming chases for the first time. -
Page 14: Joystick / Channel Selection
JOYSTICK / CHANNEL SELECTION Set-up Joystick 1) Press and hold the PROGRAM button, until the LED is lit. 2) Press and hold the MODE and FINE button at the same time, the assign LED should light. If the reverse LED lights, press FINE and MODE again to enter assign mode. 3) Use the BANK up and down keys to select the axis you wish to assign (Pan or TILT). -
Page 15: Fade Time
FADE TIME Fade Time / Assign Fade Time 1) With the power off, press the MODE and Tap/Display buttons at the same time. 2) Turn the power back on, tap the Tap/Display button to change between Fade Time and Assign Fade Time, the LCD shows: 3) Press the MODE and Tap/Display buttons at the same time to store your setting into memory. -
Page 16: Running Chases
FILE TRANSFER File Transfer allows the user to transfer all information stored in one Scanmaster 3 to a second Scanmaster unit. You must connect the units using 3-pin XLR cables. The unit sending the information will have the cable plugged into the DMX Out plug, and the receiving the information will have the cable running into the DMX In location. -
Page 17: Midi Implementation Chart
MIDI Implementation Chart MIDI IMPLEMENTATION CHART Scanmaster 3 Function Transmitted Recognized Remarks Basic channel Default Changed 1-16 Mode Default Messages Altered Note number 1-16 True voice Velocity Note ON Note OFF After touch Key's Channel Pitch bend Control change Prog Change... -
Page 18: Maintenance
2. Check power from the wall, all cables, the fuse, etc. 3. If all of the above appears to be O.K., plug the unit in again. 4. If nothing happens after 30 seconds, unplug the device. 5. Return the device to your Showtec dealer. -
Page 19: Product Specifications
Product Specification Model: Showtec Scanmaster 3 Voltage : AC 230V-50Hz (CE) Power input: DC9 ~ 12V, 500 mA min. Audio trigger: Built-in Mic DMX Input : 3-pin XLR Male connector DMX Output : 3-pin XLR Female connector Midi Input: 5-pin connector...
Need help?
Do you have a question about the SCANMASTER 3 and is the answer not in the manual?
Questions and answers