go-e HOME+ Operating Instructions Manual
For the product variants 11 kw and 22 kw
Hide thumbs
Also See for HOME+:
- Operating instructions manual (30 pages) ,
- Quick reference manual (10 pages) ,
- Short instructions (4 pages)
Table of Contents
Advertisement
Quick Links
Advertisement
Table of Contents

Related Manuals for go-e HOME+


Summary of Contents for go-e HOME+
- Page 2 power 2 change Page 2...
-
Page 3: Table Of Contents
Table of Contents Thank you for your purchase decision ............Page 4 Before installation and commissioning ............Page 5 Registration information ................Page 5 Safety instructions ..................Page 6 Product overview ..................Page 8 Scope of delivery ..................Page 9 Technical specifications ................ -
Page 4: Thank You For Your Purchase Decision
The technology for this is already built into each of our charging boxes. For more information, please visit www.awattar.com/services/goe We wish you lots of fun with your go-eCharger and enough electricity at all times. Your go-e team Page 4... -
Page 5: Before Installation And Commissioning
Ÿ to avoid damage Ÿ to increase durability and reliability Ÿ to prevent a hazard go-e GmbH does not assume any liability for damages caused by disregarding these instructions! Please dispose of the device and the packaging after use in accordance with the national legal regula- tions. -
Page 6: Safety Instructions
Any modification or repair of hardware or software may only be carried out by qualified personnel of go-e GmbH or personnel trained for this purpose. The removal of warnings attached to the go-eCharger or the opening of the device will result in the loss of any liability by go-e GmbH. - Page 7 ¡ CEE blue 32 A 1-phase 230 V 50 Hz ¡ multiple domestic plugs 16 A 1-phase 230 V 50 Hz The original go-e adapters for the go-eCharger HOME+ 11 kW and go- eCharger HOME+ 22 kW may only be used in conjunction with the respective go-eCharger.
-
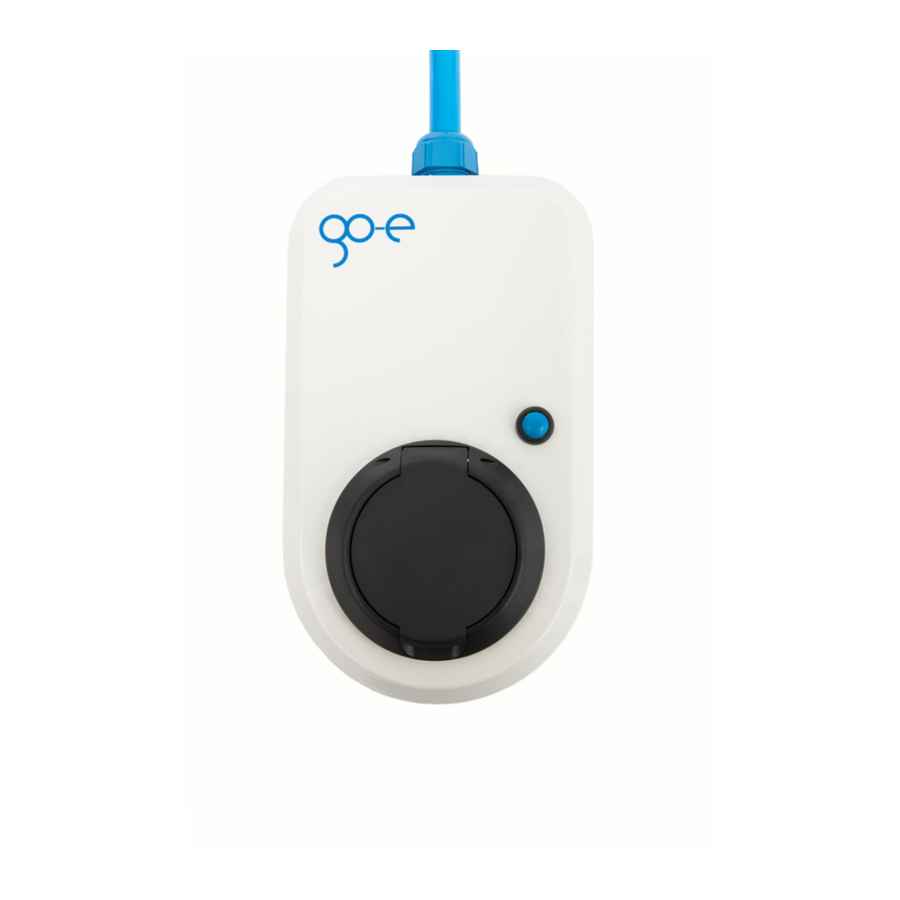
Page 8: Product Overview
Product overview 32 A CEE Plug (HOME+ 22 kW) 16 A CEE Plug (HOME+ 11 kW) (2) Connection cable (3) Housing (4) RFID reader (5) Button (6) Typ 2 socket (7) LED ring (8) Fine-wire fuse on the back (1) For plugging into a red CEE socket (2) Cable between charger and plug (3) Extremely impact-resistant and UV-resistant high-performance plastic (4) Charging enabled by RFID chips if activated as access control... -
Page 9: Scope Of Delivery
Scope of delivery 11 kW charging box 22 kW charging box with 16 A CEE plug with 32 A CEE plug Wall mounting plate Mounting set RFID chip Reset card 4 x dowels/screws for mounting plate 1 x u-piece for optional cable protection 1 x dowel/screw for u-piece Spare fine-wire fuse Optional... -
Page 10: Technical Specifications
Technical specifications Product specifications: Ÿ Dimensions: approx. 15 x 25 cm x 9 cm Ÿ Weight: approx. 2.0 kg Ÿ Connection cable: 30 cm + plug (CEE red 16 A or CEE red 32 A) Ÿ Rated voltage: 230/400 V depending on number of connected phases Ÿ... - Page 11 Protection class = I Ÿ Pollution degree = II Ÿ go-e network operator API for authorised access of the electricity network operator to the go-eCharger for network related power control App and connectivity: Ÿ Local (WiFi hotspot) or worldwide (via WiFi) usable Ÿ...
-
Page 12: Mounting
Mounting of go-eCharger HOME+ The go-eCharger has a built-in RCD protection module with direct current detection (30 mA AC and 6 mA DC). This switches off the charging station in the event of a fault current generated by the EV. Therefore, only a type A RCD must be installed on the building side, unless local regulations deviate from this. -
Page 13: Charging
Charging Start of the charger The go-eCharger performs a self-test during initial start-up or after a restart, during which the LEDs light up in rainbow colours. Ready to charge After the self-test, the LEDs light up blue in the strength of the preset charging current (1 LED = 1 ampere). - Page 14 Charging Charging After the car has released the charge, the LEDs rotate clockwise around the charging socket during the charging process. The number of "tails" corresponds to the number of phases connected (or, in the case of go-eChargers with serial number CM-03-, the number of phases set in the app).
-
Page 15: Led Status Display / Troubleshooting
LED status display / troubleshooting The go-eCharger displays the charging status via different colours and positions of the LEDs. In addition, it executes a whole series of safety queries to check the used power source for possible errors. For this reason, the go-eCharger may display an error and refuse to charge, especially with unknown power sources. - Page 16 LED status display / troubleshooting Activation required The LEDs light up blue and two white LEDs move from the top and bottom to the centre. The access control is not set to "Open". Use a taught RFID chip or the app to activate it. RFID chip detected 5 LEDs light up green.
- Page 17 Check whether the phase/s of the go-eCharger are connected properly. It is possible that only 2 phases are connected. If no function occurs, contact the go-e Support. Fault current detected The LEDs flash red at the top and light up pink at the bottom.
- Page 18 LED status display / troubleshooting Firmware update The LEDs flash pink and turn yellow with increasing progress of the update. A firmware update was started via the go-eCharger app. This may take a few minutes. Do not disconnect the charger from the power supply during this time.
-
Page 19: Reset Card / Rfid Chip
Reset card / RFID chip Reset to factory settings Mit der go-eCharger-Resetkarte können Sie alle Einstellungen der Ladebox auf die Werksparameter zurücksetzen. Ÿ To do this, hold the reset card in front of the RFID reader of the charging box. Ÿ... -
Page 20: Go-Echarger App - Connection Setup
Either scan the QR code on the reset card (an external app may be required for this) or manually search for the charger's network (displayed as go-e-xxxxxx) in the settings of your mobile device to establish a connection to the hotspot. If you connect manually, you have to enter the password that you will find on the reset card under "Hotspot key". -
Page 21: Go-Echarger App - Charging
go-eCharger app - Charging The screenshot opposite shows the "Charging" page of the go-eCharger app. This view gives you direct access to the most important functions to start, stop and monitor charging processes. (1) Do you have several go-eChargers? Then tap on the picture of the Charger or its name to the right to reach a selection page with the list of available devices. -
Page 22: Go-Echarger App - Settings
"Data" tab of the "Charging" page (note: aWATTar is currently only available in Germany and Austria). For more information about the electricity tariff visit the go-e page at aWATTar: www.awattar.com/services/goe Page 22... - Page 23 go-eCharger app - Settings Scheduler The "Scheduler" option allows you to postpone the charging process to a time when electricity is usually available in abundance (e.g. often at night). In this way, you act in a particularly sustainable way, as you do not further increase the usual load peaks at the end of the working day and use electricity that could otherwise not be used sensibly.
-
Page 24: Warranty
Warranty The statutory liability for defects law and the statutory warranty period of two years shall apply. After six months from delivery of the goods, the burden of proof of the statutory warranty shall pass to the customer. Shipping costs for repeated repairs due to technical defects by the manufacturer shall be borne by the manufacturer. -
Page 25: Confirmation For Subsidy
Ÿ Smart grid capable through connection to aWATTar Ÿ Recording of charging energy (kWh), total and broken down by RFID card Ÿ Modbus TCP (firmware version 0.40 or higher) and go-e network operator API for authorised access of the electricity network operator to the go-... -
Page 26: Ce Declaration Of Conformity
CE Declaration of Conformity Deviating declaration of conformity for go-eChargers with serial numbers CC1- or CM-02- available at www.go-e.co/downloads Page 26... -
Page 27: Online Support / Contact Details
Online support / contact details Do you still have questions about operating the go-eCharger? Then use our online support. In the FAQ at www.go-e.co/faq-charger/?lang=en we address the most frequently asked questions. You will almost certainly find there what you are looking for. - Page 28 go-eCharger HOME+...
Need help?
Do you have a question about the HOME+ and is the answer not in the manual?
Questions and answers