Table of Contents
Advertisement
Quick Links
Advertisement
Table of Contents

Related Manuals for Etac Cross 6


Summary of Contents for Etac Cross 6
- Page 1 Etac Cross 6 Manual English 75401C 201216...
-
Page 2: Table Of Contents
Adjust back support angle, 2B ............28 saved. You can also find it at www.etac.com. There is also other Adjust back upholstery, 2B ..............28 documentation such as prescribing information, sales guide and 13. -
Page 3: General
The following must be taken into account when using the product. Warning: This product can be adjusted beyond safe use. The prescription of Cross 6 must be done by medical Strong sunlight can heat parts of the chair and cause burns. -
Page 4: Transport In Vehicles
Etac / Cross 6 / www.etac.com 2. Safety Transport in vehicles • The wheelchair should primarily be placed in the The product is crash tested and approved according to ISO 7176-19 luggage compartment. (see section “CE marking, tests” in the manual). -
Page 5: Service And Maintenance
Etac / Cross 6 / www.etac.com 3. Service and maintenance Cleaning Back upholstery, seat upholstery and Chassis, handle and arm supports: arm support upholstery: Everyday maintenance: Clean the chassis Wash as per the washing instructions on with commonly used cleaning agents without the product. -
Page 6: Technical Data
Etac / Cross 6 / www.etac.com 4. Technical data Seat depth from Max user Seat height Seat height Back support Transport Chair type Art no Total width Weight back post * weight back front height width 32-45 cm 35 cm short... -
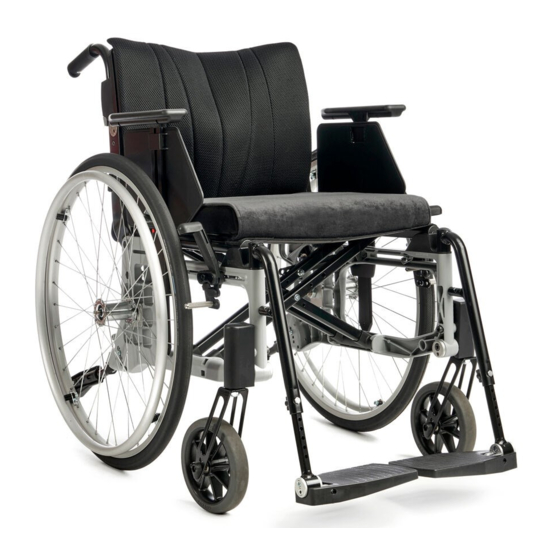
Page 7: Description
Etac / Cross 6 / www.etac.com 5. Description/Standard version Handles Steering handle lock Back rail Hand rim User brake Quick release Gable Front fork attachment Front fork Castor wheel Back cover Upholstery back Rear wheel Cross Upholstery seat Leg support... - Page 8 Etac / Cross 6 / www.etac.com 6. The chair’s possibilities Aluminium Stainless steel Handrims Plastic Foam rubber (not with attendant brake) Titanium (not with attendant brake) 2° Camber angle 0° Seat upholstery Seat Hard seat Back 3A Back 3A high...
-
Page 9: Accessories
78 = Grey 7. Accessories Installation instructions are included with all accessories when delivered from Etac. You can find them and more info about the accessories on our website www.etac.com. Settable = Adjustable using tools. Adjustable = Adjustable without tools. - Page 10 Etac / Cross 6 / www.etac.com 7. Accessories Padding For calf strap Calf pad Plush. Mounted/adjusted with Velcro Heel strap Black nylon, adjustable in length For foot support depth 13 cm Foot plate, padding For one-piece, angle adjustable foot plate...
-
Page 11: Installation Upon Delivery
Etac / Cross 6 / www.etac.com 8. Installation upon delivery Leg supports with foot plates and arm supports/side covers are delivered unassembled and must be mounted upon delivery. 9. Handling Unfolding • Push one seat post down, with your whole hand on top of the seat. -
Page 12: Leg Supports
Etac / Cross 6 / www.etac.com 9. Handling Leg supports The leg supports can be lifted off/swung to the side if needed. Lockable leg supports by pressing the red button (A). When installing lockable leg supports, press the red button (A), place the leg support in position and release the button. -
Page 13: Seating Comfort Settings
Etac / Cross 6 / www.etac.com 10. Seating comfort settings Seating comfort What constitutes good seating comfort depends on the needs and The back support setting is a combination of angles, height and condition of each individual. Here are some general guidelines to shape. - Page 14 Etac / Cross 6 / www.etac.com 10. Seating comfort settings Foot plates Tipping hazard! Adjust the height so that your feet feel supported and your thighs rest Never stand on the foot plates. against the cushion. For outdoor use, the foot plates should be 4 - 5 cm from the ground.
-
Page 15: Driving Technique Use
Etac / Cross 6 / www.etac.com 11. Driving technique use Parking Turn the castor wheels forward, apply the brakes. Do not park on a hill with user in the wheelchair. Transfer to/from a wheelchair Never stand on the foot Turn the castor wheels forward, apply the brakes, fold up the foot plates, risk of tipping! plates and lower the leg supports. - Page 16 Etac / Cross 6 / www.etac.com 11. Driving technique use The following sketches show principles for driving technique and dealing with obstacles. User, up forwards This technique is only recommended for experienced wheelchair users. - Make sure the anti-tip guards are inactive.
- Page 17 Etac / Cross 6 / www.etac.com 11. Driving technique use Attendant, up forwards - Make sure the anti-tip guards are inactive. Activate the anti-tip guards afterwards! Attendant, up backwards - Make sure the anti-tip guards are inactive. Activate the anti-tip...
- Page 18 Etac / Cross 6 / www.etac.com 11. Driving technique use Stairs, up - Make sure the anti-tip guards are inactive. Never use We recommend that there always be two attendants in this escalators, even if there is an attendant. Make sure that move.
-
Page 19: Advanced Settings, Customization
Etac / Cross 6 / www.etac.com 12. Advanced settings, customization The seat angle is obtained by the difference between front and rear seat height. At changed seat angle: - Adjust the angle of the front fork attachments. - Check the back support angle. -
Page 20: Rear Seat Height (Table)
Etac / Cross 6 / www.etac.com 12. Advanced settings, customization Rear seat height can be adjusted using: Consider the risk of tipping. - The position of the rear wheel (camber washer) in the gable. Always check the setting of the anti-tip guard. -
Page 21: Height Adjustment Front Fork Attachment
Etac / Cross 6 / www.etac.com 12. Advanced settings, customization Height adjustment front fork attachment Consider the risk of tipping. Loosen the screws (A and B). Set the desired seat height by measuring Always check the setting of the anti-tip guard. -
Page 22: Remove/Mount Front Fork
Etac / Cross 6 / www.etac.com 12. Advanced settings, customization Removing/mounting front fork - Remove cover (A) and loosen lock nut (B). Pull out the front axle and move the beveled washer (C) and the ball bearing to the new axle. -
Page 23: Change The Rear Wheel Position
Etac / Cross 6 / www.etac.com 12. Advanced settings, customization Change rear wheel position Consider the risk of tipping. 1. Remove the rear wheel Always check the setting of the anti-tip guard. 2. Loosen the nut. 3. Take the assembly apart with the washers and mount in the desired position (see table in section “Rear seat height table”). - Page 24 Etac / Cross 6 / www.etac.com 12. Advanced settings, customization Fitting 0° Camber When fitting, check that the rear wheel hub shaft is correctly set. The button in the hub should spring out to its original position. Test by pulling the wheel.
-
Page 25: Change The Rear Wheel Position, Attendant Brake
Etac / Cross 6 / www.etac.com 12. Advanced settings, customization Change rear wheel position, attendant brake H3 H4 G3 G4 F6 F5 F4 F3 F2 F1 E6 E5 E4 E3 E2 E1 D6 D5 D4 D3 D2 D1 C6 C5... -
Page 26: Adjust Back Support Angle, 3A
Etac / Cross 6 / www.etac.com 12. Advanced settings, customization Adjust the back support angle, 3A for simplifying the setting, the back angle can therefore also be adjusted between the click positions. The angle of the back support is continuously adjustable 3. -
Page 27: Adjust Seat Depth Using Lumbar Angle, 3A
Etac / Cross 6 / www.etac.com 12. Advanced settings, customization Adjust seat depth using lumbar angle, 3A Consider the risk of tipping. An extended seat depth is obtained by opening the back support Always check the setting of the anti-tip guard. -
Page 28: Adjust Back Support Height, 2B
Etac / Cross 6 / www.etac.com 12. Advanced settings, customization Adjust the back support height, 2B The back height is adjustable (see “The chair’s possibilities”). Loosen the screws to adjust the back height. Tighten the screws. Consider the risk of tipping. -
Page 29: Settings, Readjustments
Etac / Cross 6 / www.etac.com 13. Settings, readjustments Brake, adjustment 4. Make sure the brake is straight in the groove. Tighten the nut by about 5 Nm. Test the brakes! The brake is continuously adjustable. 5. Make sure the nut locks on the inside. -
Page 30: Rear Wheels With Quick-Release Axle
Etac / Cross 6 / www.etac.com 13. Settings, readjustments Rear wheels with quick-release axle When assembling, always make sure that the quick-release The distance between the hub sleeve and the locking balls can be button in the hub springs out properly. Test by pulling the adjusted by adjusting the nut on the outside of the hub. -
Page 31: Anti-Tip Guard
Etac / Cross 6 / www.etac.com 13. Settings, readjustments The anti-tip guards are adjustable in height and angle and adjustable in length. When adjusting the seat height, balance position or back angle, 3-7 cm 5 mm the function of the anti-tip guard must always be checked. -
Page 32: Camber Angle
Etac / Cross 6 / www.etac.com 13. Settings, readjustments The camber angle can be changed by replacing the washers Check that the rear wheel hub shaft is set correctly. The button between the hub sleeve and the nut (see also section “Changing in the hub should spring out to its original position. -
Page 33: Arm Support
Etac / Cross 6 / www.etac.com 13. Settings, readjustments The arm support mount can be mounted at 2 different heights. In position 1, the arm support height is adjustable between 19– 26 cm and in position 2 (standard) between 24-31 cm with 1 cm interval. -
Page 34: Accessories Settings Seat Cushion And Comfort Wedge
Etac / Cross 6 / www.etac.com 14. Settings, accessories Installation instructions are always included with the accessories when delivered from Etac. Instructions are also available on our website www.etac.com The seat cushion is cut to the set seat depth at the front or rear edge. -
Page 35: Head Support
Etac / Cross 6 / www.etac.com 14. Settings, accessories Head support is mounted on a separate head support mount or on a bow handle (optional). The head support is adjustable in height, depth, angle and sideways and detachable. Before adjusting the head support, make sure that the user has a good sitting position and is seated firmly. - Page 36 Etac / Cross 6 / www.etac.com Etac Sverige AB Tel 0371-58 73 00 Etac R82 GmbH Tel 02366-5006-0 Box 203 Fax 0371-58 73 90 Industriestraße 13 Fax 02366-5006-200 334 24 Anderstorp info@etac.se 45699 Herten info@etac.de Sweden www.etac.se Germany www.etac.de Etac AB (export) Tel 46 371-58 73 30 Etac R82 B.V.
Need help?
Do you have a question about the Cross 6 and is the answer not in the manual?
Questions and answers