Table of Contents
Advertisement
Quick Links
Advertisement
Chapters
Table of Contents

Related Manuals for Etac Cross 5


Summary of Contents for Etac Cross 5
- Page 1 Etac Cross 5 Manual english 75190N 2015-11-05 Etac Cross 5 Etac Cross 5 XL...
-
Page 2: Table Of Contents
Positioning belt ..............43 Drum brake ..............17 Headrest ................44 Seat angle .................18 10. Technical data Seat depth ................18 Etac Cross 5, Etac Cross 5 XL ..........45 Seat comfort ..............18 User manual 11. Service and maintenance Upholstery ................46 ................... 19-30 Rear wheel/castor wheel, front fork attachment ....46 Symbols and warnings ............20... -
Page 3: Intended Use
8, 10, 13, 24 mm 19 mm Intended use: Etac Cross 5 and Etac Cross 5 XL are manual, cross-folded, all- Etac Cross 5 and Etac Cross 5 XL have the best prerequisites round wheelchairs with multiple functions and they are intended to create comfort, functionality and good manoeuvrability. -
Page 4: Description
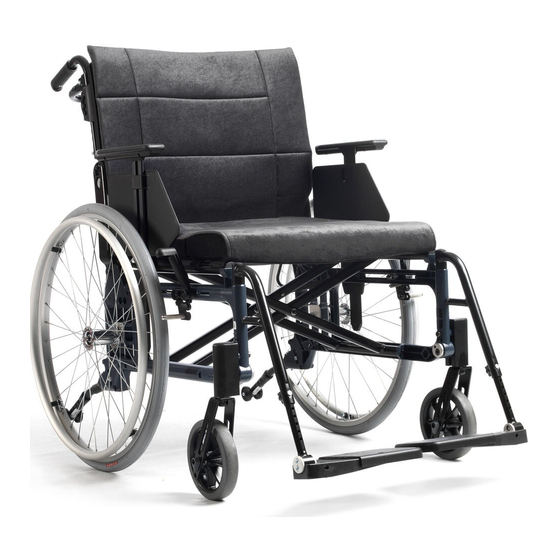
Etac / Cross 5 / www.etac.com 2. Description 1. Push handles 12. Backrest upholstery 2. Locking knob, push handles 13. Rear wheel 3. Back rail 14. Cross frame 4. Handrim 15. Seat upholstery 5. User brake 16. Legrest 6. Quick release hub 17. -
Page 5: The Chairs Possibilities
3. The chair’s possibilities In the section ”The chair’s possibilities” you can see all the adaptions possible on the wheelchair. Variations may occur in different markets, e.g. as regards backrest models. For more information, see www.etac.com or contact our customer service. - Page 6 Etac / Cross 5 / www.etac.com 3. The chair’s possibilities Seat depth Short frame 36-42 cm (triangular 36-49 cm) Seat depth Long frame 42-48 cm (triangular 42-55 cm) Standard Backrest mod. Height 30-45 cm Tapered Angle -5° - +15° Widened Short frame 36-42 cm.
- Page 7 Etac / Cross 5 / www.etac.com 3. The chair’s possibilities Normal knee angle Legrests Narrow angle lockable, Narrow angle, short Mod 1 with or without calf support adjustable in height, depth, angle and sideways (also available with flip-up calf support).
-
Page 8: Accessories
Without anti-tip attachment. Frame active Colour: black 01 4. Accessories Assembly instructions are always provided with accessories when they are supplied by Etac. Instructions are also available on our website, www.etac.com Settable = Adjusted using tools. Adjustable = Adjusted without tools. Armrest... -
Page 9: 4. Accessories
Etac / Cross 5 / www.etac.com 4. Accessories Thigh support With soft cushion to extend handrims, brake and armrests 5 mm on each Widening kit side Tray transparent, fits onto long armrest transparent, width 35-50 cm. Can be fitted onto short or Hemi tray long armrests. - Page 10 Etac / Cross 5 / www.etac.com 4. Accessories Seat belt with snap lock mounted on bow handle, adjustable in height, depth Headrest and angle. Available in several models Cross brace with snap lock Back wedge length 15 and 30 cm, attached with Velcro...
-
Page 11: Settings
Etac / Cross 5 / www.etac.com 5. Settings Front seat height The front seat height may be adjusted by: -Using the front fork attachment, adjustable in height and angle. -Changing the position of the castor wheel. -Changing the front fork. -
Page 12: Adjusting The Front Seat Height By Changing The Castor Wheel/Front Fork
** Possible in balance position 4-6 with 3° backward inclination and Std leg support. Make sure the fork/castor wheel can rotate freely without hitting the wheelchair or user. For 8x2” castor wheels, use the Transit fork (gives a seat height of 47-51 cm). *** With Cross 5 XL max user weight 135 kg. -
Page 13: Mounting The Front Fork
Etac / Cross 5 / www.etac.com 5. Settings Mounting front fork - Pull out the cover plug (A) and unscrew the retain- ing nut (B). Pull out the front fork and put the be- velled washer (C) and the bearing on the new fork. -
Page 14: Rear Seat Height
Etac / Cross 5 / www.etac.com 5. Settings Rear seat height Rear seat height can be adjusted by: -Changing the position of the rear wheel in the frame. -Changing the position of the rear wheel in the camber washer. -Changing the rear wheel. - Page 15 Etac / Cross 5 / www.etac.com 5. Settings When assembling, check so that the rear wheel axle is correctly adjusted. The button in the hub must pop out to the original position. Assembly in pos. G1 & G2 24 mm 17 mm Assembly 0°...
-
Page 16: Rear Seat Height Table
Etac / Cross 5 / www.etac.com 5. Settings Rear seat height table Rear wheel position, height Wheel Seat hgt Distance 20” 46 cm 4,5 cm 22” 48,5 cm 7,0 cm 24” 51 cm 9,5 cm 26” 53 cm 12 cm 20”... -
Page 17: Drum Brake
Etac / Cross 5 / www.etac.com 5. Settings Drum brake E1 E2 E3 E4 E5 E6 E6 E5 E4 E3 E2 E1 D1 D2 D3 D4 D5 D6 D6 D5 D4 D3 D2 D1 C1 C2 C3 C4 C5 C6... -
Page 18: Seat Angle
Etac / Cross 5 / www.etac.com 5. Settings Seat angle The seat angle is dependent on the difference between the front and the rear seat heights. Risk of tipping: Always check the setting of the the anti-tips. If the seat angle is changed: - Adjust the angle of the front fork attachment. -
Page 19: User Manual
Etac / Cross 5 / www.etac.com User manual 75190N 2015-11-05 This part of the manual (User manual) should be torn out and at all times follow the wheelchair. This as it contains impor- tant user information. Etac Cross 5 Etac Cross 5 XL... -
Page 20: Symbols And Warnings
Etac / Cross 5 / www.etac.com User manual Contents User manual Symbols and warnings .............20 Transportation in vehicles ..........21 Handling ..............22-23 Settings seat comfort Backrest cover ..............24 Seat cushion ..............24 Backrest upholstery............24 Backrest angle ..............24 Footrests...............25 Calf/heel strap ..............25 Armrests ...............25... -
Page 21: Transportation In Vehicles
Etac / Cross 5 / www.etac.com User manual Transportation in vehicles Etac’s wheelchairs are tested in accordance with ISO • If possible, the wheelchair should be placed in the 7176-19 (see ”Tests and guarantees” section in the boot. manual). •... -
Page 22: Handling
Etac / Cross 5 / www.etac.com User manual Handling Unfolding • Push down on one side of the seat frame, using the whole of the flat of the hand. • Do not hold the seat frame tube while unfolding as there is a risk of pinching your fingers. - Page 23 Etac / Cross 5 / www.etac.com User manual Legrest For lifting a wheelchair without lockable legrests: Swing in the legrests under the seat, or The legrests can be removed/swung to the side if needed. remove them, and lift using the frame (lower or Lockable legrests by pushing the red button (A).
-
Page 24: Settings Seat Comfort
Etac / Cross 5 / www.etac.com User manual Settings seat comfort Seat comfort qualities. The backrest setting is a combination of angles, height Good seating comfort depends on the needs and possi- and shape. This is why the angle settings and height for bilities available to each individual. -
Page 25: Footrests
Etac / Cross 5 / www.etac.com User manual Settings seat comfort Footrests Never stand on the footrests as there is a risk of tipping! Adjust the height until you are sure that your feet are supported and your thighs are resting on the cushion. -
Page 26: Driving Technique, Maneuvering
Etac / Cross 5 / www.etac.com User manual Driving technique, maneuvering Parking Never park on a slope with a user in the wheelchair. Transferring into/out of the wheelchair Never stand on the footrests as there is a risk of tipping! - Page 27 Etac / Cross 5 / www.etac.com User manual The following figures show principles for propelling techniques and how to overcome obstacles like steps and curbs. User, up forwards This technique is recommended only for experienced wheelchair users. – Ensure that the anti-tips are deactivated.
- Page 28 Etac / Cross 5 / www.etac.com User manual Care giver, up forwards – Ensure that the anti-tips are deactivated. Activate the anti-tips afterwards! Care giver, up backwards – Ensure that the anti-tips are deactivated. Activate the anti-tips afterwards! Care giver, down forwards –...
- Page 29 Etac / Cross 5 / www.etac.com User manual Stairs, up We always recommend using two carers for this transfer. One who walks behind and holds on to – Ensure that the anti-tips are deactivated. Never the push handle and one who walks in front and use an escalator, even if a care giver is available.
-
Page 30: Maintenance & Fault-Finding Chart
Etac / Cross 5 / www.etac.com User manual Maintenance Rear wheels: Clean quick release axles as required. Upholstery: Wash, see labels on each item. Tyre pressure: Check the tyre pressure (once/month). In the event of problems, contact your dealer or Technical Aids Centre. -
Page 31: Settings Backrest 3A
Etac / Cross 5 / www.etac.com 6. Settings backrest 3A Adjusting back support angle, mono- bi- and triangular back 1. Loosen the nut. 3. Tighten the nut. 2. Adjust the backrest angle. Use the position markings to Risk of tipping: Always check the setting of the obtain the same backrest angle on the right and left sides the anti-tips. -
Page 32: Adjusting Backrest Height, Monoangular Back
Etac / Cross 5 / www.etac.com 6. Settings backrest 3A Adjusting the backrest height, monoangular back 1. Remove the protective cover. 5. Tighten the locking screw. 2. Loosen the locking screw max. 1 turn. 6. Fit the protective cover. 3-4. Adjust the back support height using the graduation Risk of tipping: Always check the setting of the and marking on the lower back rod. -
Page 33: Adjusting Backrest Height And Lumbar Angle, Biangular Back
Etac / Cross 5 / www.etac.com 6. Settings backrest 3A Adjusting the backrest height and lumbar angle, biangular back 1-2. Remove the protective cover and loosen the locking 5-6. Set desired lumbar angle. screw (A) max. 1 turn (see also illustration 1 on page 32). -
Page 34: Adjusting Backrest Height And Lumbar Angle, Triangular Back
Etac / Cross 5 / www.etac.com 6. Settings backrest 3A Adjusting the backrest height and lumbar angle, triangular back 1-2. Remove the protective cover and loosen the locking 5. Tighten the locking screws and fit the protective cover screws (A) max. 1 turn (see also illustration 1-2 on page as in illustration 5-6 on page 32. -
Page 35: Adjusting Seat Depth Using Lumbar Angle, Triangular Back
Etac / Cross 5 / www.etac.com 6. Settings backrest 3A Adjusting seat depth using lumbar angle, triangular back An extended seat depth is achieved by opening 3. If necessary fit seat extender (accessory).. the back support angle (hip) and then the lumbar angle. -
Page 36: Settings Backrest Mod. 2
Etac / Cross 5 / www.etac.com 7. Settings backrest mod. 2 Setting backrest height The backrest height is continuously settable (See “The chairs possibilities”). Loosen the screws (A) 2-3 turns to set the height of the backrest. Ensure that both sides are at the same... -
Page 37: Readjustments
Etac / Cross 5 / www.etac.com 8. Readjustments Brake, adjustment The brakes are infinitely settable. 4. Ensure that the brake is straight in the groove and 1. Loosen the screw a couple of turns. tighten the nut. Test the brakes. -
Page 38: Adjusting The Brake Block
Etac / Cross 5 / www.etac.com 8. Readjustments Adjusting the brake block 5 mm Legrest, infinitely angle adjustable Never stand on the footrests as you may tip the chair! For lifting a wheelchair. swing in the legrests under the seat, or remove them, and lift using the frame (lower or upper part). -
Page 39: Amputee Legrest (Option)
Etac / Cross 5 / www.etac.com 8. Readjustments Amputee legrest Never sit on the amputee legrest. When lifting the wheelchair, remove the amputee legrest, swing the other legrest in under the seat (or remove it) and lift using the frame (lower or... -
Page 40: Changing The Camber Angle
Etac / Cross 5 / www.etac.com 8. Readjustments Changing the camber angle The camber angle can be changed by changing the When assembling, check so that the rear wheel washers that are mounted between the hub sleeve axle is correctly adjusted. The button in the hub and the nut. -
Page 41: Handrims
Etac / Cross 5 / www.etac.com 8. Readjustments Handrims The way in which the user is able to grip the hand- Be aware that when passing through narrow rims is influenced by the handrim’s material and its spaces there is a risk of getting your fingers distance from the wheel. -
Page 42: Accessories - Adjusting, Handling
Etac / Cross 5 / www.etac.com 9. Accessories - adjusting, handling Assembly instructions are always provided with accessories when they are delivered from Etac.Instruc- tions are also available on our website www.etac.com. Seat cushion and comfort wedge The cushion is cut to the required depth at the front or back edge. -
Page 43: Armrest, Flip-Up, Height Adjustable
Etac / Cross 5 / www.etac.com 9. Accessories - adjusting, handling Armrest, flip-up, height adjustable The flip-up armrest comes in two varieties, height ad- justable and fixed. It is mounted onto the wheelchair’s Never use the armrests to lift the wheelchair. -
Page 44: Headrest
Etac / Cross 5 / www.etac.com 9. Accessories - adjusting, handling Headrest The headrest is mounted onto the bow handle (accessory). The headrest is adjustable in height, depth and angle, and is detachable. Before the headrest is adjusted, ensure that the user has a good, secure sitting posture. -
Page 45: Technical Data
Etac / Cross 5 / www.etac.com 10. Technical data Seat depth Weight Item no Seat height Seat height Backrest Transport Type of chair Total width from back- with rear Cross 5 rear front height* width user weight rest tube** wheel... -
Page 46: Service And Maintenance
If your chair needs reconditioning or repair, only original When necessary lubricate moving parts/joints parts from Etac or components with equal quality, as with bicycle oil or similar. specified in Cross diagrams, should be used. Etac will not... -
Page 47: Tests And Guarantees
10 years. If the product is intended for use after the service marking unless combination agreement exists. Please contact life period specified by Etac, it is the responsibility of the prod- Etac for up-to-date information. uct owner to ensure product functionality in accordance with the manual and reconditioning instructions. - Page 48 West Midlands B62 8BH www.etac.com United Kingdom Snug Seat, Inc. Tel 800 336 7684 12801 E. Independence Boulevard Fax 704 882 0751 P.O. Box 1739 Information@snugseat.com Matthews, NC 28106, USA www.etac.com Etac Supply Center AB Långgatan 12 SE-334 24 Anderstorp 7 320451 370976...
Need help?
Do you have a question about the Cross 5 and is the answer not in the manual?
Questions and answers