
Related Manuals for DIG ECO1 ILV-075


Summary of Contents for DIG ECO1 ILV-075
- Page 1 Ambient Light Powered, Smart Irrigation Controller ECO1 ILV-075 ™ I N S T R U C T I O N M A N U A L...
-
Page 2: Table Of Contents
TABLE OF CONTENTS Thank you for purchasing DIG’s ECO 1 ambient light powered irrigation controller. ™ INTRODUCTION ……………………………………………………………… 3 1. ABOUT THE CONTROLLERS 1. About the controllers …………………………………………………… 3 The ECO 1 is a one-station, ambient light (solar) powered smart controller that ™... -
Page 3: Component Identification
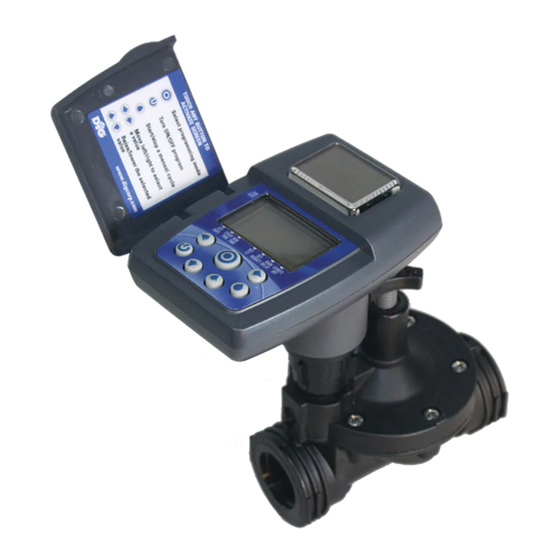
3. SYSTEM COMPONENTS 2. COMPONENT IDENTIFICATION 1. Solar PVM 6. Collapsible solenoid wire 2. LCD screen 7. Manual flow control 3. 7 button keypad 8. DC Solenoid 4. Rain sensor connection 5. Quick reference label LCD Display 1. Time and Date - Indicates current time and day 2. -
Page 4: Valve Installation
Control Buttons 4. Turn the main water supply on and pressurize the system; the valve may discharge water momentarily and then shut off. Select programming mode 5. The valve features manual bleed that can be used via the solenoid, which Turn ON/OFF program enables the valve to be operated without the use of the ECO 1 ™... -
Page 5: Setting Time And Date
In order to program the ECO 1 , you must first let the unit sit out in the light to ™ charge. In bright light conditions (full sun) this will take under 30 minutes. In shaded conditions this could take up to 2 hours. This section explains the programming features, and the steps necessary to assign irrigation schedules. -
Page 6: Setting Watering Day Schedules
and the underscore under Sa (Saturday) starts flashing. 8. Press 6. Press to proceed to the next step SET DAYS or review the program. 9. Press and the underscore under Sa disappears. Saturday is de-selected. Press to move backward. 7. SETTING WATERING DAY SCHEDULES Option 1 - Setting Specific Days of the Week: This setting determines which days the ECO 1 controller will operate. -
Page 7: Setting Watering Start Time
6. Press again, the second start time and OFF (or the last start time 5. To return to a weekly schedule, Press and the program returns to the programmed) appear flashing. weekly schedule for selecting the day of the week. 6. -
Page 8: Setting Watering Run Times
1. Press the button until the icon appears and OFF or the last run time How DIG’s ECO 1 smart controller operates using Historical Evapotranspiration (ET): ™ setting appears. After programming the watering schedule, watering start time and watering duration, 2. - Page 9 NOTE: If using one of the SimpleSmart presets we recommend evaluating For example: ™ the plants’ health for the first month and making adjustments to the system The user entered watering run time will be adjusted monthly based upon the as needed.
-
Page 10: Setting Seasonal Adjustment (Monthly Budget)
11. SETTING SEASONAL ADJUSTMENT (MONTHLY BUDGET) 12. RAIN DELAY SETTING The Rain Delay setting is used to temporarily suspend all irrigation for a defined The amount of water required by plants varies throughout the year. The Seasonal number of days. For example, during rainy weather regularly scheduled programs Adjustment percentage feature can be utilized to alter the programmed watering run time on a monthly basis. -
Page 11: Events Off Setting
13. EVENTS OFF SETTING This mode allows the user to program the timer to not water during specific months of the year, or to program the timer to not water on specific days of the week during a specific month. To turn off specific days of a month: The controller is now fully programmed. -
Page 12: Connecting A Rain Sensor
5. When the sensor is active and preventing automatic operation, a icon will appear on the display. Icon will only appear when sensor is active. FIGURE B SENSOR YELLOW SENSOR 2. Press the button to end manual run. WIRES 3. After 10 seconds the display will revert to the current time screen. WATERPROOF WIRE CONNECTORS Recommended rain sensors are the Rain Bird RSD and Hunter Mini-Clik... -
Page 13: Maintenance, Troubleshooting And Repairs
16. MAINTENANCE, TROUBLESHOOTING AND REPAIRS PROBLEM: The display is blank CAUSE: No buttons have been pushed in the previous 15 minutes To restore the controller to the default settings SOLUTION: Push any button 1. Press the button until the START EVERY is displayed and the icon appears on the bottom left of the screen. -
Page 14: Warranty
• DIG’s Technical Service Team is available to answer questions in from 8:00 AM to 5:00 PM (PST) The obligation of DIG CORPORATION under this warranty is limited to repairing or replacing Monday-Friday (except holidays) at 0011-1-760-727-0914. - Page 15 26-214 REVA 070213 1210 Activity Drive Printed in the USA Vista, CA 92081-8510, USA DIG is a Registered Service Mark of DIG Corporation...
- Page 16 SimpleSmart Regional Preset Map For Drip Systems ™ Para sistemas de goteo Mapa de ajustes previos regionales SimpleSmart ™ Region SimpleSmart ™ Find your location then match the region color with the preset number from the appropriate key. Color Preset Color de Ajustes previos Busque su ubicación luego encuentre el color de la region correspondiente con el numero de la gráfica apropiada. ...
Need help?
Do you have a question about the ECO1 ILV-075 and is the answer not in the manual?
Questions and answers