Advertisement
Quick Links
Advertisement

Subscribe to Our Youtube Channel
Related Manuals for 3M 4300 Series


Summary of Contents for 3M 4300 Series
- Page 1 4300 Stake-Mount Cabinet Series Instructions November 2002 78-8122-3167-4...
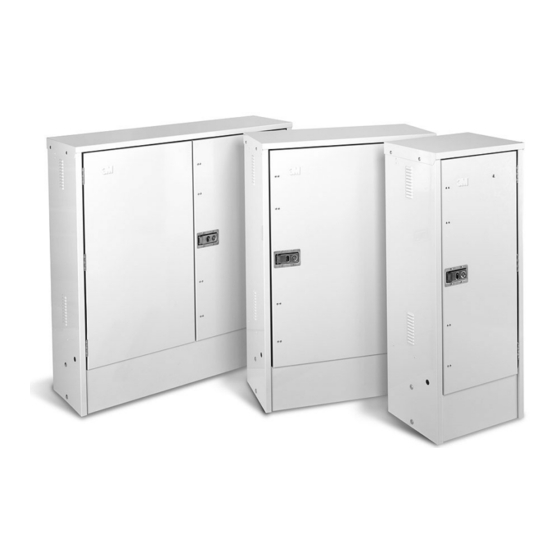
- Page 2 1.0 General The 3M ™ 4300 Stake-Mount Cabinet Series consists of three sizes of cabinets which can accommodate cross- connect termination frames or simple splice storage. These cabinets are designed for stake-mounting applications, however, they will also mount to a concrete pad using the attachment clips provided.
- Page 3 The 3M ™ 4300 Series of cabinets are fabricated with 14-gauge mill-galvanized steel. They are finished with a baked on polyester powder paint. All external hardware is stainless steel. Three cabinets are designed for cross-connect applications. The SS6N 600-pair frames are used with the 3M 4300 Series of cabinets.
- Page 4 3.0 3M ™ Accessories and Spare Parts Loaded SS6N Frames Binding Post Block Kits - For terminating cables on frames using the 4320 series blocks. with 3M ™ 710 SC connector with 3M ™ 4005-CBM ™ Self-Strip Replacement Caps - (100 tan,...
- Page 5 4.0 3M ™ Tools and Test Equipment ™ Self-Strip 4327-A Pair Probe and Dish. 4041 Splice Head - For splicing 3M ™ ™ Modules. ™ Self-Strip 4328 25-Pair Probe. ™ 710 Uni-Presser 25-Pair Cutter Presser - For splicing 3M ™...
- Page 6 Fill excavation with pea gravel to within 4" of ground level. 4" Open cabinet door(s) and remove the SS6N loaded frame(s) and the lower frame support. Lift the base cover upward and remove it from the cabinet. Remove the four knock-out rectangular holes from the cabinet end walls. The stakes attach to the cabinet using these holes.
- Page 7 Position cabinet onto slab and secure with 1/2" bolts and the attachment clips removed from the shipping pallet. Install base cover and fill cabinet with pea gravel up to the top of the base cover. 3M ™ 4411 Expandable Foam may also be used as an alternative moisture barrier in the bottom of the cabinet.
-
Page 8: Cable Termination
7.0 Cable Preparation and Bonding It is desirable to have 14 feet of cable extending above ground/pad. Remove cable sheath 18" above ground/pad. Install shield bond connectors and attach bond straps to all cables according to your company's practice. Attach all bond straps to the cabinet bond plate at left side. Identify cable bonds on log label on cabinet door. If moisture seals are required for the cables, put them on at this time. - Page 9 Mount the splice head alongside the frame so that the modules/connectors can be stored in one of the two methods shown below. Splice the frame stubs and cable groups together following your company's procedures. Note: If you are using non-sealed 3M ™ 2™...
- Page 10 9.0 Identify Cross-Connect Block Counts Determine desired feeder/distribution layout. Recommended Feeder/Distribution layouts shown are for 1:2 ratio. 1200 4306 Cabinet 4312 Cabinet 4318 Cabinet Remove protector tape from identification pads on the blocks in the cabinet. Select proper sequence of labels (blue = distribution; green = feeder) and detach strip of 20 labels from sheet. Carefully remove protective backing from strip.
- Page 11 10.0 Jumper Wire Installation and Routing 10.1 Make sure wires have clean cut ends and bend the last 3/4" of wire 90. The screw driver slot must be in the vertical/insertion position. 10.2 Split pair, TIP - left, RING - right, at assigned post positions. Insert the wire into the port and through the post until the wire extends out the exit port.
-
Page 12: Accessories Installation
FITNESS FOR A PARTICULAR PURPOSE. If this product is defective within the warranty period stated above, your exclusive remedy shall be, at 3M’s option, to replace or repair the 3M product or refund the purchase price of the 3M product. Except where prohibited by law, 3M will not be liable for any loss or damage arising from this 3M product, whether direct, indirect, special, incidental or consequential regardless of the legal theory asserted.
Need help?
Do you have a question about the 4300 Series and is the answer not in the manual?
Questions and answers