Sage Barista Express BES875 Instruction Book
Hide thumbs
Also See for Barista Express BES875:
- User manual ,
- Quick manual (160 pages) ,
- Quick manual (44 pages)
Advertisement
Advertisement

Related Manuals for Sage Barista Express BES875


Summary of Contents for Sage Barista Express BES875
- Page 1 Barista Express ™ Instruction Book – BES875...
-
Page 2: Table Of Contents
If you have any concerns please contact your local electricity company. • Your Sage appliance includes ‰ a BS 13 amp moulded mains IMPORTANT plug on the supply cord. - Page 3 • As the colours of the wire • Do not place the product near may not correspond with the the edge of a bench or table coloured markings which during operation. Ensure the identify the terminals in surface is level, clean and free your plug, please refer to of water and other substances.
- Page 4 • Use only cold, tap water • Always switch off the product in the water tank. Do no by pressing the POWER button use any other liquid. to ‘Off’, switch off at the power outlet and unplug if appliance • Never use the product without is to be left unattended, if water in the water tank.
- Page 5 SPECIFIC • Connect only to a 230V or 240V power outlet. INSTRUCTIONS • To protect against electric FOR WATER shock, do not immerse the power cord, power FILTER plug or appliance in water or any other liquid. • Filter cartridge should be •...
- Page 6 The symbol shown • The use of attachments indicates that this not sold or recommended appliance should not be by Sage may cause fire, ® disposed of in normal household electric shock or injury. waste. It should be taken to •...
- Page 7 INTEGRATED CONICAL PID TEMPERATURE CONTROL BURR GRINDER Electronic PID temperature control for increased temperature stability. Stainless steel conical burrs maximise ground coffee surface area for a full espresso flavour. Upper and lower burrs AUTO PURGE are removable for cleaning. Automatically adjusts water temperature after steam for optimal espresso extraction ADJUSTABLE GRIND SIZE temperature.
-
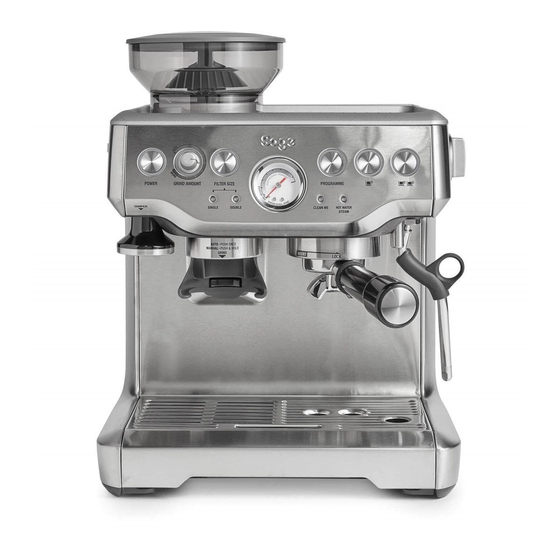
Page 8: Components
Components A. 450g bean hopper I. POWER button With locking system for easy removal, J. Integrated removable 54mm tamper storage and transfer of coffee beans. K. Group head B. Integrated conical burr grinder L. 54mm stainless steel portafilter C. Grind outlet With commercial style spouts. - Page 9 ACCESSORIES S. Steam/Hot Water light Illuminates to indicate that the steam 1. Temp Control™ Milk Jug or hot water function is selected. 2. Cleaning disc T. 1 CUP and 2 CUP buttons 3. Cleaning tablets With preset, manual over-ride or programmable shot volumes. 4.
-
Page 10: Functions
• Insert the filter into the two parts of the filter holder. Functions • To install the assembled filter holder into the water tank, align the base of the filter holder with the adapter inside the water tank. BEFORE FIRST USE Push down to lock into place. - Page 11 FIRST USE Flushing the Machine It is recommended to complete a water Initial Start Up flushing operation, without ground coffee, • Ensure the water filter is securely fitted to ensure the machine has been conditioned. inside the water tank. When the machine has reached STANDBY •...
- Page 12 GENERAL OPERATION Selecting the Filter Size Insert either the 1 CUP or 2 CUP filter Setting the Grind Size basket into the portafilter (see ‘Selecting a Filter Basket’, page 21). Press the FILTER The grind size will affect the rate of water SIZE button to select SINGLE if using the flow through the coffee in the filter basket 1 CUP filter basket, or DOUBLE if using the...
- Page 13 • To stop grinding, release the portafilter. Trimming the Dose This will release the grinding activation The Razor™ precision dose trimming tool switch and stop the grinding function. allows you to trim the puck to the right level for a consistent extraction. Tamping the Ground Coffee •...
- Page 14 Inserting the Portafilter NOTE Place the portafilter underneath the group head so that the handle is aligned with Pressing the 1 CUP or 2 CUP button during the INSERT position. Insert the portafilter a preset shot volume will immediately stop into the group head and rotate the handle the extraction.
- Page 15 2. Press 2 CUP button to start espresso NOTE extraction. Press 2 CUP button again once desired volume of espresso has been For optimal flavour when using a 1 CUP extracted. The machine will beep twice filter basket, you should extract approx. to indicate the new 2 CUP volume has 30ml.
- Page 16 Under Extracted Zone USING THE STEAM/ HOT WATER DIAL The gauge needle, when positioned in the lower zone during extraction, indicates the Steam espresso has been extracted with insufficient pressure. • Position the steam wand tip over the drip tray. •...
- Page 17 Hot Water ADVANCED TEMPERATURE MODE • Turn the STEAM/HOT WATER dial to Adjusting Water Temperature the HOT WATER position. The STEAM/ HOT WATER light will flash to indicate the Different beans require a different water machine is heating to create hot water. temperature to extract their optimum flavour.
- Page 18 Increase Water Temperature +1˚C: Decrease Water Temperature -2˚C: In Advanced Temperature Mode, press In Advanced Temperature Mode, the 1 CUP button. press the POWER button. POWER FILTER SIZE PROGRAMME PROGRAM SINGLE DOUBLE Increase Water Temperature +2˚C: In Advanced Temperature Mode, press the2 CUP button.
-
Page 19: Coffee Making Tips
Dual Wall Filter Baskets Coffee Making Use Dual Wall filter baskets if using Tips & Preparation pre-ground coffee. Dual Wall filter baskets regulate the pressure and help to optimise the extraction regardless of the grind, dose, tamp pressure or freshness. PRE-HEATING Heating your cup or glass A warm cup will help maintain the coffee’s... - Page 20 INSERTING THE PORTAFILTER NOTE Place the portafilter underneath the group head so that the handle is aligned with You will need to adjust the grind amount the INSERT position. Insert the portafilter and size if switching from a single basket into the group head and rotate the handle to a double basket, or vice versa.
- Page 21 • Always start with fresh cold milk. • Lower the tip beneath the surface, but keep the vortex of milk spinning. The indicator • Fill the jug just below the “V” at the bottom strip on the milk jug will change colour of the spout.
- Page 22 EXTRACTION GUIDE CORRECT EXTRACTION UNDER EXTRACTION OVER EXTRACTION Within Under Over Espresso Range Espresso Range Espresso Range • Flow starts after 4–7 secs • Flow starts after 1–3 secs • Flow starts after 8 secs • Flow slow like warm honey •...
- Page 23 ADJUSTING CONICAL BURRS Some types of coffee may require a wider grind range to achieve an ideal extraction or brew. A feature of your Barista Express™ is the ability to extend this range with an adjustable upper burr. We recommend making only one adjustment at a time. SINGLE DOUBLE PUSH...
-
Page 24: Care & Cleaning
Care & Cleaning REPLACING THE WATER FILTER Replace filter Set current Soak Filter Assemble Ensure parts Install filter Install water after 90 days month for 5 min water filter are connected in tank tank or after 40L parts The provided water filter helps prevent simultaneously, then also press the scale build-up in and on many of the inner POWER button. - Page 25 Priming machine for descaling function 6. Descale Hot water component by turning the steam dial to the RIGHT towards 2. Dissolve one Sage Descaling powder ® the HOT WATER icon. sachet into one litre of water then fill the water tank.
- Page 26 CLEANING THE CONICAL BURR GRINDER SINGLE DOUBLE PUSH POWER GRIND AMOUNT FILTER SIZE POWER GRIND AMOUNT FILTER SIZE Unlock hopper Empty hopper Replace hopper Lock hopper Run grinder empty Unlock hopper Remove hopper SINGLE DOUBLE PUSH TO GRIND Unlock top burr Remove top burr Clean top burr with brush Clean lower burr with brush Clean chute with brush...
- Page 27 CLEANING THE STEAM WAND CLEANING THE DRIP & STORAGE TRAY The steam wand should always be cleaned after texturing milk. Wipe the steam wand The drip tray should be removed, emptied with a damp cloth. Then with the steam and cleaned at regular intervals, particularly wand tip directed over the drip tray, briefly when the drip tray full indicator is showing set the STEAM/HOT WATER dial to...
- Page 28 3. Using a skewer or similar, clean the centre 8. Re-insert the drip tray and water tank. of the screw of any residual coffee. Contact Sage Customer Service or visit ® 4. Insert the shorter end of the Allen Key sageappliances.com for replacement...
-
Page 29: Troubleshooting
Troubleshooting PROBLEM POSSIBLE CAUSE WHAT TO DO Machine does not heat up. • STEAM/HOT WATER • Turn the STEAM/HOT WATER dial to the STANDBY position. Machine will commence dial is not in the STANDBY STEAM/HOT WATER position. heating. light flashes when the machine is turned on. - Page 30 PROBLEM POSSIBLE CAUSE WHAT TO DO Espresso runs out • Coffee is ground too coarsely. • Use slightly finer grind. Refer to ‘Setting the Grind Size’, page 11 and ‘Under Extraction’, too quickly. page 15. • Not enough coffee in the •...
- Page 31 PROBLEM POSSIBLE CAUSE WHAT TO DO No steam. • Machine has not reached • Allow time for the machine to reach operating operating temperature. temperature. The STEAM/HOT WATER light will flash to indicate the machine is heating to create steam. During this time, condensed water may purge from the steam wand.
- Page 32 PROBLEM POSSIBLE CAUSE WHAT TO DO No crema. • Coffee tamped too lightly. • Tamp between 15–20kg of pressure. • Coffee is ground too coarsely. • Use slightly finer grind. Refer to ‘Setting the Grind Size’, page 11 and ‘Under Extraction’, page 15.
- Page 33 Allow to cool for about 30–60 overheating. minutes. • If problem persists please contact Sage Customer Service or go to ® sageappliances.com No ground coffee • No coffee beans in hopper.
-
Page 34: Coffee Recipes
Coffee Recipes CAPPUCCINO A single shot of espresso with textured milk, garnished with drinking chocolate. ESPRESSO Intense and aromatic, it is also known as a short black and is served in a small cup or glass. LATTÉ A latté consists of a single espresso with textured milk and approx. - Page 35 Notes...
- Page 36 Sage Appliances GmbH Johannstraße 37, 40476 Düsseldorf, Deutschland Für den Kundendienst besuchen Sie bitte www.sageappliances.com BRG Appliances Limited Unit 3.2, Power Road Studios, 114 Power Road, London, W4 5PY Freephone (UK Landline): 0808 178 1650 Mobile Calls (National Rate): 0333 0142 970 www.sageappliances.com...
Need help?
Do you have a question about the Barista Express BES875 and is the answer not in the manual?
Questions and answers