
Related Manuals for AVANT Dozer Blade 1400


Summary of Contents for AVANT Dozer Blade 1400
- Page 1 English Dozer blade 1400 2019 1 Operator's Manual for Attachment Dozer blade 1400 Product number A36649 www.avanttecno.com A436441 2019 1 EN 2015-...
- Page 2 Dozer blade 1400 2019 1...
-
Page 3: Table Of Contents
Dozer blade 1400 2019 1 CONTENTS 1. FOREWORD ............................4 Warning symbols used in this manual ........................... 5 2. DESIGNED PURPOSE OF USE......................6 3. SAFETY INSTRUCTIONS FOR USING THE ATTACHMENT ............7 4. TECHNICAL SPECIFICATIONS ....................... 9 Safety labels and main components of the attachment ..................9 5. -
Page 4: Foreword
If you sell or transfer the equipment, be sure to hand over this manual to the new owner. If the manual is lost or damaged, you can request a new one from your Avant dealer or from the manufacturer. -
Page 5: Warning Symbols Used In This Manual
5 (24) Warning symbols used in this manual The following warning symbols are used throughout this manual. They indicate factors that must be taken into account to reduce the risk of personal injury or damage to property: WARNING SAFETY ALERT SYMBOL This symbol means: “Warning, be alert! Your safety is involved!”... -
Page 6: Designed Purpose Of Use
Rubber blade and ice cutting blades available as an option. The Dozer blade 1400 is not designed for any other use than what is specified in this manual and it must not be used for any other purposes than what it is intended for. -
Page 7: Safety Instructions For Using The Attachment
Never lift or move an unlocked attachment. The Dozer blade 1400 is designed to be used by one operator at a time. Do not let WARNING others near the danger area of the equipment when it is in use. - Page 8 Observe the local regulations concerning the use of the equipment on public roads. The loader may need to be registered for road use. Contact your local Avant dealer or local authorities for more information. Remember to wear proper personal protective equipment: ...
-
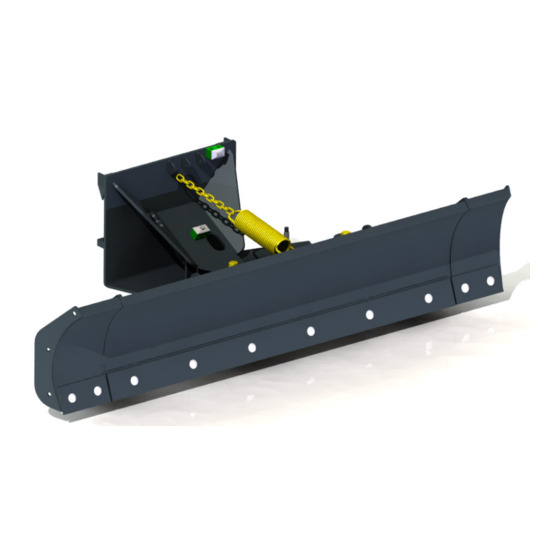
Page 9: Technical Specifications
9 (24) 4. Technical specifications Table 2 - Dozer blade 1400 - Specifications Product number A36649 Width: 1400 mm ± 30° Slewing angle: Hydraulic Weight: 125 kg Recommended input of hydraulic energy 10-20 l/min (200 bar) 30 l/min Maximum input of hydraulic energy:... - Page 10 Operate attachment only from the driver’s seat. A420049 Attachment identification plate Table 4 - Dozer blade 1400 - Main components Frame with quick coupling brackets Multi connector parking stand Hydraulic slewing cylinder Blade relese spring Skid shoes (standard equipment)
-
Page 11: Assembling The Attachment
Do not stay in the area between the attachment and the loader. Mount the attachment only on level surface. WARNING Never move or lift an attachment that has not been locked. Avant quick coupling system: Step 1: Lift the quick attach plate locking pins up and turn them backwards into the slot so that they are locked in the upper position. -
Page 12: Connecting And Disconnecting Hydraulic Hoses
5.1 Connecting and disconnecting hydraulic hoses On Avant loaders the hydraulic hoses are connected using the multi connector system. If you have an Avant 300-700 series loader with the conventional quick couplers and wish to change to the multi connector system, contact your Avant dealer or service point for instructions or installation services. - Page 13 13 (24) Keep all fittings as clean as possible; use the protective caps on both the attachment and the loader. Dirt, ice, etc. may make using the fittings significantly more difficult. Never leave the hoses hanging on the ground; place the couplings onto the holder on the attachment.
-
Page 14: Instructions For Use
14 (24) 6. Instructions for use Check the attachment and the operating environment once more before starting to work, and that all obstacles have been removed from the operating area. Quick inspection of the equipment and the operating area before use are parts of ensuring safety and the best performance of the equipment. -
Page 15: Checks Before Use
15 (24) 6.1 Checks before use Check that all obstacles, including any possibly hidden ones, have been removed from the working area or marked visibly before operation. Make sure that the blade spring release system is in full working condition and unblocked before ... -
Page 16: Operating The Dozer Blade
16 (24) 6.2 Operating the dozer blade Correct operating position: The vertical position of the blade will affect the outcome and accuracy of dozing. As a rule, the blade should be adjusted to an upright position. According to circumstances you may try to tilt the blade a little to front or back for example when removing ice. -
Page 17: Skid Shoes
17 (24) 6.2.2 Skid shoes The skid shoes improve manouvreability while ploughing and help to have even work result. Both skids should be adjusted to touch the ground lightly, when the blade is in operating position described in previous chapter. For other than ploughing work, it might be good to lift the skids or remove them. -
Page 18: Transport Position
18 (24) 6.4 Transport position Keep the loader stable. Always transport the attachment as low and close to the ground as possible. CAUTION Keep the telescopic boom retracted during transport driving. 6.5 Storing the attachment Uncouple and store the dozer blade on level surface so, that it will stand firmly on its frame. Avoid storing the attachment directly against the ground, place a pallet or blocks of wood under it, for example. -
Page 19: Maintenance And Service
Finding any fault means that the hydraulic hose or component must be replaced and the equipment must not be used until it is repaired. Spare parts are available from your nearest AVANT retailer or authorised service point. Leave the repair work to professional service technicians, if you don’t have adequate knowledge and... -
Page 20: Cleaning The Attachment
20 (24) 7.2 Cleaning the attachment Clean the attachment regularly to prevent accumulation of dirt which is more difficult to remove. A pressure washer and mild detergent can be used for cleaning. Do not use strong solvents, and do not spray directly at the hydraulic components, or at the labels on the attachment. -
Page 21: Warranty Terms
21 (24) 8. Warranty terms Avant Tecno Oy grants a warranty of one year (12 months) from the date of purchase for the attachment it manufactures. The warranty covers repair costs as follows: Work costs are covered, if the repair is not performed at the factory. - Page 22 SFS-EN ISO 12100, SFS-EN ISO 4413 Mallit / Modeller / Models Avant Hydraulitoiminen puskulevy; Avant-kuormaajan työlaite Hydraulisk schaktblad; arbetsredskap för Avant lastare A36449 Hydraulic dozer blade; attachment for Avant loaders 26.6.2019 Ylöjärvi, Finland Risto Käkelä, Toimitusjohtaja / Verkställande direktör / Managing Director...
Need help?
Do you have a question about the Dozer Blade 1400 and is the answer not in the manual?
Questions and answers