Avaya 4621SW User Manual
One-x quick edition release 2.0.0
Hide thumbs
Also See for 4621SW:
- User manual (96 pages) ,
- Installation manual (94 pages) ,
- Quick installation manual (7 pages)

Related Manuals for Avaya 4621SW


Summary of Contents for Avaya 4621SW
- Page 1 Avaya one-X™ Quick Edition Release 2.0.0 Telephone User Guide 16-600795 Release 2.0.0 July 2006 Issue 2...
- Page 2 Avaya support Avaya provides a telephone number for you to use to report problems or to ask questions about your product. The support telephone number is 1-800-242-2121 in the United States. For additional support telephone numbers, see the Avaya Web site: http://support.avaya.com/QuickEdition...
-
Page 3: Table Of Contents
Introduction ......... Telephone Features ........ - Page 4 Monitoring Incoming Voicemail Messages ......Accessing Voicemail Options and Messages from any Telephone ...
- Page 5 Chapter 9: Setting Telephone Options ......Introduction .........
- Page 6 ......... . . Avaya one-X Quick Edition Release 2.0.0 Telephone User Guide .
-
Page 7: About This Guide
About This Guide Overview This guide covers how to install and use your new Quick Edition IP Telephone. A Quick Edition IP Telephone is simple to use while offering the latest advances in telephony systems. Your Quick Edition IP Telephone obtains its operational characteristics from the software and settings on the Telephone. -
Page 8: How To Use This Document
This guide is organized to help you find topics in a logical manner. Read it from start to finish to get a complete understanding of how to use your Quick Edition IP Telephone, or use the Table of Contents or Index to locate information specific to a task or function. -
Page 9: Symbolic Conventions
This symbol calls attention to situations that can result in harm to software, loss of CAUTION: data, or an interruption to service. Avaya one-X Quick Edition Release 2.0.0 Telephone User Guide Symbolic Conventions Description Explains how to view and make calls from the... -
Page 10: Typographic Conventions
Avaya one-X Quick Edition product documentation and additional documentation is available online at the following URL: http://support.avaya.com/QuickEdition For safety information and a quick reference to installing a G10 PSTN gateway, see the Avaya one-X Quick Edition G10 PSTN Gateway Quick Installation Guide (Document Number 16-600796). -
Page 11: Chapter 1: Introducing Your Quick Edition Ip Telephone
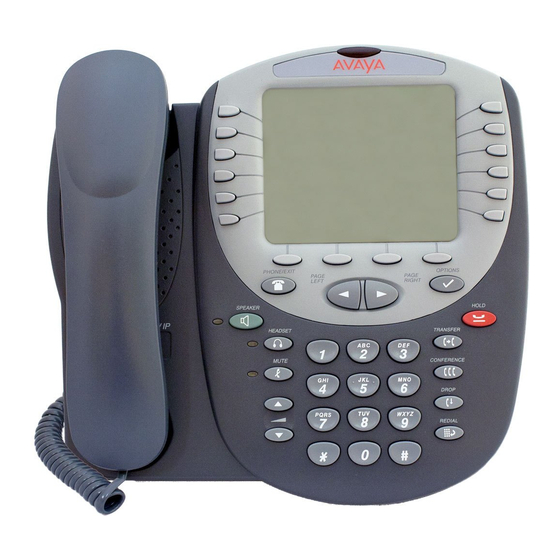
G10 PSTN gateway to enable access to traditional telephony systems. Avaya one-X Quick Edition software is embedded in each Quick Edition IP Telephone. By placing the intelligence in the Telephone and eliminating additional hardware such as call processing and application servers, installation is simple and start-up costs are minimal. - Page 12 Quick Edition network. Figure 1 shows the face of an Avaya one-X Quick Edition 4621 SW IP Telephone. The diagram contains numbered “callouts” which identify the features, softkeys, and buttons. If you are viewing this guide online, you can click any callout to jump to a corresponding description.
- Page 13 Figure 1: The Avaya one-X Quick Edition 4621 SW IP Telephone Note: The Avaya one-X Quick Edition 4610 SW IP Telephone has similar features, Note: softkeys, and buttons. Avaya one-X Quick Edition Release 2.0.0 Telephone User Guide Telephone Features July 2006...
- Page 14 Page Right Speaker Indicator Speaker Avaya one-X Quick Edition Release 2.0.0 Telephone User Guide Description When flashing, indicates that you have a Voicemail message waiting. The information shown varies according to the application/function currently active. When the Telephone is idle, the top line displays your extension number and the current date and time.
- Page 15 Redial Dialpad 1. Caller ID information usually arrives between the first and second ring. Let the Telephone ring at least once before answering. If external callers are not identified on the display, make sure you subscribe to "Caller ID" services from your local telephone company. "Caller ID" services may have different names in your area—contact your local telephone company for details.
-
Page 16: Telephone Buttons And Softkeys
Figure 1: The Avaya one-X Quick Edition 4621 SW IP Telephone The Feature buttons are located on the face of the Telephone. An icon is printed on each button to indicate the function of the button. To activate the feature associated with a telephone button,... -
Page 17: Interpreting Ringer And Feedback Tones
Interpreting Ringer and Feedback Tones As you become more familiar with your Telephone, you will recognize the various tones that you hear for incoming calls, or while using the handset or headset. Ringer tones accompany an incoming call and are heard through the speakerphone. Feedback tones may be heard through the handset, headset, or speakerphone. -
Page 18: Interpreting Display Icons
Chapter 1: Introducing Your Quick Edition IP Telephone Interpreting Display Icons As you become more familiar with your Telephone, you will recognize the icons on display in the display area. These icons are associated with the state of a call. The following table provides an overview of the most commonly seen icons. -
Page 19: Accessing Telephone Applications And Options
Call forwarding Directory Voicemail If you have a 4621 SW IP Telephone, the Line/Feature ( ) buttons at the bottom of each vertical bank provide direct access to the do-not-disturb function (DND softkey) and the Call Log application (Log softkey). -
Page 20: Call Park-Retrieve Application
The Call Park-Retrieve Application (Retrv softkey) lets you put the active call on hold in a special way so that the call can be retrieved from any other Quick Edition IP Telephone in the one-X Quick Edition network. You can: park the active call, ●... -
Page 21: Call Log Application
Accessing Telephone Options using a Web Browser If your Quick Edition IP Telephone is connected to the same network as your computer, you can use the web browser on the computer to set certain options. For information about how to view... - Page 22 Chapter 1: Introducing Your Quick Edition IP Telephone Avaya one-X Quick Edition Release 2.0.0 Telephone User Guide July 2006...
-
Page 23: Chapter 2: Installation
In addition, an administration computer may be connected to the LAN to provide web-based access to user-specific and system-wide settings. Figure 2: Network Configuration PSTN Avaya one-X Quick Edition Release 2.0.0 Telephone User Guide Local Area Network Ethernet Switch PSTN Gateway... -
Page 24: Growing Your Network
Public Switched Telephone Network (PSTN) through PSTN lines supplied by your telephone service provider. For information about how to install a G10 PSTN gateway, see the Avaya one-X Quick Edition G10 PSTN Gateway Installation Guide. Install your Quick Edition IP Telephones before you install any G10 PSTN gateways. -
Page 25: Important Networking Concepts
IP addresses in the same network address space automatically if the Local Area Network (LAN) does not include a Dynamic Host Configuration Protocol (DHCP) server host. Avaya one-X Quick Edition devices try to obtain an IP address from a DHCP server before they assign themselves IP addresses. -
Page 26: Pre-Installation Checklist
Cat5 modular line cord directly to a PoE-enabled Ethernet switch. If your Ethernet network does not provide 802.3af-compliant inline power, you must supply a PoE inline power supply such as the Avaya Model 1151B1 (see Option B shown in... - Page 27 Installing the Quick Edition IP Telephone Figure 3: Connection Jacks - 4621SW Option A, LAN is 802.3af PoE Enabled optional facultatif optionale opcional Avaya one-X Quick Edition Release 2.0.0 Telephone User Guide July 2006...
- Page 28 Chapter 2: Installation Figure 4: Connection Jacks - 4621SW Option B, LAN is not 802.3af PoE Enabled optional facultatif optionale opcional Avaya one-X Quick Edition Release 2.0.0 Telephone User Guide 1151B July 2006...
- Page 29 Installing the Quick Edition IP Telephone Figure 5: Connection Jacks - 4610SW Option A, LAN is 802.3af PoE Enabled optional facultatif optionale opcional Avaya one-X Quick Edition Release 2.0.0 Telephone User Guide July 2006...
- Page 30 Chapter 2: Installation Figure 6: Connection Jacks - 4610SW Option B, LAN is not 802.3af PoE Enabled optional facultatif optionale opcional Avaya one-X Quick Edition Release 2.0.0 Telephone User Guide 1151B July 2006...
- Page 31 To connect the first Telephone to an 802.3af PoE-compliant Ethernet LAN Two Ethernet jacks are located on the back of the Telephone (at the top of the housing). A LAN icon and a PC icon represent their correct use. Take care to plug the Cat5 cable into the LAN port when you connect the Telephone to the LAN.
- Page 32 13. Select the Save softkey. To connect additional Telephones to an 802.3af PoE-compliant Ethernet LAN 1. Plug one end of the supplied Cat5 modular line cord into the LAN port on the Telephone, and connect the other end to the Ethernet LAN.
-
Page 33: A Word About Extension Numbers
To share the Telephone LAN connection with a computer Two Ethernet jacks are located on the back of the Telephone (at the top of the housing). A LAN icon and a PC icon represent their correct use. Take care to plug your Cat5 (or better) cable into the PC port when you connect the Telephone to the computer. - Page 34 Extension numbers 500 through 599 are reserved to invoke Auto Attendant functionality. Any extension number in the 500 through 599 range can be assigned manually to a custom Auto Attendant configuration. Avaya one-X Quick Edition Release 2.0.0 Telephone User Guide July 2006...
-
Page 35: Chapter 3: Using Your Quick Edition Ip Telephone
Muting the Active Microphone ● Transferring Calls ● Making Calls The Quick Edition IP Telephone provides more than one way to initiate and take calls. You can: lift the handset, ● press the Speaker ( ● press a Line/Feature ( ) button, or ●... -
Page 36: Initiating A Call Manually
1. Use any of the four methods listed above (handset, Speaker button, Line/Feature button, or Headset button) to obtain a dial tone. 2. Press the keys on the dialpad to enter the telephone number or extension of the party that you want to call. -
Page 37: Making An Announcement Using The Paging Feature
Line/Feature ( ) button. If you are using a headset, press the Headset ( ● Avaya one-X Quick Edition Release 2.0.0 Telephone User Guide ) button. Broadcasting Announcements through Paging on page Receiving Calls on page 86. -
Page 38: Putting A Call On Hold
There may be a slight delay before the call becomes active again. Putting a Call on Hold while You Make a Second Call The Quick Edition IP Telephone can accommodate situations where you are engaged in an active call but want to place a call to another party. -
Page 39: Putting A Call On Hold While You Answer A Second Call
P2P participants with music (or another disruptive sound) by putting P2P participants on hold. If this happens, you may optionally choose to drop the telephone that is playing music on hold. - Page 40 If you are using the speakerphone, press the Speaker ( ● If you are using a headset, press the Headset ( ● Press the Drop ( ● Avaya one-X Quick Edition Release 2.0.0 Telephone User Guide Making Calls on page 35). ) button. ) button. ) button.
-
Page 41: Muting The Active Microphone
Tip: You can transfer all incoming calls to another telephone automatically by defining Tip: call-forwarding rules. For more information, see page Avaya one-X Quick Edition Release 2.0.0 Telephone User Guide ) button. ) button. ) button. Muting the Active Microphone... - Page 42 2. When you hear the dial tone, dial the number of the receiving party, or select the FrDir softkey and select the number from a directory. 3. When you hear the telephone at the far end begin to ring, hang up. A message confirming the transfer is displayed.
-
Page 43: Chapter 4: Using The Call Park-Retrieve Application
"on hold" tone otherwise. If the call is not retrieved within one minute, an alert tone is played on the one-X Quick Edition Telephone that was used to park the call. The alert tone indicates that the call is still parked and needs to be retrieved. The alert tone is played every 30 seconds, for as long as the call remains parked. -
Page 44: Parking A Call
An error message is displayed when a parked call cannot be retrieved. To retrieve a parked call from the Telephone that was used to park the call 1. At the Quick Edition IP Telephone that was used to park the call, perform one of the following actions: For handset operation, pick up the handset. - Page 45 To retrieve a parked call from any other one-X Quick Edition Telephone 1. At any Quick Edition IP Telephone connected to the network (except the Telephone that was used to park the call), perform one of the following actions: For handset operation, pick up the handset.
- Page 46 Chapter 4: Using the Call Park-Retrieve Application Avaya one-X Quick Edition Release 2.0.0 Telephone User Guide July 2006...
-
Page 47: Chapter 5: Redirecting Calls Through Call Forwarding
Chapter 5: Redirecting Calls through Call Introduction This chapter describes how to forward calls from your Quick Edition IP Telephone to the Voicemail Application, another Quick Edition IP Telephone on your one-X Quick Edition network, or an external number. Tip:... - Page 48 7. Select the Save softkey. 8. Select the Exit softkey to display the previous menu, or press the Phone/Exit ( to clear the display area. Avaya one-X Quick Edition Release 2.0.0 Telephone User Guide ) button ) button ) button...
- Page 49 PSTN line, include the 9 prefix. If the call will be redirected to a SIP network, include the 8 prefix. 6. When you are finished, select the Next softkey. Avaya one-X Quick Edition Release 2.0.0 Telephone User Guide ) button. Forwarding Calls...
- Page 50 3. Select the Off softkey. 4. Select the Exit softkey to display the previous menu, or press the Phone/Exit ( to clear the display area. Avaya one-X Quick Edition Release 2.0.0 Telephone User Guide ) button ) button ) button...
-
Page 51: Chapter 6: Using Directories
Corporate directory—This directory is populated and updated automatically. It contains an ● entry for every Quick Edition IP Telephone in the one-X Quick Edition network. You cannot add entries to this directory, edit the entries, or delete entries from this directory. -
Page 52: Adding An Entry To Your Personal Directory
● Adding an Entry to Your Personal Directory Each entry in the Personal directory can store a name and a telephone or extension number. You can add entries to your Personal directory in any of the following ways: Add the entry manually. - Page 53 ● 5. Select the Next softkey. 6. Press the keys on the dialpad to enter the telephone number or extension to associate with the entry. To associate the entry with a PSTN number, enter 9 first. To associate the entry with a SIP network number, enter 8 first.
- Page 54 6. Select the Ok softkey. 7. Select the Exit softkey to display the previous menu, or press the Phone/Exit ( to clear the display area. Avaya one-X Quick Edition Release 2.0.0 Telephone User Guide ) button. ) button ) button...
-
Page 55: Viewing Corporate And Personal Directory Entries
52 6. Select the Next softkey. 7. Optionally edit the number. Avaya one-X Quick Edition Release 2.0.0 Telephone User Guide Viewing Corporate and Personal Directory Entries ) button to move through directory pages. ) button to display the next or previous page. -
Page 56: Deleting An Entry From Your Personal Directory
The information associated with the entry is displayed. 4. Select the Del softkey. 5. Select the Exit softkey, or press the Phone/Exit ( Avaya one-X Quick Edition Release 2.0.0 Telephone User Guide ) button ) button to clear the display area. -
Page 57: Chapter 7: Using The Voicemail Application
● Voicemail Overview The Voicemail Application on a single Quick Edition IP Telephone can store a maximum of 30 voicemail messages or total of 20 minutes of voicemail messages. When your voicemail inbox is full, callers hear a message indicating that voicemail storage has been completely filled and no more messages can be saved. - Page 58 Feature on page 74). Voicemail for a particular user is stored on a Quick Edition IP Telephone at a particular extension. When an individual’s Telephone is not connected to the network, two other Telephones on the network provide backup services and record any new voicemail that would otherwise be delivered to the disconnected Telephone.
-
Page 59: Retrieving Voicemail Messages
6. If you want to delete the message, select the Del softkey, and when you are prompted to delete the message, select the Yes softkey. Avaya one-X Quick Edition Release 2.0.0 Telephone User Guide Email Notification of Voicemail ) buttons to adjust the volume while the ) button respectively. -
Page 60: Monitoring Incoming Voicemail Messages
Switching from a Personalized Greeting to the Standard Greeting on page 74). Avaya one-X Quick Edition Release 2.0.0 Telephone User Guide To change the number of rings before an unanswered call To set Voicemail options or retrieve a to set the following Voicemail options 105). - Page 61 To retrieve Voicemail messages through the PSTN, the one-X Quick Edition Note: network must be equipped with a G10 PSTN gateway. For information about G10 PSTN gateways, see the Avaya one-X Quick Edition G10 PSTN Gateway Installation Guide. To set Voicemail options or retrieve a Voicemail message using any telephone 1.
- Page 62 Chapter 7: Using the Voicemail Application Avaya one-X Quick Edition Release 2.0.0 Telephone User Guide July 2006...
-
Page 63: Chapter 8: Using The Call Log Application
Deleting and Clearing Call Log Entries ● Working with the Call Log The Call Log contains two lists of telephone numbers comprising up to 100 combined records: Incoming—Contains a record of received calls, regardless of whether the calls were ●... -
Page 64: Making Calls Using The Call Log
Chapter 8: Using the Call Log Application Note: If you have a 4621 SW IP Telephone, the Line/Function ( ) button on the bottom Note: right side of the display area provides access to the Call Log Application. You can select the Log softkey instead of performing Steps 1 and 2 of the procedures in this section. -
Page 65: Editing Call Log Entries
4. Select the Line/Function ( ) button beside the number that you want to delete. The information associated with the entry is displayed. 5. Select the Del softkey. Avaya one-X Quick Edition Release 2.0.0 Telephone User Guide ) button. ) button. - Page 66 5. When you are prompted to clear one or more lists or the missed-call counter, select the Yes softkey. 6. Select the Exit softkey to display the previous menu, or press the Phone/Exit ( to clear the display area. Avaya one-X Quick Edition Release 2.0.0 Telephone User Guide ) button. ) button July 2006...
-
Page 67: Chapter 9: Setting Telephone Options
Main menu items are displayed: Options—Lets you change user options (see ● page 68). To change system-wide options, see the Avaya one-X Quick Edition System Administrator Guide. Call Log—Lets you view the history of incoming and outgoing calls (see ●... -
Page 68: Viewing And Modifying User Options
● second call comes in while you are engaged in an active call (See Tone on page 78). Avaya one-X Quick Edition Release 2.0.0 Telephone User Guide Enabling/Disabling the Do-Not-Disturb Feature Broadcasting Announcements through Paging on page on page 87). -
Page 69: Displaying The User Options Menu
Displaying the User Options Menu You can enable password protection to prevent others from changing the user options on your Quick Edition IP Telephone. If this level of security is not required, you can disable password protection as described in password protection is enabled and you can access user options by entering the default password, 12345. - Page 70 ● To adjust the contrast level of the display area ● To enable or disable Teleworker mode on a Quick Edition IP Telephone on page 81 ● To view the connection status of the Teleworker client telephone on page 82 ●...
-
Page 71: Setting Password Options
A default password (12345) is factory installed and enabled on the Telephone. If you choose to leave password protection enabled, it is a good policy to change the default password to a password that is known only by you. -
Page 72: Setting Up Call Forwarding
You can record your name and/or a personalized greeting that may be played to callers when you are unable to answer the Telephone. In addition, button-based Voicemail options let you specify a number that the Voicemail Application dials automatically if a caller dials 0 during your personalized greeting (for example, you can redirect the call to another extension or your mobile telephone). -
Page 73: Recording Your Name
2. Select Voicemail on the User Options menu, or press 3 on the dialpad. 3. Select Record Greeting on the Voicemail Options menu, or press 3 on the dialpad. Avaya one-X Quick Edition Release 2.0.0 Telephone User Guide Viewing and Modifying User Options... -
Page 74: Switching From A Personalized Greeting To The Standard Greeting
0 during your personalized greeting. After you specify a redirection number, the zero redirect feature is enabled automatically. Avaya one-X Quick Edition Release 2.0.0 Telephone User Guide Displaying the User Options Menu on Recording a Personalized Greeting on page... - Page 75 5. Enter the number to which the call will be redirected. You can enter an extension number or an external telephone number to which calls will be redirected. If the call will be redirected to a PSTN number, include the 9 prefix. If the call will be redirected to a SIP network number, include the 8 prefix.
-
Page 76: Clearing Call Log Entries
4. When you are prompted to clear the call log, select the Yes softkey. 5. Select the Exit softkey to display the previous menu, or press the Phone/Exit ( to clear the display area. Avaya one-X Quick Edition Release 2.0.0 Telephone User Guide To clear the Incoming or Outgoing on page 66. -
Page 77: Editing Your Name In The Corporate Directory
Editing Your Name in the Corporate Directory You can change the name that is associated with your telephone extension. The name is displayed in the Corporate directory along with your telephone extension. Entering your last name followed by your first name ensures that: All names in the Corporate directory are sorted alphabetically by last name. -
Page 78: Choosing A Personalized Ringer Tone
6. Select the Exit softkey to display the previous menu, or press the Phone/Exit ( to clear the display area. Tip: If your Quick Edition IP Telephone is connected to the same network as your Tip: computer, you can use the web browser on the computer to change your name in the Corporate directory. -
Page 79: Setting The Contrast Level Of The Display Area
Corporate directory and most of the other features and services that are available to everyone who uses the one-X Quick Edition system. Avaya one-X Quick Edition Release 2.0.0 Telephone User Guide Viewing and Modifying User Options Displaying the User Options Menu on on the User Options menu, or press 7 on the dialpad. -
Page 80: How The Teleworker Application Works
Quick Edition IP Telephones connected to the network. Configuring the Teleworker Application You can add a Teleworker client telephone to the one-X Quick Edition network locally, or from a remote office. This section explains how to configure a Teleworker client telephone by connecting it to the one-X Quick Edition network directly. - Page 81 Quick Edition network directly. To enable or disable Teleworker mode on a Quick Edition IP Telephone 1. At the Telephone that you want to use as a Teleworker client, access the User Options menu as described in...
- Page 82 A Teleworker client telephone cannot act as a server for another Teleworker client Note: telephone. If an IP address has been specified and the IP address belongs to a Teleworker client telephone, the No Server message will be displayed. When Not Authorized is displayed, the Teleworker server host does not recognize the ●...
-
Page 83: Specifying A Teleworker Server Host
Given a connection to the one-X Quick Edition network through a VPN, the Teleworker client telephone at the remote office attempts to connect to one of the Quick Edition IP Telephones or G10 PSTN gateways (a Teleworker server) on the one-X Quick Edition network. -
Page 84: Adding A Teleworker Client To The Network From A Remote Location
4. After the Telephone initializes and a name has been assigned to the Telephone (if the Telephone is in a factory configured state, you will also have to assign a site name), make a note of its MAC address (see page 94). - Page 85 Edition network. In addition, the Teleworker server checks the site identifier of the remote telephone. If the site identifier is not identical to that of the company one-X Quick Edition network, the Teleworker server uploads stored system settings to the remote telephone—the telephone receives a new site identifier (identical to the one belonging to...
-
Page 86: Enabling/Disabling The Do-Not-Disturb Feature
You can also use this feature to prevent your Telephone from receiving pages. Tip: If you have a 4621 SW IP Telephone, the Line/Feature ( ) button on the bottom Tip: left side of the display area provides softkey access to the do-not-disturb function. -
Page 87: Adding And Selecting Speed Dial Entries
Using the web-based administration interface (see "To view or edit the name, extension, or paging zone assigned to a Telephone" under "Using Set Management Options to Configure Telephones" in the "Web-based Administration" chapter of the Avaya one-X Quick Edition System Administrator Guide), a Quick Edition IP Telephone can be configured to respond to pages to a specific zone, from 2 to 8. -
Page 88: Making A Call Using A Speed Dial Button
Copy an entry from a Voicemail record. ● Tip: If your Quick Edition IP Telephone is connected to the same network as your Tip: computer, you can use the web browser on the computer to assign numbers to Speed Dial buttons. For more information about the web-based options, see... - Page 89 8. Select the Ok softkey. 9. Select the Exit softkey to display the previous menu, or press the Phone/Exit ( to clear the display area. Avaya one-X Quick Edition Release 2.0.0 Telephone User Guide Adding and Selecting Speed Dial Entries ) button.
-
Page 90: Editing A Speed Dial Entry
8. When you are prompted to change the Speed Dial entry, select the Save softkey. 9. Select the Exit softkey to display the previous menu, or press the Phone/Exit ( to clear the display area. Avaya one-X Quick Edition Release 2.0.0 Telephone User Guide ) button. ) button... -
Page 91: Deleting A Speed Dial Entry
Deleting a Speed Dial Entry You can assign telephone numbers to up to nine Speed Dial entries. If you want to add a new entry but all nine Speed Dial numbers have assignments, you have to delete one of the existing entries first. -
Page 92: Email Notification Of Voicemail
Chapter 9: Setting Telephone Options Tip: If your Quick Edition IP Telephone is connected to the same network as your Tip: computer, you can use the web browser on the computer to view registration information for special features instead. For more information about the... -
Page 93: Teleworker Application
For information about how to access and use the web-based administration interface, see the "Web-based Administration" chapter of the Avaya one-X Quick Edition System Administrator Guide. To view web-based administration registration information 1. Press the Options ( 2. Select Opt Features on the Main menu, or press 6 on the dialpad. -
Page 94: Viewing Network Information About Your Telephone
2. Select Set Details on the Main menu, or press 7 on the dialpad. 3. Perform one of the following actions: To view the extension number, name, IP address, and MAC address of the Telephone, ● select the Ext softkey, or press 1 on the dialpad. -
Page 95: Logging In To Web-Based Interface
When a computer is connected to the one-X Quick Edition network, you can use the web browser on the computer to access and manage some telephone and user options through the web-based User Options interface. For best results, choose Microsoft Internet Explorer 6.0 (or later) or Mozilla Foxfire 1.0 (or later). -
Page 96: Avaya One-X Quick Edition Release 2.0.0 Telephone User Guide July
When the web browser connects to the one-X Quick Edition network, SSL is used to verify the identity of your computer to the Telephone. As part of the exchange, the Quick Edition IP Telephone generates and downloads a self-signed security certificate to your computer. - Page 97 If you have not installed the self-signed security certificate on your computer, the following message is displayed: 4. Perform one of the following actions: To proceed without installing the security certificate, click Yes. ● Avaya one-X Quick Edition Release 2.0.0 Telephone User Guide Logging in to the Web-based User Options Interface July 2006...
- Page 98 If you want to install the security certificate, click View Certificate. When the ● Certificate dialog box is displayed, click Install Certificate and follow the on-screen instructions. The User Options login page is displayed. Avaya one-X Quick Edition Release 2.0.0 Telephone User Guide July 2006...
-
Page 99: Logging Out
5. Enter the extension number of your Telephone and your password for accessing user options. The User Options Home page for the Telephone is displayed. Links to additional pages for viewing and setting Call Log options, Terminal settings, and Voicemail options, and Teleworker options are displayed in the navigation bar on the left side of the screen. -
Page 100: Changing Your User Options And Voicemail Passwords
Changing Your User Options and Voicemail Passwords You can change, enable, or disable a password for accessing user options through the User Options menu on your Quick Edition IP Telephone. For more information about this feature, Setting Password Options on page... -
Page 101: Enabling/Disabling The Do-Not-Disturb Feature
Clicking Change in the Do Not Disturb (DND) dialog box enables you to select the Enable Do Not Disturb option. For general information about this feature, see Feature on page 86. Avaya one-X Quick Edition Release 2.0.0 Telephone User Guide Options on the Home Page Setting up Call Forwarding on page Enabling/Disabling the Do-Not-Disturb July 2006... -
Page 102: Viewing And Modifying Speed Dial Assignments
Clicking Reset Missed Call Counter clears a counter that records the number of unanswered/ignored calls. Clicking Clear All Logs resets both lists and the counter of missed/ ignored calls. Avaya one-X Quick Edition Release 2.0.0 Telephone User Guide Adding and Selecting Speed Dial Entries Using the Call Log Application on page 63. -
Page 103: Options On The Terminal Settings Page
Clicking Change in the Terminal Settings dialog box enables you to change the name that is associated with your extension number in the Corporate directory. Avaya one-X Quick Edition Release 2.0.0 Telephone User Guide Options on the Terminal Settings Page... -
Page 104: Options On The Voicemail Page
Enabling/Disabling the Zero-Redirect Feature Click Change in the Zero Redirect dialog box to enable or disable the zero-redirect feature and specify an extension or telephone number for callers to redirect an unanswered call to the designated operator extension. For general information about this feature, see page Avaya one-X Quick Edition Release 2.0.0 Telephone User Guide... -
Page 105: Selecting The Language Of Voicemail Prompts
2. On the User Options menu, click Voice Mail. 3. In the SMTP dialog box, click Change. The Edit SMTP dialog box is displayed. Avaya one-X Quick Edition Release 2.0.0 Telephone User Guide on page 60). The audio component of the voicemail Playing an Audio File Attachment 95). -
Page 106: Playing An Audio File Attachment
To play audio files when they arrive as email attachments, you can download and install a free plug-in for the Microsoft Windows Media Player from the Avaya Technical Support site. Your PC must be running Microsoft Windows XP or 2003, and be equipped with a sound card. -
Page 107: Options On The Teleworker Options Page
Click Change in the Teleworker Options dialog box to enable or disable Teleworker mode, and if required, specify the IP address of a Teleworker server host. Avaya one-X Quick Edition Release 2.0.0 Telephone User Guide Options on the Teleworker Options Page... - Page 108 Chapter 10: Web-based Telephone Options Avaya one-X Quick Edition Release 2.0.0 Telephone User Guide July 2006...
-
Page 109: User Options Quick Reference
User Options Quick Reference Introduction You can change the way that your Telephone works through user options. This appendix provides a quick reference to the User Options menu items that can be accessed through the Options ( ) button on your Quick Edition IP Telephone. To access user options through the... - Page 110 9. Teleworker 1. Mode 2. Status 3. Default Server Avaya one-X Quick Edition Release 2.0.0 Telephone User Guide from left to right. Enter existing password, enter new password, and confirm new password. Confirm your selection. Turn the feature On or Off.
-
Page 111: Index
... . setting up conference call Avaya one-X Quick Edition Release 2.0.0 Telephone User Guide calling, (continued) transferring incoming call using Call Log... - Page 112 ... . . pre-installation checklist sharing LAN connection to computer Avaya one-X Quick Edition Release 2.0.0 Telephone User Guide IP address of telephone determining viewing ..
- Page 113 Retrv (Retrieve parked call) ....VMail (Voicemail) Avaya one-X Quick Edition Release 2.0.0 Telephone User Guide software version and release number load compatibility messages viewing...
- Page 114 ....what callers hear ....Volume Control buttons Avaya one-X Quick Edition Release 2.0.0 Telephone User Guide web-based system administration viewing registration information web-based user options, accessing .
Need help?
Do you have a question about the 4621SW and is the answer not in the manual?
Questions and answers