Table of Contents
Advertisement
Quick Links
Advertisement
Table of Contents

Related Manuals for BraunAbility Toyota Rear Entry Wheelchair


Summary of Contents for BraunAbility Toyota Rear Entry Wheelchair
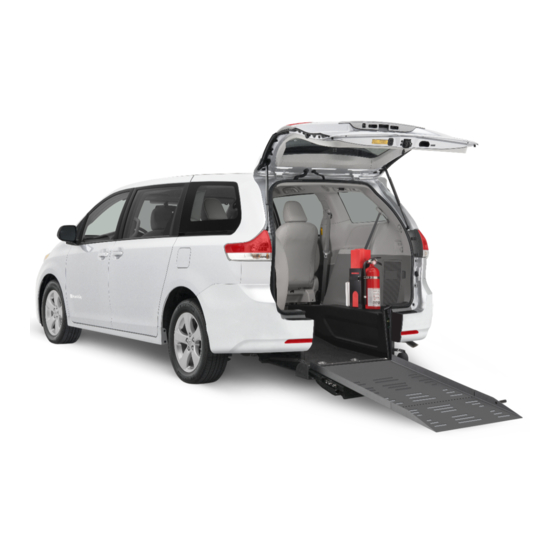
- Page 1 ® ® Toyota Rear Entry Wheelchair Accessible Vehicle Public Use 37848 Rev C...
- Page 2 ® W ARNING wheelchair accessible vehicle. We design and build each BraunAbility ® vehicle for reliability, quality and safety. Our founder, Ralph Braun, instilled that ethic from day one, and we live by that commitment today.
-
Page 3: Table Of Contents
CONTENTS Warranty and Registration Instructions ....2 Simple Stow Ramp Terminology ......12 Introduction ............3 Ramp Access Tailgate ........12 Features ............. 4, 5 Simple Stow Ramp Operation ....12, 13 Safety Precautions ..........6 Simple Stow Ramp Vertical Stow Position ..........14, 15 Operation Simple Stow Ramp Operation Safety .. -
Page 4: Warranty And Registration Instructions
WARRANTY AND REGISTRATION Examine your vehicle for any damage. Should any damage have occurred during delivery, notify the carrier at once with any claims. Review the service agreement, delivery checklist and warranty registration form with your sales repre- sentative. The form must be signed by the con- sumer and retailer. -
Page 5: Introduction
INTRODUCTION BraunAbility wheelchair acces- This manual addresses standard If you experience an operation ® sible vehicles are designed to features as well as options. Refer problem or there is any sign of provide mobility independence to the instructions applicable wear, damage, or other abnor- for wheelchair passengers. -
Page 6: Features
FEATURES Lowered Floor from Rear Hatch: Entrance/Ramp Lighting: ADA- three-passenger bench seat. A This feature provides additional compliant entrance/ramp lighting two-passenger fold-a-way seat is headroom and reduces the slope that functions in sync with the available as a rear seating option. of the ramp when deployed. - Page 7 FEATURES Filler Foldout ramp depicted. Page 5...
-
Page 8: Safety Precautions
SAFETY PRECAUTIONS Safety Symbols SAFETY FIRST! Know That..All information contained in this manual and supple- ments (if included), is provided This symbol indicates This symbol indicates for your safety. Familiarity with important safety in- important information proper operation instructions formation regarding a regarding how to as well as proper maintenance... -
Page 9: Operation
OPERATION OPERATION Before Operation Entrance Lighting Rear Hatch Operation Hatch Release Before utilizing conver- The vehicle is equipped Rear hatch operation sion features, park the with entrance lighting has not been affected vehicle on a level sur- that functions in sync by the conversion. -
Page 10: Foldout Ramp Operation
FOLDOUT RAMP OPERATION Foldout Ramp Terminology Fold Out Ramp Operation Push the stow latch release handle to the right (1), and The term deploy (unfold) The foldout ramp and vehicle carefully deploy and stow the indicates the lowering motion tailgate operate together. The spring-assisted ramp using the of the ramp to the deployed ramp and tailgate assembly are... -
Page 11: Foldout Ramp Operation
FOLDOUT RAMP OPERATION Ensure the ramp is fully deployed Ensure the ramp is fully stowed ramp latches must be fully before boarding the ramp. and latched before closing engaged (click twice). Typical the rear hatch. The two-stage both sides. 2-Stage Ramp Latch Ensure ramp is fully latched. -
Page 12: Foldout Ramp Operation Safety
FOLDOUT RAMP OPERATION Foldout Ramp Operation Remember to use good body Push the ramp out from Safety mechanics when stowing and inside the vehicle only if an deploying the ramp. Do not assistant is not available Keep clear of the area in release the ramp when de- and it is absolutely neces- which the hinged ramp bi-fold... - Page 13 FOLDOUT RAMP OPERATION Be certain there is adequate clearance outside the W ARNING vehicle before deploying the ramp. Keep clear of area in which the ramp operates. Be certain no person or obstruction is within the path of the ramp when deploy- Keep clear of ing or stowing the ramp.
-
Page 14: Simple Stow Ramp Operation
SIMPLE STOW RAMP OPERATION Simple Stow Ramp Ramp Access Tailgate Simple Stow Ramp Operation Terminology The independent tailgate The ramp is manually deployed On Floor Stow: When not in must be manually opened and and stowed by an attendant. use, the simple stow (sliding) closed by an attendant before Three oval-shaped hand hold ramp rests (stows) on the vehi-... -
Page 15: Simple Stow Ramp Operation
SIMPLE STOW RAMP OPERATION Keep clear of the ramp mecha- side of the ramp and one in the Lift the ramp so that it is parallel nism when stowing the ramp. center of the ramp platform). to the vehicle floor before manu- Remember to use good body Carefully deploy and stow the ally stowing. -
Page 16: Simple Stow Ramp Vertical Stow Position
SIMPLE STOW RAMP OPERATION Simple Stow Ramp Vertical Deploy (extend) the ramp Be sure the ramp engages Stow Position fully. Lift and fold (rotate) the the rubber retention wheels ramp to the vertical position. fully (see ramp detail). The simple stow ramp is stowed in the vertical position when a wheelchair passenger is being transported. - Page 17 SIMPLE STOW RAMP OPERATION Ensure the tailgate is fully two-stage latches must be stowed and latched before fully engaged (click twice). closing the rear hatch. The Typical both sides. Ramp Engagement 2-Stage Tailgate Latch Slot Ensure ramp is fully latched. Rubber 2 Clicks Retention...
-
Page 18: Simple Stow Ramp Operation Safety
SIMPLE STOW RAMP OPERATION Simple Stow Ramp Operation Remember to use good body If the ramp is in the vertical stow Safety mechanics when stowing and position, push the ramp out from deploying the ramp. Do not re- inside the vehicle only if an as- Keep clear of the area in which lease the ramp when deploying sistant is not available and it is... - Page 19 SIMPLE STOW RAMP OPERATION Be certain there is adequate clearance outside the W ARNING vehicle before deploying the ramp. Keep clear of area in which the ramp operates. Be certain no person or obstruction is within the path of the ramp when deploy- Keep clear of ing or stowing the ramp.
-
Page 20: Ramp Passenger Safety
RAMP PASSENGER SAFETY Wheelchair passengers and attendants (when ap- in the center of the ramp at all times. You must be plicable), must use basic common sense and good able to clearly view the ramp whenever boarding and judgment regarding ramp safety. Each wheelchair exiting the vehicle. - Page 21 RAMP PASSENGER SAFETY Different types of disabilities require different types W ARNING of wheelchairs and different types of wheelchair- equipped occupant restraint belt systems (torso restraint). It is the responsibility of the wheelchair Be aware of passenger to have his or her wheelchair equipped ramp slope.
- Page 22 RAMP PASSENGER SAFETY method and orientation of entering and exiting based on the physical characteristics of their personal wheelchair and his or her physical capabilities to maintain stability while the wheelchair is in motion on the ramp. Wheelchair Attendants: When assisting a wheel- chair occupant, remember to use good body me- chanics.
- Page 23 BLANK for LAYOUT Page 21...
-
Page 24: Wheelchair Tiedown And Occupant Restraint
WHEELCHAIR TIEDOWN AND OCCUPANT RESTRAINT Terminology Forward-Facing Wheelchair One Forward-Facing Wheelchair Tiedown and Occupant Re- Tiedown and Occupant Restraint While many of the terms are self straint System: Belt Kit is supplied for the tie explanatory, several have been down of one wheelchair and re- specifically developed to clarify Floor pocket (anchorage point) straint of an occupant. - Page 25 WHEELCHAIR TIEDOWN AND OCCUPANT RESTRAINT FLOOR PLAN A Floor Anchorage (8) Lowered Wheelchair Floor Position Page 23...
- Page 26 WHEELCHAIR TIEDOWN AND OCCUPANT RESTRAINT FLOOR PLAN B Floor Anchorage (8) Lowered Wheelchair Floor Position Page 24...
- Page 27 WHEELCHAIR TIEDOWN AND OCCUPANT RESTRAINT FLOOR PLAN C Floor Anchorage (4) Lowered Wheelchair Floor Position Page 25...
- Page 28 WHEELCHAIR TIEDOWN AND OCCUPANT RESTRAINT Occupant Restraint Wheelchair Tiedown Retractable Lap and shoulder belts should Four QRT retractable straps are Straps bear upon the bony structure of provided for securement of the (four) the body and should be worn wheelchair (two for the front and two for the rear).
- Page 29 WHEELCHAIR TIEDOWN AND OCCUPANT RESTRAINT Occupant Restraint the belt ends through the back of 2-Piece Waist Shoulder the chair. Connect the lap belt (Lap) Belt (Chest) Multi-Piece Chest & Waist Belt slotted female fitting to the cor- (female) (male) Belt responding wheelchair restraint The multi-piece chest and waist belt QRT retractor.
- Page 30 WHEELCHAIR TIEDOWN AND OCCUPANT RESTRAINT Occupant Restraint (continued) Connect the adjustable shoulder belt upper slotted female fitting to the wall-mounted shoulder belt adapter (engage pin in slot). Connect the shoulder belt lower slotted female fitting to the lap belt pin fitting (engage pin in slot). Adjust shoulder belt as needed using belt adjuster.
- Page 31 WHEELCHAIR TIEDOWN AND OCCUPANT RESTRAINT Strap, Belt and Anchorage Maintenance No product developed Inspect strap and belt assemblies Follow all inspection and main- to date can guarantee frequently. Any defects such as tenance instructions supplied by successful securement strap/belt cuts, fraying or mal- the belt manufacturer.
- Page 32 WHEELCHAIR TIEDOWN AND OCCUPANT RESTRAINT Tiedown Strap Angles Wheelchair Reference Plane Locate wheelchair in forward-facing position center- Rear ing wheelchair squarely within floor anchorages. Securement The front and rear straps, when attached, should Points create angles approximately as shown in Figure 2. Preferred angles and locations of straps from wheel- 30°...
- Page 33 WHEELCHAIR TIEDOWN AND OCCUPANT RESTRAINT Slide’ N Click Keeper Fit- ting and Floor Anchorage Attachment Instructions Plunger Floor To Engage Keeper Fitting: Anchorage Slide keeper fitting onto floor anchorage. Be sure Keeper keeper is locked into posi- tion on floor anchorage (plunger fully engaged).
- Page 34 WHEELCHAIR TIEDOWN AND OCCUPANT RESTRAINT QRT Retractor Strap Attachments Wheelchair Tiedown Figure 3 1. Place wheelchair facing forward in securement area; apply Strap Release: Push down lever wheel locks or turn power off. (lock) to release tension on strap. 2. Attach tiedowns into floor an- chorages and ensure they are locked in.
- Page 35 WHEELCHAIR TIEDOWN AND OCCUPANT RESTRAINT Figure 4 Wheelchair Chair Retractor Strap Tiedown Hook Retractor Strap Floor Anchorage Floor Anchorage Chair Hook Chair Hook Floor Anchorage Floor Anchorage Chair Retractor Strap Hook Retractor Strap Page 33...
- Page 36 WHEELCHAIR TIEDOWN AND OCCUPANT RESTRAINT Shoulder Shoulder Figure 5 Retractor Strap Belt Adapter Belt Retractor Strap Keeper Keeper Slide’ N Click Keeper Engaging Floor Anchorage Lap Belt Lap Belt with Male Hook Tongue Keeper attachment details are provided on page 31. Keeper Lap Belt with Keeper...
- Page 37 WHEELCHAIR TIEDOWN AND OCCUPANT RESTRAINT Slide’ N Click Figure 6 Keeper Engaging Floor Anchorage Shoulder Shoulder Belt Belt Adapter Keeper attachment Keeper details are provided on page 31. Lap Belt with Male Tongue Lap Belt with Female Keeper Receptacle Retractor Floor Retractor Anchorage...
- Page 38 WHEELCHAIR TIEDOWN AND OCCUPANT RESTRAINT Occupant Restraint Figure 7 Shoulder Belt Adapter Lap Belt Female Slotted Fitting Retractor Page 36...
- Page 39 WHEELCHAIR TIEDOWN AND OCCUPANT RESTRAINT Lap & Shoulder Belt Attachments b. Extend shoulder belt over passenger’s shoulder and across torso, and fasten pin 1. Attach Lap Belts - Use integrated stiffeners to connector onto lap belt feed belts through openings between seat backs and bottoms, and/or armrests to ensure proper 3.
-
Page 40: Seat Operation - Rear
SEAT OPERATION Flip Down Rear Bench Seat Deploy (Lower) Seat (if equipped) To Deploy (Lower) Seat: A two-passenger fold-a-way 1. Rotate truss lock (A) seat is available as a rear counterclockwise to seating option. The two-pas- unlock seat. senger seat is mounted on a cantilever seat base. - Page 41 SEAT OPERATION Seat Back Stow (Raise) Seat To Stow (Raise) Seat: To Deploy (Raise) Seat To Stow (Lower) Seat Back: Back: 2. Rotate truss lock (A) 1. Lift seat stow latch clockwise to lock seat. (D) and lift seat to full Push down recline lever Push down recline lever See Figure 8.
-
Page 42: Preventive Maintenance
BraunAbility. Refer to the War- systems along with cleaning and Inspect and clean routinely. ranty Booklet for details regard- lubricating procedures should be... - Page 43 PREVENTIVE MAINTENANCE Generally inspect the ramp as- If there is any sign of damage, sembly for positive securement, wear, abnormal condition or alignment, wear or other pos- improper operation, discontinue Contact your service sible damage. Discontinue ramp conversion use immediately. facility immediately operation if there is any sign of Contact your sales representa-...
-
Page 44: Jacking And Tire Changing
Transporting a Lowered Floor Vehicle Jack Points: Jack points have not been affected by the conversion. BraunAbility lowered floor vehicles should be transported on a trailer rather than towed with Jacking and Tire Changing Procedures: Jack- one set of wheels suspended and the other ing and tire changing procedures have not been set of wheels remaining in road contact. -
Page 45: Reporting Safety Defects
National Highway Traffic Safety Admin- BraunAbility istration (NHTSA) in addition to notifying BraunAbility. 631 West 11th Street P.O. Box 310 If NHTSA receives similar complaints, it may open an inves-... - Page 47 ® © 2015 BraunAbility. All rights reserved. All illustrations, descriptions and specifications in this manual are based on the latest product information at the time of publication. The Braun Corporation reserves the right to make changes at any time without notice.
Need help?
Do you have a question about the Toyota Rear Entry Wheelchair and is the answer not in the manual?
Questions and answers