IDS X Series Training Manual
With bi-directional wireless
Hide thumbs
Also See for X Series:
- Quick start manual ,
- Installer manual (72 pages) ,
- Owner's manual (48 pages)

Related Manuals for IDS X Series


Summary of Contents for IDS X Series
- Page 1 Training Manual with Bi-directional Wireless Installer Training Firmware Version 2.7x X16 Stock Code: 860-1-473-X16 X64 Stock Code: 860-1-864-XS...
- Page 2 IDS X-Series Training v2.7...
- Page 3 Partition Menu on LCD keypads _________________________________________________________________________ 105 Trouble conditions _____________________________________________________________________________________ 106 Quick Guide __________________________________________________________________________________________ 107 X-SMS Module ________________________________________________________________________________________ 108 Voice Module _________________________________________________________________________________________ 118 Connecting Directly to the X-Series System Board with the Panel Interface Device ________________________________ 123 IDS X-Series Training v2.7 | Contents...
- Page 4 Example: If any zones above 16 are mentioned then X64 is being described. Training must be done with X64 panels as some of the exercises are not suitable for the X8s or X16. Any settings involving telephone communication are not available on X8s. IDS X-Series Training v2.7...
- Page 5 Default Button button. Replace power whilst still holding the button. Wait until the panel status LED flashes and then release the button. Panel Status LED The status LED indicates the condition of the operating system. IDS X-Series Training v2.7 | Hardware...
- Page 6 4. Serial Output The serial connection on the X-Series alarm panel (Version 2.10 and up) can communicate with any device that has the IDS Serial Protocol incorporated into it. The example below is the X-SMS Module connected via the serial output:...
- Page 7 The siren connects directly to the siren output and can drive up to a 30 watt siren. Note: The siren must be self-driven, the siren output just supplies 12v DC and not an audio sound and therefore you cannot use a "standard" speaker. IDS X-Series Training v2.7 | Hardware...
- Page 8 The line coming into the building must go directly to the alarm panel and then onto any telephones. This will stop any attempt to disrupt communication by taking the phone off the hook. Not available on the X8s. IDS X-Series Training v2.7...
- Page 9 X-Series Panel does not need to be in the beginning or end of the daisy chain. Note: All X-Series keypad bus devices must be powered from the X-Series panel unless an IDS RS485 Bus Isolator is used, as described in point 8.6.
- Page 10 8.2. IDS X64 – 8 Zone Smart Expander Module The IDS X64 – 8 Zone Smart Expander Module comes with 4 new connectors which connect to the IDS Smart Power Supply Module, allowing it to report back to the X-Series alarm panel, in the case of mains failure, low battery and fuse failure.
- Page 11 NOTE: To save you from having to replace the fuse when there is a short or when too much current is drawn, the IDS Smart Power Supply Module has a resettable fuse. To reset the fuse just turn the IDS Smart Power Supply Module off for a few seconds and then turn it back on.
- Page 12 8.4. IDS X-Series Output Expander module The IDS X-Series alarm panels support two PGM Output Expander Modules. Each Output Expander has eight programmable normally open relay outputs. The outputs are programmed by addresses and actions from a defined list of programmable output events, which will be covered in the programming section of this manual.
- Page 13 LEDs flashing and an LCD keypad will display "Unreg", as shown in the example below. Simply press the hash # key to enrol a keypad to the X-Series panel. Keypad IDs are assigned to keypads on enrolment in the order of enrolment, from Keypad ID 1 to Keypad ID 8.
- Page 14 X64 alarm system Note: The X-Series remote receiver cannot work in a standalone mode, it must be connected to an X-Series alarm panel. Dip Switch 7 can used to disabled 3 second panic from Receiver hardware v1.05 IDS X-Series Training v2.7...
- Page 15 9. Wireless Integration The X-Series Panels supports both IDS Xwave and IDS Xwave wireless zone expanders. Xwave only supported from version 2.7x and higher. (X64 and X16) LEDs Tamper Switch Tamper Dip switches Dip switches LEDs 12V DC Outputs 12V DC...
- Page 16 2. No activity on the X-Series serial bus 3. No X-Series messages detected 4. No messages for this peripheral detected from X-Series 5. Not used 6. Expander not yet registered on the X-Series 7. Expander tamper violated 8. Unsupported DIP address configured IDS X-Series Training v2.7...
- Page 17 (See Output programming) 2 Zone Inputs 12V Power Input Programmable Output (Relay) LED Status LED1 will light up when powering up and change state when a beacon from the Xwave Hub is received. IDS X-Series Training v2.7 | Hardware...
- Page 18 If the device has just lost communications and reconnects then you will need to default the aXess Interface before it registers on the panel and this loses all tags. Use IDSwift2 to download all tag information before replacing any interfaces or removing missing devices. IDS X-Series Training v2.7...
- Page 19 Beeper sounds for 15 seconds. Tag Held in Field Yellow LED flashes slowly. Note: Unless otherwise stated the Yellow LED will stay on unless there is a communication issue with the panel in which case it will flash. IDS X-Series Training v2.7 | Hardware...
- Page 20 NB: You cannot power a magnetic lock with the aXess interface or Integrated Reader. Use a Smart PSU to power the magnetic lock, or use a Smart PSU and Bus Isolator to power the aXess Interface and magnetic lock. IDS X-Series Training v2.7...
- Page 21 16, until the telephone dialler from the last arm cycle. correct page with the zone is located Feedback while entering data Single extended beep = Correct entry 3 beeps = Incorrect entry IDS X-Series Training v2.7 | Entering Data...
- Page 22 1/5/9/13 have a value of 1, zone 2/6/10/14 have a value of 2, zone 3/7/11/15 have a value of 4 and zone 4/8/12/16 have a value of 8. H = Hour m = minutes s = seconds Value Example: The time in this location is: 21 minutes and 40 seconds IDS X-Series Training v2.7...
- Page 23 Then press the keys that represent the location number followed by the [*] key Now enter the data value that needs to be in the location followed by the [*] key You can enter the next location or press the [#] key to exit Installer mode. IDS X-Series Training v2.7 | Programming...
- Page 24 Standard Location [Location Number] [*] [Value] [*] Bitmap Location [Location Number] [*] [Option] [*] [Option] [*]..[#] Sub-location method [Location Number] [*] [Sub-location Number] [*] [Value] [*] String method [Location number] [*] [all values to be entered] [*] IDS X-Series Training v2.7...
- Page 25 [0] [*] The keypad will begin to beep until all locations have been reset. The LEDs on the keypads will flash indicating that they have no IDs and the system is defaulted. Location 1 to 8: Zone Type Location Type: Extended Location Can be programmed using the string method.
- Page 26 When the panel is armed the violation of an Outdoor Instant zone will cause the panel OUTDOOR to register an alarm condition the only difference to an Instant zone is the contact ID INSTANT ZONE code sent to the control room. IDS X-Series Training v2.7...
- Page 27 Enter the value for an instant zone followed by the [*] key.) [0] [4] [*] Now zone 8 [8] [*] Panic zone [0] [3] [*] To exit location 1 press the [#] key Note: You will still be installer mode IDS X-Series Training v2.7 | Locations...
- Page 28 Global Settings Location 9: IDS Smart Power Supply Module Trouble Display Location Type: Bitmap When the Monitored Power Supply detects any of the trouble conditions that are enabled in the table below, the power light on the keypad flashes and if set in location 14, option 2, will beep. To view the trouble condition: Press and hold the [7] key down until the beep.
- Page 29 This is the number of times the zone must violate within the time set in location 12, Cross-zone delay time, above. Valid Range: 1 -15 Default: 3 Note: Each zone must be enabled to be part of the cross-zone group. (Location 101 to 164 depending on the zone number) IDS X-Series Training v2.7 | Global Settings...
- Page 30 This is the time the system waits before reporting that the electricity has been disconnected. Data format: HHmm Valid Range: 0001 - 1800 Default: 0004 Note: AC restoral waits for one minute, after AC has been restored before reporting the restoral. IDS X-Series Training v2.7...
- Page 31 RSSI is signal strength measurement and if lower than 20% a Wireless low RSSI trouble will be logged. If a zone is monitored for tamper and then a tamper signal is Zone tamper detected by the alarm a trouble will be triggered. IDS X-Series Training v2.7 | Global Settings...
- Page 32 21. Valid Range: 2 - 16 Default: 4 Note: Keypad lockout must be enabled under extra partition options. (Location 221 to 228 option 4 depending on the partition the keypad belongs too.) IDS X-Series Training v2.7...
- Page 33 Location 25: Month to Start Daylight Savings Location Type: Standard Select the month that daylight savings begins. Value Month Value Month Value Month Disabled September January June October February July November March August December April IDS X-Series Training v2.7 | Global Settings...
- Page 34 Week 5 Location 31: Daylight Savings Time Offset Location Type: Standard This is the value that the time must be offset by when daylight savings is enabled. Data Format: mmm Valid Range: 1 - 250 Default: 060 IDS X-Series Training v2.7...
- Page 35 LED flashes. If this option is enabled then the only way to default is via the installer code and location 0. Value Action Default Switch Enable defaulting of the default button Disable the defaulting of the default button Status LED IDS X-Series Training v2.7 | Advanced Miscellaneous Settings...
- Page 36 Note: For the Contact ID and SIA formats, event reporting codes are automatically configured. Locations 501 to 588 enable or disable reporting events for Contact ID and SIA. All other formats, the reporting codes must be entered manually into location 300 to 373. IDS X-Series Training v2.7...
- Page 37 If the alarm cannot report on the first attempt, this location tells the system how many times to try. The default is 6 attempts, and can be changed to a maximum of 9. (0 will disable dialling) Valid Range: 1 - 9 Default: 6 IDS X-Series Training v2.7 | Communication Settings...
- Page 38 Location 48: Download Options Location Type: Bitmap The IDS X-Series alarm system can be up/downloaded with IDSwift software over a standard phone line, via an IDS modem. The following options help the system to deal with incoming calls. Default Action...
- Page 39 Note: If the account code is 0000 no reporting will take place. This also allows you to configure which partitions report and which do not. IDS X-Series Training v2.7 | Communication Settings...
- Page 40 Zone 16 is a panic zone, let’s make it a silent panic so that the siren will not trigger alerting the intruder, but will send the signal to the monitoring company. Instructions Key Presses Enter location 116 [1][1][6] [*] [4] [*] Select the silent zone option LED 4 will come on Exit the location IDS X-Series Training v2.7...
- Page 41 This is the time the panel will wait before triggering the alarm, once all movement has stopped. If movement is detected within this time, the system resets and waits for all movement to stop again. Format: HHmm Default: 0000 Valid range: 0000 to 2359 IDS X-Series Training v2.7 | Auto Arm and Auto Alarm...
- Page 42 Time that the partition must auto arm entered in 24 hour format (HHmm H=hour, m=minute) Instructions Key presses Enter location 180 [1][8][0] [*] Enter the partition number [1] [*] Enter the time for the partition to auto arm [2] [0] [3] [0] [*] IDS X-Series Training v2.7...
- Page 43 Default: 000000 Instructions Key presses Enter location 196 [1][9][6] [*] Valid range: 000001 to 999999 Enter a serial code [1] [2] [3] [4] [5] [6] [*] IDS X-Series Training v2.7 | Security Options...
- Page 44 All no zone activity auto arm settings All no zone activity alarm settings Default: 8888 Valid range: 0001 to 9999 Instructions Key presses Enter location 197 [1][9][9] [*] Enter the new installer code [4] [3] [2] [1] [*] IDS X-Series Training v2.7...
- Page 45 The diagrams below show which page is being displayed via the keypad LEDs and which zones they represent for the X64. Curve keypad LEDs Zones: 1 to 16 17 to 32 33 to 48 49 to 64 Classic keypad LEDs IDS X-Series Training v2.7 | Partition Options...
- Page 46 Let us enable siren toot on arm and disarm so the customer will know if the alarm is armed when using a remote transmitter. Instructions Keypad presses Enter the partitions location [2][1][1] [*] Option 10 and 11 need to be enabled [1][0] [*] [1][1] [*] Exit the location IDS X-Series Training v2.7...
- Page 47 Valid range: 0000 to 5959 Exercise: Instructions Keypad presses Enter the location 230 [2][3][0] [*] Enter partition 1’s sub-location [1] [*] Change the 30 sec default to 10sec (mmss) [0][0] [1][0] [*] Exit the location IDS X-Series Training v2.7 | Partition Options...
- Page 48 [1] [2] [3] [4] [1] [1] [1] [1] [*] leave as default by leaving them in partition 1 When the [*] key is entered the data will be saved and you will be exited out of the location IDS X-Series Training v2.7...
- Page 49 You could also map the keypad zone to zone 33 even though you don’t have an expander with zone 33 physically connected. NOTE: Please remember that you still need to give the zone a zone type and place it into a partition for it to work. IDS X-Series Training v2.7 | Keypad Configuration...
- Page 50 Configure keypad 1, to be a global keypad with the partition menu active. Instructions Key presses Enter the location for keypad 1 [2][5][1] [*] Option 3 must be enabled [3] [*] Enable partition menu [5] [*] Exit the location IDS X-Series Training v2.7...
- Page 51 You can either use the Panic or Medical keys to scroll through the options and press the * key to select or enter the sub-location number and * key. Note: The IDS aXess location can only be programmed using an IDS LCD keypad and IDSwift2. You cannot use and LED keypad.
- Page 52 15 seconds to draw attention to the door being open. If the door is monitored by a door magnet connected to a Forced door monitoring zone and the door opens without a valid tag being presented a Forced Door Alarm will trigger. IDS X-Series Training v2.7...
- Page 53 Upon location entry the following will be displayed: Scroll backwards using Scroll forward using the Medical key the Panic key Press * key to enter [#] will return user to Installer menu location entry. IDS X-Series Training v2.7 | X-Series Wireless...
- Page 54 LED previously flashing will now be ON. 3. The system will now wait for a new zone to be selected. 4. [#] key at any time will return the user back to the sub menu selection menu. IDS X-Series Training v2.7...
- Page 55 2. Enter the zone number or scroll to the zone. 3. Enter [*] to delete that detector. 4. [#] key at any time will return the user back to the sub menu selection menu. IDS X-Series Training v2.7 | X-Series Wireless...
- Page 56 Locations to enter reporting codes if you want to report stay zones to the control room. Location Profile Zones Location Profile Zones 1 to 16 33 to 48 17 to 32 49 to 64 Default is 00 Valid Range: 00 - FF IDS X-Series Training v2.7...
- Page 57 Wireless Detector Wireless devices monitor their batteries and when a battery needs changing Battery Low this low battery code is sent. Wireless Detector After changing the battery a restoral is sent. Battery Restore IDS X-Series Training v2.7 | Reporting Codes...
- Page 58 Swinger Shutdown The system can be set to try restore a zone that has been disabled 332 to 335 1 to 16 Restore by swing shutdown and if it’s able to then this code is sent. IDS X-Series Training v2.7...
- Page 59 Location 375: Quick Stay Reporting Codes per Partition Location Type: Extended There is a sub-location for each of the 8 partitions. These reporting codes are sent when someone stay arms the system using the quick Stay arm key, [5]. IDS X-Series Training v2.7 | Reporting Codes...
- Page 60 I/O Module zones 53-56 Output expander 2 output 2 I/O Module zones 57-60 Output expander 2 output 3 I/O Module zones 61-64 NOTE: The Xwave I/O Module output number is based on what zone that I/O Module is learnt IDS X-Series Training v2.7...
- Page 61 Location 389: Clear Keypad Programmable Outputs on Disarm Location Type: Bitmap Any outputs enabled in this location will be reset when the alarm system is disarmed. The keypad outputs are: Keypad No. Output Address Default: OFF IDS X-Series Training v2.7 | Triggering Outputs...
- Page 62 If any panic event is triggered. 0102 Output 409 Fire Programmable Output If a fire zone is triggered. 0402 Tamper Zone If a zone is set to be of the zone type tamper. 0000 Programmable Output IDS X-Series Training v2.7...
- Page 63 1 to 8 25 to 32 49 to 56 9 to 16 33 to 40 57 to 64 17 to 24 41 to 48 Data format: 0000 Valid Range: 0000 - 4103 Default: 0000 IDS X-Series Training v2.7 | Triggering Outputs...
- Page 64 0000 Restore occupants and restores when battery is replaced. RF Receiver Battery If the receiver’s battery goes low an output can be triggered and 0000 reset when restored. RF Receiver Battery restore 0000 IDS X-Series Training v2.7...
- Page 65 Location Type: Extended Each of the six zone expanders has two outputs. [Installer Code] [*] [Location] [*] [Output No.] [*] [m] [m] [s] [s] [*] Data format: mmss Valid Range: 0000 – 5959 Default: 0002 IDS X-Series Training v2.7 | Triggering Outputs...
- Page 66 Each location has 8 sub-locations representing the 8 outputs on each expander. [Installer Code] [*] [Location] [*] [Output No.] [*] [h] [h] [m] [m] [*] Data format: HHmm Valid Range: 0000 – 2359 (2400 disables) Default: 2400 IDS X-Series Training v2.7...
- Page 67 This location has 8 sub-locations representing the output on each keypad. [Installer Code] [*] [4] [5] [7] [*] [Output No.] [*] [h] [h] [m] [m] [*] Data format: HHmm Valid Range: 0000 – 2359 (2400 disables) Default: 2400 IDS X-Series Training v2.7 | Triggering Outputs...
- Page 68 Shutdown via telephone. At the auto test report, the system will try and Zone Swinger restore the zone if it is not violated and this will Shutdown Restore be reported via telephone. IDS X-Series Training v2.7...
- Page 69 Wireless Detector detectors and if the signal drops below 20% a RSSI Low message will be sent to alert the security company. AC Restored After AC is restored a message can be sent. IDS X-Series Training v2.7 | Event Reporting...
- Page 70 The X-Series alarm panel has a dedicated Dedicated Panic panic onboard and if this is triggered a panic signal will be sent. The alarm can be configured to send a test Test Report report every 1 hours to every 14 days. IDS X-Series Training v2.7...
- Page 71 21, the signal will be sent. Reserved When arming with the “Quick Arm” keys Arm without User Code or an arm/disarm zone this option must Reporting be enabled to send an arm signal. Reserved IDS X-Series Training v2.7 | Event Reporting...
- Page 72 AC restored report Telephone module 1 or 2. Telephone Module 1 Low Battery reporting Telephone module 1 or 2. Telephone Module 1 Auto test report telephone module 1 or 2. Telephone Module 1 Zones bypassed reporting Telephone module 1 or 2. IDS X-Series Training v2.7...
- Page 73 These location has 4 sub-locations representing 4 outputs learnt to each Xwave Hub. [Installer Code] [*] [6] [4] [5] [*] [Output No.] [*] [h] [h] [m] [m] [*] Data format: HHmm Valid Range: 0000 – 2359 (2400 disables) (Output number is 1-4) Default: 2400 IDS X-Series Training v2.7 | Event Reporting...
- Page 74 Appendix 1. Extra Contact ID Zone Reporting……………………………………………………………………..75 2. Communication Default Settings.…………………………………………………………………….77 3. Features Grouped by Location……………………………………………………………………….Error! Bookmark not defined. IDS X-Series Training v2.7...
- Page 75 Low CO2 Zone Loss of supervision - RF Zone Gate valve sensor Zone Loss of supervision - RPM Zone Low water level Zone Sensor tamper Zone Pump activated Zone RF low battery Zone IDS X-Series Training v2.7 | Contact ID Zone Reporting...
- Page 76 Access relay/trigger fail Zone Reserved for Ademco Use Zone Access RTE shunt Zone Reserved for Ademco Use User Access DSM shunt Zone Reserved for Ademco Use User Access reader disable Zone System Inactivity Sounder/Relay Disable Zone IDS X-Series Training v2.7...
- Page 77 Factory Default 5 Action Default Enable Tone Dialling Keep Two Separate Telephone Numbers Disable Dual Reporting Disable Alternate Reporting Locations 51 – 54 Primary Telephone Numbers Clears all numbers IDS X-Series Training v2.7 | Location 0 Option 5 Default changes...
- Page 78 Telephone module 1 Zone force arm reporting Telephone module 1 Zone tamper reporting Telephone module 1 Zone tamper restore reporting Telephone module 1 Zone swinger shutdown reporting Telephone module 1 Zone swinger shutdown restore Telephone module 1 reporting IDS X-Series Training v2.7...
- Page 79 Telephone module 1 Restored Wireless Receiver Jam Restored Telephone module 1 Wireless Detector RSSI Low Telephone module 1 Restored Dedicated Panic Telephone module 1 Test Report Telephone module 1 IDS X-Series Training v2.7 | Location 0 Option 5 Default changes...
- Page 80 Disable bus-wired peripheral tamper monitoring Disable onboard dedicated panic– audible Enable low battery monitoring Enable low battery cut-out Disable bypassing with user code*** Disable Dedicated Panic Zone Bypassing Disable remote transmitters to cancel a panic condition IDS X-Series Training v2.7...
- Page 81 Locations 350 – 357 Stay Close Reporting Clears all codes Locations 358 – 365 Open Reporting Clears all codes Locations 366 – 373 Siren Cancel Reporting Clears all codes IDS X-Series Training v2.7 | Location 0 Option 6 Default changes...
- Page 82 * Wireless Detector Battery Low Telephone module 1 Wireless Detector Supervision fail Telephone module 1 Wireless Receiver Signal Jammed Telephone module 1 Wireless Detector RSSI Low Telephone module 1 AC Restored Telephone module 1 IDS X-Series Training v2.7...
- Page 83 Keypad lockout reporting Telephone module 1 Reserved Reserved Armed without user code Telephone module 1 reporting Reserved Reserved Location 600 – 616 Voice Module Phone Numbers Clears all Numbers IDS X-Series Training v2.7 | Location 0 Option 6 Default changes...
- Page 84 Training Manual Multi-Language with Wireless User Menu Firmware Version 2.7x X16 Stock Code: 860-1-473-X16 X64 Stock Code: 860-1-864-XS IDS X-Series Training v2.7...
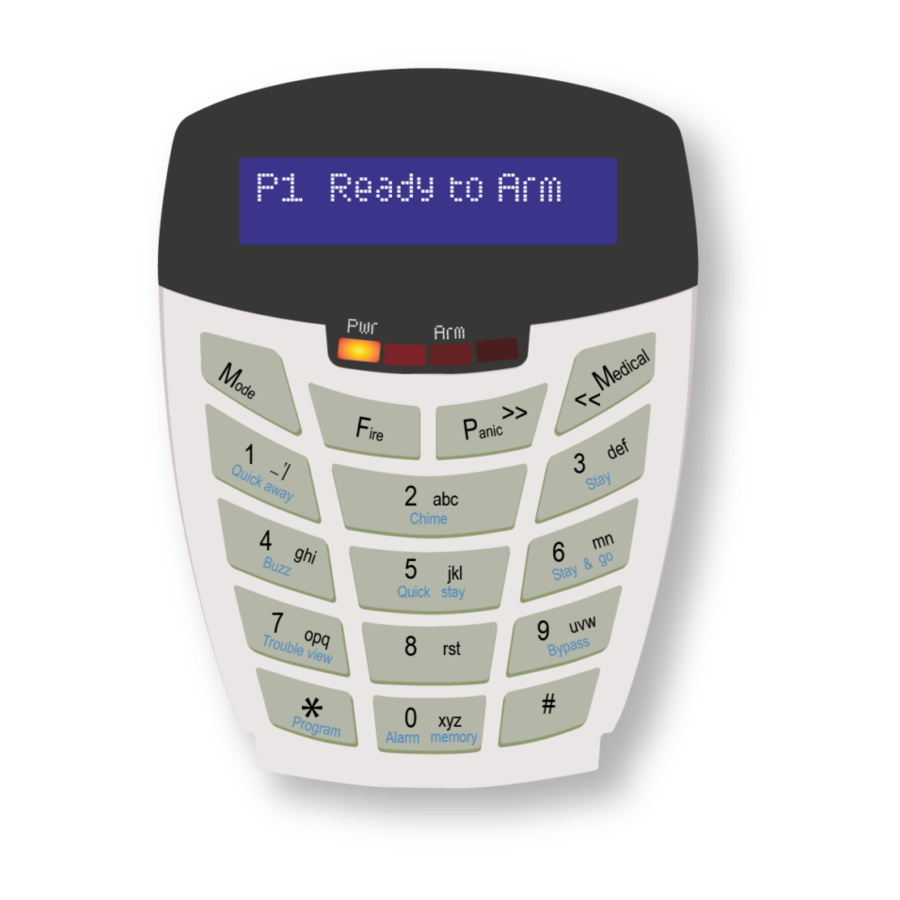
- Page 85 [*] key to page to the information from the last arm next 16, until the correct page Exit out of menu cycle. with the zone is located IDS X-Series Training v2.7 | Keypad Key Descriptions...
- Page 86 Then press either 4, 5 or 6 Key to select the different key press tones. To select the 'click' tone press and hold the #Key and the 0 key. To select a keypad Tone Volume and hold the # Key. Then press either 1, 2 or 3 Key to select the different key tone Volumes. IDS X-Series Training v2.7...
- Page 87 Enter each zone to be bypassed until complete, then press the [#] [5][*][1][7][*][1][8][*][2][1][*]..[#] key to exit There are 4 stay profiles so that different zones can be bypassed depending on different scenarios that may arise. IDS X-Series Training v2.7 | Standard User Functions...
- Page 88 Press the [5] key, then the keypad will ask you in which stay profile to arm. This feature only works with an LCD keypad. Note: This option must be enabled under installer settings, location 251 – 258: Keypad Options IDS X-Series Training v2.7...
- Page 89 To access the next 16 zones press the [*] key, and add the zones as needed When complete press the [#] key The zone LED will be on Panic zones can be bypassed if enabled in zone options location 101 to 164 IDS X-Series Training v2.7 | Standard User Functions...
- Page 90 The master menu is for administering the system by adding, deleting users, adding remote transmitters, etc. To access the master menu press and hold the [*] key until the beep, about 3 seconds, then enter the master code [1][2][3][4] followed by the [*] key. IDS X-Series Training v2.7...
- Page 91 [8][7] [*] Now enter the user code to be deleted, followed by the [*] key [2][5][8][0] [*] When complete press the [#] key This will leave you in the master menu IDS X-Series Training v2.7 | Standard Master User Functions...
- Page 92 Above is a table of all the user properties, we will make a Duress Code (followed by the [*] [2] [*] key) When complete press the [#] key This will leave you in the master menu IDS X-Series Training v2.7...
- Page 93 A table and details of the available outputs and their corresponding values is on 56. Note: By default there are only five outputs on the alarm panel. The other outputs are only available if the device that has the output required is installed. IDS X-Series Training v2.7 | Standard Master User Functions...
- Page 94 Default Button Assignment: Button 2 = Stay Arm Button 3 = Arm / Disarm Any button held down for more than three seconds will cause a panic to trigger Arm / Disarm Stay Arm Query Button Multi-coloured LED IDS X-Series Training v2.7...
- Page 95 Stay Armed in profile 1 2 short Stay Armed in profile 2 3 short Stay Armed in profile 3 4 short Stay Armed in profile 4 15 flashes Alarm has been triggered Output Long Triggered IDS X-Series Training v2.7 | Bi-directional Remote Transmitters...
- Page 96 Will arm the allocated partition in stay profile 4 and then allow you to scroll to the next available profile if one is configured Stay & Go Partition Number Will arm the allocated partition in the current/last used stay profile IDS X-Series Training v2.7...
- Page 97 4. Enter the partition whose devices you want to walk test: [1][*] 5. Enter the number of minutes the walk test must stay active, 1 to 15 minutes. The system will automatically exit walk test mode once the time entered expires IDS X-Series Training v2.7 | Bi-directional Remote Transmitters...
- Page 98 This will leave you in the master menu Default Button Assignment: Button 1 = Arm / Disarm Button 3 = Stay Arm Any button held down for more than three seconds will cause a panic to trigger Stay Arm Arm / Disarm IDS X-Series Training v2.7...
- Page 99 [1] [*] Now enter the user code or user slot number, followed by the [*] key [2][4][6][8] [*] When complete press the [#] key This will leave you in the remote receiver menu IDS X-Series Training v2.7 | Standard Remote Transmitters...
- Page 100 Enter the relay number, followed by the [*] key [1] [*] Enter the pulse time in mmss, followed by the [*] key [0][0][1][0] [*] When complete press the [#] key This will leave you in the remote receiver menu IDS X-Series Training v2.7...
- Page 101 Enter the value to select a language, followed by the [*] key [3][1] [*] Scroll to the language, followed by the [*] key to select [Panic] [*] When complete press the [#] key IDS X-Series Training v2.7 | Standard Remote Transmitters...
- Page 102 Enter the master code, followed by the [*] key [1][2][3][4] [*] Enter the value to delete a tag, followed by the [*] key [3][4] [*] Enter the card number, followed by the [*] key [tag number] [*] When complete press the [#] key IDS X-Series Training v2.7...
- Page 103 Enter the value to change the date, followed by the [*] key [4][1] [*] Enter the date, followed by the [*] key [1][8][0][7][1][0] [*] When complete press the [#] key IDS X-Series Training v2.7 | Setting the Time and Date...
- Page 104 Number Menu Option beep Manually Setting Outputs The X-Series Outputs, can be manually triggered on or off, via the keypad. [Mode] [3] [*] [Output [*] Press and hold Output Number Output until beep triggering Menu Option IDS X-Series Training v2.7...
- Page 105 E = Entry/Exit delay Status iv. S = Stay Armed v. A = Away Armed LCD Screen vi. ! = Alarm Note: This option must be enabled under installer settings, location 251 – 258: Keypad Options IDS X-Series Training v2.7 | Alarm Memory...
- Page 106 If a zone is monitored for tamper and then a tamper signal is detected by the Zone tamper alarm a trouble will be triggered. Once the trouble has been corrected, press and hold [7] again, and [#] immediately thereafter. AC failure will clear automatically, once AC has been restored. IDS X-Series Training v2.7...
- Page 107 5 = Low Battery 13 = Wireless Supervision Failure 6 = 12V Aux Fuse 14 = Wireless RF Jam 7 = Engineer Reset 15 = Wireless low RSSI 8 = Box Tamper 16 = Zone Tamper IDS X-Series Training v2.7 | Quick Guide...
- Page 108 Multi-Language with Wireless X-SMS Module X-SMS Stock Code: 860-36-0485 IDS X-Series Training v2.7...
- Page 109 X-SMS module works with IDS X-Series panels from version 2.3x and above. In this training guide we will cover step by step how to install the IDS X-SMS Module, we will explain the concept of programming the unit and go through same of the main commands.
- Page 110 It is recommended to default the X-SMS Module on a new installation. To default the X-SMS Module, hold the ‘Default’ button on power up until the ‘Heart Beat LED’ comes on, ± 3 seconds. 1.3. Status LEDs IDS X-Series Training v2.7...
- Page 111 The cell networks limit the number of characters to 160 per SMS. The X-SMS Module doesn’t store any user codes, it just sends them to the X-Series Panel. Make sure the code you use has the appropriate permissions in the X-Series Alarm Panel. IDS X-Series Training v2.7 | X-SMS Module...
- Page 112 Raw – A contact ID string is sent to the phone. Full – All enabled events will be sent to the phone in English. Reduced - Only the following will be reported: Arm/Disarm, Zone violations, Panics, AC Fail/Restore and Battery Low/Restore. (This is the default) IDS X-Series Training v2.7...
- Page 113 Code – 1234 (a valid user code) Command – Report Extended Command – Threshold Data – 14 (Number of SMSes) 071 348 9467 The SMS should look like this: 1234 report threshold 14 IDS X-Series Training v2.7 | X-SMS Module...
- Page 114 To bypass zone 3 you will use the following information: Code – 1234 (a valid user code) Command – Bypass Not needed Extended Command – * Data – 3 (Zone number) IDS X-Series Training v2.7...
- Page 115 To check the bypass status of zone 1 you will use the following information: Code – 1234 (a valid user code in partition 1) Command – Bypass Extended Command – Status Data – 1 (Zone number) The SMS should look like this: 1234 bypass status 1 IDS X-Series Training v2.7 | X-SMS Module...
- Page 116 P1,P3 Stay arm P2 in stay profile 3 1234 Stay arm P1 & P4 in stay profile 1 1234 P1,P4 Disarm all partitions 1234 Disarm Disarm P2 1234 Disarm Disarm P5 & P6 1234 Disarm P5,P6 IDS X-Series Training v2.7...
- Page 117 074 049 2481 disabled Manage Airtime Save balance string in the SMS module 1234 Airtime Command Enter the string supplied Query airtime balance 1234 Airtime Balance Add airtime 1234 Airtime Network supplied string IDS X-Series Training v2.7 | X-SMS Module...
- Page 118 Voice Module X-Series Voice Module Stock Code: 860-06-X64-0412 IDS X-Series Training v2.7...
- Page 119 DTMF tones. The controls are: Arm/Disarm, Bypass zones, Trigger an output, Query status of the partition Note: The voice module only works on version “D” X-Series boards and firmware version 1.08 and up. IDS X-Series Training v2.7 | Voice Module...
- Page 120 To get a status report on the partition and its zones: Press [1] Voice “partition 1 disarmed, zone 3 bypassed...” 4.3. Arm / Disarm To arm or disarm a partition: Press [2] Voice “enter partition” Press [partition number] Voice “partition number armed” IDS X-Series Training v2.7...
- Page 121 Partition Users Partition Users 10 to 19 50 to 59 20 to 29 60 to 69 30 to 39 70 to 79 40 to 49 80 to 89 IDS X-Series Training v2.7 | Voice Module...
- Page 122 For each of the users that receive events on their phones, their user codes must be created in the correct user slot and their phone number must be entered into the correct location for their partition. E.g. Partition 1 user must be added to slot 10 and their phone number must be added to 601. IDS X-Series Training v2.7...
- Page 123 To upgrade the firmware of the system. This will be distributed as an encrypted file. To do this: a direct connection board must be connected serially to a computer and the IDS software must be loaded on the computer. The PCB is then connected to the alarm panel via the serial connector on the board.
- Page 124 3. Double click on the IDSwift software icon to run the software and login. Default user name is “admin” and password is “admin”. 4. Open the client window. 5. Choose the client and then open the client. IDS X-Series Training v2.7...
- Page 125 9. When complete and successful, read and follow the instructions. Note: The alarm panel must be defaulted after the upgrade. IDS X-Series Training v2.7 | Connecting Directly to the X-Series System Board with the Panel Interface Device...
Need help?
Do you have a question about the X Series and is the answer not in the manual?
Questions and answers
How many keypad can you have
Up to 8 keypads can be used with the IDS X Series.
This answer is automatically generated