IDS X Series Quick Start Manual
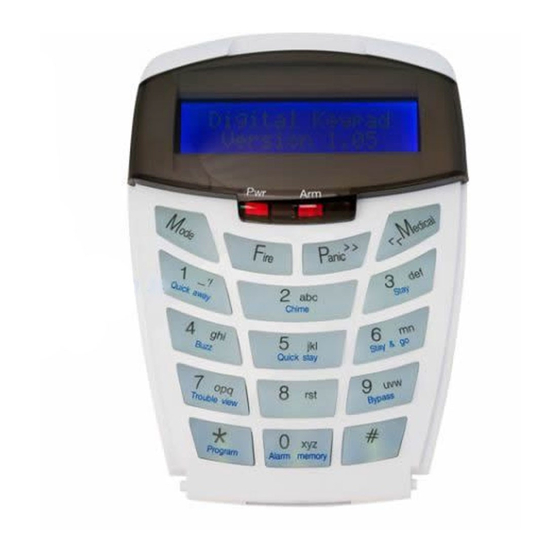
Alarm panel
Hide thumbs
Also See for X Series:
- Quick start manual ,
- Training manual (126 pages) ,
- Installer manual (72 pages)
Table of Contents
Advertisement
Quick Links
XSeries Alarm Panel
Quick Start Guide
Thank You for choosing IDS to Protect You
Congratulations on your purchase of an IDS X-Series alarm
panel. IDS XSeries panels are powerful, versatile, and highly
configurable security systems, which should be installed by a
professionally trained installer.
This Quick Start Guide covers basic user functionality. Most
panel features are programmable only by an IDS-accredited
installer in possession of the INSTALLER CODE and are
identified with this symbol.
Advanced User Functions, identified with this symbol () are
covered in the X-series Advanced User Manual, available at
www.idsprotect.com.
IDS recommends using LCD keypads for all installations. For
information on operation with LED keypads refer to the
Advanced User Manual.
Understanding Alarm Panel Functions
Panel Status:
The alarm is either ARMED or DISARMED.
When DISARMED, the alarm is NOT READY when a zone is
violated. The alarm cannot be armed.
When disarmed, the alarm is READY when all zones are closed.
The alarm can be armed.
Entering Data:
Press [*] to enter data
[#] to exit programming / menu or to clear data
Successful data entry – single extended keypad beep
Failed entry – triple keypad beep
Setting Date and Time
The Panel EVENT LOG, as well as some features depend on the
panel having an accurate date and time. The panel can lose
date and time if a power failure is longer than the backup
battery life.
Setting the Time
Hold [*] until BEEP; enter [MASTER CODE] [*] [40] [*] [TIME]
[*] [#]
Note: Time format is MMSS
Setting the Date
Hold [*] until BEEP; enter MASTER CODE [*] [41] [*] [DATE] [*]
[#]
Note: DATE format is DDMMYY
Emergency Alarms
Emergency alarms can be triggered:
-
on the keypad by holding [F] for fire, [P] for panic, or [M]
for medical, or
-
Via Fixed Panic Buttons installed by the alarm installer, or
-
Via an IDS remote transmitter, holding down any button
for 3 seconds or a dedicated button.
Arming & Disarming your Alarm
X-series panels provide multiple arming methods and modes to
suit your lifestyle.
Away Arm
Use AWAY ARM when you are leaving the premises, all zones
are armed and entry / exit zones will give the delay when
exiting & entering.
To away arm:
1.
Enter USER CODE or hold down [1] until keypad beeps
2.
Exit premises via entry/exit zone before exit delay beep
sequence completes
Stay Arm
Use STAY ARM when you want some zones armed and others
to be ignored if violated. Stay zones are automatically bypassed
with no exit or entry delay.
1.
Select your stay profile. (Up to 4 profiles available)
Hold [MODE] until "beep", enter [2] [*] [PROFILE
NUMBER] [*]
2.
Hold the [5] key until the "beep". (Holding [5] down again
will switch to the next profile.
ADVANCED OPTIONS: Create and customise Stay Profiles,
allocate zones to Stay Profiles, create BUZZ zones
Stay & Go
Use STAY AND GO when wanting to stay arm but also activate
the entry & exit delays.
1.
Hold [6] until BEEP
2.
Exit premises via an entry/exit zone before exit delay
beep sequence completes
Disarm
1.
Enter through nominated entry/exit zones
Note: Enter USER CODE before countdown is complete
Remote Arm / Disarm
Use your remote transmitter to arm / disarm by pressing the
programmed button
ADVANCED OPTIONS: Buttons can be designated different
functions or to partitions
700-678-03A
Bypassing Zones
Bypass a zone to prevent it triggering an alarm when armed
1.
Confirm panel is DISARMED
2.
Hold [9] till BEEP, [ZONE NO] [*] [ZONE NO] [*] etc. (A
user code may be needed if the option is enabled)
Note: Bypassed zones will be cleared when system is disarmed
Panic zones can be bypassed only if programmed version 2.3.
Chime Zones
The keypad will chime when a CHIME ZONE is violated while
the panel is DISARMED
To setup chime zones:
Hold [2] until BEEP, [ZONE NO] [*]
Note: Used for sensitive areas as an early warning.
Viewing Panel Information
View Alarm Memory
View zones that were violated, bypassed, or tampered during
the last arm cycle
1.
If ARM LED is flashing, there are events in ALARM
MEMORY
2.
Confirm panel is DISARMED
3.
Hold [0] till beep
4.
Press [1] [*] to view violated zones
5.
Press [2] [*] to view bypassed zones
6.
Press [3] [*] to view tampered zones
7.
Press [6] [*] to view event log.
Note: ALARM MEMORY is cleared with next ARM cycle
Adjust Keypad Buzzer Volume
1.
Hold [#] WITH any key from [0] to [6] for 1 second
Key Entry
Buzzer Sound
Key Entry
[#] [3]
Loud (default)
[#] [6]
[#] [2]
Medium
[#] [5]
[#] [1]
Soft
[#] [4]
[#] [0]
Click
Working with Stay Profiles
STAY PROFILES enable a user to ARM while bypassing
programmed zones. This is useful when users are in the
premises, but want some zones armed.
Creating Stay Profiles
STAY ZONES are automatically bypassed when a panel is STAY
ARMED. STAY ZONES are allocated to one of four STAY
PROFILES.
1.
Select the desired STAY PROFILE.
2.
Hold [MODE] until beep [2] [*] [PROFILE NUMBER] [*]
3.
Allocate STAY ZONE. Hold [3] until BEEP, ZONE NO [*]
Buzzer Sound
2kHz (High)
1kHz (Medium)
440Hz (Low)
Advertisement
Table of Contents

Related Manuals for IDS X Series


Summary of Contents for IDS X Series
- Page 1 Via Fixed Panic Buttons installed by the alarm installer, or Congratulations on your purchase of an IDS X-Series alarm Note: Bypassed zones will be cleared when system is disarmed Via an IDS remote transmitter, holding down any button panel.
- Page 2 Numbers will be displayed once all the letters Hold [MODE] till BEEP, then [1] [*] [PARTITION NUMBER] [*] Call an IDS-certified installer out to resolve the trouble listed on the key have been displayed. Arm a Specific Partition...
Need help?
Do you have a question about the X Series and is the answer not in the manual?
Questions and answers