Table of Contents
Advertisement
Quick Links
Advertisement
Table of Contents

Related Manuals for Jung LB Management


Summary of Contents for Jung LB Management
- Page 1 LB Management...
- Page 2 2 COMPANY Ernst Paris Company founder Albrecht Jung...
- Page 3 COMPANY 3 Progress as tradition. Every day. When Albrecht Jung founded his company in 1912, three things were already important to him: progress, quality and design. These principles have characterised JUNG to date and are no- ticeable and can be experienced in all parts of the company.
- Page 4 4 PREFACE...
- Page 5 PREFACE 5 Preface For more than 100 years, the name JUNG has stood for com- ponents and systems that are impressive due to modern technology, sophisticated design and wide functional diversity. Living is now even more comfortable, secure and energy-effi- cient with the new LB Management system.
-
Page 6: Table Of Contents
6 CONTENTS THE JUNG LB MANAGEMENT Mix-up Protection Easy to install Backwards Compatibility Intuitive operation LB MANAGEMENT LIGHT Clear advantages Equipment Overview USAGE SCENARIOS Switching and button operation Single Family House 4.2.1 Components 2.1.1 Hands-free lighting 4.2.2 Definitions 2.1.2 Alarm function 4.2.3 Switches as master and satellite units 82... - Page 7 5.4.3 Connecting satellite units 6.4.8 Display setpoint and actual CONTENTS 7 temperature or current time 5.4.4 Integrating device in group control 129 THE CLEVER CONFIG APP 5.4.5 Connecting wind sensor Operation made easy Functionality depending on the attachment 7.1.1 Switching and dimming lights Blind types 7.1.2 Controlling shading...
- Page 8 8 THE JUNG LB MANAGEMENT The JUNG LB Management Easy to install Intuitive operation Clear advantages...
- Page 9 THE JUNG LB MANAGEMENT 9...
-
Page 10: The Jung Lb Management
It is possible to control the LB Manage- ment manually on the device, automatically using sensors and/or timers and using the JUNG smart phone app. The easy to install inserts have a low installation depth – this makes the mounting easier and shortens the installation times. - Page 11 THE JUNG LB MANAGEMENT 11...
-
Page 12: Easy To Install
12 THE JUNG LB MANAGEMENT Easy to install The installation of the LB Management components is now even easier. The low installation depth of the inserts provides more space for the wiring. The galvanised steel supporting plate creates sufficient stability. The enclosed mounting claws enable easy and quick installation and ensure a secure hold in the flush-mounted box and cavity wall box. - Page 13 THE JUNG LB MANAGEMENT 13 The commissioning is particularly reliable due to the plug-in attachments with stable retaining springs made of stainless steel. Mix-up protection signals by LED or using the display if the attachment has been plugged in to the wrong insert, e.g.
-
Page 14: Intuitive Operation
14 THE JUNG LB MANAGEMENT 1.2 Intuitive operation In addition to the manual operation, the Bluetooth compo- nents of the new LB Management system are conveniently operated and configured using a smart phone with the JUNG Clever Config App. - Page 15 THE JUNG LB MANAGEMENT 15...
-
Page 16: Clear Advantages
Use of Bluetooth technology; therefore own WLAN is not required. Colour and material of the attachments can be selected from the extensive JUNG range. All inserts can be freely combined with the JUNG attachments in the AS, A, CD and LS ranges. Low installation effort saves time and money. - Page 17 THE JUNG LB MANAGEMENT 17...
-
Page 18: Usage Scenarios
18 USAGE SCENARIOS 2. Usage scenarios 2.1 Single Family House Hands-free lighting Alarm function Automatic light for the guest toilet Light and automatic ventilation for the guest toilet Temperature control in the bath room Convenient lighting control with satellite units... - Page 19 USAGE SCENARIOS 19 Lighting control with satellite units and 2-gang touch dimmer Automatic shading in the case of strong sunlight Shade complete areas using group control Automatic shading control with Lock-out protection Presence simulation...
-
Page 20: Hands-Free Lighting
Coming home in the dark and the hall light switches on automatically. You can set up this func- tion in no time using a JUNG automatic switch or ceiling observer / presence detector. In the case of long or angled hallways, you extend the detection area easily with a 3-wire satellite unit and another automatic switch. -
Page 21: Alarm Function
USAGE SCENARIOS 21 2.1.2 Alarm function The automatic switching becomes a watchdog with a tap in the JUNG Clever Config app. The activated alarm function detects movement by persons and makes the lighting flash. Burglars are unsettled and deterred. If required, the light signal also makes neighbours aware. -
Page 22: Automatic Light For The Guest Toilet
Would you like further added value? How about if the radio also plays music? This is not a problem with the JUNG Smart Radio! The movement detector switches off lighting and radio again automatically if movement is no longer detected. -
Page 23: Light And Automatic Ventilation For The Guest Toilet
USAGE SCENARIOS 23 2.1.4 Light and automatic ventilation for the guest toilet After manual operation of the light switch, the fan is switched on for a certain time and switched off again automatically. The fan switches on three minutes after switching off the lighting. The programmable shut-off delay ensures the best possible air circulation. -
Page 24: Temperature Control In The Bathroom
24 USAGE SCENARIOS 2.1.5 Temperature control in the bathroom With the JUNG Standard room thermostat, you control your bathroom temperature not only via intelligent time programs (daytime reduction, night-time reduction) but also individually as required, for example via the short-term timer. For even more comfort, an external room temper- ature sensor and a floor temperature sensor can be connected. -
Page 25: Convenient Lighting Control With Satellite Unit
USAGE SCENARIOS 25 2.1.6 Convenient lighting control with satellite unit Getting up again to switch off the main lighting in the bedroom? You add further control points to the master unit using the 2-wire satellite unit. The range of functions is predefined by the master unit. Would you like even more comfort? The bedroom lighting can be dimmed with the Universal Touch Dimmer as master unit. -
Page 26: Convenient Lighting Control With Satellite Units
26 USAGE SCENARIOS 2.1.7 Convenient lighting control with satellite units Control the lighting in the bedroom without getting up? You add further control points to the master unit using the 3-wire satellite unit. You can thus also conveniently switch the lamp on the other side of the bed. -
Page 27: Switching Complete Areas Using Group Control
USAGE SCENARIOS 27 2.1.8 Switching complete areas using group control Using the Universal blinds insert, you cascade the shading so that the blinds can be controlled flexibly individually, per room, per floor or per building — individually and conveniently. One Universal blinds insert controls one or more shading motors , another Universal blinds insert compiles multiple controls to a group. -
Page 28: Automatic Shading In The Case Of Strong Sunlight
28 USAGE SCENARIOS 2.1.9 Automatic shading in the case of strong sunlight You shade your living area comfortably and time-controlled with the JUNG timer attachments. Thanks to the astro function, nobody has to think any more about the programming or any changeover to summer or winter time. -
Page 29: Lock-Out Protection
USAGE SCENARIOS 29 2.1.10 Lock-out protection Have you thought of everything? Can the shading be controlled individually, does it shade automatically in the case of strong sunlight and does it follow the astro function daily? We think a step further for you: With the practical lock-out prevention, you prevent the shutters closing automatically while there is still somebody present outdoors. -
Page 30: Presence Simulation
30 USAGE SCENARIOS 2.1.11 Presence simulation With the JUNG presence simulation, the house or apartment has the effect of being occupied when the occupants are not at home. In normal operation, the individual switching times of the last 24 hours are stored permanently in the automatic switch. The oldest ones are overwritten if there are more than 60 switching operations. - Page 31 USAGE SCENARIOS 31 USAGE SCENARIOS 31 Casa Fonte Boa, Portugal Photos: Jose Campos...
-
Page 32: Office Building
32 USAGE SCENARIOS 2.2 Office building Daylight-linked lighting control in the entrance area Automatic staircase light (conversion) Lighting and shade as required in the meeting room Individual presence detector with constant light function Semi-automatic lighting with energy saving function... - Page 33 USAGE SCENARIOS 33...
-
Page 34: Daylight-Linked Lighting Control In The Entrance Area
The entrance area of office buildings is generally particularly busy at the start and end of work. With the JUNG LB Management, you adjust the lighting control using the Clever Config app by the combination of different functions and time programs: At the start of work, the lighting switches to CONTINUOUS ON from 08:00 to 10:00 with a brightness of 80 percent. -
Page 35: Automatic Stairwell Light (Conversion Of Existing Stairwell Relay Circuits)
2.2.2 Automatic stairwell light (conversion of existing stairwell relay circuits) With the JUNG LB Management, you bring more security and convenience into the stairwells without having to install new cables. Because, with the combination of pulse insert, automatic switch and stairwell timer, you simply build on the existing cable structure (3-wire or 4-wire sys- tem). -
Page 36: Light And Shade As Required In The Meeting Room
36 USAGE SCENARIOS 2.2.3 Light and shade as required in the meeting room Never again too bright for a presentation; never again too dark for a meeting. With the combination of light and shading control, you comfortably adapt the light conditions to the current need by tapping buttons in the Clever Config app. -
Page 37: Individual Presence Detector With Constant Light Function
If an office is not occupied, the lighting is also switched off. The desired brightness and other settings can be adjusted individually using the JUNG Clever Config app. Comfortably via Bluetooth, without having to set up a ladder. Also sub- sequently. And completely without network. -
Page 38: Semi-Automatic Light With Energy Saving Function
There are rooms in which the light is always on although nobody is present. The problem is already solved with the simplest LB Management switch insert. The 1-channel relay switch insert has an integrated and adjustable delay time, after which the light is automatically switched off as required. -
Page 39: Display Window
USAGE SCENARIOS 39 2.2.6 Display window Would you like to illuminate your display window during darkness more efficiently using a time control? Using the memory function of the Universal centre plate, you set the lighting in your display window to CONTINUOUS ON for the period from 17:00 to 24:00. As the manual operation always has priority over the automatic operation, you can of course switch the light on or off at any time manually using the left rocker. -
Page 40: Switch Restaurant Lighting Centrally
40 USAGE SCENARIOS 2.2.7 Switch restaurant lighting centrally As owner of a restaurant or tavern, do you want to switch your lighting centrally from one place and not have to constantly operate multiple switches in various areas? Using the Dimmer for rail mounting, you switch and dim the complete lighting installation using the Standard centre plate on 2-wire satellite unit. -
Page 41: The Hotel Corridor - Check-In And Arrival
Basic lighting is required in hotel corridors. The ceiling observer / presence detector in combina- tion with dimmers from the JUNG LB Management provides this function and even more: When a guest enters the detection area, the lighting in the hotel corridor switches from the preselected basic brightness (40 percent) to the switch-on brightness (100 percent) and the guest walks to his hotel room in the light. - Page 42 42 EQUIPMENT OVERVIEW Equipment Overview Inserts Attachments Combination Possibilities Satellite Units Mix-up Protection Backwards Compatibility...
- Page 43 EQUIPMENT OVERVIEW 43...
-
Page 44: Equipment Overview
44 EQUIPMENT OVERVIEW 3. Equipment Overview Completely in accordance with the modular principle, the LB Management system provides different inserts and attachments that can be combined for individual control of lighting and shade. -
Page 45: Inserts
EQUIPMENT OVERVIEW 45 3.1 Inserts INSERTS LIGHT SHADE TEMPERATURE REFERENCE CONTROL NUMBER Standard blinds insert 1730 JE Universal blinds insert 1731 JE Relay switch insert 1-channel 1701 SE Electronic switch insert 1-channel 1704 ESE ... -
Page 46: Combination Possibilities
46 EQUIPMENT OVERVIEW 3.3 Combination Possibilities The following table shows you which inserts and attachments of the JUNG LB Management System can be combined with each other. CENTRE PLATE STANDARD UNIVERSAL STANDARD UNIVERSAL BLINDS INSERT 2-GANG CENTRE PLATE TIMER TIMER... - Page 47 EQUIPMENT OVERVIEW 47 eNET AUTOMATIC AUTOMATIC AUTOMATIC AUTOMATIC CEILING STANDARD RADIO SWITCH 1.1M SWITCH 2.2 M SWITCH 1.1M SWITCH 2.2 M OBSERVER / ROOM CENTRE PLATE BLINDS INSERT BLINDS INSERT UNIVERSAL UNIVERSAL PRESENCE THERMOSTAT DETECTOR WITH DISPLAY ...
-
Page 48: Satellite Units
− The maximum total cable length is 100 metres. 3.5 Mix-up Protection Our intelligent attachments in the JUNG LB Management system can detect whether they have been placed again on the same insert type or even on the identical insert after they have been removed and collected in a carton, for example for renovation of the inserts. -
Page 49: Backwards Compatibility
− 3-wire Lighting Management satellite units can no longer be used and must be replaced with inserts and attachments from the new LB Management system. The master units must also be replaced with master units from the LB Management system. - Page 50 50 LB MANAGEMENT LIGHT LB Management Light EQUIPMENT OVERVIEW AUTOMATIC LIGHT 4.4.1 Components SWITCHING AND BUTTON OPERATION 4.4.2 Operating modes and functions 4.2.1 Components Observer operating mode 4.2.2 Definitions Presence detection operating mode Switch Continuous On function Button Continuous Off function Delay time 0.5 –...
- Page 51 LB MANAGEMENT LIGHT 51...
-
Page 52: Lb Management Light
52 LB MANAGEMENT LIGHT 4. LB Management Light 4.1 Equipment Overview INSERTS REFERENCE NUMBER Mini universal dimmer LED 1724 DM Universal dimmer LED built-in 1724 DEB Standard rotary dimmer LED 1730 DD Universal rotary dimmer LED 1731 DD 3-wire rotary satellite unit... - Page 53 LB MANAGEMENT LIGHT 53 Relay switch insert 1-channel The 1-channel relay switch insert switches different lamps, e.g. LED, halogen bulbs or fluorescent lamps. Using the operating mode selection button (BAWT) with LED indicator, you can conveniently set delay times if desired. The switch insert can be installed in a commercially available device socket (e.g.
- Page 54 54 LB MANAGEMENT LIGHT Relay switch insert 2-channel The 2-channel relay switch insert switches different lamps, e.g. LED, halogen bulbs or fluorescent lamps, also the programma- ble ventilation. Using the operating mode selection button (BAWT) with LED indicator, you can conveniently set delay times if desired.
- Page 55 LB MANAGEMENT LIGHT 55 Electronic switch insert The electronic switch insert is optimised for 230 V LED lamps. It also switches incandescent lamps, high-voltage halogen bulbs, dimmable inductive transformers or Tronic transformers with halogen lamps. The integrated soft start is particularly gentle on lamps here.
- Page 56 − Operation with the 1208 REG stairwell timers for rail mounting − Can be combined with the Standard centre plate, movement detectors and ceiling observers/ presence detectors from LB Management − Retriggering of the delay time by repeated operation of the centre plate and/or by repeated acquisition by the presence detector −...
- Page 57 LB MANAGEMENT LIGHT 57 Standard touch dimmer LED You can switch and dim the lighting with the Standard touch dimmer LED. As an LED dimmer, the dimmer specifically sets itself automatically to leading edge or trailing edge phase con- trol. The dimmer is implemented as 2-wire / 3-wire device and is supplied with 230 V mains power.
- Page 58 58 LB MANAGEMENT LIGHT Universal touch dimmer LED You can switch and dim the lighting with the Universal touch dimmer LED. As LED dimmer, you can set it specifically to leading or trailing edge phase control. The dimmer is implemented as 2-wire / 3-wire device and is supplied with 230 V mains power.
- Page 59 LB MANAGEMENT LIGHT 59 2-gang touch dimmer Universal LED You can switch and dim lighting with the 2-gang touch dimmer Universal LED. As LED dimmer, you can set it specifically to lead- ing or trailing edge phase control. The dimmer is implemented as 2-wire / 3-wire device and is supplied with 230 V mains power.
- Page 60 Using the 1-channel Power DALI push-button controller TW insert, you control luminaires with DALI interface and DALI ballasts. The operation is performed using the JUNG centre plates or timers and/or using automatic switches and ceiling Seiling observers / presence detectors.
- Page 61 LB MANAGEMENT LIGHT 61 Mini universal dimmer LED You can switch and dim incandescent lamps, HV halogen lamps and electronic or dimmable inductive transformers for halogen or LED lamps using the Mini Universal Dimmer LED. The Mini Universal Dimmer LED is operated using a 2-wire satellite unit with button attachment, push-buttons with normally open contact or the 3-wire rotary satellite unit.
- Page 62 62 LB MANAGEMENT LIGHT Universal dimmer LED built-in You can switch and dim incandescent lamps, HV halogen lamps and electronic or dimmable inductive transformers for halogen or LED lamps using the Universal Dimmer LED built-in. The Mini Universal Dimmer LED built-in is operated using a 2-wire satellite unit with button attachment, push-buttons with normally open contact or the 3-wire rotary satellite unit.
- Page 63 LB MANAGEMENT LIGHT 63 Standard rotary dimmer LED You switch and dim the LEDs using the Standard Rotary Dimmer LED. The switching on is performed by soft start that is gentle on the lamp, and the operation of the device is also possible without a neutral conductor.
- Page 64 64 LB MANAGEMENT LIGHT Universal rotary dimmer LED You switch and dim LEDs using the Universal Rotary Dimmer LED. The operation of the device is also possible without a neu- tral conductor. You can also connect satellite units to the rotary universal dimmer.
- Page 65 LB MANAGEMENT LIGHT 65 3-wire rotary satellite unit You control the Universal Rotary Dimmer LED and the Mini Universal Dimmer LED with the rotary satellite unit. The 3-wire rotary satellite unit is mounted in device sockets according to DIN 49073 with an appropriate cover.
- Page 66 − Can only be combined with the Standard centre plate − Low-cost control point − Installation of other control points for the control of LB Management Light − Any number of 2-wire satellite units can be connected to a master unit −...
- Page 67 LB MANAGEMENT LIGHT 67 Universal dimmer for rail mounting LED Switch and dim the lighting in your house using the dimmer for rail mounting. The major benefit: You do not have to lay any new cables for a renovation, but attach directly to the existing installation.
- Page 68 68 LB MANAGEMENT LIGHT Dimmer power booster for rail mounting LED Using the dimmer power booster for rail mounting, you ex- pand dimmers modularly depending on power requirements. Many different power boosters can be connected depending on the dimmer. You can also conveniently switch and dim large LED loads.
- Page 69 LB MANAGEMENT LIGHT 69 Standard automatic switch 1.1 m The automatic switch controls the lighting in interior rooms depending on movement. If motion is detected in the detection area, it switches on the lighting automatically and off again after expiry of a delay time of two minutes – convenient and energy-saving.
- Page 70 70 LB MANAGEMENT LIGHT Standard automatic switch 2.2 m The automatic switch controls the lighting in interior rooms depending on movement. If motion is detected in the detection area, it switches on the lighting automatically and off again after expiry of a delay time of two minutes – convenient and energy-saving.
- Page 71 LB MANAGEMENT LIGHT 71 Universal automatic switch 1.1 m The automatic switch controls the lighting in interior rooms depending on movement. If motion is detected in the detec- tion area, it switches on the lighting automatically and off again after expiry of a specified delay time – convenient and energy-saving.
- Page 72 72 LB MANAGEMENT LIGHT Universal automatic switch 2.2 m The automatic switch controls the lighting in interior rooms depending on movement. If motion is detected in the detec- tion area, it switches on the lighting automatically and off again after expiry of a specified delay time – convenient and energy-saving.
- Page 73 LB MANAGEMENT LIGHT 73 Ceiling observer/presence detector The ceiling observer / presence detector controls the lighting in interior rooms depending on movement. If motion is detected in the detection area, it switches on the lighting automatically and off again after expiry of a specified delay time – conven- ient and energy-saving.
- Page 74 74 LB MANAGEMENT LIGHT Standard centre plate The Standard centre plate is a 1-channel attachment for all LB Management inserts. It can be actuated at the top, bottom and also full surface. Overview of the functions: − Lighting control using appropriate inserts −...
- Page 75 LB MANAGEMENT LIGHT 75 Universal centre plate The Universal centre plate with memory and lock-out functions is a 1-channel attachment for all inserts. The attachment consists of a divided rocker that looks like a 2-gang rocker. A coloured LED is assigned to each rocker half that is used for the function display, status display and as pilot light.
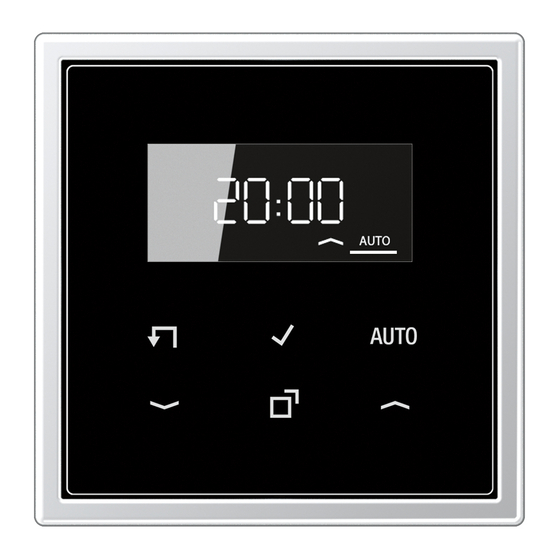
- Page 76 Standard timer with display The standard timer with display is a 1-channel timer for all inserts. It consists of a genuine glass surface in the typical JUNG design with a backlit display and six operating buttons. Overview of the functions: −...
- Page 77 (0 – 100 percent blind height of the slats for blind inserts; On/Off for a relay insert) − Lock function: Deactivation of automatic functions, satellite units and time schedules − Operation of the LB Management inserts via Clever Config app with status feedback in values (0 – 100 percent, On/Off) −...
- Page 78 The eNet Radio centre plates are available as full surface and 2-gang rocker. It is an attachment for all switching and dimming inserts or 3-wire satellite units from LB Management Light. The at- tachment consists of a divided rocker that looks like a 2-gang rocker. The rocker can be actuated at the top, bottom and also full surface.
- Page 79 LB MANAGEMENT LIGHT 79 Can be adjusted with the eNet Server (depending on insert): − Slat reversal time / fabric tightening time, reversal time for change of direction, − Direction of travel can be inverted − Operating locks − Deactivate satellite unit evaluation −...
-
Page 80: Switching And Button Operation
80 LB MANAGEMENT LIGHT 4.2 Switching and button operation LB Management provides switch and pulse inserts for the simple switching of lighting. All our inserts are functional without attachment. The setting of the inserts also functions with the oper- ating mode selector if no attachment is attached. -
Page 81: Definitions
LB MANAGEMENT LIGHT 81 4.2.2 Definitions SWITCH A device of the electrical installation with an operating element that is actuated by pressing, turning or tilting. The electrical contact is closed by any actuation and remains in this state until the operating element is actuated again. -
Page 82: Switches As Master And Satellite Units
− A 230 V installation button as normally open contact − A 2-wire LB satellite unit with centre plate − A 3-wire LB satellite unit with any of the LB Management attachments 4.2.4 Installation and settings Our switch inserts and pulse inserts already provide functions to automate the lighting. The following chapter gives an overview of the installation steps and the configurable operating modes and functions. -
Page 83: Electronic Switch Insert
LB MANAGEMENT LIGHT 83 Note the following for the installation: − Illuminated buttons must have a separate N terminal. − Do not attach or replace the attachment under voltage, otherwise a malfunction can occur. Proceed as follows to set the delay time: Press and hold the TEST button for longer than four seconds. - Page 84 84 LB MANAGEMENT LIGHT You can set the following operating modes: Universal, R, L, C, LED − Factory defaults − Automatic calibration to the load, trailing edge phase control, leading edge phase control or LED leading edge phase control − Load type: −...
-
Page 85: Pulse Insert
LB MANAGEMENT LIGHT 85 PULSE INSERT The pulse insert is exclusively used for the establishment of stairwell light controls. The pulse in- sert gives control signals for this to a stairwell timer for rail mounting that switches the stairwell light centrally. -
Page 86: Dimming
86 LB MANAGEMENT LIGHT 4.3 Dimming A lighting system is initially always designed for the maximum required brightness. However, in practice there is the requirement in many situations to reduce the lighting and adapt to the individual needs. Dimmed light improves the lighting and living quality, creates individual lighting conditions in everyday working and makes a significant contribution to energy saving. -
Page 87: Installation And Settings
LB MANAGEMENT LIGHT 87 4.3.2 Installation and settings Connecting and installing dimmer for rail mounting Dimmer for rail mounting Lighting 2-wire satellite unit 3-wire satellite unit Installation button AC 230 V 16 A Connecting and installing dimmer for rail mounting and power booster for rail mounting... - Page 88 88 LB MANAGEMENT LIGHT You can set the following operating modes: Universal, R, L, C, LED − Factory defaults − Automatic calibration to the load, trailing edge phase control, leading edge phase control − Load type: − Incandescent lamps − HV halogen lamps −...
-
Page 89: Dimmability Of Light Sources
LB MANAGEMENT LIGHT 89 4.3.3 Dimmability of light sources INCANDESCENT LAMPS The incandescent lamp is a so-called “thermal radiator”. Current flows in the incandescent lamp through a thin thread that consists of conductive material – the filament. The filament is heated until it radiates yellow or white light. -
Page 90: Dimming Principles
90 LB MANAGEMENT LIGHT 4.3.4 Dimming principles LEADING EDGE PHASE CONTROL In the case of the leading edge phase control principle, the dimmer blocks the current to the lamp at the beginning of every sine half-wave. It is not conductive. The electronic switch in the dimmer is not switched through until after expiry of a configurable delay time and the connect- ed lamps are energised. -
Page 91: Installation-Related Power Reduction
LB MANAGEMENT LIGHT 91 The trailing edge phase control principle is suitable for all incandescent lamps and loads with capacitive input behaviour, e.g. electronic transformers. There are also LED laps that are only suitable for the trailing edge phase control principle. For example, these are lamps that have a capacitor on the input side (e.g. - Page 92 92 LB MANAGEMENT LIGHT For installation of multiple dimmers above or next to each other Reduction for the outer devices by 10 percent and by 20 percent for the inner devices Example: Installation of 3 dimmers, each with 500 watts, in a multiple combination...
-
Page 93: Setting Operating Mode And Basic Brightness
LB MANAGEMENT LIGHT 93 4.3.6 Setting operating mode and basic brightness All our LB Management dimmers measure the characteristic of the connected load automatical- ly and then select the best suitable dimming principle themselves. For capacitive and ohmic loads,trailing edge phase control is usually set; for inductive loads leading edge phase control. - Page 94 94 LB MANAGEMENT LIGHT Proceed as follows to set the operating mode and the basic brightness: − First, ensure that the load is switched off. TOUCH DIMMER ROTARY DIMMER MINI UNIVERSAL DIMMER LED UNIVERSAL 1711 DE UNIVERSAL 1731 DD 1724 DM...
-
Page 95: Dali
LB MANAGEMENT LIGHT 95 4.3.7 DALI DALI stands for “Digital Addressable Lighting Interface” and is a standard for the digital data transmission between components of a lighting system. DALI was developed at the beginning of the 21 century and has largely replaced the 1-10-V technology in buildings. The objective was the creation of an easy to use interface in a system with low component costs. - Page 96 96 LB MANAGEMENT LIGHT Earth conductor and neutral conductor must be present for a 5-core cable. The connected nodes may be connected to any phases. The wiring of the DALI nodes can be performed as series or star wiring or as mixed networking.
-
Page 97: Tips For The Planning Of Dimmers For Led Lamps
LB MANAGEMENT LIGHT 97 4.3.8 Tips for the planning of dimmers for LED lamps SELECTING LAMPS Ensure that the LED lamps can be dimmed. Preferably only install lamps of the same manufacturer and from the same batch (same date of manufacture) in a system. -
Page 98: Assistance In The Event Of Problems
98 LB MANAGEMENT LIGHT 4.3.9 Assistance in the event of problems PROBLEM CAUSE REMEDY Connected LED or compact Specified basic brightness is − Increase basic brightness. fluorescent lamps switch off in too low. the lowest dimming position or flicker. Connected lamps do not Specified basic brightness is −... - Page 99 LB MANAGEMENT LIGHT 99 PROBLEM CAUSE REMEDY Dimmer has switched off and Overtemperature protection − Disconnect dimmer from cannot be switched on again. has tripped. mains power supply, also switch off circuit breaker. − LED trailing edge phase control: Reduce connected load;...
-
Page 100: Automatic Light
Or you design more complex installations, in which the tripping of a movement de- tector switches other automatic switches or ceiling observers / presence detectors independently of the brightness. JUNG ceiling observers / presence detectors can be used as observers and as presence detectors. -
Page 101: Components
LB MANAGEMENT LIGHT 101 4.4.1 Components INSERTS REFERENCE NUMBER Relay switch insert 1-channel 1701 SE Relay switch insert 2-channel 1702 SE Electronic switch insert 1-channel 1704 ESE Standard touch dimmer LED 1710 DE Universal touch dimmer LED 1711 DE 2-gang touch dimmer Universal LED... -
Page 102: Operating Modes And Functions
102 LB MANAGEMENT LIGHT 4.4.2 Operating modes and functions Our automatic switches and presence detectors / ceiling observers provide a variety of functions to automate the lighting conveniently and as needed. The following chapter gives an overview of the individual operating modes and functions. -
Page 103: Continuous On Function
LB MANAGEMENT LIGHT 103 CONTINUOUS ON FUNCTION The load is switched on manually and continuously until the function is deactivated again. With this function and using the Clever Config app or a switch on the device, you can prevent the movement detector not detecting any presence for stationary activities and switching off the lighting. -
Page 104: Presence Simulation Function
104 LB MANAGEMENT LIGHT PRESENCE SIMULATION FUNCTION In the recording mode (inactive mode), the switching processes in automatic mode that are tripped by presence of persons are recorded. The recorded switching processes are played in the playback mode. In doing so, the load in the playback mode is always only applied when the brightness condition (brightness <... -
Page 105: Constant Light Regulation Function
LB MANAGEMENT LIGHT 105 The device must be combined with a dimming insert to perform the night light function. The movement detector switches the light to the value of the night light brightness for all switch-on commands. The value is set to 20 percent at the factory and can be adjusted using the Clever Config app. -
Page 106: Setting Up Detection Areas
106 LB MANAGEMENT LIGHT 4.4.3 Setting up detection areas If a movement detector is supplied with mains power, it starts a calibration process of the envi- ronment for max. 60 seconds. In this time, no movement is detected and no switching command is accepted. -
Page 107: Ceiling Observer/Presence Detector
LB MANAGEMENT LIGHT 107 Options for limitation of the detection area The detection area of the automatic switches can be limited if required. This gives you more flexi- bility for the selection of the mounting location. A shutter that limits the detection area to an angle of 90° is included in the scope of delivery of the 1.1 m automatic switches. -
Page 108: Settings
108 LB MANAGEMENT LIGHT CREATION OF AN EXTENDED MONITORING ZONE If a room or property needs an extended monitoring zone, multiple movement detectors can be connected together. For this, you need a movement detector master unit (for example an LED Universal touch dimmer with 1.1 m Universal automatic switch or alternatively a presence detec-... -
Page 109: Pairing Universal Automatic Switches With Mobile Devices
4.4.5 Pairing universal automatic switches with mobile devices The universal automatic switches can be paired with a smart phone via Bluetooth. The commissioning and adjustment are child's play using the JUNG Clever Config app. Proceed as follows to pair the universal automatic switch with a mobile telephone: Activate the pairing mode on the device. - Page 110 110 LB MANAGEMENT SHADING LB Management Shading EQUIPMENT OVERVIEW WIND ALARM 5.7.1 Wind sensor ELECTRICAL CONNECTION Cup Anemometer 5.2.1 Connecting insert 5.7.2 Wind sensor interface 5.2.2 Requirements for the shading motor 5.7.3 Central wind alarm TIPS FOR OPERATION SUN PROTECTION FUNCTION 5.3.1 Moving blinds and slats...
- Page 111 LB MANAGEMENT SHADING 111...
-
Page 112: Lb Management Shading
The two blind inserts, Standard and Universal, can each be combined with the various covers: Standard centre plate, Universal centre plate, Standard Timer and Universal Timer. Produced in the diverse JUNG design, they can be selected to fit in with the rest of the electrical installation. - Page 113 The Standard blinds insert can control blinds, shutters and awnings. Overview of the functions: − Intelligent insert for operation with centre plate and timer from LB Management − Data-based bidirectional communication of attachments and inserts − Test operation without attachment is possible −...
- Page 114 Wind or brightness sensors can be connected for even more intelligent control. Overview of the functions: − Intelligent insert for operation with centre plate and timer from LB Management − Data-based bidirectional communication of attachments and inserts − Test operation without attachment is possible −...
- Page 115 LB MANAGEMENT SHADING 115 Standard centre plate The Standard centre plate is a 1-channel attachment for all LB Management inserts. It can be actuated at the top, bottom and also full surface. Overview of the functions: − Automatic shading control using appropriate inserts −...
- Page 116 Standard timer with display The standard timer with display is a 1-channel timer for all in- serts. It consists of a genuine glass surface in the typical JUNG design with a backlit display and six operating buttons. Overview of the functions: −...
- Page 117 On/Off for a relay insert) − Lock function: Deactivation of automatic functions, satellite units and time schedules − Operation of the LB Management inserts via Clever Config app with status feedback in values (0 – 100 percent, On/Off) −...
- Page 118 118 LB MANAGEMENT SHADING Bluetooth brightness / temperature sensor The Bluetooth brightness / temperature sensor is used for re- cording brightness and temperature values. It can be adhered on window panes without tools using an adhesive pad and is operated with a lithium battery. It is thus independent of the mains power supply and can be attached everywhere in the room without interfering cables.
- Page 119 The eNet Radio centre plates are available as full surface and 2-gang rocker. It is an attachment for all switching and dimming inserts or 3-wire satellite units from LB Management Light. The at- tachment consists of a divided rocker that looks like a 2-gang rocker. The rocker can be actuated at the top, bottom and also full surface.
- Page 120 120 LB MANAGEMENT SHADING Adjustable with eNet Server (depending on insert): − Slat reversal time / fabric tightening time, reversal time for change of direction − Direction of travel can be inverted − Operating locks − Deactivate satellite unit evaluation −...
-
Page 121: Electrical Connection
LB MANAGEMENT SHADING 121 5.2 Electrical connection The blind inserts have four terminals L, N, Up and Down for the control of a motor for the shading system. The Universal Blind Insert has two additional terminals 1 and 2 available for the connection of satellite units. -
Page 122: Requirements For The Shading Motor
122 LB MANAGEMENT SHADING 5.2.2 Requirements for the shading motor The motors used must be fitted with a limit switch (mechanical or electronic) that de-energises the motor in the limit position. The mains power for moving the shading is available here after switching through the relays. -
Page 123: Tips For Operation
LB MANAGEMENT SHADING 123 5.3 Tips for operation As well as the actual moving of the blinds, you can adjust slats if necessary depending on the blinds, and temporarily deactivate automatic or programmed switching processes using the lock function. You can also set an individual ventilation position, at which the blind stops auto- matically. -
Page 124: Reversal Time
124 LB MANAGEMENT SHADING SETTING VENTILATION POSITION Proceed as follows to set the ventilation position: Move blinds up. The blinds control switches off 2 minutes automatically after approx. 2 minutes. Press and hold button (> 1 second). Blind moves down. -
Page 125: Control Variants
LB MANAGEMENT SHADING 125 5.4 Control variants 5.4.1 Individual controller The simplest variant of the automatic shading control is the individual control. If there are only a few blinds to operate, the individual controller presents itself as low-cost variant. Individual controller INDIVIDUAL CONTROL max. -
Page 126: Group And Central Control
126 LB MANAGEMENT SHADING 5.4.2 Group and central control Group or central control is when individual blind inserts are interconnected via the satellite unit inputs. As only one satellite unit input is needed, group and central controls can only be realised with the Universal blinds insert. - Page 127 LB MANAGEMENT SHADING 127 Central control CENTRAL CONTROL GROUP CONTROL INDIVIDUAL CONTROL In the case of very large systems, for example in office buildings, all blinds can be controlled cen- trally. The entire system can be globally protected against storms if a wind sensor is connected. A group controller is installed on every floor and the respective master is centralised with a higher level master.
-
Page 128: Connecting Satellite Units
The LB Management satellite unit uses the same concept on both control points. Various operating concepts can also be combined with each other here, such as a Standard Timer and a Universal Centre Plate. -
Page 129: Integrating Device In Group Control
LB MANAGEMENT SHADING 129 5.4.4 Integrating device in group control Connect the blind inserts together with each other as follows for group control. Note: In doing so, the blind inserts can also be present on different phase conductors. Group control... -
Page 130: Connecting Wind Sensor
130 LB MANAGEMENT SHADING 5.4.5 Connecting wind sensor Wind sensors protect the blinds against destruction from high wind. If the wind sensor signals high wind, the blind is moved to a safe upper limit position and locked there until the specified threshold has been undercut again. -
Page 131: Functionality Depending On The Attachment
LB MANAGEMENT SHADING 131 5.5 Functionality depending on the attachment Function Standard Universal Standard Timer Universal timer eNet Standard centre plate centre plate Bluetooth Radio centre plate UP, DOWN, STOP operation Ventilation position can ... -
Page 132: Blind Types
Roller shutters are usually blinds that can be moved up and down using a strap or crank drive. Alternatively, the systems are equipped with a motor drive and are moved up and down with this. The JUNG LB Management is modern and convenient, and meets the following require- ments: −... -
Page 133: Selection Of The Attachment
LB MANAGEMENT SHADING 133 5.6.1 Selection of the attachment The selection of the attachment depends on the type of blind and on the desired range of func- tions. Overall, there are various different attachment types available. Standard Universal Standard Universal timer... -
Page 134: Wind Alarm
/ Wind strength Anemometer setting JUNG Art. No: 132 U WS Wind sensor with converter The wind sensor interface is the control gear of the cup cross. Depending on the level of the preselected wind speed, a floating output relay in the anemometer interface closes. A mains voltage of 230 V is applied to the satellite unit input 2 of the blind insert via this relay. -
Page 135: Central Wind Alarm
LB MANAGEMENT SHADING 135 5.7.3 Central wind alarm Thanks to the satellite unit principle of the LB Management, the anemometer can be used across all phases as central wind alarm for all blinds of an installation. Central control AC 230 V... -
Page 136: Sun Protection Function
136 LB MANAGEMENT SHADING 5.8 Sun protection function 5.8.1 Universal timer Bluetooth You can expand your Universal Timer Bluetooth individually with sensors. This makes your blind insert a complex and nevertheless easy to use switching centre for the shading system of the building. -
Page 137: Bluetooth Brightness / Temperature Sensor
LB MANAGEMENT SHADING 137 TEMPERATURE The evaluation of the temperature and brightness values is not performed in the brightness / temperature sensor but in the devices paired via Bluetooth. You specify a threshold for the temperature using the Clever Config app. The setting range of the threshold is 5 –... - Page 138 138 TEMPERATURE CONTROL Temperature Control EQUIPMENT OVERVIEW ELECTRICAL CONNECTION 6.2.1 Connecting insert FUNCTIONAL DESCRIPTION 6.3.1 Heating or cooling operating mode 6.3.2 Frost protection and temperature drop detection 6.3.3 Heating optimisation 6.3.4 Offset 6.3.5 Controller adjustment Two-point control Pulse width modulated control 6.3.6 Valve adjustment 6.3.7 Temperature sensor 6.3.8 Behaviour after power failure...
- Page 139 TEMPERATURE CONTROL 139...
-
Page 140: Temperature Control
Using the Standard display and the room thermostat insert with sensor connection, temperature control is technically very easy to implement. Produced in the diverse JUNG design, they can be selected to fit in with the rest of the electrical installation. - Page 141 With the room thermostat insert, you can control electric floor heating systems and electrothermal drives. The room thermo- stat insert is operated together with the room thermostat at- tachment of LB Management. An external sensor can also be connected to the room thermo- stat.
- Page 142 142 TEMPERATURE CONTROL Relay switch insert 1-channel The 1-channel relay switch insert switches different lamps, e.g. LED, halogen bulbs or fluorescent lamps. Using the operating mode selection button (BAWT) with LED indicator, you can conveniently set delay times if desired. The switch insert can be installed in a commercially available device socket (e.g.
- Page 143 TEMPERATURE CONTROL 143 Electronic switch insert The electronic switch insert is optimised for 230 V LED lamps. It also switches incandescent lamps, high-voltage halogen bulbs, dimmable inductive transformers or Tronic transformers with halogen lamps. The integrated soft start is particularly gentle on lamps here. The switch insert can be installed in a commercially available device socket (e.g.
- Page 144 The Standard display for room temperature control is an at- tachment for the room thermostat insert and the switch inserts from LB Management. It consists of a genuine glass surface in the typical JUNG design with a backlit display and six operating buttons.
-
Page 145: Electrical Connection
TEMPERATURE CONTROL 145 6.2 Electrical connection The room thermostat insert has six terminals N, L, heating (output), C (cooling input, 2x external sensor connection for external temperature measurement and for switching from heating to cooling. The outer conductor is connected to L and the neutral conductor to N. The connector for cooling is connected to C, and the connector for heating is connected to heating. -
Page 146: Functional Description
146 TEMPERATURE CONTROL Connect the room thermostat insert according to the wiring diagram. Mount the insert in a wall box. In doing so, the connection terminals must be facing down. Sufficient connection space remains thanks to its installation depth of only 24 mm. Attach the frame and attachment to the insert. -
Page 147: Heating Optimisation
TEMPERATURE CONTROL 147 6.3.3 Heating optimisation Heating of the room starts a maximum of four hours before the switching time, so that the desired temperature in the room is reached when the switching time is reached and the heating process does not have to be started first. The OPT symbol in the display of the attachment flashes during the heating phase. -
Page 148: Temperature Sensor
148 TEMPERATURE CONTROL 6.3.7 Temperature sensor The room thermostat attachment has a built-in temperature sensor which is used to measure the room temperature. In combination with a room thermostat insert, an external sensor can be connected, which is used either to measure the room temperature or to limit the maximum floor temperature. The following settings are possible: The room temperature is measured by the internal temperature sensor. -
Page 149: Factory Settings
TEMPERATURE CONTROL 149 6.3.9 Factory settings The following settings are stored as factory settings on the standard display: − Times for comfort and ECO temperature MON – FRI SAT – SUN COMFORT COMFORT 06:00 08:30 07:00 22:00 12:00 14:00 17:00 22:00 −... -
Page 150: Programming Menu Overview
150 TEMPERATURE CONTROL 6.4.2 Programming menu overview TEMP LOCK Tap the Menu button to open the programming menu or to exit the programming menu. Tap the Plus or Minus button to reach the desired functions. Tap the OK button to confirm your selection. The following menu items can be selected in the programming menu: −... -
Page 151: Set Operating Lock
TEMPERATURE CONTROL 151 6.4.3 Set operating lock An active operating lock prevents operation directly at the attachment. The operating lock on the attachment can be activated as follows: Tap the Menu button. LOCK flashes on the display. Tap the OK button. NO flashes on the display. -
Page 152: Set Date And Time
152 TEMPERATURE CONTROL 6.4.5 Set date and time The date and time that should be shown on the display can be set as follows: Tap the Menu button. Select SET. Tap the OK button to confirm the selection. The year now flashes on the display. Tap the Plus or Minus button to change values for date and time. -
Page 153: Display Setpoint And Actual Temperature Or Current Time
TEMPERATURE CONTROL 153 6.4.8 Display setpoint and actual temperature or current time After commissioning, the device shows the setpoint temperature and switches off the display after 2 minutes without operation. Alternatively, you can select the display of the actual tempera- ture or the current time. - Page 154 154 THE CLEVER CONFIG APP The Clever Config App OPERATION MADE EASY 7.1.1 Switching and dimming lights 7.1.2 Controlling shading 7.1.3 Controlling automatic switches 7.1.4 Device list 7.1.5 Manage Favourites DOWNLOADING THE APP INSTALLATION REQUIREMENTS PAIRING THE DEVICES 7.4.1 Requirements for the pairing 7.4.2 Performing pairing THE COMMISSIONING OF A DEVICE...
- Page 155 THE CLEVER CONFIG APP 155...
-
Page 156: The Clever Config App
In doing so, the Bluetooth connection is estab- lished over a range of up to 10 metres between smart phone and the selected LB Management device. The app enables the convenient −... -
Page 157: Operation Made Easy
THE CLEVER CONFIG APP 157 Operation made easy With the app, the smart phone becomes remote control for the building technology. The lighting is switched on or set to the desired brightness using your fingertip. Blinds are moved up or down or to any desired position. -
Page 158: Controlling Shading
158 THE CLEVER CONFIG APP 7.1.2 Controlling shading The blinds and shutters can be controlled individually and precisely using the Clever Config app. Universal time on blind insert Configuration Save as Favourite Push up: move up Pull down: move down T ap on - : move up Tap on + : move down (display of the blind position in percent) -
Page 159: Controlling Automatic Switches
THE CLEVER CONFIG APP 159 7.1.3 Controlling automatic switches The automatic switches and presence detectors can be configured and operated using the Clever Config app. Configuration Save as Favourite Tap: switch on, switch off Drag clockwise: brighter Drag anticlockwise: darker T ap on + : brighter Tap on - : darker (display of the brightness in percent... -
Page 160: Device List
160 THE CLEVER CONFIG APP 7.1.4 Device list All connected Bluetooth devices of the LB Management system can be sorted by room, man- aged and operated in the device list. You add new devices using the symbol at the top right,... -
Page 161: Manage Favourites
THE CLEVER CONFIG APP 161 7.1.5 Manage Favourites Devices and functions can be set up as Favourites according to personal requirements. Tap on the star symbol in the header of the desired function for this. This displays the function as Favourite on the start page of the app, and the preferred devices are always only a fingertip away. -
Page 162: Pairing The Devices
162 THE CLEVER CONFIG APP 7.4 Pairing the devices In order to be able to control an LB Management device using the app, the device is first paired with the mobile device via Bluetooth. 7.4.1 Requirements for the pairing Ensure that the following requirements are met before you pair the devices with the app: −... - Page 163 THE CLEVER CONFIG APP 163 The found devices are listed in the app. Select the desired device in the list. Multiple devices can also be put into pairing mode simulta- neously. Device and mobile device are now paired. The device configuration is transferred to the Clever Config app.
-
Page 164: The Commissioning Of A Device
164 THE CLEVER CONFIG APP 7.5 The commissioning of a device After the successful pairing, the app displays the paired device and reports the identified type of the device, e.g. switch. 7.5.1 Add device information Assign a Room, for example living room, to the paired device. Give the device a Name, using which the device can be easily assigned later, for example ceil- ing lamp. -
Page 165: Making Settings
THE CLEVER CONFIG APP 165 7.5.2 Making settings Using the Clever Config app, you conveniently set up the time control of the LB Management de- vices directly using your smart phone. You make other settings under the Parameters menu item. - Page 166 166 THE CLEVER CONFIG APP Furthermore, you can define the switching times not only according to time but also according sun position as the Universal Timer can calculate the sunrise and sunset times depending on the local geographic location (see chapter “8.5 Astro function” on page 190). You also set in the device configuration in the Sun Position menu that the app may access the local position.
-
Page 167: Parameters
Details about the adjustable parameters can be found in the chapters “4. LB Management Light” on page 52 and “5. LB Management Shading” on page 112. -
Page 168: Adjustable Functions
168 THE CLEVER CONFIG APP 7.5.3 Adjustable functions UNIVERSAL TIMER In combination with the Universal Timer Bluetooth attachment, the following functions are avail- able using the Clever Config app: − Operation of blind and lighting with status feedback (in percent) or switching states (On/Off) −... -
Page 169: Universal Automatic Switch And Ceiling Observer / Presence Detector
THE CLEVER CONFIG APP 169 UNIVERSAL AUTOMATIC SWITCH AND CEILING OBSERVER / PRESENCE DETECTOR In combination with the Universal automatic switch attachment and the ceiling observer / presence detector, the following functions are available using the Clever Config app: − Programming of up to 16 individual switching times −... -
Page 170: Adjustable Parameters
Automatic location adjustment using location LB Management Astro time function of the smart phone Sun protection value 4,000 – 80,000 lux All LB Management inserts in combination with a Temperature threshold Off. brightness / temperature Sun protection 5 – 50 °C... - Page 171 THE CLEVER CONFIG APP 171 FACTORY SETTINGS EXPLANATION 0 minutes Its own astro time shift can be set for each switching time. Astro times reflect the sunrise and sunset times in the course of a calendar year. The sun protection is executed if any specified sun protection value is exceeded for more than 2 minutes.
- Page 172 172 OPERATION Operation MANUAL CONTROL 8.1.1 Standard centre plate 8.1.2 Universal centre plate AUTOMATIC CONTROL 8.2.1 Standard room thermostat 8.2.2 Standard Timer 8.2.3 Universal timer Bluetooth 8.2.4 Pairing Universal Timer Bluetooth with mobile devices 8.2.5 eNet Standard Radio centre plate eNet Standard Radio centre plate eNet Radio Centre Plate OPERATION USING THE...
- Page 173 OPERATION 173...
-
Page 174: Operation
174 OPERATION 8. Operation Light and shading can be manually controlled easily and intuitively by pressing a button with the Standard and Universal Centre Plates. The Standard and Universal Timer attachments are avail- able for programmed control. 8.1 Manual control 8.1.1 Standard centre plate You control light and shade manually by pressing a button with the Standard centre plate. - Page 175 OPERATION 175 YOU WOULD LIKE TO... IMPLEMENTATION FURTHER INFORMATION ... switch the light. − Briefly press the centre plate. If the dimming insert is used, the light is switched to the saved switch-on brightness when switch- ing on..switch on the light with mini- −...
-
Page 176: Universal Centre Plate
176 OPERATION 8.1.2 Universal centre plate The Universal centre plate has the same functions as the Standard centre plate, however expands these with further functions. Both the Standard centre plate as well as the Universal centre plate provide the following functions: −... - Page 177 OPERATION 177 YOU WOULD LIKE TO... IMPLEMENTATION FURTHER INFORMATION ... switch the light. − Briefly press the centre plate. If the dimming insert is used, the light is switched to the saved switch-on brightness when switch- ing on..switch on the light with mini- −...
-
Page 178: Automatic Control
8.2 Automatic Control 8.2.1 Standard room thermostat The Standard RTR is an LB Management attachment with six operating buttons. Use the Plus and Minus buttons to set the displayed temperatures or times in the menu. Using the middle bottom button Programming / Settings Menu, you reach the menu in which you can select and program various functions such as the astro function or the lock function. - Page 179 OPERATION 179 YOU WOULD LIKE TO... IMPLEMENTATION FURTHER INFORMATION ... increase the setpoint − Tap the Plus button for less than one The setpoint temperature is increased by 0.5 °C temperature. second. for each tap of the button. In cooling operation, you cannot increase the setpoint temperature using the Plus button.
-
Page 180: Standard Timer
The Standard Timer is an LB Management attachment with six buttons. Depending on the insert, you control the LB Management functions using the arrow buttons. Using the middle bottom button Programming / Settings Menu, you reach the menu in which you can select and program various functions such as the astro function or the lock function. - Page 181 OPERATION 181 YOU WOULD LIKE TO... IMPLEMENTATION FURTHER INFORMATION ... switch on the light / − Press the right arrow button. If the dimming insert is used, the light is switched move the blinds up. to the saved switch-on brightness..
-
Page 182: Universal Timer Bluetooth
The Universal Timer Bluetooth has four buttons (On/Off / Lock function / Bluetooth) for perform- ing local operation. The LB Management inserts are directly controlled with the left rocker half. The toggle function (On/Off) – as is also the case for the Universal centre plate – is executed by briefly pressing the left button at the top or bottom. - Page 183 OPERATION 183 YOU WOULD LIKE TO... IMPLEMENTATION FURTHER INFORMATION ... switch the light. − Tap the left button briefly. If the dimming insert is used, the light is switched to the saved switch-on brightness when switch- ing on..switch on the light with mini- −...
-
Page 184: Pairing Universal Timer Bluetooth With Mobile Devices
184 OPERATION 8.2.4 Pairing Universal Timer Bluetooth with mobile devices Proceed as follows to pair the Universal Timer Bluetooth with a mobile device: Install the Clever Config app on the mobile device and open the app. Press and hold the Bluetooth button of the Universal Timer Bluetooth for more than four seconds. -
Page 185: Enet Standard Radio Centre Plate
OPERATION 185 8.2.5 eNet Standard Radio centre plate The eNet Standard Radio centre plate has two buttons and the eNet Radio centre plate has four buttons, which are used for local operation. With the eNet Standard Radio centre plate, you control light and shade by pressing a button. The button reacts on the full surface and in particular makes the switching of light using the toggle function particularly simple: The light goes on by pressing a button at any place and off again by pressing on the switch again. -
Page 186: Enet Radio Centre Plate
− Transmitter for wireless transmission of switching, dimming and blind commands − Operation on switching, dimming or blind insert or 3-wire satellite unit from LB Management − 2 switching times can be saved that can be repeated every 24 hours (only applies to the eNet Radio centre plate) −... -
Page 187: Operation Using The Satellite Units
OPERATION 187 8.3 Operation using the satellite units The following rules apply when you operate the lighting via satellite units: 8.3.1 Installation button as satellite unit The master is switched by briefly pressing the button that functions as satellite unit. This happens in toggle mode. -
Page 188: Timer Function
188 OPERATION 8.4 Timer function Light and shade can be automatically controlled according to a schedule using the timer func- tion. This light can be switched on or off or dimmed to a desired brightness at defined times. Move blinds up or down at specific times or to a specified position. The timer function can be used with the Standard Timer or the Universal Timer Bluetooth. -
Page 189: Switching Times
OPERATION 189 8.4.1 Switching times The Standard Timer has two week blocks. The first block is Mon – Fri and the second is Sat – Sun. For both week blocks, you can program the Up/Down switching time pairs for blind inserts and the On/Off switching time pairs for switching and dimming inserts. -
Page 190: Astro Function
190 OPERATION 8.5 Astro function Using the astro function, you switch light and shading depending on sunrise and sunset. The times for moving the blinds up and down and for switching the light on and off adjust them- selves during the year to the changing sunrise and sunset times. Note: You must specify the current date and the country for which the times should be calculat- ed so that the Standard Timer attachment can calculate the astro times. - Page 191 OPERATION 191 OUTDOOR LIGHTING TIMER PROGRAM IN COMBINATION WITH ASTRO FUNCTION 5:15 ON at 06:00 6:00 8:15 Sunrise OFF 8:30 at 06:00 at the earliest Sunset ON 16:00 at 17:00 at the earliest 17:00 OFF at 22:30 22:30 January December Hatched area: Lighting ON...
-
Page 192: Presence Simulation
192 OPERATION 8.6 Presence simulation If you are absent for a prolonged time (e.g. on account of a holiday), you can simulate that persons are present in the building using presence simulation and thus deter potential burglars. The presence simulation records switching processes for this and reproduces them automatical- ly as required. - Page 193 INDEX 193 Index Alarm function 73, 115, Alarm operation 100, 103, Fading 93 Ambient brightness 20, 69, 70, 71, Frost protection function 24 Artificial light 103 Functionality extra-low voltage 93 Astro function , 76, 77, 27, 28, Astro time 166 Astro time shift 166 Ghosting effect 97 Automatic mode...
- Page 194 194 INDEX Network voltage 60 Satellite unit input 53, 54, Neutral conductor 55, 57, 58, 59, 61, 62, 63, 64, Schedule 28 67, 68, 82, 94, 96, Security password 152 Night light function 100, 107, Shading function 132 Night Mode 173, Shading position 28 Normal operation...
- Page 195 Universal 2-gang touch dimmer LED 45 Universal automatic switch 1.1 m 45, 52, 71, 79, 84, 99, 105, Universal automatic switch 2.2 m 21, 30, 45, 52, 72, Universal blinds insert 27, 28, 29, 45, Universal centre plate 27, 29, 39, 45, 48, 52, 172, 178, Universal dimmer for rail mounting LED Universal dimmer LED built-in...
- Page 196 ALBRECHT JUNG GMBH & CO. KG P.O. Box 1320 58579 Schalksmühle Germany Phone +49 2355 806-553 +49 2355 806-254 international@jung.de For sales contacts in your country see: jung-group.com/contact JUNG-GROUP.COM...
Need help?
Do you have a question about the LB Management and is the answer not in the manual?
Questions and answers