Vatech EzRay Air Wall VEX-S300W Installation Manual
Hide thumbs
Also See for EzRay Air Wall VEX-S300W:
- User manual (193 pages) ,
- Installation manual (68 pages) ,
- User manual (86 pages)
Table of Contents
Advertisement
Advertisement
Table of Contents

Related Manuals for Vatech EzRay Air Wall VEX-S300W


Summary of Contents for Vatech EzRay Air Wall VEX-S300W
-
Page 5: Notice
All brand names and logos used in this manual are copyrighted. For further information not covered in this manual or the accompanying documentation, please contact us with any method listed below: VATECH Co., Ltd. Telephone: (+82) 1588-9510 E-Mail: gcs@vatech.co.kr Manual name: EzRay Air Wall (Model: VEX-S300W) Installation Manual Version: 1.46... -
Page 6: Conventions Used In This Guide
Conventions Used in this Guide Conventions Used in this Guide The following symbols are used throughout this manual to emphasize information or indicate a potential risk to the equipment or user. Make sure that you fully understand each symbol and obey the instructions, which appear to the right of the symbol. Warnings indicate information that should be followed with the utmost precision. - Page 7 Do not connect any items or equipment to this system, which are not part of the system: IEC60601-1-1. Any equipment not approved by VATECH must comply with the applicable standards: IEC 60950-1 for IT equipment (ex: PC) and IEC 60601-1 for medical electrical equipment.
- Page 8 Conventions Used in this Guide Installation site Proper shielding of the room is essential: Since these requirements vary depending on the country, it is the installer’s responsibilities to verify that all applicable radiation safety requirements are met. This equipment should not be installed near other ...
-
Page 9: Table Of Contents
Table of Contents Table of Contents Notice ........................i Conventions Used in this Guide ................. ii Table of Contents ....................v 1. Introduction ....................1 Manufacturer’s Liability ..............1 Customer’s Responsibility ..............1 2. Before Installing the Equipment ..............3 Required Tools ................. -
Page 10: Table Of Contents
Table of Contents This page intentionally left blank. EzRay Air Wall (VEX-S300W) Installation Manual... -
Page 11: Introduction
1. Introduction Introduction Manufacturer’s Liability As the manufacturer, VATECH assumes liability for the safe and reliable installation and operation of this equipment only when: Equipment installation, including software installation, has been carried out by an authorized agent by this installation manual. - Page 12 1. Introduction This page intentionally left blank. EzRay Air Wall (Model: VEX-S300W) Installation Manual...
-
Page 13: Before Installing The Equipment
2. Before Installing the Equipment Before Installing the Equipment Two installers are required to install the equipment safely. Required Tools The following tools are necessary to install the equipment. Item Figure Size Wrench Set 1.5 mm-10 mm Monkey Spanner 200 mm Ratchet with Socket: 13 mm (for M8), Extension Bar... - Page 14 2. Before Installing the Equipment Item Figure Size Marker Pen (thick tip) Hammer Multi-meter Hammer Drill Cutting Pliers EzRay Air Wall (Model: VEX-S300W) Installation Manual...
-
Page 15: Unpacking The Boxes
Check the packaging for signs of damage visually before opening the package. If it appears damaged, do not open the package and immediately contact the shipping company, agent or VATECH Wear the anti-static or general-purpose gloves. (Refer to ‘Parts and Accessories List’ on page 15-19. - Page 16 2. Before Installing the Equipment Unpacking the Main Box Move the main box to a convenient place as close as possible to the installation location. Remove each box in the following order. A: Top Cover B: Upper Box C: Middle Box D: Lower Box A ...
-
Page 17: Checking The Components
2. Before Installing the Equipment Checking the Components Upper Box (B) Items Figure Qty. Comments Confirmed YES □ Double Stud Frame NO □ YES □ Double Stud Cover NO □ <Wall Bracket: Double Stud> Drilling YES □ Paper Template for (Size: A2) NO □... - Page 18 2. Before Installing the Equipment Items Figure Qty. Comments Confirmed Items Figure Qty. Comments Confirmed Fisher YES □ Anchor NO □ <Wall (M10 x L40) Bracket: Double YES □ Stud> Fisher Bolt (M10 x L35) NO □ <Wall Bracket: Blank Single Stud>...
- Page 19 2. Before Installing the Equipment Middle Box (C) Items Figure Qty. Comments Confirmed 3 options: YES □ 1. 450 mm Horizontal Arm Assembly 2. 600 mm NO □ 3. 900 mm Accessory Kit YES □ Rectangular Cover 2x3 NO □ (option) YES □...
- Page 20 2. Before Installing the Equipment Items Figure Qty. Comments Confirmed HEX HEAD WOOD YES □ SCREW for Single Stud NO □ Single Stud (M10 x L70) YES □ Wrench Bolt (M5 x L25) NO □ YES □ X-ray Generator NO □ Stopper X-ray YES □...
- Page 21 2. Before Installing the Equipment Items Figure Qty. Comments Confirmed X-ray YES □ Generator Arm Screw NO □ Cover 2 X-ray YES □ Generator Arm Screw NO □ Cover 1 ANTI YES □ ACETAL ROTATION (Black) NO □ BLOCK 2 ANTI YES □...
- Page 22 2. Before Installing the Equipment Items Figure Qty. Comments Confirmed YES □ Wrench Bolt for Double Stud Double Stud NO □ (M8 x L20) Double Stud Cover YES □ Screw Double Stud NO □ (FH M4 x L8) YES □ Double Stud Sticker Double Stud...
- Page 23 2. Before Installing the Equipment Lower Box (D) Items Figure Qty. Comments Confirmed YES □ Scissor Arm Assembly NO □ (including cables) X-ray Generator Assembly YES □ (including cables NO □ Round Cover) Remote Exposure Switch Assembly YES □ (including Holder NO □...
- Page 24 2. Before Installing the Equipment Items Figure Qty. Comments Confirmed Door Interlock YES □ Cable NO □ (option) Remote Exposure - Standard for YES □ Switch Cable the USA (Doorbell type) - Option for the NO □ (Standard or other regions Option) Remote Exposure - Standard for...
- Page 25 2. Before Installing the Equipment Parts and Accessories List Part Items Specification Figure Qty. Confirmed Horizontal YES □ Material: Arm Frame ABS (White) NO □ Cover YES □ Horizontal Material: Arm Cable ABS (White) NO □ Cover YES □ Power Box Material: Cover Deco ABS (White)
- Page 26 2. Before Installing the Equipment Part Items Specification Figure Qty. Confirmed X-ray YES □ Generator Arm Screw NO □ Cover 2 X-ray YES □ Generator Arm Screw NO □ Cover 3 YES □ Generator Size: Cover Bolt PH M3 x L6 NO □...
- Page 27 2. Before Installing the Equipment Part Items Specification Figure Qty. Confirmed BLOCK STIFFENER YES □ Wrench Bolt Size: M5 x L25 NO □ Remote Exposure Switch YES □ Assembly (including NO □ Holder and Double-sided Sticker) Remote YES □ Exposure Size: Switch Holder FH M3 x L16...
- Page 28 2. Before Installing the Equipment Part Items Specification Figure Qty. Confirmed YES □ Installation Manual NO □ YES □ User Manual NO □ Remote Exposure - Standard for Switch YES □ the USA (Doorbell - Option for the NO □ type) other regions (Standard or...
- Page 29 2. Before Installing the Equipment Part Items Specification Figure Qty. Confirmed YES □ - Material: ABS Rectangular Cover 4x3 - FOV: 4x3 (3x4) NO □ HEX HEAD YES □ WOOD Size: M10 x L70 SCREW NO □ (Double Stud) HEX HEAD YES □...
- Page 30 2. Before Installing the Equipment This page intentionally left blank. EzRay Air Wall (Model: VEX-S300W) Installation Manual...
-
Page 31: Installing The Equipment
3. Installing the Equipment Installing the Equipment Before Start Observe wall properties During installation, the technician is responsible for the assessment of wall properties and selecting the method of attaching the unit to the wall. The wall construction must be able to resist a shear load of 76 kg (168 lbs) and tractive force of 204 kg (450 lbs) at each attachment location. - Page 32 3. Installing the Equipment Mounting Overview Mounting type Mounting points on the wall Cabinet Installation Wall Bracket Installation (Single Stud) Wood wall - Wood screw (M10 x L70) X 3 (Part No.14) Concrete wall - Fisher Anchor (M10 x L40) X 3 (No.15) - Fisher Bolt (M10 x L35) X 3 (No.
-
Page 33: Marking Drill Points On The Wall
3. Installing the Equipment Marking Drill points on the wall <Single Stud> <Double Stud> Prepare the spirit level. Attach the drilling template (Single Stud: Part No.17 or Double Stud: Part No.25) temporally. Place it on the wall and ensure leveling is obtained (the bubble should be located in the middle of the spirit level). -
Page 34: Installing The Power Box Assembly
3. Installing the Equipment Installing the Power Box Assembly 3.2.1 Mounting the Power Box Assembly (For wood walls) Cabinet Installation and Wall Mount Installation Type (Single Stud) Ratchet with Extension Bar Socket Size: 17 mm and Socket Crosshead screwdriver w/ L=200 mm magnetic tip Part No.: 14... - Page 35 3. Installing the Equipment Remove the Power Box Cover of the Power Box Assembly. Attach the Power Box Base to the wall with three wood screws. Ratchet with Extension Bar Socket Size: 17 mm and Socket Part No.: 14 HEX HEAD Size: M10 x L70 WOOD SCREW Qty.: 3 ea...
- Page 36 3. Installing the Equipment Wall Mount Installation Type (Double Stud) Perform Step 1 on page 25. Attach the Double Stud Frame (Part No.33) to the wall with six wood screws. Socket Size: Ratchet with Extension Bar 17 mm (for M10) and Socket 13 mm (for M8) Part No.: 38...
- Page 37 3. Installing the Equipment Assemble the Double Stud Covers (Part No.35) with eight flat head screws. Part No.: 44 Double Stud Size: FH M4 x L8 Cover Screw Qty.: 8 ea Attach two Double Stud Stickers (Part No.36) on each Double Stud Cover. EzRay Air Wall (Model: VEX-S300W) Installation Manual...
- Page 38 3. Installing the Equipment Attach the Power Box Base to the Double Stud Frame with six wrench bolts. Allen Wrench Size: 6 mm Part No.: 43 Wrench Bolt Size: M8 x L20 Qty.: 6 ea EzRay Air Wall (Model: VEX-S300W) Installation Manual...
- Page 39 3. Installing the Equipment 3.2.2 Mounting the Power Box Assembly (For Concrete walls) Cabinet Installation and Wall Bracket Installation Type (Single Stud) Drill the marked points using the hammer drill. Remove the debris and clean the holes using the dust pump. Put the Fisher Anchor (Part No.14) into the holes using the hammer.
- Page 40 3. Installing the Equipment Remove the Power Box Cover of the Power Box Assembly. Attach the Power Box Base to the anchors with three fisher bolts. DO NOT tighten the bolts entirely until after leveling is complete. Allen Wrench Size: 8 mm Part No.: 16 Fisher Bolt Size: M10 x L35...
- Page 41 3. Installing the Equipment Wall Bracket Installation Type (Double Stud) Perform Step 1 and 2 on page 29. Put the Fisher Anchor into the holes using the hammer. Hammer Part No.: 41 Fisher Anchor Size: M10 x L40 Qty.: 6 ea Attach the Double Stud Frame to the anchors with six fisher bolts.
- Page 42 3. Installing the Equipment 3.2.3 Leveling the Power Box Assembly: Front/Rear Slightly loosen the four wrench bolts before placing the spirit level on the equipment. Allen Wrench Size: 3 mm Place the spirit level on the position as shown in the figure. To adjust the horizontality (level), loosen one wrench bolt by using the wrench.
- Page 43 3. Installing the Equipment Since the Power Box Assembly is shipped with one bolt tightened, they are required to be loosened prior to leveling 3.2.4 Leveling the Power Box Assembly: Left/Right Place the spirit level on the position as shown in the figure. After placing the spirit level on its position, adjust the two bolts until the bubble on the spirit level is located in the middle.
-
Page 44: Installing The Horizontal Arm
3. Installing the Equipment Installing the Horizontal Arm The length of the horizontal arm: L= 450, 600, or 900 mm The installation procedures are the same regardless of the arm’s length. After pulling out the cables through the opening, insert the horizontal arm into the hole on the Power Box Assembly. - Page 45 3. Installing the Equipment Make sure that the Horizontal Arm moves smoothly. If not, slightly loosen the wrench bolts. 3.3.1 Leveling the Horizontal Arm Place the spirit level on the position as shown in the following figures. <Front/Rear> <Left/Right> Check if the bubble on the spirit level is located in the middle. EzRay Air Wall (Model: VEX-S300W) Installation Manual...
- Page 46 3. Installing the Equipment If it is not in the middle, follow the same procedures in ‘3.2.3 Leveling the Power Box Assembly: Front/Rear’ and ‘3.2.4 Leveling the Power Box Assembly: Left/RightError! Reference source not found.’. After leveling the Horizontal Arm is complete, make sure to fasten the four wrench bolts as shown in the following figures.
-
Page 47: Installing The Scissor Arm
3. Installing the Equipment Installing the Scissor Arm Scissor arm can cause injury during installation. DO NOT remove the safety strap and shrink wrap for scissor arm until the installation is completed. When you remove the strap and shrink wrap, the scissor arm will be opened by its spring tension. - Page 48 3. Installing the Equipment Tighten the wrench bolt in the Horizontal Arm Frame End, and cover the Frame End with the Horizontal Arm Frame Cover (Part No.1). Part No.: 1 Horizontal Arm Frame Cover Qty.: 2 ea <Location of the hole to tighten the wrench bolt> <Tightening the wrench bolt and covering the Frame End>...
-
Page 49: Installing The X-Ray Generator Assembly
3. Installing the Equipment Installing the X-Ray Generator Assembly Handle the X-Ray tube head with care when installing the X- Ray tube head. Place X-ray Generator Arm Bushing (Part No.7) on the top of the hole in the X-Ray Generator Arm. Attach the X-ray Generator Assembly to the scissor arm while making sure that the cables from the Scissor Arm go through the X-Ray Generator Arm’s hole. - Page 50 3. Installing the Equipment For information about connecting cables, please see ‘3.6.4 Cabling between the Scissor Arm and the X-ray Generator’ on page 48. Attach the X-ray Generator Stopper (Part No.8) to the rear top of the X-ray Generator Arm. Tighten the screw above the attached stopper.
- Page 51 3. Installing the Equipment Cover the rear side of the X-ray Generator Arm with the X-ray Generator Arm Cover (Part No.9). Tighten three bolts on the rear cover of the X-ray Generator Arm. Part No.: 13 Generator Cover Size: PH M3 x L6 Bolt Qty.: 3 ea EzRay Air Wall (Model: VEX-S300W) Installation Manual...
- Page 52 3. Installing the Equipment Cover three holes with caps. Part No.: 10 GENERATOR ARM COVER CAP1 Qty.: 1 ea Part No.: 11 GENERATOR ARM COVER CAP2 Qty.: 1 ea Part No.: 12 GENERATOR ARM COVER CAP3 Qty.: 1 ea EzRay Air Wall (Model: VEX-S300W) Installation Manual...
-
Page 53: Connecting The Cables
3. Installing the Equipment Connecting the Cables Whenever handling the cables and electronic board: 1. Wear the anti-static gloves (Part No.45). 2. DO NOT wear a thick jacket. Always ensure that the cables are firmly connected. A bad connection could cause deterioration of image quality. 3.6.1 Connecting the Power Cord Connect the N (Neutral) and L (Live) Connectors of the permanent power cord to the... - Page 54 3. Installing the Equipment 3.6.2 Connecting Horizontal Arm Cables 1. Cable Name: H001624 (L=450 mm) / H001625 (L=600 H001626 (L=900 mm) 2. The installation procedures are the same, regardless of the Horizontal Arm’s length. Connect the cable H001624 with the Connector 1, 2 on the Power Box Board, and the Protective Earth (PE) Cable on the PE Conductor.
- Page 55 3. Installing the Equipment Cover the Power Box Base with the Power Box Cover, and tighten two truss screws on the Power Box Deco. Part No.: 5 Size: M4 x L6 Truss Screw Qty.: 2 ea Power Box Deco Tighten two truss screws on the bottom of the Power Box Cover. Part No.: 5 Size: M4 x L6 Truss Screw...
- Page 56 3. Installing the Equipment 3.6.3 Cabling between the Scissor arm and horizontal arm. Scissor Arm Horizontal Arm During cable installation, avoid any cable kinks and maintain the proper bending. Ensure that cables are not caught on the cover. EzRay Air Wall (Model: VEX-S300W) Installation Manual...
- Page 57 3. Installing the Equipment Connect the cables from the horizontal arm and scissor arm. White connector (3-pin) ↔ White connector (3-pin) Black connector (8-pin) ↔ Black connector (8-pin) Protective Earth (PE) Cable from the Scissor Arm When you connect the Protective Earth (PE) Cables to the PE conductor by using the Truss Screw (Part No.5) with Star Washer (Part No.6), please refer to the illustration below.
- Page 58 3. Installing the Equipment Arrange the cables and cover the horizontal arm opening with the HORIZONTAL LOWER COVER (Part No.2). Material: ABS (White) HORIZONTAL ARM CABLE COVER Part No.: 2 Qty.: 1 ea 3.6.4 Cabling between the Scissor Arm and the X-ray Generator White connector (3-pin) ↔...
- Page 59 3. Installing the Equipment 3.6.5 Tie the cables 1. Tie the cables together with a cable tie Part No.: 26 Cable Tie Qty.: 2 ea EzRay Air Wall (Model: VEX-S300W) Installation Manual...
- Page 60 3. Installing the Equipment 3.6.6 View after Completion EzRay Air Wall (Model: VEX-S300W) Installation Manual...
- Page 61 3. Installing the Equipment 3.6.7 Remote Exposure Switch and Power Cable Connections There are four connectors on the bottom of the Power Box Assembly as described below. Connector 1, 2, 3: Remote Exposure Switch Connectors Connector 4: AC Power Cable Connector ...
- Page 62 3. Installing the Equipment Option Connector Description Connector 1 Connector 2 Connector 3 Press AC Power (1) and (2) Cable Option 2 at the same (Option) time. (1) Remote (2) Remote Exposure Exposure Switch Switch (Standard) (Option) Press AC Power (1) and (2) Cable Option 3...
- Page 63 3. Installing the Equipment Option Connector Description Connector 1 Connector 2 Connector 3 AC Power Press Cable Option 6 (1) or (2). (Option) (2) Remote (1) Remote Exposure Exposure Switch Switch (Doorbell type) (Standard) (Option) Press (2) and (3) at the same AC Power time.
- Page 64 3. Installing the Equipment EzRay Air Wall (Model: VEX-S300W) Installation Manual...
-
Page 65: Product Specifications
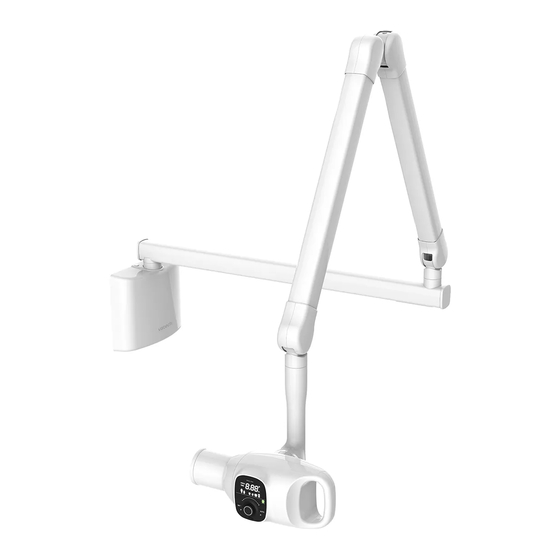
4. Product Specifications Product Specifications Mechanical Specifications Dimensions EzRay Air Wall (Model: VEX-S300W) Installation Manual... - Page 66 4. Product Specifications EzRay Air Wall (Model: VEX-S300W) Installation Manual...
- Page 67 4. Product Specifications EzRay Air Wall (Model: VEX-S300W) Installation Manual...
- Page 68 4. Product Specifications With Horizontal Arm 900 mm With Horizontal Arm 600 mm With Horizontal Arm 450 mm EzRay Air Wall (Model: VEX-S300W) Installation Manual...
- Page 69 4. Product Specifications Weight Item Item Dimension (mm) (kg) With With Horizontal Scissor Arm: Arm: Folded 1205.3(L)x1074.9(H)x342.6(W) Total Assembly 900mm 17.9 (including Unfolded 2468.3(L)x507.6(H)x342.6(W) Power Box Assembly and Folded 905.3(L)x1074.9(H)x342.6(W) X-ray Generator 600mm 16.6 Unfolded 2168.3(L)x507.6(H)x342.6(W) Assembly) Folded 755.3(L)x1074.9(H)x342.6(W) 450mm 15.9 Unfolded 2018.3(L)x507.6(H)x342.6(W)
-
Page 70: Technical Specifications
Min. 1.5 mm Al Type Inverter Type Tube Voltage 55-65 kV Tube Current 1.0-3.0 mA Manufacturer VATECH Co., Ltd. Model V1-650304 (Stationary Anode type) Version Focal spot size 0.4 mm (IEC 60336) Anode heat contents Max. 2.7 kJ Maximum Anode Heat... -
Page 71: Electrical Specifications
4. Product Specifications Electrical Specifications Item Description Power Supply Voltage 100-240 V ~ Frequency 50/60 Hz (Single phase) Power Rating 4-2 A Tube Voltage 65 kV fixed (± 3 %) Option A: 2.5 mA Tube Current Option B: 3.0 mA ... -
Page 72: Environmental Specifications
4. Product Specifications Environmental Specifications Item Description 10 ~ 35 ℃ Temperature During operating Relative humidity 30 ~ 75 % Atmospheric pressure 860 ~ 1060 hPa -10 ~ 60 ℃ Temperature Transport and storage Relative humidity 10 ~ 75 % non-condensing Atmospheric pressure 860 ~ 1060 hPa EzRay Air Wall (Model: VEX-S300W) Installation Manual... -
Page 73: Appendix
Appendix Appendix Drilling Template <Single Stud> EzRay Air Wall (Model: VEX-S300W) Installation Manual... - Page 74 Appendix <Double Stud> EzRay Air Wall (Model: VEX-S300W) Installation Manual...
-
Page 75: Connecting The Third-Party Exposure Switch(Optional)
Appendix Connecting the Third-party Exposure Switch(Optional) This section explains how to connect the third-party exposure switch with the equipment from VATECH. How-to: 1. Cut the exposure switch cable provided with the equipment. 2. According to the following schematic diagram, rewire the cables. -
Page 76: Installation Checklist
Appendix Installation Checklist General information: Information about the equipment purchaser (Customer) Name of Clinic or Hospital Address Phone E-Mail Information about the equipment seller (Dealer) Name of dealer Phone E-Mail Website Installation information: Installation information Names of installers Scheduled date of installation Date of installation Model Serial No. - Page 77 Appendix While installing equipment While installing equipment Are installers careful with any sensitive parts while □ □ carrying equipment? Did installers perform installations, according to □ □ manual? Did installer make sure harness and equipment are □ □ well connected and not damaged? □...
- Page 78 No part of this manual may be reproduced, transmitted, or transcribed without the expressed written permission of the manufacturer. We reserve the right to make any alterations, which may be required due to technical improvement. For the most current information, contact your VATECH representative. Manufactured by VATECH Co., Ltd. Tel: (+82) 1588 9510 Email: gcs@vatech.co.kr...
- Page 80 Copyright © VATECH Networks | All Rights Reserved.
Need help?
Do you have a question about the EzRay Air Wall VEX-S300W and is the answer not in the manual?
Questions and answers