Zimmer Opton Pro Instructions For Use Manual
25 watt
Hide thumbs
Also See for Opton Pro:
- Instructions for use manual (60 pages) ,
- Operating instructions manual (54 pages) ,
- Instructions for use manual (48 pages)
Table of Contents
Advertisement
Quick Links
Advertisement
Table of Contents

Related Manuals for Zimmer Opton Pro


Summary of Contents for Zimmer Opton Pro
- Page 1 Instructions for use OptonPro 25 Watt...
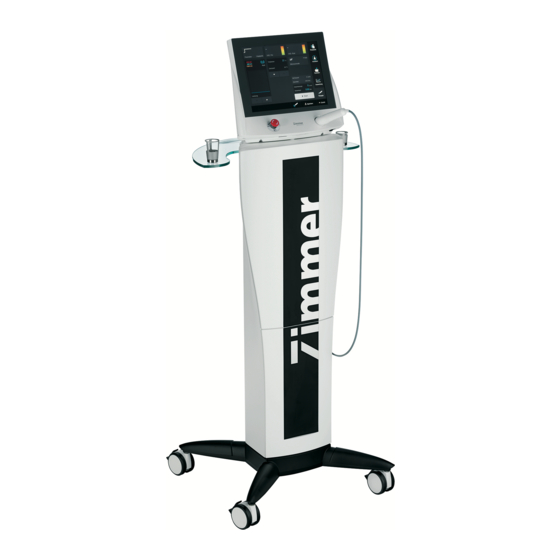
- Page 3 Illustrations Front of the device Fig. 1 Selection and operating Control unit elements Display Emergency stop button Main switch Applicator with fibre optic Applicator 5.1 Manual switch 5.2 Integrated infrared sensor and laser aperture Fibre optic cable Test sensor Test sensor and applicator holder...
- Page 4 Illustrations Rear of the device Fig. 2 Ports Fibre optic outlet Footswitch connector 10 Identification plate 11 Mains connector 12 Main fuse 13 Interlock connector 14 USB connector...
- Page 5 Illustrations Screens / display Fig. 3 Display view Status line Buttons on the screen Buttons in the navigation menu Buttons in the status line Fig. 4 Navigation menu / (A) Therapy Switches to the therapy screen status line (B) History Switches to the VAS history Description of the (C) Favourites...
- Page 6 Illustrations Accessories Spacer, small Spacer, large Foot switch (optional) 4 Laser warning sign with laser 5 Laser Warning Sign OptonPro Protective laser glasses warning light 7 Interlock plug...
-
Page 7: Explanation Of Symbols
Explanation of Symbols Caution: laser aperture Note: The laser beam exits at the end of the applicator Turn the emergency stop button in the direction of the arrow to unlock Applied part type B Foot switch connector Interlock connector Rating of the accessible fuses Protection class II Operating instructions Follow instructions for use... - Page 8 Explanation of Symbols Text with “Caution” indicator in the instructions for use will explain possible safety infractions that could have the potential to cause minor to moderate injury or damage to equipment. Text with “Warning” indicator in the instructions for use will explain possible safety infractions that will potentially cause serious injury and equipment damage.
-
Page 9: Table Of Contents
Contents Figure Front of the device Rear of the device/switches and ports Display views/navigation menus Accessories Explanation of Symbols Page Indications for Use Contraindications / Side effects Safety Information / Warnings Application information OptonPro 25W – in brief System set-up 6.1 Safety measures 6.2 Assembly and start-up Configuration... - Page 10 Contents Manufacturer Scope of Delivery, Accessories Device Combinations / Safety and Maintenance / Functional Test Error messages / Troubleshooting / Disposal Manufacturer's EMC declaration The instructions for use are an integral part of the device. They must be stored with the device and kept accessible at all times for anyone authorised to operate this device. Last updated: September 2020 U.S.A.
-
Page 11: Indications For Use
Indications for Use Indications for Use The OptonPro 25W is indicated to provide topical heating for the purpose of elevating the tissue temperature for the: temporary relief of minor muscle and joint pains and stiffness temporary relief of muscle spasm ... -
Page 12: Contraindications / Side Effects
Contraindications / Side effects Contraindications The OptonPro 25W should not be used: over areas of fresh haematoma and active hemorrhage over a pregnant uterus over malignant, semimalignant and benign tumours and even over areas that are suspicious or contain potentially cancerous tissue ... -
Page 13: Safety Information / Warnings
Safety Information / Warnings Precautionary Definitions The precautionary instructions throughout the manual are indicated by specific symbols. It is important to understand these symbols and their definitions before operating this equipment. The definition of these symbols are as follows: Text with “Caution” indicator will explain possible safety infractions that could have the potential to cause minor to moderate injury or damage to equipment. - Page 14 Medical Electrical Equipment. Minimize this by not using other equipment with the OptonPro 25W. The device may be opened by service technicians authorized by Zimmer MedizinSystems only. DO NOT remove the cover, disassemble, modify, or remodel the unit or accessories. This may cause unit damage, malfunction, electrical shock, fire or personal injury.
- Page 15 Observe all the relevant safety instructions! Use only accessories that are specially designed for this unit. Do not use accessories manufactured by other companies on this (table, unit, device, etc.). Zimmer MedizinSystems is not responsible for any consequences resulting from using products manufactured by other companies.
- Page 16 Safety Information / Warnings The unit integrates a class 4 laser. The accessible laser radiation is very hazardous for the eye and hazardous for the skin. Diffuse radiation can also be hazardous. Laser radiation can cause fire or explosion hazard. The laser radiation delivered by the device is invisible.
- Page 17 Safety Information / Warnings User group The use of the OptonPro 25W is limited to professionals (such as physicians, therapists and healthcare professionals). Patient groups No limitation with regard to gender, nationality, ethics and skin colour types I Celtic type, II Nordic type, III mixed type, IV Mediterranean type, V dark type, VI black type.
- Page 18 Safety Information / Warnings No reflective and scattering objects The user and the patient may not wear any reflective and scattering objects in the treatment field, for example, rings, piercings, etc. No changes during the service life During the service life of the device, no changes may be made to the device or the medical system.
-
Page 19: Application Information
To do this, pull the mains plug out of the socket. The device may be opened only by service technicians authorised by Zimmer MedizinSystems. The device does not contain any parts to be maintained by the user. - Page 20 Application information Protective Measures and Equipment at the workspace Test Sensor The test sensor makes it possible to measure and balance the laser power emitted. The test sensor is also used to store the applicator after the treatment and during periods in which the device is not in use.
- Page 21 Application information Treatment Room In the surroundings of the laser workplace there should be no reflective surfaces (equipment, windows, walls, ceilings, fittings, pictures, mirrors, e.g.). Ensure that any reflecting objects in the treatment area cannot deflect the laser radiation. Matt-surfaced or diffusely scattering instruments should be used if necessary.
-
Page 22: Optonpro 25W - In Brief
OptonPro 25W – in brief What is the OptonPro 25W? OptonPro 25W is a topical heat lamp. What does the OptonPro OptonPro 25W emits energy in the infrared spectrum to provide topical heating for the 25W do? purpose of elevating the tissue temperature. What is the advantage of the The simultaneous application of laser light of three wavelengths OptonPro 25W? -
Page 23: System Set-Up
System set-up 6.1 Safety measures Safety measures Affix a laser warning sign including light to each door to the treatment room. Remove the laser warning sign sticker from the sheet enclosed with the device and affix it visibly to the device. Select a sticker in a language which can be understood by all employees. -
Page 24: Assembly And Start-Up
System set-up 6.2 Assembly and start-up Power cable assembly Connect the power cable to the provided port (11) on the device and connect the cable to the mains. Interlock plug Connect the interlock plug to the provided port (13) on the device. Switch device on Switch on the device using the main switch. -
Page 25: Configuration
Configuration Note: The following descriptions are based on the factory settings. All buttons, menus and sub-menus can be activated directly on the screen with finger pressure. Ensure that all persons present in the treatment room are wearing protective laser glasses. Changes to the default settings can only be made in the configuration menu from the start-up screen. - Page 26 Configuration Deactivation of the code Option to adjust the deactivation time period. The adjustment can be made using the -/+ buttons. The access is deactivated after the set time has passed, if no settings have been made on the screen within this time. The code must then be re-entered.
- Page 27 Configuration Maintenance Activation of the “Maintenance” button opens a window in which the date and time can be set to meet country-specific requirements. Export VAS / Favourites Enables the VAS data and Favourites saved in the device to be saved on a USB stick. This is used to backup or transfer the data to an additional/another OptonPro 25W devices.
-
Page 28: Operation Instructions
Operation instructions 8.1 Performing a treatment Note: The following descriptions are based on the factory settings. Open therapy screen Activating the “therapy” button in the start-up screen opens the therapy screen. Adjust power The power is adjusted in the “Power” bar graph. Two options are available for adjusting the power: Using the arrow buttons underneath the bar graph, the power can be adjusted in 0.1 W increments. -
Page 29: Displays And Buttons
Operation instructions 8.2 Displays and Buttons Description of the display elements and buttons Note: The following description relates to the therapy screen which is provided through the selection of “Protocols”. If the selection is made directly via “Therapy”, the display (6) is not available. Instead of this, a “Thermal threshold”... - Page 30 Operation instructions 8.2 Displays and Buttons Activation/deactivation is carried out using the 810 nm, 980 nm and 1064 nm buttons. Activating the “OK” button accepts the entry and returns to the therapy screen. Activating the “X” button interrupts the process and returns to the therapy screen.
- Page 31 Operation instructions 8.2 Displays and Buttons VAS history Activating the “History” button in the screen leads directly to the history of the patient currently selected. Activating the “History” button in the navigation bar opens the list with the patients created. The patient to be assessed is selected directly in the line.
- Page 32 Operation instructions 8.2 Displays and Buttons (8) Save Activation of the “Save” button opens an alphabetical keyboard to enter an individual name of the program. Activating the “OK” button accepts the saved data. Activating the “X” button interrupts the process. (9) Performance test The performance test is used to check the laser power emitted.
-
Page 33: Thermal Threshold Test
Operation instructions 8.3 Thermal Threshold Test Note: A precondition for the thermal threshold test is intact thermal sensitivity. If this is locally disrupted, the test should be performed at a heat-sensitive site. To do this, the laser beam is applied until the patient perceives the heat. If the application time is in the range of 7 to 11 seconds, the correct laser power is determined. - Page 34 Operation instructions 8.3 Thermal Threshold Test If the emission lasts for less than 7 seconds, the following message appears: “The power is set too high. Please repeat the test.” The power is automatically decreased by 0.5 W. If the patient perceives a feeling of warmth between 7 and 11 seconds (2), the recommended power is determined.
-
Page 35: Protocols
Operation instructions 8.4 Protocols Protocols Enter the Protocols by selecting the button Protocols (1). There are 2 options available for selecting the desired therapy: - (2) Body regions - (3) List Selecting via body The desired body region is selected by activating the white square. regions Select the treatment type or indication directly in the corresponding line, to open the therapy screen. -
Page 36: Favourites
Operation instructions 8.5 Favourites Favourites The programs changed and saved (1) in the therapy screen are filed in Favourites (2) Note: Details about the saving procedure, check chapter 8.2: Displays and Buttons Edit In the Favourites list, these can be 1. -
Page 37: Technical Information
Technical Information Wavelengths OptonPro 25W 810 nm, 980 nm and 1064 nm Output power Max. 25 Watt, CW mode OptonPro 25W Power consumption Max. 1.8 A OptonPro 25W Without spacer Spacer, small Spacer, large Treatment distance 0 cm 1.2 cm 4.5 cm Treatment area min. - Page 38 Technical Information Spacer, small L 1.2 cm Spacer, large L 4.5 cm Dimensions H 30 x W 35 x L 20 cm (without column) Laser class Safety distance NOHD (Nominal Ocular Hazard Distance) 3 m MPR (maximum permissible radiation) of skin below limit at 17 cm Beam divergence 32°...
-
Page 39: Cleaning / Disinfection
Cleaning / Disinfection Before starting any maintenance and cleaning measures the device must always be switched off at the main switch and the mains cable must be disconnected. Make sure that when cleaning and disinfecting the labelling of the device (such as warnings, labels of control devices, identification plate) is not damaged. -
Page 40: Manufacturer
Manufacturer Manufacturer Zimmer MedizinSysteme GmbH Junkersstraße 9 89231 Neu-Ulm, Germany Tel. +49 (0)731. 9761-0 Fax +49 (0)731. 9761-118 www.zimmer.de Distributor Zimmer MedizinSystems 3 Goodyear, Suite B Irvine, CA 92618 Tel: (800)-327-3576 Fax: (949)-727-2154 www.zimmerusa.com Page 30... -
Page 41: Scope Of Delivery, Accessories
Scope of Delivery / Accessories Scope of Delivery 4687 1 basic device OptonPro 25W 1 mains cable 67250131 68072310 1 interlock plug 87450250 2 protective glasses 95730015 1 laser warning sign for door, including warning light 93070620 1 spacer, small 93070630 1 spacer, large 10102986... -
Page 42: Device Combinations / Safety And Maintenance / Functional Test
Safety and maintenance OptonPro 25W is manufactured according to the IEC 60601-1 safety regulation. As the manufacturer, Zimmer MedizinSysteme can only consider itself to be responsible for safety and reliability if the equipment is operated in accordance with the instructions for use, ... -
Page 43: Error Messages / Troubleshooting / Disposal
If faults occur frequently or they cannot be eliminated, always inform the service/ after-sales service department. Customer service is reached through your authorized sales representative or by contacting the USA office in Irvine, CA. Head Office Zimmer MedizinSystems 3 Goodyear, Suite B Irvine, CA 92618 Tel: (800)-327-3576 Fax: (949)-727-2154 www.zimmerusa.com... -
Page 44: Manufacturer's Emc Declaration
Manufacturer's EMC declaration The OptonPro 25W was developed according to the recognised rules of engineering; the information on use as intended of the components was taken into account. The OptonPro 25W should not be operated near active HF surgical devices or magnetic resonance imaging devices which can cause significant electromagnetic interference. - Page 45 Manufacturer's EMC declaration Table 1 Guidance and Manufacturing Declaration- Electromagnetic Emissions The device OptonPro 25W is intended for use in the electromagnetic environment specified below. The customer or user of the device OptonPro 25W should ensure that it is used in such environment. Emission Measurement Compliance Electromagnetic Environment-Guidelines...
- Page 46 Manufacturer's EMC declaration Voltage dips in accordance 0 % U 0,5 cycle 0 % U 0,5 cycle The supply voltage quality must with IEC 61000-4-11 At 0°, 45°, 90°, 135°, At 0°, 45°, 90°, 135°, correspond to that of a typical 180°, 225°, 270°...
- Page 47 Manufacturer's EMC declaration Table 4 Electromagnetic immunity to HF radio communication equipment Test Maximum Immunity Test Band Distance Frequency Service Modulation Energy Level (MHz) (MHz) (V/m) 380-390 TETRA 400 Pulse Modulation 18 Hz 430-470 GMRS 460, FRS 460 ± 5kHz Derivation 1kHz Sine 704-787 LTE Band 13, 17...
- Page 48 OptonPro Instructions for use Zimmer MedizinSystems 3 Goodyear, Suite B Irvine, CA 92618 Tel: (800)-327-3576 Fax: (949)-727-2154 www.zimmerusa.com info@zimmerusa.com...
Need help?
Do you have a question about the Opton Pro and is the answer not in the manual?
Questions and answers