Zimmer OptonPro Operating Instructions Manual
Hide thumbs
Also See for OptonPro:
- Instructions for use manual (60 pages) ,
- Instructions for use manual (48 pages) ,
- Instructions for use manual (48 pages)
Table of Contents
Advertisement
Quick Links
Advertisement
Table of Contents

Subscribe to Our Youtube Channel
Related Manuals for Zimmer OptonPro


Summary of Contents for Zimmer OptonPro
- Page 1 Operating Instructions OptonPro...
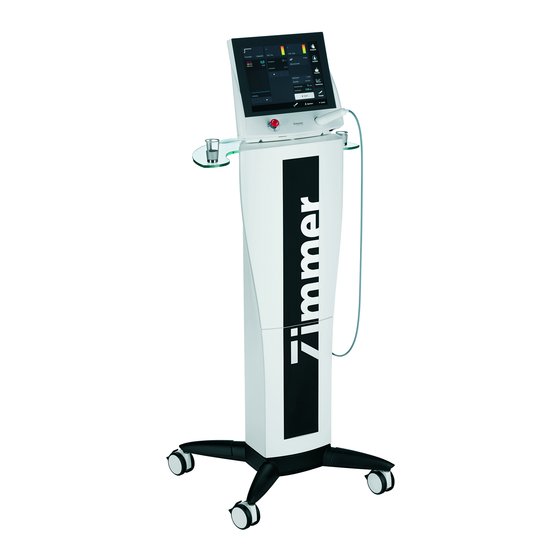
- Page 3 Figures Front view of device Fig. 1 Selection and control elements Control unit Display Emergency Off button SD card slot On/off switch Applicator with fibre-optic cable and calibration sensor Applicator Fibre-optic cable Calibration sensor and holder for applicator...
- Page 4 Figures Display Fig. 2 Screen readouts Status bar Buttons on the screen Title bar Navigation bar...
- Page 5 Figures Rear Fig. 3 18 / 19 Connector sockets Footswitch socket Interlock connector socket Connector for mains cable Holder for mains fuse Name plate 18 / 19 Socket without function for OptonPro Touch pen in holder Fibre-optic cable outlet...
- Page 6 Figures Accessories Fig. 4 22 Spacer small 23 Spacer large 24 Footswitch 25 Laser warning sign 26 Laser warning lamp 27 Interlock connector 28 Protective sleeve 29 Laser protective glasses...
-
Page 7: Table Of Contents
Fig. 1 Selection and control elements Fig. 2 Screen readouts Rear view of device Fig. 3 Connector sockets Fig. 4 Accessories Page OptonPro – quick introduction Safety measures, commissioning, function test 2.1. Quick operating instructions Instructions for use 3.1. General operation Thermal threshold test 3.3. - Page 8 Contents on delivery, accessories Errors, troubleshooting, disposal Manufacturer's EMC declaration Valid for the OptonPro. These operating instructions are an integral part of the device. They must be stored with the device and kept accessible at all times for anyone authorised to operate this device.
-
Page 9: Optonpro Quick Introduction
It delivers laser light for photochemical and thermal stimulation of parts of the What does the musculoskeletal system in physical therapy. OptonPro do? The simultaneous application of laser light of two wavelengths What is the (810 and 980nm) opens up a wide range of therapy options for the user. -
Page 10: Safety Measures, Commissioning, Function Test
Safety measures, commissioning, function test 2.1 Quick operating instructions Attach a laser warning sign and a warning light to every door to the treatment Safety room. measures The laser safety officer must check that the safety measures are correctly applied. When it is not in use, the device must be protected from unauthorised use by actuating the code key. - Page 11 Safety measures, commissioning, function test 2.1 Quick operating instructions Note: Make sure that the main switch of the device is set to '0'. Note: Ensure that all persons present in the treatment room are wearing protective goggles. Ensure that the applicator (6) is inserted completely into the calibration sensor (8).
-
Page 12: Instructions For Use
To prevent use of the laser by unauthorised persons the OptonPro must be activated by input of a key code every time the device is switched off and on again. The activating code is required for the setting and emission of laser power. - Page 13 Instructions for use 3.1. General operation Note: We recommend activating the key code in the programme screen. If the key code is activated in the treatment screen, the treatment screen is deactivated, and intensity entries cannot be made. Press the "Code (1)" button to open a numerical keypad to enter the code. Activating the key code Enter the factory-programmed code 1234 or your own code as programmed in...
- Page 14 Instructions for use 3.1. General operation Plug the required spacer onto the applicator. Spacer Press the "Parameters" button to open the "Parameters" window. Setting parameters The parameters for the various operating modes can be selected here. The parameters to be changed are selected with the buttons (1). The values are set with the buttons (2).
- Page 15 Instructions for use 3.1. General operation Press the "Rated parameter" button to open the Setting "Rated parameter" window. target parameters Entry field (1) gives the option of entering a specific number of Joules. Reminder An acoustic signal sounds once the specified number of Joules has been output.
- Page 16 Instructions for use 3.1. General operation To define the correct laser power for the specific situation, we recommended Recommendation performing a thermal threshold test before every treatment (Section 3.2). Several options are available for setting power. Use the arrow keys to set the power 1.
- Page 17 Instructions for use 3.1. General operation 3. There is a number block (1) in the "Input power" window. Setting power with number block Press the number block (1) to open another window “Input” (2). The required power is entered with the numeric keypad (3). The numbers with the black background are changed when a number button is selected.
- Page 18 Instructions for use 3.1. General operation Press the “Start” button to put the laser into operational status. Activating the laser The operational status of the laser is indicated by the "Ready" message in the status bar. The “Start” button is inactive, the “Stop” button active. Laser power is delivered by pressing the footswitch, and the “Ready”...
- Page 19 Instructions for use 3.1. General operation Power delivery is stopped by deactivating the footswitch or when the total Ending treatment energy has been delivered. The display in the bottom status bar changes from "Active" to "Ready". The power must be manually set to 0.0 W. Either set the values with the two arrows beneath the bar graph or activate the bar graph, then the number block and enter the value with the numerical keypad.
-
Page 20: Thermal Threshold Test
Instructions for use Thermal threshold test Note: The thermal threshold test is especially recommended to avoid overdose with darker skin types (IV, V, VI), particularly in CW mode. The thermal threshold test requires unimpaired thermal sensitivity. If it is locally impaired, the test should be conducted at a heat-sensitive location. - Page 21 Instructions for use Thermal threshold test The laser power is now set according to the user's best judgement and Implementation delivered by pressing the footswitch. During delivery of laser power, the elapsed time is displayed in the bar graph (3) in the thermal threshold test window. If the patient feels a sensation of heat, the laser delivery is stopped by pressing the footswitch.
-
Page 22: 2-Phase Programmes
Instructions for use 3.3. 2-phase programme The laser power can be applied statically and dynamically. 2-phase programme We recommend using both procedures in one session. Note: Trigger and major pain points are treated statically and the remaining pain region is treated dynamically. Programmes with 2 phases are integrated into the programme list. -
Page 23: 3.4. Saving Programmes
Instructions for use 3.4. Saving programmes Note: The SD card must be correctly inserted into the SD card slot for saving programmes. If this is not the case, it is not possible to save programmes. The programmes may also be saved unchanged. The programme parameters can be changed and saved in the treatment screen. - Page 24 Instructions for use 3.4. Saving programmes Programmes can be saved in the Favourites list or in the Memory list. There Note: are 120 memory spaces available in each case. Saving to the Favourites list / Memory list Press the "Favourites" button (1) to open the Favourites list and automatically save the programme to the Favourites list.
-
Page 25: Retrieving Favourites / Memory List, Opening
Instructions for use 3.5. Retrieving favourites / memory list opening programme, editing list OptonPro has one Favourites list and one Memory list. The saved programmes are listed in both lists. They can be: opened for treatment or edited (sequence changed or deleted). - Page 26 Instructions for use 3.5. Retrieving favourites / memory list opening programme, editing list Select the programme to be edited by clicking directly in the row. Editing Favourites Press the arrow key (1) to move the programme up. Press the arrow key (2) to move the programme down. Press the "Delete"...
-
Page 27: Configuration Menu
Configuration menu In the configuration menu, the factory settings can be changed and customized. Changes to the default settings can only be made from the start screen. Note: Press the “Configuration” button to open the Configuration menu. Selecting the Configuration menu (13) (11) (12) - Page 28 Configuration menu Press the "Language" button to open the window for selection of the language. Language Select directly in the appropriate row. Alternative Language The "Alternative language" function is not enabled. Configuration options for the programme start settings: Start menu Press the "Start menu"...
- Page 29 Configuration menu Option to set an individual key code. Code Pressing the "Code" button opens the number window to enter the code. To set an individual key code, the old code must first be input into the "Old code" field in the number window. Press "OK"...
-
Page 30: Navigation Bar
Navigation bar The navigation bar makes operation quick and easy. It is on the right side of every screen. Description of functions (1) Favourites: Switches to Favourites area (2) Programmes: Switches to the Programme list (3) Treatment: Switches to the treatment recommendations (4) Memory: Switches to the Memory area (5) Calibration:... -
Page 31: Therapy Recommendations
Therapy recommendations The Therapy recommendations menu helps you to select the treatment. Press the "Treatment" button to open the "Therapy recommendations" menu. Therapy Note: In the "Therapy recommendations" menu, the desired application can be selected in two ways • using body regions •... - Page 32 Therapy recommendations Press the "List” button (1) to open the list of applications. Application selection using list Irrespective of whether selection of the application uses the body region or the Note: list, the programme steps through to the treatment screen are analogous and are only described once below.
-
Page 33: Calibration
Calibration Calibration serves to control the laser power delivered. It should be run once a day before using the laser. 1. Enable the laser by entering the key code. Calibration 2. If the interlocking device is installed, close door. procedure 3. - Page 34 Calibration The result of the calibration is shown in window (1). Results of calibration 1. Calibration OK: Laser is working correctly 2. Restricted accuracy: The laser shows a deviation in laser power. This indicates soiling or age-related deviations of the laser system. The device can be used further, but maintenance should still be carried out within the next 4 weeks.
-
Page 35: Key Code
Key code The laser is protected from unauthorised access by a key code, which must be input every time it is switched on. If the code is deactivated, only the parameters can be set. Note: The laser cannot be activated using the “Start” button, power settings cannot be changed, and calibration cannot be conducted. -
Page 36: Indications
Indications Myopathy, tendinopathy • Periarthropathia humeroscapularis • Adductor insertional tendinopathy • Epicondylopathy • Patellar tendinopathy • Greater trochanteric tendonitis • Achillodynia • Plantar fasciitis • Pes anserinus insertional tendinopathy Lumbago • Painful muscle spasms • Sciatica Osteoarthritis • Knee osteoarthritis •... -
Page 37: Contraindications
Contraindications • Fresh haematoma • Malignant, semimalignant and benign tumours • Treatments in the vicinity of the eye • Pregnancy • During menstruation in the abdominal region and the lower back Particular caution is advised for treatment near the ear, the nose, the mucous membranes and blood vessels. -
Page 38: Explanation Of Symbols
Explanation of symbols Invisible laser radiation! Avoid irradiation of the eye or skin by direct or indirect radiation! Laser class 4 Wavelength 810nm and 980nm, P 7W CW EN60825-1:2007 Caution laser aperture Turn the Emergency Off button in the direction of the arrows to unlock Device type BF Footswitch socket... -
Page 39: Safety Instructions
Safety instructions OptonPro is a Class 4 laser. The accessible laser radiation is very hazardous for the eye and hazardous for the skin. Diffuse radiation can also be hazardous. Laser radiation can cause a fire or explosion hazard. The laser radiation delivered by the device is invisible. - Page 40 Safety instructions 1. The device is not intended for operation in explosive areas and/or General remarks combustion-enhancing atmospheres. 2. Avoid using combustible anaesthetic gases or oxidising gases such as nitrogen oxide (N O) and oxygen. When saturated with oxygen, some materials, such as cotton, can ignite at high temperatures which arise in normal operation of the laser equipment.
- Page 41 Safety instructions All persons present in the treatment room (patient, therapist, assistants) must Protective glasses wear suitable protective glasses. Use only protective glasses with an optical density of OD > 3 at 810nm and 980nm and a light penetration of at least 20% in the visible range. The glasses must be heat and UV resistant and comply with EN 207 requirements.
-
Page 42: General Instructions, Sd Card, Accessories, Service
"No SD card has been found". Use of the Memory requires an SD card. Insert the SD card and press "OK". Only the included accessories must be used when operating the system. Accessories The device may be opened by service technicians authorised by Zimmer Service Medizinsysteme only. -
Page 43: Repairs, Maintenance, Cleaning, Disinfection
200 hours. After another 200 operating hours, the device stops working for safety reasons. Please notify customer service at Zimmer Medizinsysteme once the first message appears. Regular maintenance of the laser unit is required to identify and possibly eliminate damage and wear on the glass fibres and other optical components. -
Page 44: Technical Data
Technical data 810nm and 980nm Wavelength 100-240V~, 50Hz/60Hz Power supply 220V~/50Hz max. 200VA Power consumption 2x T 2A Mains fuse Protection class Type BF in accordance with EN 60601-1 Applied part 4 semiconductor diode lasers, fibre-optic cables Laser system min. Ø 10mm Treatment field max. - Page 45 Technical data H 30 x W 35 x L 20 cm Dimensions Laser class NOHD (Nominal Ocular Hazard Distance) 1.66m Safety distance 35° Beam divergence Door contact switch, which opens upon opening the door, capacity 12V, 10mA, Interlock device series installation possible for multiple doors Liquid crystal display (LCD) Display Total weight: 3.8 kg...
-
Page 46: Ce Mark, Legal Information
CE mark legal information CE mark This product bears the CE mark 0123 in accordance with the EC Medical Device Directive 93/42/EEC. The product is rated in Class IIb according to Annex IX of the Directive. National laws and regulations must be observed when installing and operating Legal Information this treatment device. -
Page 47: Contents On Delivery, Accessories
Contents on delivery, accessories • Mains cable Scope of delivery • Footswitch • Interlock connecting socket • Protective glasses (2 pair) • Laser warning sign • Warning lamp • Spacer small • Spacer large • Spacer sleeves (25 count) • Touch pens (2 count) Mains cable Accessories 94.062.522... -
Page 48: Errors Troubleshooting Disposal
Errors troubleshooting disposal Make sure that the mains plug is properly inserted in the power outlet and the No response at main device connector is firmly plugged into the device port. switch, display remains dark Inspect the mains cable for damage. Check the power supply and the power outlet. - Page 49 If faults occur frequently or they cannot be eliminated, always inform the service / Customer service after-sales service department. Customer service is reached through your authorised sales representative or by contacting the head office in Neu-Ulm. Zimmer MedizinSysteme GmbH Head office Junkersstraße 9 D-89231 Neu-Ulm Tel.
-
Page 50: Manufacturer's Emc Declaration
Portable and mobile RF communications devices (such as mobile phones) may interfere with medical electrical devices. OptonPro should only be operated with the original parts specified in the delivery and accessories list. Operation of the device with accessories other than those specified may result in increased emissions or decreased immunity of the device. - Page 51 Manufacturer's EMC declaration Guidelines and manufacturer's declaration – electromagnetic immunity The OptonPro is intended for operation in one of the electromagnetic environments specified below. The customer or user of the OptonPro should ensure that it is used in such an environment.
- Page 52 Guidelines and manufacturer's declaration – electromagnetic immunity The OptonPro is intended for operation in one of the electromagnetic environments specified below. The customer or user of the OptonPro should ensure that it is used in such an environment.
- Page 53 Recommended separation distance between portable and mobile RF telecommunications equipment and the Opton Pro The OptonPro is intended for operation in an electromagnetic environment in which RF disturbances are monitored. The customer or user of the OptonPro can help prevent electromagnetic interference by maintaining a minimum distance between portable and mobile RF telecommunications equipment (transmitters) and the OptonPro, depending on the output power of the communications equipment.
- Page 54 OptonPro Operating Instructions Zimmer MedizinSysteme GmbH Junkersstraße 9 D-89231 Neu-Ulm Tel. +49 731. 97 61-291 Fax +49 731. 97 61-299 export@zimmer.de www.zimmer.de...
Need help?
Do you have a question about the OptonPro and is the answer not in the manual?
Questions and answers