Zimmer Soleo SonoStim Operating Instructions Manual
Hide thumbs
Also See for Soleo SonoStim:
- Instructions for use manual (96 pages) ,
- User manual (104 pages) ,
- User manual (104 pages)
Table of Contents
Advertisement
Advertisement
Table of Contents

Related Manuals for Zimmer Soleo SonoStim


Summary of Contents for Zimmer Soleo SonoStim
- Page 1 Operating Instructions Soleoline Soleo SonoStim, Soleo Galva, Soleo VacoS...
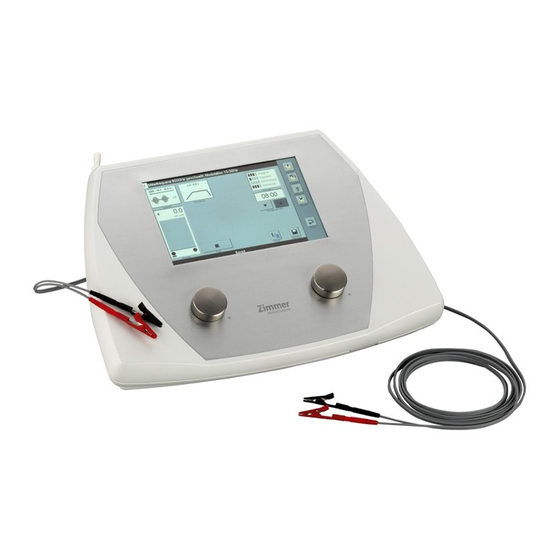
- Page 3 Soleo SonoStim / Soleo Galva Front view of device Fig. 1 Selection and control elements 1 Intensity controller channel I 5 Screen 2 Intensity controller channel II 6 Touch pen in holder 3 Alligator clip option 7 SD card slot 4 Slot for ultrasound head Fig.
- Page 4 Fig. 3 Soleo SonoStim / Soleo Galva Rear view of device Switch and connector sockets 12 Connector for mains cable 16 Socket for electrode cable channel II 13 Fuse drawer for mains fuse 17 Socket for 0.8/2.4 MHz ultrasound head...
- Page 5 VacoS Front view of device Fig. 4 Connector sockets 1 Connector socket Vaco electrode sleeve, black, cathode Circuit I 2 Connector socket Vaco electrode sleeve, red, anode 3 Connector socket Vaco electrode sleeve, black, cathode Circuit II 4 Connector socket Vaco electrode sleeve, red, anode...
- Page 6 VacoS Rear view of device Fig. 5 Switch and connector sockets 5 On/off switch 9 Socket for electrode cable Channel II 6 Connector for mains connector cable 10 Socket for connecting cable with SonoStim I Galva channel II 7 Connector for mains cable 11 Socket for electrode cable channel I 8 Fuse holder for mains fuse 12 Socket for connecting cable with...
- Page 7 Soleo SonoStim/Soleo Galva and VacoS Side view Fig. 6 Connector valve for water separator...
-
Page 8: Table Of Contents
Switch and connector sockets VacoS Front view of device Connector sockets Rear view of device Switch and connector sockets Soleo SonoStim / Soleo Galva and VacoS Side view Page Soleoline – Summary Fitting the cables, starting the system Soleo SonoStim / Soleo Galva... - Page 9 Contents Description of the selection buttons Electrotherapy – Screenshots of the various therapy screens Electrotherapy 10.1 Description of the screen elements 10.2 Description of the parameter button 10.3 Description of the surge button 10.4 Change current form parameters 10.5 Change surge parameters 10.6 Description of the screen elements and the interference button Ultrasound therapy –...
- Page 10 Error messages, Troubleshooting, Disposal Manufacturer's EMC declaration Valid for Soleo SonoStim, Soleo Galva and VacoS devices. These Operating Instructions are an integral part of the device. They must be stored with the device and kept accessible at all times for anyone authorised to operate this device.
-
Page 11: Soleoline - Summary
Soleoline – Summary An ultramodern and innovative range of products with 3 different devices What is Soleoline? available. Soleo SonoStim An ultramodern and innovative combination device for electrotherapy and ultrasound therapy with the option of attaching a vacuum unit. Soleo Galva An ultramodern and innovative electrotherapy device with the option of attaching a vacuum unit. -
Page 12: Fitting The Cables, Starting The System Soleo Sonostim / Soleo Galva
Fitting the cables Starting the system 2.1 Soleo SonoStim / Soleo Galva Note: The following description of fitting the cables refers to the operation of Soleo SonoStim / Soleo Galva without VacoS. Note: There are green arrows on the cables as guides for correct connection with the device. -
Page 13: Vacos
VacoS is controlled and operated via Soleo SonoStim/Soleo Galva. Stand- alone operation is not possible. Place Soleo SonoStim / Soleo Galva on VacoS so that the devices are flush on Preparation top of one another. The connector sockets for the Vaco electrode sleeves must be at the front of the device (Fig. - Page 14 2.2 VacoS Note: If Soleo SonoStim / Soleo Galva is operated in connection with VacoS, the electrode cable is connected to VacoS. The installation is described below. Ensure when connecting the electrode cable to VacoS that the green arrow is Fitting the pointing upwards when being plugged in.
- Page 15 Vaco electrodes Plug the short mains connecting cable into the appropriate sockets on VacoS Connecting to the (6) and Soleo SonoStim / Soleo Galva (12). mains Plug the mains cable into the appropriate socket on VacoS (7) and then plug Connecting the the cable into the mains power wall socket.
-
Page 16: Configuration
Configuration 3.1 General Note: The following descriptions always refer to therapy using a single channel and are based on the factory default settings. Note: Changes to the default settings can only be made from the start screen. After switching on the device and the self-test, the start screen opens. Start screen Selecting configuration... - Page 17 Configuration 3.1 General In the configuration menu the factory settings can be changed and individually Configuration menu set. After activation of the configuration menu the ‘Select configuration’ screen is active. Saving settings Press the button to save the new settings. Quitting the configuration menu Press the...
- Page 18 Configuration 3.1 General Configuration options for the programme start settings: Start settings Press the arrow key to open the drop-down menu to select the programme start configurations. The options are selected by pressing on the appropriate row. Option to choose between 2 start screens: Start screen Press the arrow key to open the...
- Page 19 Configuration 3.1 General To switch the signal sound on and off when activating the control fields: Sound Press the arrow key to open the drop- down menu to switch sound on and off. The selection is made by pressing on the appropriate row. Option to adjust the volume in steps from 1 to 4: Volume Press the...
- Page 20 Configuration 3.1 General Option to configure the start of the screen saver after 0 to 20 minutes: Screen saver The time is selected using both arrow keys. Note: While therapy is running the screen saver function is deactivated. Option to configure an individual welcome message. Welcome message Activate the Welcome message field to open the screen keyboard to...
- Page 21 Configuration 3.1 General Setting defaults Press the button to reset the factory standard settings. Version Press the button to open the window with information about the current software version. Press the OK button to close the window.
-
Page 22: Electrotherapy
Configuration 3.2 Electrotherapy Activate the menu Electrotherapy settings to open the ‘Electrostimulation configuration’ screen. The settings required for therapy can be adjusted here. Option to configure a uniform therapy time of 1 to 60 minutes for all Time programmes. The time is selected using both arrow keys. Option to adjust the polarity reversal time from 10 to 120 seconds. - Page 23 Configuration 3.2 Electrotherapy Option to adjust the base frequency to 2500 Hz, 4000 Hz and 8000 Hz: Frequency The frequency is selected using both arrow keys. Note: The device is preset with a base frequency of 8000 Hz. If you modify the base frequency in this menu, the name of programmes MF00 to MF11 will remain with 8000Hz.
-
Page 24: Ultrasound Therapy
Configuration 3.3 Ultrasound therapy Note: Activation of the ‘Ultrasound Therapy’ menu and the associated settings is only possible in the Soleo SonoStim version. Press the menu Ultrasound therapy settings to open the ‘Ultrasound therapy configuration’ screen. The settings required for therapy can be adjusted here. - Page 25 Configuration 3.3 Ultrasound therapy Option to configure the units for intensity in a bar graph: Units Press the arrow button to open the drop-down menu to select the desired units for power. The unit is selected by pressing on the appropriate row.
-
Page 26: Maintenance
Software can be updated using the updates menu. You will receive the latest information about updating software when an update is planned. For servicing other passwords are necessary. Servicing is permissible by Zimmer technicians or technicians trained by Zimmer MedizinSysteme only. -
Page 27: Soleo Sonostim Quick Operating Instructions
Soleo SonoStim Quick operating instructions 4.1 Electrostimulation Note: The following note applies to all therapy forms available in the system. Changing the therapy time can result in a modification of the effects and the patient must be carefully monitored during treatment. - Page 28 Soleo SonoStim Quick operating instructions 4.1 Electrotherapy Electrotherapy is selected by pressing on the appropriate row. Selecting electrotherapy The following description refers to the electrotherapy programme. Select the current forms group by pressing on the appropriate row (here Selecting monophasic rectangular current).
- Page 29 Soleo SonoStim Quick operating instructions 4.1 Electrotherapy Select the current form by pressing on the appropriate row (here LF 00). Selecting current form After selecting the current form, the therapy screen opens automatically for Therapy screen channel I.
- Page 30 ‘Active’ to ‘Ready’. The therapy time is automatically reset at the end of the therapy. Note: The Vacuum icon is only visible if VacoS is connected to Soleo SonoStim / Soleo Galva and switched on as described in Chapter 2.2.
-
Page 31: Ultrasound Therapy
Soleo SonoStim Quick operating instructions 4.2 Ultrasound therapy Starting the programme Press the button to open the ‘Programme’ screen. The programme is selected here. Ultrasound therapy is selected by pressing on the appropriate row. Selecting ultrasound therapy... - Page 32 Soleo SonoStim Quick operating instructions 4.2 Ultrasound therapy Select the desired ultrasound therapy programme by pressing on the Selecting the appropriate row (here US 01). programme After selecting the ultrasound therapy programme, the therapy screen opens. Therapy screen Note: Check that the information shown on the Parameter button (here 5 cm...
- Page 33 Soleo SonoStim Quick operating instructions 4.2. Ultrasound therapy Adjust the intensity using the intensity controller on the left. Setting intensity Press the button to start the therapy. Starting therapy The display in the bottom status bar changes from ‘Ready’ to ‘Active’ with the start of therapy and the ‘Start’...
- Page 34 Soleo SonoStim Quick operating instructions 4.2 Ultrasound therapy At the end of the therapy time an acoustic signal indicates that the therapy has Ending therapy ended and the clock is reset to 00:00. The intensity automatically returns to zero, the bar graph display disappears and the coupling display is inactive. The display in the bottom status bar changes from ‘Active’...
-
Page 35: Water Bath Treatment
Soleo SonoStim Quick operating instructions 4.2.1 Water bath treatment Note: If the ultrasound therapy is done in a water bath, the ultrasound head temperature monitoring must be changed before starting the therapy. Press the ‘Parameters’ Implementation button to open the ‘Ultrasound Parameters’ window. - Page 36 Soleo SonoStim Quick operating instructions 4.2.1 Water bath treatment If at the end of the therapy an additional treatment with the same ultrasound programme will be carried out, after adjusting the intensity, the following message appears: If, at the end of therapy, the programme will be changed, the function of the water bath button is automatically deactivated.
-
Page 37: Combination Therapy
Soleo SonoStim Quick operating instructions 4.3 Combination therapy Starting the programme Press the button to open the ‘Programme’ screen. The programme is selected here. Select combination therapy by pressing on the appropriate row. Selecting combination therapy... - Page 38 Soleo SonoStim Quick operating instructions 4.3 Combination therapy Select the desired combination therapy programme by pressing on the Selecting the appropriate row. programme After selecting the combined therapy programme, the therapy screen opens. Therapy screen...
- Page 39 Soleo SonoStim Quick operating instructions 4.3 Combination therapy Adjust the intensity using the intensity controller on the left. Setting intensity of the ultrasound Combination therapy is activated by adjusting the intensity using the intensity Starting therapy controller on the right.
- Page 40 Soleo SonoStim Quick operating instructions 4.3 Combination therapy At the end of the therapy time, an acoustic signal indicates that the therapy has Ending therapy ended and the clock is reset to 00:00. The intensity automatically returns to zero, the bar graph display disappears and the coupling display is inactive. The display in the bottom status bar changes from ‘Active’...
-
Page 41: Soleo Galva - Quick Operating Instructions
Soleo Galva Quick operating instructions Starting the programme Press the button to open the ‘Programme’ screen. Select the current forms group by pressing on the appropriate row (here Selecting monophasic rectangular current). current forms group Note: The additional steps required to carry out the therapy are described in more detail in Section 4.1. -
Page 42: Soleo Sonostim / Soleo Galva
If a vacuum unit is not attached, the ‘Vacuum’ button is not displayed. This is also the case if data transmission or the connection of the vacuum unit to Soleo SonoStim / Soleo Galva is broken or interrupted. Press the... - Page 43 Soleo SonoStim / Soleo Galva Quick operating instructions Electrotherapy with VacoS A base vacuum of 16 kPa is set at the factory. Activating base vacuum Press the button to activate the base vacuum for intake of the Vaco electrodes. By activating the base vacuum, the vacuum is active.
- Page 44 Soleo SonoStim / Soleo Galva Quick operating instructions Electrotherapy with VacoS By adjusting the intensity using the intensity controller on the left, the display in Starting the lower status bar changes from ‘Ready’ to ‘Active’ and the therapy starts. electrotherapy The effective current is shown in the bar graph and the therapy time counts down in seconds.
- Page 45 Soleo SonoStim / Soleo Galva Quick operating instructions Electrotherapy with VacoS Note: The vacuum must be ended manually using ‘Stop’ after expiry of the time. The ‘Stop’ button changes to ‘Start’. Deactivating the vacuum Deactivate the vacuum using the button.
-
Page 46: General Instructions - Vacos/Sd Card
General information VacoS SD card VacoS contains an integrated water separator that collects the moisture VacoS collected in the sponges and protects the vacuum unit from limescale. If the water separator is full, the message ‘Empty water separator’ appears on the screen. -
Page 47: Description Of The Selection Buttons
Description of the selection buttons Note: The following descriptions are all based on the factory settings. Press the button to open the settings menu. Configuration The options are described in detail in Section 3. Press the button to open the start screen from the Programme window. Start Press the button Favourites... - Page 48 Description of the selection buttons Press the button to open the indications menu. Indications Press the button Memory • to open the memory list for editing • to add the programme to the memory list in memory mode. Press the button to open the channel mode. Channel When the button is pressed different channel mode options can be selected.
- Page 49 Description of the selection buttons In Monostim mode, channel 1 or channel 2 can be activated for the desired Channel Group therapy. Activates channel I, channel I is active. Activates channel II, channel II is active. Synchronisation group The surge output is defined here for the Twinstim and Duostim modes. Alternate activation: The current forms are started and stopped simultaneously on both channels.
- Page 50 Description of the selection buttons Press the button to select a different current form for channel I. Press the button to select a different current form for channel II. Note: Both buttons are highlighted in channel mode and can only be activated in Duostim mode.
- Page 51 Description of the selection buttons Press the button to move the order of the list upwards by one position. Moving Press the button to move the order of the list downwards by one position. Moving Press the button to delete the selected programme from the list. Deleting Press the button to scroll one page down the list.
- Page 52 Description of the selection buttons Press the button to close the Favourites and Memory programmes. Close Press the button to reject the changes made. Cancel Press the button to confirm the changes in the selected list. The changes are applied by pressing the button.
-
Page 53: Electrotherapy - Screenshots Of The Various Therapy Screens
Electrotherapy Screenshots of the various therapy screens Monostim Example: Programme LF00 on one channel (I). Twinstim Example: Programme LF00 on both channels (I and II). - Page 54 Electrotherapy Screenshots of the various therapy screens Duostim alternating Duostim parallel Duostim separate...
-
Page 55: Description Of The Screen Elements
Electrotherapy 10.1 Description of the screen elements Note: The ‘Parameter’, ‘Surge’ and ‘Vacuum’ buttons turn into control panels once an electrotherapy programme has been selected. Title bar The title bar shows the channel mode and the name of the effective current form. - Page 56 Electrotherapy 10.1 Description of the screen elements Therapy time Shows the total therapy time from the After starting therapy the remaining start of therapy. time is displayed. Bar graph of intensity Shows the currently specified intensity. In CC mode: In CV mode: display in mA eff or peak.
-
Page 57: Description Of The Parameter Button
Electrotherapy 10.2 Description of the parameters button Parameters 1. Presents the parameters of the current therapy programme. 2. Activates ‘ Parameters of Current Form’ for modification. A detailed description can be found in Section 10.4. 1.1 Frequency display 1.2 Graphic view of waveform 1.3 Polarity 1.4 CC / CV 1.5 Galvanic component... - Page 58 Electrotherapy 10.2 Description of the parameters button Graphic view of waveform. 1.2 Waveform Display of polarity: 1.3 Polarity only positive • only negative • polarity reverses automatically • Note: If the polarity reverses automatically, the first polarity reversal is for 45 seconds (factory setting) or the time set in the configuration menu.
-
Page 59: Description Of The Surge Button
Electrotherapy 10.3 Description of the surge button Surge active Indicates that a surge is activated and shows the parameters of the effective surge. 6.0 / 12.0 s - rise time and retention time of the surge phase in seconds - pause of the surge phase in seconds 12.0 After activation of the surge window, the surge parameters can be set separately. - Page 60 Electrotherapy 10.3 Description of the surge button Surge inactive When the therapy is inactive, the surge is shown completely in blue. Surge active During therapy, the surge is shown as an animation showing the surge position. Alternating Synchronisation mode alternated In two-channel mode the alternating surge mode is shown by the two opposing arrows in the top left corner.
-
Page 61: Change Current Form Parameters
Electrotherapy 10.4 Change current form parameters Note: Only the parameters that are shown in the parameter window can be changed. Note: If the Parameters button is activated during therapy, the therapy will be interrupted, the intensity returns to zero and the therapy time is set to the standard value. - Page 62 Electrotherapy 10.4 Change current form parameters The parameters that are to be changed are selected with the Selecting the parameters arrow keys. The parameter highlighted in blue can be changed (impulse time here). Note: Changes to the pulse and pulse hold time also change the frequency. Use the arrow keys Changing parameters to increase or decrease the value within the limits specified in the current...
- Page 63 Electrotherapy 10.4 Change current form parameters Press the Galvanic component arrow keys to reinforce the current form with a galvanic component or to eliminate the galvanic component. Press the Switching CC / CV mode arrow keys to switch the current form from CC to CV mode and vice versa. Press the Changing polarity arrow keys to change the polarity of the current form.
- Page 64 Electrotherapy 10.4 Change current form parameters Press the Saving parameters button to save the modified parameters. Press the Cancelling changes button to reject changes.
-
Page 65: Change Surge Parameters
Electrotherapy 10.5 Change surge parameters Note: If the Surge button is activated during therapy, the therapy will be interrupted, the intensity returns to zero and the therapy time is set to the standard value. When the Surge button is activated, the ‘Surge Parameters’ window is Activating opened. - Page 66 Electrotherapy 10.5 Change surge parameters The duration of the surge phase is calculated from the duration of the rise time, hold time and down time. Select the parameters to be changed using the Selecting parameters arrow keys. 1. Rise time (1.5 s here) 2.
- Page 67 Electrotherapy 10.5 Change surge parameters Press the Saving parameters button to save the modified parameters. Press the Cancelling changes button to reject changes.
-
Page 68: Description Of The Screen Elements And The Interference Button
Electrotherapy 10.6 Description of the screen elements and the interference button This parameter window shows the maximum effect. Interference Static with sweep deactivated. Animated with sweep activated. parameter window Animated view Static view When the parameters window is activated, the ‘Parameters of Current Form’ window is opened. -
Page 69: Ultrasound Therapy - Screenshot Of The Therapy Screen
Ultrasound therapy Screenshot of the therapy screen... -
Page 70: Ultrasound Therapy
Ultrasound therapy 12.1 Description of the screen elements Title bar The title bar shows the channel mode and the name of the current ultrasound therapy programme. Status bar The status bar shows information on the current status of the therapy. If the therapy is not active, it shows the word ‘Ready’. - Page 71 Ultrasound therapy 12.1 Description of the screen elements Graphic view of the active ultrasound head (large ultrasound head here). 1.1 Ultrasound head Graphic view of the operating mode 1.2 Operating mode Pulse ratio continuous Pulse frequency pulsed Pulsed operating mode showing the pulse ratio (1:3 here) and the pulse frequency (50 Hz here).
- Page 72 Ultrasound therapy 12.1 Description of the screen elements The coupling is shown digitally as a percentage. Coupling Important: The most beneficial coupling value is 100%. If the coupling is below the preset value (factory setting 75%), an acoustic signal sounds and the therapy time is paused. In this case: Set a new coupling value and when the coupling is sufficient the therapy will continue.
-
Page 73: Description Of The Parameter Button
Ultrasound therapy 12.2 Description of the parameter button Note: If the Parameters button is activated during therapy, the therapy will be interrupted, the intensity returns to zero and the therapy time is set to the standard value. Note: Only the parameters that are shown in the parameter window can be changed. - Page 74 Ultrasound therapy 12.2 Description of the parameter button Press the two arrow buttons Selecting the mode to select the desired mode. Modes: • continuous • pulsed with duty cycles of 1:2, 1:3, 1:5 and 1:10 Press the two arrow buttons Selecting the frequency to select the desired frequency.
- Page 75 Ultrasound therapy 12.2 Description of the parameter button Press the Saving button to save the modified parameters. Press the Cancelling changes button to reject changes made.
-
Page 76: Description Of The Treatment Depth Button
Ultrasound therapy 12.3 Description of the treatment depth button Note: If the Treatment Depth button is activated during therapy, the therapy will be interrupted, the intensity returns to zero and the therapy time is set to the standard value. Press the ‘Depth of treatment’ button Adjusting treatment depth to open the treatment depth screen. -
Page 77: Combination Therapy - Screenshot Of The Therapy Screen
Combination therapy Screenshot of the therapy screen Note: The buttons and functions on the ‘Combination’ therapy screen correspond exactly to the therapy screens for ‘Electrostimulation’ and ‘Ultrasound therapy’ as described in the previous sections. An extensive description of the therapy screen will not be given here. -
Page 78: Electrotherapy With Vacos - Screenshot Of The Therapy Screen
Electrotherapy with VacoS Screenshot of the therapy screen Note: The ‘Electrotherapy’ displays and buttons have been described in detail in the preceding sections and only the displays and buttons that are also active when using VacoS will be described in this section. Electrotherapy combined with VacoS... -
Page 79: Description Of The Screen Elements
Electrotherapy with VacoS 14.1 Description of the screen elements Signals the connection of the vacuum unit in the therapy screen. Vacuum Note: If a vacuum unit is not attached, the ‘Vacuum’ button is not displayed. This is also the case if data transmission or the connection of the vacuum unit to SonoStim / Soleo Galva is broken or interrupted. -
Page 80: Changing Parameters
Electrotherapy with VacoS 14.2 Changing parameters Press the button Changing vacuum parameters to open the vacuum menu to set the vacuum parameters. The factory setting is continuous mode. Continuous mode Pulse mode Adjust the pulse duration using both arrow keys. The pulse time can be set from 0.5 s to 8.0 s. - Page 81 Electrotherapy with VacoS 14.2 Changing parameters Changing base vacuum Increase or decrease the base vacuum using the arrow keys to the left and right of the ‘Base Vacuum’ window. Note: If the base vacuum is set higher than 16 kPa, the vacuum must be increased first.
- Page 82 Electrotherapy with VacoS 14.2 Changing parameters Press the button Saving parameters to save the changed parameters and to return to the ‘Vacuum’ start screen. Press the button Cancelling changes to reject the changes and to return to the ‘Vacuum’ start screen.
-
Page 83: Indications Menu
Indications menu The Indications menu helps you to select the therapy. Press the button Indications to open the Indications menu. Select a body region by touching a blue circle. Selecting by body region... - Page 84 Indications menu After selecting the desired body region (shoulder in this example) the Selecting by Indication window opens showing various symptoms in the shoulder region. symptoms Select the symptoms by clicking on the relevant row (shoulder-arm syndrome in this example). After selecting the symptoms another window opens showing detailed Selecting by symptoms.
- Page 85 Indications menu After selecting the detailed symptoms another window opens showing Therapy information detailed therapy information and a suggested programme. Press the button Selecting the therapy programme to open the therapy screen with the programme.
-
Page 86: Saving A Modified Programme
Saving a modified programme As described in the previous sections, the programme parameters can be separately modified and saved. Note: The procedure for saving is similar for all therapy forms. The save procedure for an electrotherapy programme is described below. Selecting the programme The change is shown in the title bar (LF 01 –... - Page 87 Saving a modified programme Press the button Opening the memory list to open the screen to enter the programme name. Two options are available for naming a programme. Naming the programme 1. Accept the programme name in the input field. 2.
-
Page 88: Favourites
Saving a modified programme 16.1 Favourites Saving a programme in Favourites Press the button to open Favourites. Adding the programme to Favourites Press the button to add the programme to Favourites. The programme is automatically saved in the first free space in the list. Favourites Programme number in the list... -
Page 89: Memory
Saving a modified programme 16.2 Memory Saving a programme in the Memory Press the button to open the Memory. Adding the programme to the Memory Press the button to add the program to the Memory. The programme is automatically saved in the first free space in the list. Memory Programme number in the list... -
Page 90: Retrieving And Editing Favourites And Memory
Retrieving and editing favourites and memory 17.1 Retrieving favourites The individual saved programmes are listed in Favourites. From here they can be: 1. retrieved for therapy or 2. edited (sequence changed or deleted). Press the Selecting Favourites button to open Favourites. Select the desired programme by pressing on the appropriate row. -
Page 91: Editing Favourites
Retrieving and editing favourites and memory 17.2 Editing favourites Press the Editing Favourites button to open the ‘Edit Favourites’ screen. Select the program to be edited by clicking on the appropriate row. Selecting the programme Activate the appropriate arrow keys to move the programme up or down in Changing sequence the sequence. - Page 92 Retrieving and editing favourites and memory 17.2 Editing favourites Deleting a programme Pressing the button triggers the security question ‘Delete’. Press the button to delete the saved program. Press the button to keep the saved program.
-
Page 93: Retrieving And Editing Memory
Retrieving and editing favourites and memory 17.3 Retrieving and editing memory Press the Selecting Memory button to open the Memory. Select the desired programme by pressing on the appropriate row. Selecting therapy Editing Memory The following steps to edit the Memory correspond exactly to those used to Note: edit Favourites that were described in detail in the preceding section. -
Page 94: Sequence Programmes
Sequence programmes Sequence programmes are a compilation of up to three electrotherapy programs that can be automatically started in sequence. Various programmes are factory-defined in the ‘Currents’ programmes for sports rehabilitation. They generally consist of warm-up, training and relaxation phases. Therapy screen for a preset programme The currently active sequence (1 to 3) - Page 95 Sequence programmes Note: Because different pulse shapes and frequencies entail different sensitivities to current, the intensity surges are defined for the individual sequences before starting the therapy. Press the field Activating the sequence window to open the ‘Sequences’ window. Before starting the sequence therapy, the intensity surges are defined here for the individual sequences.
- Page 96 Sequence programmes Press the field Sequence 2 General muscle strengthening to open the ‘Sequences’ window. Select sequence 2 by clicking on the row. It is highlighted in blue after activation. Confirm sequence 2 with OK. Define the intensity for sequence 2 using the two intensity buttons.
- Page 97 Sequence programmes Press the field Sequence 1 Relaxation phase to open the ‘Sequences’ window. Select sequence 3 by clicking on the row. It is highlighted in blue after activation. Confirm sequence 3 with OK. Define the intensity for sequence 3 using the two intensity buttons. Note: After defining the intensities, the therapy time runs through the various sequences.
- Page 98 Sequence programmes Press the field Activating sequence 1 to open the ‘Sequences’ window. Activate sequence 1 by directly pressing on the row and confirm with OK. By activating sequence 1, the therapy time is reset to the predefined value and the start button becomes active.
- Page 99 Sequence programmes Click the button to start the therapy. Starting therapy The three sequences run in succession. The change of sequence is indicated by an acoustic signal. When the therapy time has finished an acoustic signal sounds. Ending therapy...
-
Page 100: Paralysis Diagnostics And Therapy Overview
Paralysis diagnostics and therapy overview Soleo SonoStim / Soleo Galva include special programmes for diagnostics and therapy of paresis and flaccid paralysis. The diagnostic programmes provide indications for assessment of the severity of a flaccid paralysis and make it easy to individually define the parameters for treatment of the specific patient. -
Page 101: Lange Medium Frequency Test
Paralysis diagnostics 19.1 Lange medium frequency test The Lange medium frequency test gives a general indication of whether a muscle is partially or totally denervated. The electrodes are positioned on the muscle for testing. Screenshot Note: By regulating the intensity the Pulse button becomes active.. Trigger a single pulse by setting an appropriate intensity and pressing the Implementation button. -
Page 102: Neofaradic Test
Paralysis diagnostics 19.2 Neofaradic test The neofaradic test indicates whether a muscle is normally innervated. A muscle is normally innervated if it reacts with a contraction equal in length to an excitation time of one minute. An innervation disorder can be assumed if no contraction or only a short contraction is observed. -
Page 103: Chronaxia/Accommodation Quotient
Paralysis diagnostics 19.3 Chronaxia/accommodation quotient This programme is used to conduct a simple and quick diagnosis. It consists of three steps that measure the rheobase, chronaxia and accommodation threshold, from which the accommodation quotient is calculated. Screenshot Surge current magnitude for triggering a minimum muscle twitch with a Rheobase square-wave pulse of 1000 ms. - Page 104 Paralysis diagnostics 19.3 Chronaxia/accommodation quotient Step 3: Accept rheobase value. By accepting the calculated pulse, the intensity is automatically set to double the rheobase value. The intensity cannot be modified in this step. Pulse duration for triggering a minimum muscle twitch at a surge current Chronaxie strength that is double the rheobase value.
- Page 105 Paralysis diagnostics 19.3 Chronaxia/accommodation quotient Step 3: Accept chronaxia value. Surge current magnitude for triggering a minimum muscle twitch with a Accommodation triangular pulse of 1000 ms. threshold Accommodation Surge intensity (mA) of the TPC at 1000ms quotient Surge intensity (mA) of the RPC at 1000ms (rheobase) triangular pulse characteristic rectangular pulse characteristic Calculating...
- Page 106 Paralysis diagnostics 19.3 Chronaxia/accommodation quotient By accepting the value of the accommodation threshold, the accommodation Accommodation quotient is automatically calculated. The calculated values are shown in a quotient window. Evaluation of the chronaxia < 0.05 ms Hyperexcitability 0.05–1 ms Normal excitability 1–20 ms Partial degeneration >...
-
Page 107: Fischgold Test
Paralysis diagnostics 19.4 Fischgold test This programme is used to conduct a simple and quick diagnosis. The measurement is conducted in two phases: In phase 1 the intensity I1 of the first muscle twitch is calculated for a square- wave pulse of 1 ms pulse duration. In phase 2 the intensity I2 of the first muscle twitch is calculated for a square- wave pulse of 100 ms. - Page 108 Paralysis diagnostics 19.4 Fischgold test Conduct measurement phase 2 in the same way as phase 1. Conducting measurement After the measurement the calculated values are shown at the top right of the phase 2 screen. Evaluation of the quotients < 1.7: normally functioning neuromuscular system >...
-
Page 109: Indications
Indications 20.1 Electrotherapy • Functional circulation disorders Therapy to stimulate • Angiopathy in diabetes mellitus blood flow • Angioneuropathy (Raynaud’s syndrome) • Acrocyanosis • Arterial occlusive disease (stage I/IIa) • Venous vascular diseases • Chronic venous insufficiency • Sympathetic reflex dystrophy •... - Page 110 Indications 20.1 Electrostimulation • Neuritis • Polyneuropathy • Radicular syndrome • Nerve compression syndrome • Allodynia • Causalgia • Venous ulcers Trophic stimulation • Neurotrophic ulcers therapy • Decubitus ulcers • Delayed wound healing • Osteoporosis • Delayed bone healing •...
- Page 111 Indications 20.1 Electrotherapy • Faecal incontinence • Urinary incontinence • Intestinal motility disorder • Chronic constipation • Secondary lymphoedema and lymph stasis • Pelvipathy • Polyneuropathy • Anterior horn cell disease of the spinal cord • Peripheral paralysis, plexus paralysis •...
- Page 112 Indications 20.2 Ultrasound therapy • Vertebral pain syndrome, e.g., cervical syndrome Indications from • Anyklosing spondylitis (only during inflammation-free periods) orthopaedics, surgery, traumatology, • Joint diseases rheumatology • Rheumatoid arthritis (if heat treatment is indicated) • Joint degeneration • Periarthropathy •...
-
Page 113: Contraindications
Contraindications 21. 1 Electrotherapy • Acute inflammation (local, systemic) General • Arterial occlusive disease from stage IIb according to Fontaine contraindications • Suppurative processes • Fever • General infections • Malignant and benign tumours • Thrombophlebitis • Phlebothrombosis with risk of embolism •... - Page 114 Contraindications 21.2 Ultrasound therapy • Diseases in which heat should not be applied, e.g., acute inflammatory General diseases contraindications • Diseases in which mechanical forces are contraindicated, e.g., phlebothrombosis, haemorrhagic diathesis • Do not apply ultrasound higher than C3 • Do not apply ultrasound to parenchymatous or heat-sensitive organs (testes, eyes, pregnant uterus, liver, kidney, etc.) •...
-
Page 115: Explanation Of Symbols
Explanation of symbols In the Operating Instructions, this symbol stands for danger. Follow directions in the Operating Instructions at all times. In the Operating Instructions this symbol stands for ‘Caution’ with regard to possible damage to property. Follow operating instructions Manufacturer Serial number Type BF (as per IEC 601-1):... -
Page 116: Warnings
Warnings Please note: Never connect two patients to the device in one session! Do not use the device in wet rooms (hydrotherapy) or balneotherapy rooms. Do not leave patients unattended during treatment. Do not conduct electrotherapy treatment on patients with implants or any Electrotherapy other implanted electronic device unless the risk has been assessed and found negligible. - Page 117 Disinfect the ultrasound head with standard disinfectants after use. The use of coupling agents other than the special ultrasound gel Sono plus may damage the ultrasound head. We recommend Sono plus by Zimmer MedizinSysteme. Do not conduct treatment on patients with a tendency to haematoma unless Vacuum the risk has been assessed and found to be negligible.
-
Page 118: General Technical Information
General technical information Soleo SonoStim / Soleo Galva Operating voltage 100–240 V, 220 V / 50/ 60 Hz Power consumption max. 60 VA Protection class Mains fuse 2 x 3.15 A T Applied part Type BF Dimensions 322 mm x 234 mm x 130 mm Weight 2.1 kg... -
Page 119: General Technical Information - Vacos
General technical information VacoS Operating voltage 100–120 V or 230–240 V, 220 V / 50/ 60 Hz (see manufacturing plate) Power consumption max. 50 VA Protection class Mains fuse 2 x 0.5 A T Applied part Type BF Dimensions 322 mm x 234 mm x 130 mm Weight 3.0 kg Transport... -
Page 120: Specific Technical Information
Specific technical Information 26.1 Stimulation current Power emitted 1000 2000 80 mA 80 mA 80 mA 80 mA Galvanisation GA xx 14 V 40 V 60 V 60 V 6 mA 20 mA 20 mA 20 mA Diadynamic currents DD xx 16 V 40 V 250 mA... -
Page 121: Ultrasound
Specific technical Information 26.2 Ultrasound Ultrasound heads Frequency 800 kHz (0.8 MHz) and 2.4 MHz Small ultrasound head 1 cm² , ERA = 1.1 cm² at 800 kHz (0.8 MHz), 0.5 cm² at 2.4 MHz Maximum output 1 W at 800 kHz (0.8 MHz), 0.5 W at 2.4 MHz Intensity steps 0.1 to 1 W/cm²... -
Page 122: Vacos
Specific technical Information 26.3 VacoS Negative pressure 12–60 kPa Pulse operation Period duration adjustable from 1 to 8 s in steps of 0.5 seconds, duty factor Accuracy < ± 20 % (This value represents the legally permissible value required by law, and not the actual accuracy level for each device) -
Page 123: Cleaning Disinfection
Cleaning Disinfection Clean housing with standard alcohol-free plastic cleaner. Housing Disinfect housing with standard alcohol-free disinfectant suitable for plastic. Clean the screen with standard alcohol-free plastic cleaner. Screen Disinfect the screen with standard alcohol-free disinfectant suitable for plastic. Clean the ultrasound heads with tap water. Ultrasound heads Disinfect the ultrasound heads with standard alcohol-free disinfectant suitable for plastic. -
Page 124: Use And Care
Electrodes 28.1 Use and care All standard electrodes for electrotherapy can be connected to Soleo SonoStim / Soleo Galva using insulated cable terminals. Reliable disposable electrodes are particularly suitable. Disposable electrodes offer the advantage of simple, fast, accurate and hygienic application. -
Page 125: Information About The Use Of Various Electrode Types
Electrodes 28.2 Information about the use of various electrode types Select and apply electrodes with care. In constant current operation, a good, General note even skin contact must be ensured. A reduction in the contact area may result in paraesthesia in patients. Before starting the treatment, the skin must be inspected and cleaned if necessary, e.g., if the patient is sweaty or has applied any cream. - Page 126 Electrodes 28.2 Information about the use of various electrode types Both rubber and zinc plate electrodes must always have a moist intermediate Sponge holders and layer placed underneath. It is recommended to use sponge holders for rubber sponges electrodes and sponges, which should be at least 1 to 2 cm thick, for zinc plate electrodes.
-
Page 127: Ce Marking
EU Medical Devices Directive 93/42/EEC and meets the essential requirements of Annex I to this Directive. The product Soleo SonoStim is rated in Class IIb according to Annex IX of the Directive. The product Soleo Galva is rated in Class IIa according to Annex IX of the Directive. -
Page 128: Contents On Delivery Accessories
Contents on delivery Accessories 30.1 Soleo SonoStim Contents on delivery Soleo SonoStim 2 pairs of electrode cables, incl. 2 red and 2 black alligator clips, 2.90 m long 1 variable frequency ultrasound head 0.8 and 2.4 MHz, ø 28 mm... -
Page 129: Soleo Galva
Contents on delivery Accessories 30.2 Soleo Galva Contents on delivery Soleo Galva 2 pairs of electrode cables, incl. 2 red and 2 black alligator clips, 2.90 m long 1 storage tray, right 1 storage tray, left 1 mains cable 2 touch pens Accessories Item No. -
Page 130: Vacos
2 pairs of Vaco self-sealing electrodes, 90 mm diameter, with sponges 2 pairs of Vaco self-sealing electrodes, 60 mm diameter, with sponges 2 connecting cables for Soleo SonoStim / Soleo Galva 1 mains connecting cable, short 4 sorting racks for Vaco electrode sleeves... -
Page 131: Device Combinations
Device combinations Soleo SonoStim and Soleo Galva can be combined with VacoS. The party that combines and uses the devices as a medical system is responsible for correct assembly of the devices. -
Page 132: Safety And Maintenance
Safety and maintenance Soleo SonoStim / Soleo Galva are produced in accordance with the safety requirements of EN 60601-1. Zimmer MedizinSysteme as the manufacturer can be responsible for the safety and reliability only in the following circumstances: • if the device is operated from an approved earthed wall socket and the electrical installation conforms to DIN VDE 0100 Part 710 •... -
Page 133: Functional Test
Functional test Soleo SonoStim / Soleo Galva runs a self-test that checks all internal components after it is switched on. An error message is shown in case of faults. An extended functional test can also be run in all three operating modes as described below. -
Page 134: Safety Checks
Technical safety checks National laws and regulations must be observed when installing and operating the therapy devices Soleo SonoStim and Soleo Galva. Store the Operating Instructions so they are accessible to operators of the General device at all times. Access must be available for inspection authorities at any information time. -
Page 135: Error Messages Troubleshooting Disposal
Error messages Troubleshooting Disposal Cable check With stimulation current therapy in continuous current mode: the patient current circuit is broken. This message generally indicates failed electrodes, dirty electrode terminals or a faulty patient fuse. Press OK to clear the message. Excess current This refers to an increase above the maximum allowable current. - Page 136 Error messages Troubleshooting Disposal No SD card found If the SD card is not inserted, the message ‘No SD card found’ appears when the Indications, Favourites and Memory buttons are pressed. Insert the card and confirm with OK.
- Page 137 Vacuum button deactivates In this case: • Check if Soleo SonoStim / Soleo Galva are correctly placed on VacoS. • Check if Soleo SonoStim / Soleo Galva are correctly attached to VacoS via the connecting cable. • Check if VacoS is switched on.
- Page 138 Error messages Troubleshooting Disposal VacoS If the water separator is full the message ‘Empty water separator’ appears Water separator full on the screen. Note: If the water separator is not emptied, therapy cannot be started. The water separator is emptied by using a water bottle which is supplied with VacoS.
- Page 139 Customer service can be contacted through your authorised sales representative or by contacting the head office in Neu-Ulm, Germany. The device must be sent to the factory in the original packaging only. Zimmer MedizinSysteme GmbH Head office Junkersstraße 9 89231 Neu-Ulm, Germany Tel.
-
Page 140: Manufacturer's Emc Declaration
The Soleo SonoStim / Soleo Galva is intended for use in one of the electromagnetic environments specified below. The customer or the user of the Soleo SonoStim / Soleo Galva device should ensure that the device is used in such an environment. - Page 141 The Soleo SonoStim / Soleo Galva is intended for use in one of the electromagnetic environments specified below. The customer or the user of the Soleo SonoStim / Soleo Galva device should ensure that the device is used in such an environment.
- Page 142 The Soleo SonoStim / Soleo Galva is intended for use in one of the electromagnetic environments specified below. The customer or the user of the Soleo SonoStim / Soleo Galva device should ensure that the device is used in such an environment.
- Page 143 To assess the electromagnetic environment due to fixed RF transmitters, an electromagnetic site survey should be considered. If the measured field strength in the location where the device Soleo SonoStim / Soleo Galva is used exceeds the applicable RF compliance level above, the device Soleo SonoStim / Soleo Galva should be observed to verify normal operation.
- Page 144 Soleoline Operating Instructions Zimmer MedizinSysteme GmbH Junkersstraße 9 D-89231 Neu-Ulm Tel. +49 731. 97 61-291 Fax +49 731. 97 61-299 export@zimmer.de www.zimmer.de...
Need help?
Do you have a question about the Soleo SonoStim and is the answer not in the manual?
Questions and answers