Table of Contents
Advertisement
Quick Links
Advertisement
Table of Contents

Subscribe to Our Youtube Channel
Related Manuals for Zimmer Opton


Summary of Contents for Zimmer Opton
- Page 1 Instructions for Use Opton...
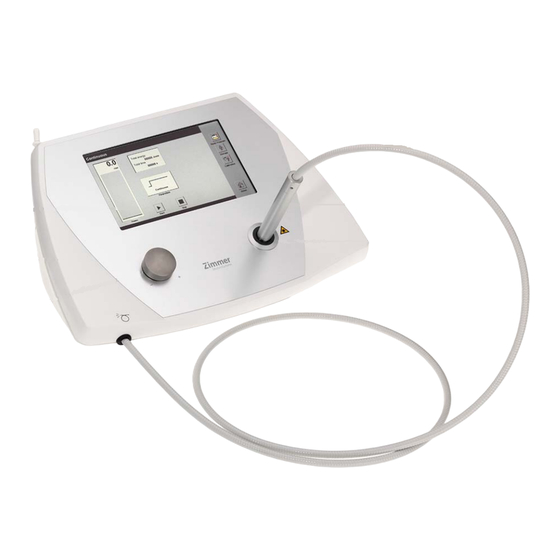
- Page 2 Figures Front panel of the device Fig. 1 Selection and control 1 Controller unit elements 2 Display 3 Intensity controller Applicator with 4 Applicator fiber-optic cable 5 Fiber-optic cable Calibration sensor 6 Calibration sensor and holder for applicator...
- Page 3 Figures Rear panel of the device Fig. 2 Switches and sockets 7 Footswitch socket 8 Interlock connector socket 9 Socket for mains cable 10 Holder for main fuse 11 Identification plate 12 On/off switch 13 Emergency stop button 14 Touch pen in holder...
- Page 4 Figures Display / Navigation Bars Fig. 3 Display 9 Status bar 10 Title bar 11 Navigation bar Fig. 4 Navigation bar (A) Home Moves back to main page Description of the (B) Calibration Switches to the calibration page functions (C) Therapy Switches to treatment recommendations (D) Basic Program Switches to the base program...
- Page 5 Figures Accessories 14 Footswitch 15 Laser warning sign with 16 Interlock plug laser warning lamp 17 Protective sleeve 18 Laser protection glasses 19 Laser warning sign...
-
Page 6: Explanation Of Symbols
Explanation of Symbols Caution: laser aperture Note: laser radiation emitted from applicator tip Turn the emergency stop button clockwise (following the arrows) to unlock Type Applied BF part Footswitch socket Interlock socket Value of accessible fuses Instructions for use Follow the instructions for use Serial number Article number Manufacturer... -
Page 7: Table Of Contents
Accessories Explanation of symbols Page Indications Contraindications Side effects Safety instructions / warnings Application information Opton – in brief Device set-up 7.1 Safety precautions 7.2 Assembly and putting into service Settings Operation instructions 9.1 Performing treatments 9.2 Treatment recommendations Calibration... - Page 8 Error messages / troubleshooting / disposal Manufacturer´s EMC declaration This instructions for use is valide for Opton devices and integral part of the device. It must be stored with the device and kept accessable at all times for anyone authorized to operate the device.
-
Page 9: Indications
Indications Opton is used to initiate and support healing processes in the body's tissues. The device is suitable for the treatment of the following indications: Myopathy, tendinopathy Lower back pain (such as ischialgia) Arthropathy, arthrosis Rheumatoid arthritis Trauma disorders (such as sprains and strains) -
Page 10: Contraindications
Contraindications - Fresh haematomas - Malignant, semi-malignant and benign tumours - Treatments around the eye - Pregnancy - During menstruation in the abdomen or lower back Particular caution is adviced in applying treatments near the ear, the nose, mucous membranes and blood vessels. Absolutely avoid direct irradiation of these areas. -
Page 11: Side Effects
Side effects When used correctly, no side effects are known. Page 3... -
Page 12: Safety Instructions / Warnings
Safety instructions / warnings Opton is a Class 4 laser. The accessible laser radiation is very hazardous to the eye and hazardous to the skin. Even diffusely scattered radiation can be dangerous. The laser radiation can cause fires or explosions. - Page 13 Safety instructions / warnings General 1. The device is not intended for use in potentially explosive and/or combustive environments. 2. The use of flammable anaesthetic or oxidising gases such as nitrous oxide O) and oxygen should be avoided. Some materials such as cotton which are saturated with oxygen can be ignited by high temperature occurring during intended use of the laser device.
-
Page 14: Application Information
Please keep a safe distance of several metres. Opton is not suitable for use in explosive, flammable or combustive environment. During use, the device is to be located in a position allowing direct access to the device's central mains supply so that it can be disconnected from the mains at any time. - Page 15 Target beam Opton has a target beam that provides information about the direction of the laser beam. The target beam is not the same diameter as the laser beam and is not an indicator of the surface area being treated.
-
Page 16: Opton - In Brief
What is Opton? A medical high-power laser therapy device for treatment with laser radiation. What does Opton Opton delivers laser beams to provide photochemical and thermal stimulation of parts of the musculoskeletal system requiring physical therapy. Why Opton? The simultaneous use of laser beams of two wavelengths (810 and 980nm) provide the user with a wide array of treatment options. -
Page 17: Device Set-Up
Device set-up 7.1 Safety precautions Safety measures Place a laser warning sign and a warning light on each door to the treatment room. The laser safety officer must ensure that all safety measures have been correctly followed. The device should be protected against unauthorised use by activating the key button when not in use. -
Page 18: Assembly And Putting Into Service
Device set-up 7.2 Assembly and putting into service Assembling the Connect the mains cable to the corresponding socket (9) on the device and mains cable connect the cable to the mains. Interlock plug Connect the interlock plug (16) to the corresponding socket on the device (8). Connect the Connect the footswitch (14) to the corresponding socket on the device (7) and footswitch... -
Page 19: Settings
Ensure that all persons in the treatment room are wearing safety glasses. To prevent unauthorised persons from using the laser, Opton must be activated by entering a key code each time it is switched on. Only once the code has been entered, can the laser beam output be set and delivered. - Page 20 Settings The setting options are shown below. (1) Language Press the "Language" button to open the window for selecting the language. The selection is made directly on the corresponding line. (2) Start-up settings 1. Individual options for start-up settings. 1.1 Basic program in serial pulses, non-pulsing and single pulse modes. 1.2.
- Page 21 Settings Note: The key code must be entered each time the Opton is switched on. (8) Default Press "Default" to restore the default factory settings. Note: The "Maintenance" menu is only accessible to service technicians. Save settings Press "OK" to save the changed settings and return to the home screen.
-
Page 22: Operation Instructions
Operation instruction 9.1 Performing treatments Starting the program The treatment screen will open automatically after the home screen has displayed for four seconds or by pressing the "Start" button. Set operating modes Press "Parameters" (1) to open the "Parameters" window. Here you can select options for the different operating modes. - Page 23 Operation instruction 9.1 Performing treatments Activate the laser Pressing the "Start" button makes the laser ready to operate. This is indicated with the message "Ready" in the footer. If the "Start" button is no longer lit up (because it has already been pressed), the "Stop" button becomes active.
-
Page 24: Treatment Recommendations
Operation instruction 9.2 Treatment recommendations The "Treatment Recommendations" menu helps users select appropriate treatment options. Treatment Press the "Treatment" button in the navigation bar to open the "Treatment Recommendations" menu. Selecting treatments Select the body region by clicking on the black circles shown. by body region Selecting the body After selecting the desired region of the body, a window listing the... - Page 25 Operation instruction 9.2 Treatment recommendations Treatment program Once the selection menu is closed, the treatment program opens with recommendations for the kind of treatment and recommended amount of energy output. The parameters for the pre-defined programs can be individually modified and saved.
-
Page 26: Calibration
Calibration Calibration is used to control the amount of laser beam emitted. It should be performed each day before the first use of the laser. Calibration 1 Close the doors of any interlock plug that has been installed. procedure 2. Make sure that the laser wand is in the calibrator. 4. -
Page 27: Key Code
Key code The laser is protected by a key code that must be entered each time the device is switched on. Correctly entering If an incorrect key code is entered, this will be indicated by the following the key code message. -
Page 28: Technical Data
Technical data Wavelength 810 nm and 980 nm Power supply 100-240V~, 50 Hz / 60 Hz 220 V~ / 60 Hz Power consumption max. 100 VA Mains fuse 2 x T2A Protection class Applied part Type BF per EN 60601-1 Laser system 3 semi-conductor diode lasers, optical fibres Treatment area... - Page 29 Technical data Environmental Operation: conditions Temperature: 10° to 40°C Humidity: 30% to 90% relative humidity, no condensation Air pressure: 700 to 1060 hPa Storage and transport: Temperature: -10° to 50°C Humidity: 10% to 90% relative humidity, no condensation Air pressure: 500 to 1060 hPa Storage and transport Please keep all packaging.
-
Page 30: Cleaning And Disinfection
Cleaning and disinfection – Before starting any maintenance or cleaning measures, the device must be switched off with the main switch and the mains cable unplugged. – Ensure that the cleaning and disinfection does not damage any labels on the device (such as warnings, labels of control devise, identification plote). - Page 31 Cleaning and disinfection alcohol-free disinfectant for metal and plastics which has a bactericidal, virucidal and fungicidal effect. Then proceed as indicated under "Housing / Foot Switch". Use a cotton swab to clean the applicator lens. Absolutely no residual cleaning or disinfectant agent must be left on the applicator lens! Any contamination will change the optical properties of the lens.
-
Page 32: Ce-Mark
CE-mark The product bears the CE marking according to EC Directive 93/42/EEC concerning medical devices. Page 24... -
Page 33: Scope Of Delivery / Accessories
Scope of delivery and accessories Delivery includes: Article no. 4651 1 basic unit 1 mains cable 1 foot switch 1 interlock plug 2 sets of safety glasses 1 laser warning sign for door incl. warning light 25 protective sleeves 2 touch pen 1 user manual * see also accessories Accessories... -
Page 34: Device Combination
Device combinations For Opton no combination devices are provided by the manufacturer. Anyone who contrary to these specifications combines devices and thus operates a medical system does so at its own risk. Page 26... - Page 35 Safety and maintenance Opton is manufactured according to the safety regulations in DIN EN 60601-1. Zimmer MedizinSysteme GmbH can only be held responsible for the device's safety and reliability if the device is operated using a proper power outlet with earth contact and the electrical installation complies with DIN VDE 0100 part 710, ...
-
Page 36: Functional Tests
Functional tests Note Ensure that all persons in the treatment room are wearing safety glasses. Functional test 1. Make sure that the applicator is fully inserted into the calibration sensor. 2. Turn the device on. 3. Enter the key code. 4. -
Page 37: Safety Checks Metrological Control
Safety checks Metrological control For the device Opton neither a Safety check (STK) nor a Metrological Control (MTK) is required in Germany. In Germany, among others, the Medical Devices Operator Ordinance (MPBetreibV) and the BG regulation to electrical systems and equipment (BGV A3) apply in their current version. - Page 38 Errors Troubleshooting Disposal Device does not No response to the main switch, display remains dark function Possible cause 1: Mains connection Remedy for cause 1: Check if the mains cable is properly plugged into the electrical outlet and that the plug is firmly inserted into the socket on the device.
- Page 39 Disposal The device must be returned to the factory in its original packaging. It must be disposed of by Zimmer MedizinSysteme GmbH. In foreign (European) countries please refer to national regulations for disposal. Contact your distributor if necessary. Page 31...
-
Page 40: Manufacturer's Emc Declaration
Portable and mobile RF communications equipment (such as mobile telephones) can affect electrical medical devices. Opton may only be operated with the original parts specified in the list of items included in the delivery and available OEM accessories. The operation of the device with other parts may result in increased emissions or likelihood of malfunctions! Guidelines and manufacturer's declaration concerning electromagnetic emissions The Opton device is intended for use in the electromagnetic environment specified below. - Page 41 Manufacturer's EMC declaration Guidelines and manufacturer's declaration of electromagnetic immunity The Opton device is intended for use in the electromagnetic environment specified below. The customer or user of the Opton device should ensure that it is used in such an environment.
- Page 42 Guidelines and manufacturer's declaration of electromagnetic immunity The Opton device is intended for use in the electromagnetic environment specified below. The customer or user of the Opton device should ensure that it is used in such an environment. Immunity...
- Page 43 The Opton device is intended for use in the electromagnetic environments where RF disturbances are controlled. The customer or the user of the Opton device can help prevent electromagnetic interference by maintaining a minimum distance between portable and mobile RF communications equipment (transmitters) and the Opton device as recommended below, according to the maximum output power of the communications devices listed below.
- Page 44 Opton Instructions for Use Zimmer MedizinSysteme GmbH Junkersstraße 9 D-89231 Neu-Ulm Tel. +49 731. 97 61-291 Fax +49 731. 97 61-299 export@zimmer.de www.zimmer.de...
Need help?
Do you have a question about the Opton and is the answer not in the manual?
Questions and answers