
Related Manuals for CAME BPT MITHO/SB


Summary of Contents for CAME BPT MITHO/SB
- Page 1 CENTRALINO DI FB00861M02 PORTINERIA MITHO/SB IT Italiano MANUALE DI INSTALLAZIONE ED UTILIZZO EN English...
-
Page 2: Table Of Contents
INDICE AVVERTENZE ..................Pag. INSTALLAZIONE E MESSA IN SERVIZIO ASSEMBLAGGIO . -
Page 3: Avvertenze
AVVERTENZE Le informazioni pubblicate nel presente manuale contengono diritti di CAME S.p.a. o dei suoi fornitori e non possono essere riprodotte in qualsiasi maniera né trasmesse ad altri. Le informazioni contenute nel presente manuale sono soggette a modifiche senza preavviso. CAME S.p.a. -
Page 4: Installazione E Messa In Servizio
Installazione e messa in servizio ASSEMBLAGGIO Rimuovere il supporto metallico dall’apparecchio facendolo scor- rere su di esso dopo aver premu- to il pulsante 1 (fig. 1). Fissare il supporto metallico al corpo del piedistallo mediante le viti in dotazione (fig. 2). Inserire i morsetti precablati negli appositi alloggiamenti (fig. -
Page 5: Inserimento/Rimozione Della Scheda Micro Sd
ASSEMBLAGGIO Inserimento/rimozione della scheda MICRO SD ATTENZIONE Prima di inserire o togliere la MICRO SD, togliere l’alimen- tazione al videoterminale ri- muovendo le morsettiere M1 e M2. Funzione del ponticello SW4 (Resistenza di chiusura) L’apparecchio dispone di un ponticello SW4, per l’impedenza di chiusura di fine linea dell’impianto di videocitofonia. -
Page 6: Cablaggio Delle Prese Rj 45
ASSEMBLAGGIO Cablaggio delle prese RJ 45 Presa RJ 45 Presa RJ 45 Cosa connettere Cosa connettere ai morsetti della presa ai morsetti della presa Liberi Linea B Alimentazione locale Alimentazione locale Ingresso Allarme Comune Chiamata dal pianerottolo Alimentazione locale Alimentazione locale Libero BUS MultiMaster Libero... -
Page 7: Manuale Per L'utente
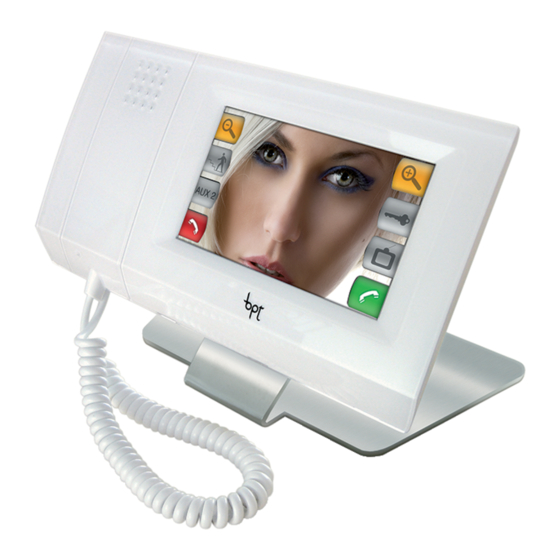
Manuale per l’Utente INFORMAZIONI GENERALI Caratteristiche tecniche 203,5 1 – Altoparlante (vivavoce) 2 – Cornetta 3 – Microfono 4 – Display 16:9 touch screen 4,3” 5 – Alloggiamento penna per touch screen 6 – Prese RJ45 Nota: Dopo 5 minuti di permanenza inattiva in una qualunque schermata il terminale ritornerà automaticamente alla schermata di apertura e la luminosità... -
Page 8: Principali Funzioni Associate Alle Icone Della Schermata Di Apertura
INFORMAZIONI GENERALI Principali funzioni associate alle icone della schermata di apertura La schermata di apertura permette di accedere rapidamente ed in maniera intuitiva a tutte le funzioni gestibili dal terminale Mitho SB e di avere un immediato feed back degli eventi che interessano il sistema. Menù... -
Page 9: Funzioni Videocitofoniche Di Portineria
FUNZIONI VIDEOCITOFONICHE DI PORTINERIA Funzioni base Consultare l’elenco utenti utenti esterno Premere il pulsante per accedere all’elenco utenti. messaggi chiamate segreteria setup Per trovare l’utente desiderato, scorrere l’elenco utilizzando i pulsanti oppure premere il pulsante per ottenere una schermata con l’elenco completo degli utenti suddivisi in rag- gruppamenti alfabetici (funzione molto utile in impianti con elevato numero di utenti). -
Page 10: Aggiungere Utenti All'elenco Dei Preferiti
FUNZIONI VIDEOCITOFONICHE DI PORTINERIA Aggiungere utenti all’elenco dei preferiti Premere il pulsante per accedere all’elenco degli utenti utenti esterno preferiti. messaggi chiamate Nota: segreteria setup Al primo accesso l’elenco risulterà vuoto. Premere il pulsante per visualizzare l’elenco completo degli utenti. Selezionare tutti gli utenti da aggiungere all’elenco dei pre- feriti. -
Page 11: Inoltrare Una Chiamata
FUNZIONI VIDEOCITOFONICHE DI PORTINERIA Inoltrare una chiamata Selezionare l’utente desiderato dall’elenco generale o da quel- lo dei preferiti per avviare immediatamente la chiamata. - - - - > - - - - Chiamata in corso < - - - - - - - > Comunicazione stabilita utenti esterno messaggi... -
Page 12: Rispondere Ad Una Chiamata
FUNZIONI VIDEOCITOFONICHE DI PORTINERIA Rispondere ad una chiamata In caso di chiamata, la schermata principale viene automati- camente sostituita dalla schermata che mostra l’immagine del chiamante ripreso dal posto videocitofonico esterno. Premere il pulsante per rifiutare la chiamata. Per rispondere alla chiamata sollevare il ricevitore oppure pre- mere il pulsante per attivare la modalità... -
Page 13: Inoltrare Una Chiamata Ad Un Interno
FUNZIONI VIDEOCITOFONICHE DI PORTINERIA Inoltrare una chiamata ad un interno Dopo aver risposto ad una chiamata, premere il pulsante per accedere all’elenco utenti; ricercare l’utente desiderato e inoltrare la chiamata. Una volta stabilita la comunicazione con l’utente desiderato e verificata la sua disponibilità a ricevere la chiamata, premere il pulsante per mettere in comunicazione il posto esterno utenti... -
Page 14: Chiamate Al Portiere
FUNZIONI VIDEOCITOFONICHE DI PORTINERIA Chiamate al Portiere Gli utenti possono chiedere di essere contattati dal Portiere utenti esterno inviando una chiamata. La presenza di chiamate è evidenziata dal lampeggio dell’icona 1; premere l’icona per accedere all’elenco chiamate. messaggi chiamate segreteria setup Le chiamate sono raccolte in pulsanti che riportano il nome dell’utente, ora e data della chiamata;... -
Page 15: La Segreteria Videocitofonica
FUNZIONI VIDEOCITOFONICHE DI PORTINERIA La segreteria videocitofonica Mitho SB consente di registrare un messaggio che può venire utenti esterno riprodotto dal posto esterno in caso di assenza del portiere. Il chiamante, in risposta, potrà lasciare un videomessaggio (riportante data e ora della chiamata) in una videosegreteria. messaggi chiamate segreteria... -
Page 16: Consultare La Segreteria Videocitofonica
FUNZIONI VIDEOCITOFONICHE DI PORTINERIA Consultare la segreteria videocitofonica La presenza di messaggi videocitofonici non letti in segreteria utenti esterno è rivelata dall’icona lampeggiante sulla schermata princi- pale. messaggi chiamate segreteria setup Selezionare l’icona per accedere all’elenco dei messaggi registrati in ordine cronologico, partendo dal più recente. I messaggi non letti sono contrassegnati dall’icona Per visualizzare un messaggio videocitofonico premere sul pulsante corrispondente. -
Page 17: Setup Dispositivo
SETUP DISPOSITIVO Principali funzioni del menù setup Dalla schermata principale, premere sull’icona “setup” 1. utenti esterno messaggi chiamate segreteria setup Il menù “setup” raccoglie tutte le impostazioni di base del terminale Mitho SB. melodie sveglia data/ora timers citofonia tecnico Scegliere una melodia per le chiamate Premendo sul pulsante “melodie”... -
Page 18: Regolare Numero E Pausa Degli Squilli
SETUP DISPOSITIVO Premendo il pulsante “TONI” è possibile attivare/disattiva- re il suono associato alla pressione dei pulsanti e regolarne il volume con le frecce poste sulla parte superiore della finestra. ESTERNO SVEGLIA PIANEROT. TONI Regolare numero e pausa degli squilli Numero di squilli e pausa tra gli stessi possono venire modifi- cati sulle suonerie che presentano l’icona ESTERNO... -
Page 19: Regolare Data E Ora Del Terminale
SETUP DISPOSITIVO Regolare Data e Ora del Terminale Premere sul pulsante “data/ora”. Per impostare l’ora esatta selezionare il pulsante e premere il pulsante “SET”. Sulla tastiera che appare, digitare l’ora esatta e premere “OK”. Per impostare giorno, mese, anno corrente selezionare il pul- sante e premere il pulsante “SET”. -
Page 20: Setup Citofonia
SETUP DISPOSITIVO Setup Citofonia Premere sul pulsante “citofonia”. La schermata che appare, contenente i comandi necessari per registrare e riascoltare il messaggio da lasciare in segreteria. Vedi capitolo “La segreteria Videocitofonica” Funzione Sveglia Selezionare l’icona “sveglia”. Per impostare l’ora di sveglia selezionare il pulsante e pre- mere il pulsante “SET”. -
Page 21: Timer
SETUP DISPOSITIVO Timer Il menù “timer” consente di programmare 4 fasce orarie gior- lun mar mer gio ven sab dom naliere, nel corso delle quali il centralino di portineria viene attivato automaticamente per intercettare le chiamate. Premere su uno dei 4 pulsanti che rappresentano le fasce orarie per iniziare la programmazione. -
Page 22: Setup Tecnico
SETUP DISPOSITIVO Intercettazione chiamate NON attiva Intercettazione chiamate Attiva utenti esterno messaggi chiamate Nota: L’intercettazione delle chiamate può essere forzata mediante l’ap- segreteria setup posito pulsante sulla finestra principale. Setup Tecnico Selezionare l’icona “tecnico”. Le funzioni di setup tecnico sono riservate a personale qualificato per questo motivo l’accesso può... -
Page 23: Scelta Lingua Terminale
SETUP DISPOSITIVO L’operazione è di notevole importanza nei casi in cui si debba aggiornare il firmware del terminale o nel caso in cui si voglia trasferire una configurazione da un terminale ad un altro con stesso codice chiamata. Il pulsante “invio sn” è necessario all’identificazione del dispositivo qualora si stia programmando l’impianto da PC. Il pulsante permette di selezionare lo standard del segnale video dell’... -
Page 24: Reset Dispositivo
SETUP DISPOSITIVO Info Terminale Il pulsante “INFO” (fig. 24) permette di visualizzare una serie di informazioni tecniche sul terminale che possono tor- nare utili al Vostro installatore per aggiornamenti del software o interventi tecnici. RESET Reset dispositivo Ogni volta che anomalie di funzionamento, interventi e altre ragioni tecniche richiedono il reset dell’apparecchio, premere leggermente il pulsante collocato all’interno dell’apertura al di sotto della scocca del dispositivo (vedi figura), utilizzando il pennino in dotazione;... -
Page 25: Schemi Di Installazione
Schemi di installazione X1 Singolo blocco Mitho SB Mitho SB Mitho SB Mitho SB VAS/100 MH VAS/100 MH VAS/100 MH VAS/100 MH XDV/304 XDV/304 VA/01 VA/01 Ð M1 Ð M1 DVC... DVC... VCM/1D VCM/1D VCM/2D VCM/2D XIP Singolo blocco Mitho SB Mitho SB VAS/100 MH VAS/100 MH... -
Page 26: Xip Residenziale
XIP Residenziale Mitho SB Mitho SB Mitho SB VAS/100 MH VAS/100 MH VAS/100 MH XDV/304 XDV/304 VA/01 VA/01 Ð M1 Ð M1 XDV/304A DVC... DVC... Mitho SB Mitho SB VAS/100 MH VAS/100 MH XDV/304 VA/08 Ð M1 DDVC... Program. impianto Attendere VCM/1D VCM/2D... -
Page 27: Esempio Connessioni X1
Esempio connessioni X1 XDV/304 Mitho SB Mitho SB Ð Ð VAS/100MH VAS/100MH Ð Ð + 18V – + 18V – 230V 50Hz 18V 10VA 230V 50Hz 18V 10VA 230V 230V 230V 230V VA/... BOUT... - Page 28 ATTENZIONE Una volta terminata la messa in servizio dell’impianto l’installatore deve rilasciare tutta la documentazione neces- saria per eventuali interventi tecnici futuri (tabelle di associazione IN/OUT dei dispositivi, file di sistema ed eventuali password). Il prodotto è conforme alle direttive di riferimento vigenti. Dismissione e smaltimento.
- Page 29 THE PORTER FB00861-EN SWITCHBOARD MITHO/SB GUIDE FOR INSTALLATION AND USE EN English...
- Page 30 CONTENTS WARNINGS . . . . . . . . . . . . . . . . . . . . . . . . . . . . . . . . . . . . . . . . . . . . . . . . . . . . . . . . . . . . . . . . . . . . . . . . . . . . . . . . . . . . . . . . . . . . Pag . INSTALLATION AND COMMISSIONING ASSEMBLY .
-
Page 31: Warnings
WARNINGS The information in this manual is covered by the rights of CAME S . p . a . or its suppliers and may not be reproduced in any way, nor transmitted to others . The information in this manual is subject to change without advance notice . CAME S . -
Page 32: Installation And Commissioning
Installation and commissioning ASSEMBLY Remove the unit from the me- tallic support by sliding it after pressing the plastic button . User the provided screws to fa- sten the metal support to the stand base (fig . 2) . Insert the prewired terminals in the specific housings (fig . -
Page 33: Insertion/Removal Of The Micro Sd Card
ASSEMBLY Insertion/removal of the MICRO SD card ATTENTION Before inserting or removing the MICRO SD, cut off the pow- er supply to the video termi- nal by removing the terminal boards M1 and M2.. Function of the jumper SW4 (Closure resistance)) The appliance is equipped with an SW4 jumper, for end of line closure impedance of the video entry control system . -
Page 34: Wiring Of The Rj 45 Sockets
ASSEMBLY Wiring of the RJ 45 sockets Socket RJ 45 Socket RJ 45 What to connect to the What to connect to the terminals of the socket terminals of the socket Free Line B Local power supply Local power supply Common alarm input Doorbell Local power supply... -
Page 35: User's Manual
User’s manual GENERAL INFORMATION Technical Features 203,5 1 – Loudspeaker (hands free) 2 – Receiver 3 – Microphone 4 – 4 . 3 ” touch screen 16:9 display 5 – Touchscreen pen housing 6 – RJ45 sockets Note: After 5 minutes of inactivity on any screen, the terminal will automatically return to the opening screen and the screen luminosity will be reduced (according to the setup settings). -
Page 36: Main Functions Associated With The Icons On The Opening Screen
GENERAL INFORMATION Main functions associated with the icons on the opening screen The opening screen provides fast, intuitive access to the functions managed by the Mitho SB terminal . It also provides immediate feedback on events involving the system . Main menu Call interception by the Alarm clock on... -
Page 37: Porter Video Entry Control Functions
PORTER VIDEO ENTRY CONTROL FUNCTIONS Standard functions Consult the user list users entries Press the button to access the users list . messages calls list videomail setup To find the desired user, scroll the list using the buttons or press the button to display the screen with a com- plete list of users divided into alphabetical groups (very useful in systems with a large number of users) . -
Page 38: Add The User To The Preferred List
PORTER VIDEO ENTRY CONTROL FUNCTIONS Add the user to the preferred list Press the button to access the preferred users list . users entries messages calls list Note: The first time it is accessed, the list will be empty. videomail setup Press the button to display the complete user list . -
Page 39: Forwarding A Call
PORTER VIDEO ENTRY CONTROL FUNCTIONS Forwarding a call Select the desired user from the main list or from the preferred list to immediately start the call . - - - - > - - - - Call in progress < - - - - - - - > Communication established users entries messages... -
Page 40: Answering A Call
PORTER VIDEO ENTRY CONTROL FUNCTIONS Answering a call In the event of a call, the main screen is automatically replaced by a screen which shows the image of the caller filmed from the video entry control panel . Press button to refuse the call . -
Page 41: Forwarding A Call To An Extension
PORTER VIDEO ENTRY CONTROL FUNCTIONS Forwarding a call to an extension After answering a call, press the button to access the user list; search for the desired user and forward the call . Once communication has been established with the desired user and he has confirmed that he wants to receive the call, press the button to place the entry panel in communica-... -
Page 42: Calls To The Porter
PORTER VIDEO ENTRY CONTROL FUNCTIONS Calls to the porter The users can request the Porter to contact them by sending users entries a call . The presence of calls is indicated by a flashing icon 1; press the icon to access the call list . messages calls list videomail... -
Page 43: Videomail
FUNZIONI VIDEOCITOFONICHE DI PORTINERIA Videomail MithoSB allows you to record a message, that can be played users entries from the entry panel if you are out . The caller can respond by leaving a video message (indicating the call date and time) on a video answer phone that you can messages calls list check when you return . -
Page 44: Checking The Videomail
FUNZIONI VIDEOCITOFONICHE DI PORTINERIA Checking the videomail The presence of unread video entry control messages is indi- users entries cated by the flashing icon on the main screen . messages calls list videomail setup Select the icon to access the list of recorded messages in chronological order, starting from the most recent one . -
Page 45: Device Setup
DEVICE SETUP Main functions in the setup menu Press the “setup” icon on the main screen . users entries messages calls list videomail setup The “setup” menu encompasses all the basic settings for the Mitho SB terminal . melodies alarm clk. date/time timers door entry... -
Page 46: Adjust Number And Pause Of Rings
DEVICE SETUP Pressing the “TONE” button allows you to activate or deactivate the sound associated with pressing the buttons and to regulate their volume with the arrows at the top of the window . ENTRIES ALARM CLOCK FLOOR TONE Adjust number and pause of rings The number of rings and the pause between them can be modified on ringtones with the icon ENTRIES... -
Page 47: Adjusting The Terminal Date And Time
DEVICE SETUP Adjusting the terminal date and time Press the “date/time” button . To set the current time, select button and press the “SET” button . On the keypad that appears, type in the current time and press “OK” . To set the current day, month, and year, select button press the “SET”... -
Page 48: Door Entry Setup
DEVICE SETUP Door entry setup Press the “ door entry” button . The screen shown contains the commands needed to record and listen to your answer phone message . See the chapter “Video mail” Alarm clock function Select the “alarm clk.” icon . To set the alarm clock time, select button and press the “SET”... -
Page 49: Timers
DEVICE SETUP Timers The “timers” menu is used to programme daily time periods mon tue wed thu during which the porter switch board is automatically acti- vated to intercept the calls . Press one of the 4 buttons that represent the time periods to start programming . -
Page 50: Service Setup
DEVICE SETUP Call interception NOT active Call interception Active users entries messages calls list Note: Call interception can be forced using the specific button on the videomail setup main window. Service setup Press the “service” button . The functions of service setup are reserved for qualified personnel. -
Page 51: Terminal Language Selection
DEVICE SETUP update the firmware of the terminal or if you want to transfer a configuration from one terminal to another with the same call code . The “send sn” button is needed to identify the device if it is being programmed from a PC using PCS/300 software . Button allows selection of the standard of the video signal of the system, either PAL or NTSC . -
Page 52: Device Reset
DEVICE SETUP Terminal info The “INFO” button (fig . 24) allows you to view a series of technical information on the terminal, which could be useful for your installer in terms of software updates or technical operations . RESET Device reset Any time that operating anomalies, servicing or other technical reasons require the unit to be reset, press lightly on the button located inside the opening under the body of the device (see figure), using the pen provided . -
Page 53: Installation Diagrams
Installation diagrams X1 Single block Mitho SB Mitho SB Mitho SB Mitho SB VAS/100 MH VAS/100 MH VAS/100 MH VAS/100 MH XDV/304 XDV/304 VA/01 VA/01 Ð M1 Ð M1 DVC... DVC... VCM/1D VCM/1D VCM/2D VCM/2D XIP Single block Mitho SB Mitho SB VAS/100 MH VAS/100 MH... -
Page 54: Xip Residential
XIP Residential Mitho SB Mitho SB Mitho SB VAS/100 MH VAS/100 MH VAS/100 MH XDV/304 XDV/304 VA/01 VA/01 Ð M1 Ð M1 XDV/304A DVC... DVC... Mitho SB Mitho SB VAS/100 MH VAS/100 MH XDV/304 VA/08 Ð M1 DDVC... Program. impianto Attendere VCM/1D VCM/2D... -
Page 55: X1 Connection Example
X1 connection example XDV/304 Mitho SB Mitho SB Ð Ð VAS/100MH VAS/100MH Ð Ð + 18V – + 18V – 230V 50Hz 18V 10VA 230V 50Hz 18V 10VA 230V 230V 230V 230V VA/... BOUT... - Page 56 ATTENTION Once the system has been commissioned, the installer must issue all documentation required for possible future technical service (IN/OUT association tables for devices, system files and any passwords). - This device complies with Part 15 of the FCC Rules. Operation is subject to the following two conditions: (1) this device may not cause harmful interference and (2) this device must accept any interference received, including interference that may cause undesired operation.
Need help?
Do you have a question about the MITHO/SB and is the answer not in the manual?
Questions and answers